Wednesday, May 31, 2023

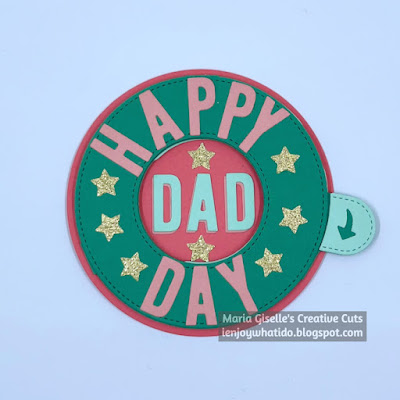
Magic Iris Shaped Father's Day Card

Hello! Welcome back to my card. I am excited to share my card with you today. I had the Lawn Fawn Magic Iris die set in my craft stash for a while now. I only get to use it this week. My first try didn't turn out the way I wanted it to be. I almost wanted to call it quits but I am glad I did not because I just love how this card turned out. 

Lawn Fawn has a video tutorial on how use this die set which I am linking here, Magic Iris. I highly recommend that you watch the video before using this die set. I had to watch it again on my second attempt on using this die just to be sure I am doing it right. 

My colors are inspired by the latest Inkspirational Challenge which I also linked below in case you are interested to see and join their challenge. I usually look around at other blog challenges to find inspiration especially when I hit a wall while creating something. 

The latest Lawnfawnatics Challenge (also linked below) is Dies Only. True enough, this card used only dies. The sentiment die cuts are from LF Cole's ABCs die set. The smiley face is from the LF Outside In Stitched Flower die set. The glitter stars are from my die cut box. I apologize because I am notd sure which die I used for the stars. I usually die cut little shapes ahead of time and store it in a bea box so it is ready for use. I am sure you can find any star die in your craft stash that you can use for this purpose. 


I added a shadow to the sentiment inside the iris which was not my original plan. I die cut the letters on light peach cardstock at first but I didn't like the look of it on the dark peach cardstock. I die cut the letters on light green cardstock. I adhered the light peach letter die cut to the back of the light green letter die cuts, slightly offsetting it for a shadow effect. 

For the shaped card, I die cut the dark peach cardstock using a circle die slightly larger than the LF Magic Iris base. I die cut two circle pieces. I scored the second circle 1/2" from the top. I applied glue to this flap. I adhered this to the back of the assembled magic iris die cuts, making sure that the orientation of the card is relative to how the sentiment is laid. 


As a tip, for the mechanism to continue working on this shaped card, only apply adhesive to the stabilizers on both front and back of the assembled magic iris die cuts. 

Below is a short video showing the interactive feature of this shaped card. I hope you like it.


Thank you for visiting my blog. Have a blessed, brilliant and creative day!

Maria Giselle B.

I am sharing this creation at


Friday, May 26, 2023

Woodblock Stamped Image on a Card


Hello! Welcome back to my blog. Several inspirations came to mind for this card but it was the Woodblock Wednesday challenget that sparked my interest to create this card. I don't have a lot of woodblock stamps. I bought this stamp for my oldest son's 8th grade graduation class give away decor, which was 8 years ago. This stamp has been hibernating since then. Having a challenge like this allowed me to use this stamp. I truly enjoyed crafting with it again.

Not only have I revived this woodblock stamp. I also revived the Stamp-a-Ma-Jig which is the stamp positioner before Misti. 

I also created this card following a sketch which I linked below. If you have been following my blog, sketch challenges are my absolute favorite challenges. 

I lightly drew a diamond shape on the center of a white carstock cut at 5 1/2" x 4 1/4". I stamped the hibiscus flowers around this diamond with different dye ink colors, and rotating the hibiscus for some variation on top of the color variation. 

I used the Stamp-a-Ma-Jig in this process which allowed me to repeat stamp the flower if needed, and also allowed me to add highlights to the flower edges. 

I clean the stamp in between ink colors using a stamp scrubber. 

To get into the tight spaces in between the flowers, I used the plastic film that comes with the Stamp-a-Ma-Jig. It guided me on how to fit the flower on those tight spaces. It is so fun to put this tool in action again. 

I die cut a diamond window at the center. I backed this with a burlap die cut which I die cut on cream colored cardstock. The burlap die is from HoneyBee stamps. 

For the sentiment, I die cut the word hello on gold glittered cardstock. I die cut two more of these  sentiments on scrap kraft cardstock. I adhered this kraft letter die cuts to the back of the gold glittered letter die cuts for some dimension. The die I used is from My Favorite Things but this stamp set is retired.

The additional sentiment was stamped on kraft cardstock using orange dye ink. Thanks to my friend, Abbie, for giving me some input while I was creating this card. She helped me chose which color of dye ink I should use for the this additional sentiment. I fussy cut the sentiment leaving a small border around it. This sentiment is from an MFT stamp set which was lately pulled out of the vault. Unfortunately,  it is currently out of stock.

I adhered the sentiments to the burlap window. 

I trimmed off an eight of an inch off each side to make this panel into a 5 1/4" x 4". I added foam adhesive to the back of this panel, and adhered this to an A2 white top folding note card.

Thank you very much for visiting my blog. Have a blessed, brilliant and creative day!

Maria Giselle B.

I am sharing this creation at


Thursday, May 25, 2023

CAS Sketch Inspired Card


Hello. Welcome back to my blog. Today's card is something that I usually have a hard time creating. Would you believe that I have difficulty creating Clean & Simple Cards? It is just that I love to embellish my cards to a point that it cannot be considered Clean & Simple. The advantage of CAS cards is that it easy to pull it all together compared to an embellished card. 

The sketch that inspired my card is at the end of this post. Just like my previous post, I mashed two blog challenges to create this card. I love the pink color theme of this card. 

This is also one way of using those scraps with that striped background. Trimming the cardstock in different widths adds additional interest to the background. This is also a way of using those small image stamps in a stamp set. 

I used white pigment ink to stamp the small images. I was undecided at first whether I should embossed the flowers or not. By the time I poured white embossing powder to this panel, some of the ink has dried up. But it's alright. I think having some of the flowers embossed while others are not added another point of interest to this card. 


I blended a white chalk ink on the edges of the striped panel. 

The sentiment was stamped using a pink dye ink followed by Versamark. It was heat embossed using clear embossing powder.

The cat was colored with my sister's university cat in mind, Tisoy. I colored the images with Copic markers. The stamp set I used for this card is Newton's Nook Designs Flower Garden stamp set.

Thank you for visiting my blog. I hope you have a blessed, brilliant and creative day!
Maria Giselle B.

I am sharing this creation at


Wednesday, May 24, 2023

Color Inspired Shaker Birthday Card

Hello. Welcome back to my blog. Several blog challenges inspired me to create this card. These blog challenges are linked at the end of this post.

The balloon frame was watercolored using a stitched scallop circle die from Pretty Pink Posh. I applied orange Kuretake Gansai Tambi watercolor to a watercolor paper. Once this has dried, I applied a coat of Coliro watercolor as a second coating for a bit of shimmer. I did the watercoloring before the die cutting. You can also do the other way around.

Using a slightly larger circle die, I die cut a window on a slate cardstock. I flicked some orange Coliro watercolor to this windowed panel. I adhered an acetate to the back side of this window panel. I adhered the scalloped circle frame to the front. For the tip portion of the balloon, I created this using a stitched polygon die. I partially die cut the polygon this since I needed only half of it to complete the balloon design. I ran this through the die cutting machine again to add the stitching detail to the end part of the balloon.

For the shaker portion of the card, I adhered foam strips to the back portion of the panel, lining the circle acetate window to create a well. I pre-treated the sides of the foam with a powder tool. I poured clear sequins to this well. 

I trimmed a white cardstock larger than the circle window. I adhered some of the clear sequins to this panel. After the glue has dried, I adhered this panel to the foam adhesive to seal the shaker window. The shakers I used are from Pretty Pink Posh.

Working on the front of the card, I smooshed the Tim Holtz Hickory Smoke Distress Oxide ink on my palette. I spritz this with water. I applied this pigment to a watercolor paper. I applied several coats of the pigment to the watercolor paper. I die cut the sentiment to this watercolored paper. I also die cut this sentiment on scrap cardstock. The sentiment die is from Simon Says Stamp. I stacked the sentiment die cuts by adhering the colored cardstock on the back of the watercolored sentiment die cut. I added some Ranger glitter to parts of the sentiment die cut for a bit of sparkle.

For the subsentiment, I stamped this on white cardstock using an orange dye ink. I die cut this into a strip using a sentiment strip die. I also die cut an extra strip and adhered it to the back of the sentiment strip die cut. 

I adhered the sentiments to the acetate.

I added a string and bow to the balloon using a twine.

I added more adhesive foam to back of the panel before adhering this a top folding A2 note card.


Thank you for stopping by. Have a blessed, brilliant and creative day!

Maria Giselle B.

I am sharing this creation at


Tuesday, May 23, 2023

Color Inspired Birthday Card


Hello! Welcome back to my blog. Today's project is part of Kat Scrappiness's Color Challenge Collaboration IG Hop. There are prizes for grab. I have the link at the bottom of this post so you can start hopping. 

I also created this card for my third son who celebrated his 18th birthday last Saturday. It was a busy weekend for him, having a track and field meet on his birthday, then his high school graduation last Sunday. 

This card involves die cutting. I have a dedicated die cutting plate which I usually place on the bottom of the die cutting sandwich. You can feel the love for it once you see it because of all the cuts created by all the dies cut on it. Sometimes part of a die does not fully die cut the paper when using an overused die cutting plate. This is when I use the metal shim to add more pressure to the die cutting sandwich when I ran it through the die cutting machine. Adding a metal shim when cutting intricate with intricate dies, just like the plaid background, will help come up with a clean die cut. 


I specifically love stacking die cuts to create dimension. It does not turn out perfect sometimes especially when you are stacking intricate dies just like the Happy Birthday sentiment, but this is hardly noticeable. Stacking die cuts is also a way of using up those scraps of cardstock or even patterned paper. 

Don't be afraid to add details to die cuts. I added embossed dots to the layering cake. I also added embossing on the rim of the cake.

Those cake stands that hold the sentiment are actually die cuts using a slim strip die. I encourage you to look beyond the intended use of your craft items and give it some new use.


And those negative die cuts from the plaid die, keep those. You never know when this comes handy. I keep mine in a container. I plan to use it to inlay it to the plaid background die cut just like what I did on this card or maybe create a tiled background. 

I hope you like today's card. I hope you join the KS's IG hop. Have a blessed, brilliant and creative day.

Maria Giselle B.


I added below links to the Kat Scrappiness products I used on this card. There will be no additional cost to you should you decide to purchase any of these products. While you are at the Kat Scrappiness website, do check out their wide array of products especially the exclusive Kat Scrappiness products. They have a new release, too!  


I am sharing this creation at

Monday, May 22, 2023

Double Paged Rainbow Color Inspired Layout


Hello! Welcome back to my blog. Early this month, we celebrated National Scrapbooking Day. Pinkfresh Studio's NSD challenge motivated me to work on this layout. I have not scrapbooked in a long time. I am more into cardmaking. I truly enjoyed creating this double paged layout that I see myself doing more scrapbooking in the future. Not to forget, I am so happy that my photo printer is back in action again so I can print the photos that I want to scrap about. Thanks to my husband who fixed the connection issues of my printer. 

I am using Pinkfresh Studio products in this layout. The patterned papers and the ephemera are from the Let's Stay Home collection. The squares are from one of the patterned paper from this collection. I cut these squares apart and re-arranged it to fit my double paged layout. 

The main title of the layout was created using the PS Inna Alpha Hot Foil Plate, Layering Stencil and Die Set. I had this collection for a while and I could not believe that I waited this long to play with it. At first, it looks intimidating to use it but once I started playing with it, I had to stop myself from wanting to create more projects using it. 

The foiling part was also a challenge since I have not used my Spellbinders Glimmer Machine in a long time. I had some waste of materials at first because I had to re-orient myself on how to use the machine. After two over foiling, I finally got it. 

I used the stencil to add colors to the foiled letters, following the color of the square the letter will be adhered to. I only used two shades of color for each letter. The flower has three layering stencils. I only used one ink for that just lightly applying ink on the first layer then adding the ink heavily on the next succeeding layers. 


After I adhered the colored squares to the panel to form a rainbow grid, I started planning the rest of the elements of the layout. I also added the color coordinating embroidery flosses that I will be using to stitch on some of the colored boxes. 

It is very tempting to stitch on all the boxes but I didn't want to take the eye away from the photos and the embellishments. 


I hope you like today's project. Have a blessed, brilliant and creative day!

Maria Giselle B.

I am sharing this creation at


Friday, May 19, 2023

Sketch Inspired Christmas Card

Hello! Welcome back to my blog. I created this card to join several blog challenges which I linked below. I also included the inspiration sketch at the bottom of this post. The paper products I used for this card is from Pebbles. 


The cup was created using a freebie die from Trinity Stamps. I love this die because it die cuts the cup outline leaving you with negative cuts that you can either not use or use and inlay it back to the outline cup. The negative pieces that I inlaid to the outline cup are washi tapes from the Pebbles paper collection. I adhered this to a white cardstock before strategically die cutting it using the outline cup die. I pieced it back to the outline cup securing it with transparent tape on the back. 

The poinsettia and candy canes are stickers from the paper collection. I adhered it to a white cardstock before fussy cutting it.

The bows were cut on gold mirror cardstock using dies from Waffle Flower.

I really enjoyed creating this card since I was able to use some of my craft stash stickers. I look forward to using more of my patterned paper stash.

Have a blessed, brilliant and creative day!

Maria Giselle B.

I am sharing this creation at


Wednesday, May 17, 2023

Graduation Card


Hello! Welcome back to my blog. My 2nd son is graduating high school this Sunday. So excited for him on this milestone.

The background panel involves a lot of die cutting. I die cut the plaid cover panel on an ink blended background. I pieced in some of the square negative cuts to provide contrast to the white sentiment die cuts. The words and numbers are die cut in multiples and adhered on top of each other for some dimension.


I enjoyed creating this project a lot since it is a mash up of cardmaking (based on the supplies used and the size), and scrapbooking. I think this is something doable for me compared to the large scale scrapbook layout. 

Thank you for visiting my blog. Have a blessed, brilliant and creative day!

Maria Giselle B.

I added below links to the Kat Scrappiness products I used on this card. There will be no additional cost to you should you decide to purchase any of these products. While you are at the Kat Scrappiness website, do check out their wide array of products especially the exclusive Kat Scrappiness products. They have a new release, too!  


Sunday, May 14, 2023

Tri-fold Mother's Day Card


Hello! Welcome back to my blog. I created this card for a friend of mine at work who I appreciate so much especially her genuineness. The focal point of this card is the small letter L. Please don't tell me that you thought it was a number 1. The die I used to cut this stiching alphabet die is from Spellbinders. This die has a number version, and the number 1 is different from the letter L. I die cut the elements of this card on various shades of blue cardstock, which is my friend's favorite color. 


Adding my friend's name to the card adds a touch of personalization to this card. 


I hope you like my card. Happy Mother's Day! Don't forget to make your mom feel special. This is my mom's first mother's day celebration in heaven. I believe she is still very much around watching over us. 


Have a blessed, brilliant and creative day!

Maria Giselle B.