Saturday, January 27, 2018

Stamp Inspired Stitch 3D Frame Card


I used to love cross-stitching. I cross-stitched for many years and stopped after I gave birth to my eldest son who is now 16 years old.

When Paper Smooches came out with the Cross Stitch die, I was looking forward to revisiting the craft that I used to do and love. Initially, I had difficulties using the die. Some holes are not cut, and if I ran it again through the Sizzix Big Shot, the die shifted. I was wasting a lot of paper so I stopped playing with this die for a while. But I have this project in my mind since I bought this die, so I gave it another try. This time, I added a metal shim, used a regular cardstock and taped the die to the paper with washi tape. It was a success! I used a Spellbinders Craft Tool N' One to clean up the die cut and the metal die. I had to poke out some of the die cut pieces, too.


For the stitched design, using the free template from PS website, I created a heart based from the heart stamp on the new PS In Stitches stamp set. I also created the letters based on PS Alphadot to tie the design all together.


The person I made this card for celebrated her birthday last week. I know her favorite color is green so I mixed up green DMC threads from my stash. I stitched the heart with an ombre effect. I stitched her name on the bottom. I made a French Knot for the dot of the I.

I was going to make this as a plain card. But like any finished cross-stitched piece, I wanted the panel to be on a frame, a 3D frame. I used the Cricut Design Space to search for a 3D frame. The image is from Cricut Word of Mouth. It is a print, score and cut image but it can easily be edited by changing it to a score and cut image. This cut file also comes with a slit for inserting a photo or paper to display on the frame. This can be edited out by using the CDS Contour function.

Back to the frame, I cut the image on a brown cardstock. I used a bone folder to fold the scored lines created by the Cricut. I added a gold striped washi tape from American Crafts to the portion that will be the actual frame. I applied a double adhesive tape on the fold that will adhere to the inner frame panel. Before assembling the frame, I applied a white cardstock to the back of the cross-stitched panel. Somehow, the holes look better with a white backing. I adhered this to the inner frame panel. I started fold-rolling the sides of the frame. Lori Whitlock has a video on assembling this 3D Frame which I find very helpful. You may want to watch it, too for reference.

The finished product is 4"x 5". I adhered this to a top folding card of the same size. Despite the card being dimensional, it is smaller than a regular sized card, so it fit an A2 size envelope.

I stamped the inside of the card with a birthday greeting from PS and WPlus9. I added some Pretty Pink Posh Sparkling Clear Confetti Mix as a last element.

Thank you for visiting my blog. I look forward to creating more cross-stitched cards. My Favorite Things also released cross stich tag die with free design templates.

Hope you try out this technique. Have a blessed & brilliant day!

Maria Giselle B.

I am sharing this creation at


Tuesday, January 23, 2018

Mirrored Stamp Birthday Card


My sister's birthday is on Friday. I created this card for her, and I hope she likes it.

I started off by mirror stamping the hedgehog. This image stamp is from the Clearly Besotted Let's Roll stamp set. My recipe in mirror stamping is a Misti Stamping Tool, Versamark ink, acetate and Paper Smooches Babe Block. For the pennant banner, I used a stamp from the WPlus9 Happy Mail stamp set. I colored the hedgehogs and the banner with Prismacolor color pencils. I added details to the hedgehog using white Sakura Gelly Roll pen and black Sakura Glaze pen. I fuzzy cut these images leaving a white border around the edges. Afterwhich, I folded the pennant banner in between the triangle pennants to score it. I adhered the ends to each hedgehog, sort of like the hedgehogs are biting the string of the banner.

I am using a Studio Calico patterned paper for the background and the hill. These were cut at 5 1/4" x 4". The hill was cut with a Lawn Fawn Stitched Hillside border die. I adhered the hill die cut on top of the blue patterned paper. I adhered the hedgehogs using foam tape. I applied Kool Tack Clear Foam adhesive to certain parts of the banner to secure it and add dimension. I applied clear Spectrum Noir Shimmer pen to the pennants, followed by Ranger Glossy Accents. I set this aside to dry.


To complete the sentiment, I die cut a cardstock using Simon Says Stamp Happy Birthday Craft die but using only the word birthday. I adhered this using Ranger Distress Collage Medium, placed some acrylic blocks on top of it, and allowed it to dry. I added some shimmer to this intricate die cut by using Sakura Stardust Clear Glitter pen.

At this point, I find the card too simple so I heat embossed some clouds on vellum using Paper Smooches Spectrum stamp set. The powder I used is Wow! Pearl Silver embossing powder. I fuzzy cut the clouds very closed to the embossed edge. I adhered this to the top portion of the blue patterned paper by adding dots of Ranger Distress Collage Medium to the back of the embossed edges. I placed an acrylic block on top of the clouds while it dries. I trimmed off the overhanging clouds.

For the hill, I stamped flowers from Lawn Fawn Mom and Me stamp set. I used Tsukineko Delicata Rose Gold ink.

I adhered this scene panel on a purple cardstock with fun foam for added dimension before adhering it to a white side folding note card.

Happy Birthday, Ate Ning! I hope you enjoy your day.

Thank you for visiting my blog. Have a blessed & brilliant day!

Maria Giselle B.

I am sharing this creation at

Ultra Violet New Year's Card


I wasn't able to send out Christmas cards to friends who sent Christmas cards to me & my family. So, I sent them a card to greet them a Happy New Year (although, I sent it out a few days after the year has begun.) I am using a Gerda Steiner digital image freebie. I printed the images in Canson watercolor paper. I created a pearlized watercolor by mixing Zig Kuretake Gansai Tambi watercolor and Perfect Pearl on a watercolor palette. Once the watercoloring is done, I set this aside to dry. I partially embossed the bottom part of the panel, making sure not to emboss the watercolored image, using We R Memory Keepers Next Level embossing folder Gemstones.


I heat embossed a happy sentiment from Paper Smooches Sentiment Sampler stamp set. I used a Recollections embossing powder for this sentiment. I also heat embossed the confetti on the top part of the panel using a confetti stamp from Mama Elephant Confetti stamp set. I used Ranger Platinum embossing powder for this. 

Working on the frame, I am using Li'l Inker Designs Fringed Scalloped Rectangle and Simon Says Dual Stitched Rectangle dies to cut a violet cardstock. Ultra violet is Pantone's color of the year, thus, my choice of color. I adhered this to the watercolored panel, centering the colored image to the frame. I adhered this to a top folding 5 1/2" x 4 1/4" white notecard.

Thank you for visiting my blog. Have a blessed and brilliant day!

Maria Giselle B.

I am sharing this creation at


Sunday, January 21, 2018

Cupcake Shaped Card


My 5-year old is such a sweet boy and he wanted to make something special for his friend in class who celebrated his birthday last Thursday. He would like to give him a cupcake, not the real one, since birthday treats are not allowed in their school anymore. To make him involved, we looked through the images I have access to in Cricut Design Space. This is the cupcake he chose and it is now up to me to make it into a card.

This is a layered cut. I duplicated the base layer, flipped one of the base cupcake cuts vertically, and welded the two base cupcakes to create a card. I started cutting the next layers using cardstock. The cupcake wrapper is in the same cut as the heart topper. Using the icing layer as a guide, I cut off the wrapper portion. I ran this through a Fiskar Paper Crimper tool. I adhered all layers on top of each other. I added Stickles to the chocolate sponge cake part of the cupcake. I applied clear Wink of Stella to the heart topping. I applied Ranger Glossy Accents to the heart. I set this aside to dry.

I stamped a happy birthday sentiment to the inside of the card finishing off this cupcake shaped card.

Thank you for visiting my blog! Have a blessed & brilliant day!

Maria Giselle B.

Monday, January 15, 2018

Shaker Tag


We have a new challenge at Incy Wincy Designs. Our challenge theme is Tag. I am using an image from one of our sponsors for this challenge. Scrap N' Dipity. As soon as I saw these critter images, I fell in love with it. Aren't they cute?!

I sized the images so it will fit inside the window of the fold out tag. I printed the image on Canson watercolor paper. I colored the images using Zig Clean Color markers. I fuzzy cut the image. I ran a black marker around the cut images. I applied a dot of black Ranger Enamel Accents to the eyes. Once this had dried, I added a small dot of white Ranger Enamel Accents over the dried black enamel  dot.

I am using the Mama Elephant Union Square for the tag. The set includes the window die with the fold-up cover, and the solid tag die. Before I snipped these two dies apart, I cut 3 different colored cardstocks using these dies. Having these two dies attached cut out the window die into the solid tag. If you had these dies already snipped apart, just tape both dies together to re-create the cut.

I then snipped off these two dies apart. Using the solid tag die, I die cut color coordinating patterned papers and a white cardstock. I adhered the white tag die cut to the back of the patterned paper tag die cut to make the tag more sturdy. I misted this patterned paper with diluted Pearl Perfect Pearl for a shimmer effect.


Now, back to working on the window die cut. I embossed a star image to the front of fold-up cover. The star is from the Hero Arts Written In The Stars stamp set. I used Wow! White Pearl embossing powder for a subtle look. I embossed the sentiment on top of the embossed star image. The sentiment if from an old Hampton Art/Doodlebug stamp set. I stamped this using different pigment inks, matching the ink colors with the cardstock colors. I embossed this sentiment using clear embossing powder.

I adhered an acetate to the inner side of the window tag using a double adhesive tape. I then applied Darice Adhesive Strips around the window to form a well. I rubbed an anti-static tool to the inner edge of the foam strips. I poured a mix of sequins to the center of the window. I used the Misti Stamping Tool to line up the corners of the window tag and the patterned paper. Yes! The Misti is not only for precision stamping but also for precision alignment. Now the shaker tag is done.


To further embellish the tag, I adhered the fuzzy cut critter to the acetate window. I adhered a triple bowed twine to the top of the tag. These tags are now ready to be attached to a gift or even adhered to a card front as an interactive embellishment.

While working with the Scrap N' Dipity images, another idea that came into my mind is coloring a couple of the same image, fuzzy cut it, and layer it for a dimensional image. Just thinking about it, these images will look cute using this technique. What do you think?

Thank you for visiting my blog. Have a blessed & brilliant day!

Maria Giselle B.


I am sharing this creation


Wednesday, January 10, 2018

Crown and Card Gift Pair


3D

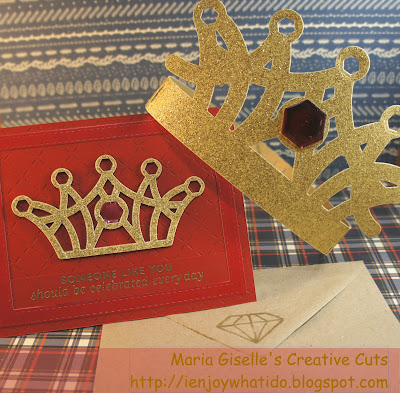
I created this for a co-worker of mine who is celebrating her birthday. I came up with the crown theme after I complemented her hairstyle is lacking a crown to make her a true queen. This inspired and challenged me to create her a crown. And, what is a gift without a matching card, right?


I used the Cricut Design Space to search for a crown image. I filtered the search to images that I own. This crown is from the Life Is A Party Cartridge. This crown cut file comes in layers and cuts the embellishments. It also cuts tick marks as a guide in adhering the small die cuts. Using the contour function, I removed the tick marks because I am not planning to use the small die cut pieces due to time constraint. I welded the detailed and base layer to save time. I cut this on gold glitter paper. The reverse side of the glitter paper is white in color. To cover it up, I mirror cut the crown on gold cardstock and adhered it to the reverse side of the glitter cardstock.

I die cut hexagons using the Avery Elle Custom Panels to create a more detailed crown since I decided not to add the hexagon embellishments included in this cut file. Do you remember the Epiphany Crafts Studio Tool to create bottle cap embellishments? I created the center gem of the crown using this tool.


For the card, I wanted it to match the crown. The Cricut Cartridge I used is all about planning a party. I die cut the detailed crown that is included in the card file version of the crown. I cut this using the glitter paper and cut it four more times using the gold cardstock. I stacked them to create a dimensional embellishment.


For the front card panel, I embossed a red cardstock using the Li'l Inker Designs Quilted Stitched Pattern die. The size of this red panel is 5 1/2"x4 1/4". I sprayed this panel with diluted Perfect Pearl in water. I die cut a red frame using Simon Says Stitched Rectangle die. The sentiment is from Mama Elephant Make A Wish stamp set. I heat embossed this on a red cardstock strip uisng Wow! Rich Pale Gold embossing powder.

To put the card together, I am using a 100lb. Neenah Desert Storm Cardstock for the card base. I adhered the red embossed panel to this. I adhered the sentiment strip to the back of the frame, then adhered this to the red embossed cardstock. I then adhered the crown to the center of the card. I die cut a hexagon using the Avery Elle die on a red mirror paper and adhered this to the center of the crown just like the 3D paper crown. I stamped a Happy Birthday sentiment inside the card. This card and crown are ready to be given.

Thank you for visiting my blog. Have a blessed and brilliant day!

Maria Giselle B.

I am sharing this creation at


Thursday, January 4, 2018

Paper Photo Wallet


I created a birthday card for my father which I was planning to send with his package through my uncle. The problem is the card is bigger than the box so I had to come up with an instant replacement.


I started by stamping a Neenah Desert Storm cardstock with Simon Says Basic Stripes stamp set to create the background. I used the Misti Stamping Tool to re-stamp the stripe stamp repeatedly for a bold impression. I used different shades of brown for a gradient look. This panel is sized at 5 1/2"x4". I scored this panel at 1 7/8" and 2 1/8".


I am using the Lawn Fawn Selfie Frames die set to create the flip photo frames for my sons' photos. I die cut a white cardstock and traced the phone die cut onto a white cardstock for the backing of the flip photo frame. 

To connect the phone photo frames, I cut a 1/2" acetate strip and scored it on the middle. I used a strong adhesive to adhere this to the the solid white cardstock backing of the photo panel. I adhered the photos to the back of the phone die cuts, centering the photos to the opening. I adhered this to the back panels. To adhere this connected photo frames to the scored kraft cardstock, I used a scrap piece of kraft cardstock and scored it at the middle. I adhered a piece to the back of the first and last photo frame. I adhered the other end of the scored scrap to the inner side of the paper wallet except for the back side since I have to create the closure strap. I created a closure tab for the wallet by adhering two kraft strips, about 1/4" to make it thick. I created two scores on this strip, about 1/8" apart. I just eyeballed the score making sure I have enough strip to wrap around the opening of the wallet. I rounded one end of the strip. I adhered the other end to the inner back side of the paper wallet. This is the time I adhered the last photo frame tab to the inner back of the paper wallet.


I cut a hole on the front using a kraft knife. The hole should be long and wide enough to accommodate the closure tab. The photo wallet is pretty much done. Now, it is time to embellish it.


I just re-created the design of the birthday card I made for him. I stamped a smaller star stamp from Altenew Halftone Stars using varied dye inks. I used the Misti Tool so I can stamp the star multiple times with the last ink using Versamark so I can emboss it with Judikins Sparkle embossing powder. I die cut the star using the coordinating metal die. I die cut a fun foam using the next smaller star die. I adhered a bunched up DMC gold floss to the front of the wallet and secured this with the dimensional star. 

For the sentiment, I am using Altenew Label Love. I embossed this with white embossing powder on a brown cardstock. I traced the letters with a brown marker to make the letters more solid. 

To make this more personalized, I had my sons write their names on a cardstock strip. Ryan wanted to write on pink cardstock strip using a rainbow pattern. A potential crafter, what do you think?

Thank for you for taking time to visit my blog. Have a blessed & brilliant day!

Maria Giselle B.

I am sharing this creation at