Hello! Welcome back to my blog. For today's card, I am using the Hero Arts Christmas Color Layering Stamp set. I am using non-traditional Christmas tree colors. I stamped the Christmas tree layers using colors from the same color family. I used a Misti Stamping Tool so I can re-stamp the image, if needed.
I created a mask to be able to create a scene of trees, with some appearing to be at the back of another tree. Fussy cutting the tree mask seems challenging but the mask need not to be perfect.
Depending on the mask you are using, sometimes it is difficult to ink the area between the image and the mask. I used a Tsukineko Fantastix blending tool to apply ink to those missed spots.
I embossed the last Christmas tree layer, adding Wow! White Puff embossing powder. With the use of the Misti Stamping Tool, I re-stamped the last layer on the same spot with Versamark ink. I added Judikins Iridescent Sparkle embossing powder, and heat embossed it. The White Puff adds dimension while the Iridescent Sparkle adds shimmer.
I stamped the tree trunk with brown dye ink.
I stamped the sentiments on the tree using Versafine Onyx Black ink. I poured black embossing powder to the stamped sentiments, and heat set it. I used the Misti Stamping Tool on this step, too. Because of the textured snow, it took several re-stamping before I got a crisp impression of the sentiment.
I blended a light blue ink on the panel. I stamped snow flurries to the background using the same light blue ink for a subtle background.
I trimmed an 8th of an inch on the long and short sides. I adhered this to a blue colored cardstock cut at 4 1/4" x 5 1/2", then adhered it to a top folding A2 notecard.
I added star sequins to the top of the trees. I drew a snow slope using a Sakura White Gelly Roll Pen.
Thank you for visiting my blog. Have a blessed, brilliant and creative day!
Hello! Welcome back to my blog. Today is my first post as I continue my journey in AECP Level 2. I cannot wait to learn more to better my craft. I am so thankful to Erum, our AECP coach, for the continued support.
Foiling is on trend right now. There are several crafting tools to do foiling but for today's card, I foiled without the use of heat. Although, there is still some heat used on this card but not directly to transfer the foil. You'll find out what I mean later on.
I trimmed a peach cardstock at 4 1/4" x 5 1/2". I prepped the cardstock with anti-static powder. I stamped the butterfly images on this panel repeatedly using a sticky ink. I used the Misti Stamping Tool in stamping the butterflies so I can re-stamp the images just in case the impression was not good. I poured Ranger Sticky embossing powder on the sticky ink, then heat set it being careful not to over melt the sticky powder. The butterfly stamps are from the Altenew Hibiscus Stamp set.
I covered the melted powder with Wow! Snow White Fab Foil. I burnished the foil to the sticky image using a bone folder. I am not always successful with this foiling technique. Most of the time, I have areas where the foil did not adhere. I sometimes leave it as is but if you are still aiming for a perfect foiled image using this technique, reposition the foil back on the sticky image. Briefly heat the back of the panel to activate the glue and burnish the foil to the image. This is when you start using heat for foiling. Sometimes this trick works. Sometimes it does not. Still the effect is gorgeous!
I added stitching holes to the panel using one of the Altenew String Art Rectangles Dies. I created a window using a rectangle die smaller than the String Rectangle die I used. You can also use a craft knife to create the window.
I added a blanket stitch on the inner frame outlining it. I blended a peach ink on the left-over rectangle panel. I buffed the ink off the foiled images.
For the sentiment, I am using a die from the Altenew Hello and Hugs Die Set. I die cut the word hugs on peach cardstock three times. On one of the sentiment die cuts, I pounced the sticky ink on the bottom half of the word. I poured sticky ink to this, then heat set it. I covered the area with the same white foil then burnish it.
For the top half of the sentiment, I pounced the sticky ink on it again. This time, I poured Altenew Golden Peach Crisp embossing powder. I heat set this.
I adhered the other two sentiment die cuts to the back of the embossed/foiled sentiment for added dimension.
I adhered the inner panel to a peach cardstock cut at 4 1/4" x 5 1/2". I used the frame to guide me in its placement.
I added foam adhesive to the back of the stitched frame. I adhered this to the peach cardstock panel making sure that the frame is aligned with the rectangle die cut panel.
I adhered the stacked sentiment die cut.
I added sequins to the panel and some dimensional glue to cover the center holes of the sequins.
Thank you for viewing my blog. Have a blessed, brilliant and creative day!
6/2024: Altenew decided to change its affiliate program starting this month. Below is my affiliate link to the website. I don't think I can directly link the products I used with this new program. Please feel free to do a product search. I will update as I figure this out. The good thing about this new affiliate program is that I get to earn on each Altenew product you purchase and not only on the product/s I used on this project. As before, there will be no additional cost to you if you make a purchase. It is just a way to help a fellow crafter sustain her love for crafting. While in the Altenew blog, don't forget to check out their new release for this month. Thank you for your support!
Hello! Thank you for visiting my blog. This is part 2 of my created card for this month's challenge at Incy Wincy Designs. We are halfway through the month of November. Wow! It seems like November is passing by quickly.
Anyway, if you don't recognize the image I used for the focal point of this card, it is the same image I foiled on my first card for the challenge, Foiled Digital Image. After I foiled the image on the first card, I kept the left-over foiling. I didn't want to put the foil into waste. I trimmed a Deco-foil toner sheet large enough to fit the reverse foiled mug. I ran this through the Minc Machine. I fussy cut the reverse foiled mug. I set this aside to work on the rest of the card.
For the panel, I trimmed strips of patterned paper from scraps of My Mind's Eye 6x6 paper pad. After I arranged these strips on the order I want it, I adhered this to a scrap 4 1/4" x 5 1/2" light weight cardstock.
I die cut a frame using the Avery Elle Pierced Mat Elle-ments. After I die cut the shape, I used my craft knife to cut off the center of the shape, leaving a thin, open frame.
I adhered this frame to the striped panel. I adhered the foiled mug with foam adhesive. I tucked a foiled Minc sentiment ephemera to complete the panel.
Thank you for visiting my blog. You still have a couple more days to join the challenge.
Hello! Welcome back to my blog. For today's card, I am featuring a Christmas coverdie from Kat Scrappiness. I did some stitching which shows through the open spaces of the coverdie.
To create the card, I die cut the coverdie on a heavy weight cardstock. I die cut a 4 1/4" X 5 1/2" 80 lb. white cardstock using a slim card stitching die from Crafty Meraki. I temporarily adhered the coverdie die cut to the stitching die cut with washi tape, creating a hinge on the right side of the die cut. In this way, I will be able to know the areas where I will be stitching a certain color of the embroidery floss.
Once I filled up the spaces with cross stitches, I adhered the coverdie to the stitched panel with liquid glue. I die cut another piece of the tree coverdie and stacked it over the coverdie from some dimension. I trimmed the excess on the sides. I placed something heavy over this panels for better adhesion between the layers while the glue is drying.
I matted this stitched panel with a red cardstock. I adhered this to a dark green side folding note card.
I embellished the panel with star gems, pearls and snowflake sequins.
I love the final outcome of this project since it combines two of my favorites, cardmaking and stitching. I feel like I can re-create this card again using a different color combination of embroidery floss. To make things easier for me next time, I created the stitching pattern into a pdf (Kat Scrappiness Christmas Tree Stitching Pattern).
Thank you for visiting my blog. Have a blessed, brilliant and creative day!
I added below a link to the Kat Scrappiness product I used on this card. There will be no additional cost to you should you decide to purchase this product. While you are at the Kat Scrappiness website, do check out their wide array of products especially the exclusive Kat Scrappiness products.
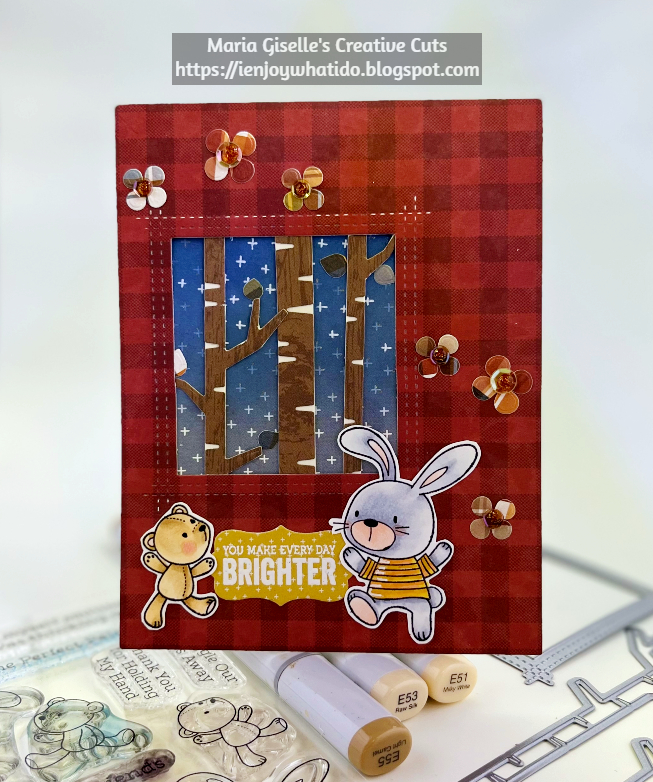
Hello! Welcome back to my blog. I created this card to join the My Favorite Things Sketch Challenge. It is so nice to be back in the swing of things. It has been a while since I last participated in a challenge due to my busy schedule. I am so glad that finally my schedule can accommodate this again. You have no clue how much I miss this part of my crafting.
I am using a new product in my stash, the My Favorite Things Birch Tree Die-namics. It is new to my stash, but MFT retired this set. There are different birch tree dies available in the market.
I am using the Echo Park Fall Fever 6x6 paper pad. I trimmed a red plaid paper to 4 1/4" x 5 1/2'. I die cut a window on this panel using the MFT LJD Rectangle Peek-a-Boo Window Die-namics. I did partial die cutting technique to extend the length of the window.
I trimmed a blue patterned paper slightly larger than the panel window. I blended blue ink on the topmost area. I traced the white plus design on the patterned paper with a clear sparkle pen and a white gel pen.
I die cut the birch trees on a browned patterned paper from the paper pad. I adhered these die cuts to a cream cardstock to highlight the markings of the birch tree. I fussy cut the excess. I adhered the birch trees to the back of window. I adhered the blue patterned paper on the back of the birch trees for a blue sky look.
I stamped two images from the MFT Snuggle Bunnies on Neenah Solar White cardstock with Memento Tuxedo Black ink. I colored the images using Copic markers. I fussy cut the images leaving a white border around it.
For the sentiment, I stamped this on a yellow patterned paper from the pad using Versamark ink. The sentiment is from the retired MFT Mason Jar Labels stamp set. I poured white embossing powder to the sticky ink, then heat embossed it. I die cut the sentiment using a die from the coordinating MFT Mason Jar die set. I adhered this and the fussy cut critters to the bottom of the window.
To re-create the small elements of the sketch, I die cut the leaves from the MFT Birch Tree Die-namics on a multi-colored plaid patterned paper. I adhered four of the leaves in a cluster to create flowers. I adhered the excess on the birch trees.
I added brown clear sequins for the center of the flowers. I added a dot of copper Nuvo Glitter Drop to the center of the sequins. I set this aside to dry.
Once the glue has dried, I added shimmer to the flowers using Cleark Wink of Stella.
I added details to the bunny's shirt with white gel pen. I also added details to the critters' eyes and noses using a black Sakura Glaze pen.
Thank you for visiting my blog. Have a blessed, brilliant and creative day!
Hello! Welcome back to my blog. Today's card features one of the Kat Scrappiness Shaker Card Kits. The kit includes a shaped foam dimensional base, a shaped acetate and a shaped chipboard overlay. All you have to do is adhere the base to your project which will serve as the well for your shaker elements. Add the shaker elements. Adhere the acetate, then, adhere the overlay. Easy-peasy! But for this project, I am stepping it up a notch on how to use this product. I created an ornament using this shaker card kit.
I traced the heart foam base on a white cardstock and a kraft cardstock. I cut these hearts out. I added holes on the white cardstock using a cross stitch die. I used different red embossing threads to fill the white heart. I used the decorative overlay as a guide on where to stitch each red thread. I adhered the kraft cardstock to the back of the stitched heart to cover the back of the embroidered heart.
On the heart decorative overlay, you have an option to either use the lighter or the darker colored side. To match the kraft cardstock, I used the darker side. I blended a brown dye ink to this overlay to give it a rustic look. I pounced some gold pigment ink for a bit of shimmer.
I adhered the shaped foam to the stitched heart. I added snowflake sequins for the shaker. I adhered the acetate, then adhered the overlay. I set this aside to work on the display card.
I got this idea from Jennifer McGuire. She used a die to create the display card. I re-created my display card using a trimmer and a curve die in my stash. Just like Jennifer's card, my card size is 5" x 7". I cut 4 pieces of red cardstock at 7" x 2". I will refer to these pieces as strips from hereon. I scored the ends of the short side at 1/2" and 1".
I added a curved opening on the strips using a curved die from Avery Elle Custom Panel dies set. To make sure the curved cut will be consistent on all of the four strips, I taped two strips at a time, positioned and secured the die with a tape, then run this through the die cut machine. I used one of these strips as a guide to cut the other two pieces. This time, I used the curve cut portion as a guide to where I position the curved die. I butt the die to the curved side of the cut strip, temporarily securing this with a tape. I then run this through the die cutting machine.
I masked the fold tabs on two of the strips. I stamped a snowflake background to each strip using a red dye ink for a subtle tone on tone effect. The effect is so subtle that I could have stamped the back panel too. Something to keep in mind later on. The stamp I used is from La-la Land Crafts Winter Knits stamp set.
On the stamped strip, I added glue to the tab facing backward, and adhered this to the other strip, making sure both are aligned. I added glue again to the back tab and adhered it to the top portion of the card base. I repeated this process for the bottom portion.
To add the ornament to the display card, I needed to re-create Jennifer's string die cut. I don't have a die like it. Instead, I used a die that is originally intended to cut a flag for a mailbox. I modified it to work for the purpose of suspending the ornament. Just like how Jennifer did it, I taped the ornament holder to the back of the upper strip but unlike Jennifer's, I taped the ornament to the back of the second strip. In doing so, it keeps the display card upright since my ornament has more weight.
To embellish the display card, I added a sentiment banner on the bottom strip. I did partial die cutting to extend the length of the banner to accommodate the sentiment. The sentiment is from Lawn Fawn Offset Sayings stamp set and the die is from Lawn Fawn Fancy Folded Banners die set. I curved the sentiment to follow the curve of the banner. I heat embossed the sentiment using red embossing powder.
I embellished the top strip with a wreath, a bow and a red pearl. I also added a red pearl to the heart ornament.
I trimmed a 4 1/2" x 6 1/2" white cardstock. I adhered this to the back of the card panel. This will be a spot to right a personal message to the recipient. At the same time, it adds some stability to the display card.
Thank you for visiting my blog. Have a blessed, brilliant and creative day!
I added below a link to the Kat Scrappiness product I used on this card. There will be no additional cost to you should you decide to purchase this product. While you are at the Kat Scrappiness website, do check out their wide array of products especially the exclusive Kat Scrappiness products.
Hello! Welcome back to my blog! A new month means a new challenge at Incy Wincy Designs. For this month of November, Incy Wincy is not being sponsored by a stamp company but rather we are paying tribute to a stamp company, STAMPlorations. Please visit the challenge blog post to know more about this company and its owner's battle with cancer. The challenge theme for this month is Giving Thanks and/or Encourage a Friend.
I printed the image on white cardstock. I used a toner printer since I am going to foil this image. The image I used on this card is linked below. I foiled the image using the Minc Machine. I colored the image using a detailed blending brush and dye inks. I really like the result of this technique, the soft and subtle colors. To step it up, I colored in the details using color pencils.
I fussy cut the image leaving a white border around it.
For the background panel, I trimmed a patterned paper at 5 1/2" x 4 1/4". I flicked gold watercolor to this patterned paper. I added gold to the edges of this panel by gently sliding the embossing pad to each edge. I then poured gold embossing powder to the edges then heat set it.
I added details to a wide patterned paper strip with the use of an edger die from Impression Obsession. I did not snip the dies apart so I can run the dies together through the die cut machine. I adhered strips of watercolor paper to the back to add a little bit of dimension to this wide strip. I adhered this to the patterned paper panel.
For the sentiment, I die cut this on orange cardstock using sentiment and alphabet dies from Concord & 9th, Avery Elle and Hero Arts. I die cut extras to layer it on each other. I blended ink to the bottom parts of the letters, and pounced gold pearl powder to it.
I adhered the mug to the panel, then adhered the sentiment and alphabet die cuts. I added details to the letters using a white gel pen.
Thank you for visiting my blog. I hope you join us in this month's challenge. If you decide that you want to help Shery out, there are a lot of options to help out, details are in the challenge blog. When you check the blog, be sure to also check the special offer Shery has for Incy Wincy followers.
In this month of November, let us not forget to be thankful for the things we had and still have. Have a blessed, brilliant and creative day!