Hello! Welcome back to my blog. This is the last preview of the upcoming Altenew release in March. The only product I have in this batch of products is the 3D embossing folder. Hit the older post button below to see how I used this product in my cards.
Are you enjoying the previews? Any favorites so far? There are only 2 more days before this release goes live. Until then, you can now add the products of your liking from the upcoming release to your wish list. Also, be on the lookout for Altenew social media hops to see how other designers used these products from the release. We hope to inspire you.
Hello! Welcome back to my blog. This is my 3rd preview post of Altenew's March's release. Today's featured product is very interesting since the sentiment has a vertical orientation. There are some products like this out in the market but very limited. Most likely, if I have to create a vertical sentiment, I will be using an alphabet stamp or die, and fix the letters vertically. The downside with that is not all alphabets are equal in width unlike the vertical sentiments.
This bundle comes with a die and foil option. I only have the foil plate which doesn't have a matching die to cut out the sentiment. The matching die is included in the die set. But don't worry, cutting the foiled sentiment with scissors is not that hard. Use a corner punch to round the corners.
My cards below feature the Vertical Greetings Hot Foil Plate. Foil plates are mostly associated with the use of a foiling machine and a heat foil. What if you ran out of foil or you don't have a foiling machine or you are just not having luck in foiling? Two of my cards target these issues which hopefully will let you to look into your hot foil plates in a different way, and make you use it more than what it is intended for.
Foiled sentiment
Inking with dye ink.
Inking with sticky ink and adding embossing powder.
These products are not yet available in store. It will be available on March 2. If you like this foil plate set and die set, add it to your wishlist and come back to the store on release day. Be on the lookout for Altenew social media hops to see how other designers use products from the release. We hope to inspire you!
Hello! Welcome back to my blog. Sorry if I have been missing in action last week. I was busy with work and with projects which will be revealed in the coming week. Stay tuned for it!
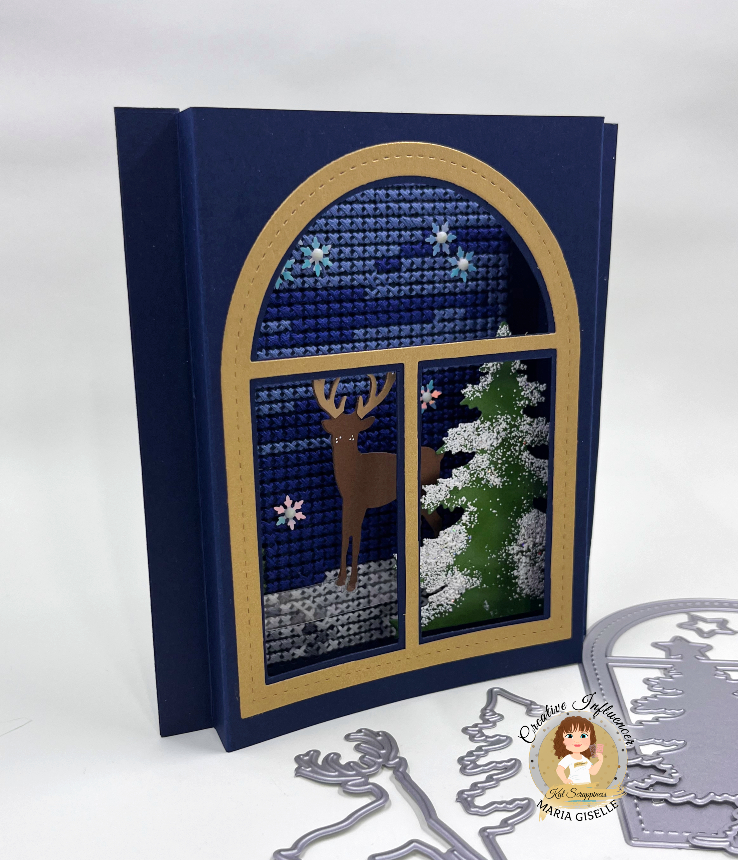
I know that winter is almost done but I can't let go of this card idea so just bear with me this last time then I will shift gears to creating spring cards.
I got this pop-up card idea from Jennifer McGuire. I think the scene that I created works perfectly for this kind of card.
I started off with cutting a navy-blue cardstock at 4 1/4" x 5 1/2". I added stitching holes to do this using the Crafty Meraki Stitch-a-Cross slimline die. I cross stitched the background for the scene.
I trimmed two pieces of blue cardstock at 6" x 5 1/2". I scored this at 1/2" and 1" on the long side at each end. I creased this really well using a bone folder.
On one of the folded panels, I traced the inside of the window from the Kat Scrappiness The Night Before Christmas Window Scene dies. I used a craft blade to cut the pieces off to create a window. There are areas where there is a gap in the tracing line because of the tree but I just cut this straight connecting the ends of the traced lines. I adhered the cross stitched panel to the other folded panel.
I die cut the elements that I will use for my card. I die cut the window on a matte gold carstock. I cut the tree on a green cardstock. I die cut the small reindeer from the KS Reindeer Duo dies on a brown cardstock and light brown cardstock. I cut two pieces of the deer on brown cardstock.
I cut the tree off the window die cut, just following the lines of the window to cut it straight. I adhered this to the top of the blue panel with the window opening. Luckily, the window frame is smaller than the window frame. I thought that the window frame is exactly the same size as the window I cut. Now, I have a margin between the edge of the frame and the window. What a happy accident!
I blended green ink to the tree to create layers. On this inked portion, I dabbed Versamark ink. I mixed Wow! Midas Touch embossing powder and Wow! White Puff Powder embossing powder on a small jar. I poured this to the inked areas and heat embossed it. I repeated this several times.
For the deer, I cut the antlers off the light brown cardstock. I adhered this to one of the brown deer die cuts, making sure that the antlers are aligned. I applied Nuvo Midas Touch to the antlers. I adhered the deer's feet to an acetate strip using Glossy Accent. I adhered the other deer to the back of the deer.
I adhered the tree to one side of the folded panel, on the fold. I adhered the tip of the acetate strip to the other folded panel. I adhered silver sequins to the cross stitched panel. I added glow in the dark gems to the center of the snowflakes.
I added double adhesive tape to the folds and adhered it together. Now, my pop-up card is done. Below is a short video showing the interactive features of this card.
Thank you for viewing my card. Have a blessed, brilliant and creative day!
I added below the link to the Kat Scrappiness products I used on this card. There will be no additional cost to you should you decide to purchase a product. While you are at the Kat Scrappiness website, do check out their wide array of products especially the exclusive Kat Scrappiness products. There is also an ongoing slimline sale. Enjoy!
Hello! Welcome back to my blog. This is my second post previewing products from the upcoming Altenew March Release. Click the previous post button if you want to see the 1st preview of the Altenew March Release.
Today's product feature is a 3-in-set which you can mix and match the products coming up with different results. You can color the stamped image with any color medium you like. You can stamp the image and use the stencil to blend in the colors. You can just use the stencil to create a no-line colored floral image. Although you can create a one-layer card just by coloring the flowers, the coordinating die allows you to extend the use of these florals. Use it as an embellishment to card and scrapbook layouts. Add foam tape to pop it up for a dimensional look. All the possibilities.
This product is not yet available in store. It will be available on March 2. If you like this 3-in-1 set, add it to your wishlist and come back to the store on release day. Be on the lookout for Altenew social media hops to see how other designers use products from the release. We hope to inspire you!
Hello! Starting today, I will be featuring products from Altenew's March release. And yes, I am a part of that release. I don't know about you, but I am so excited!
These are only previews. These products will not be available until March 2. So, if you find something that interests you. add it to your wish list and do comeback to the store on release day. Also, be on a look out for Altenew social media hops featuring designers using the products in the release. We hope to inspire you.
Hello! Welcome back to my blog. Happy Valentine's Day! I created these mechanical pencil Valentine's giveaways for my youngest son's 5th grade class.
I added washi tape to each mechanical pencil to customize each pencil. I printed each recipient's name using a label maker.
For the heart, I die cut scraps of cardstock using a heart die from HoneyBee Paper Hugs Honey Cuts. I die cut a circle on the lower left portion of the heart. I will thread the tip of the pencil through this hole, sort of like an arrow piercing the heart. I embossed the sentiment using Versafine Onyx Black ink and clear embossing powder. I added heart details using a stencil and a red ink. I also blended ink on the sides of the heart to give it a vintage look.
I truly enjoyed making this project because all of the supplies I used are readily available in my craft room. The mechanical pencils were bought at the start of school. My senior did some school supply panic buying at that time. Too much school supplies that the mechanical pencils can last him through college.
The cardstock/patterned papers used for the hearts are from my paper scrap box. I used the scraps that are large enough to cut the heart.
I have tons of washi tapes! One washi tape design for a pencil makes the pencil unique on its own.
I also have tons of heart die cuts that I keep in a container. I used this to accent my son's name.
Thank you for visiting my blog. Have a blessed, brilliant and creative day!
Hello! Welcome back to my blog. This card was created as part of my AECP 2 journey featuring Monochromatic colors. Today's card is a first for me. I created monochromatic cards before but never in white.
I am using the Altenew Happy Birthday stamp set and Altenew Trebel Love die set on this project. I started off with die cutting all of the three dies that come in the set on white cardstock. I die cut multiples of these dies, three of each. This is a great way to use those scraps. The sentiment is cut as one. I snipped the words to separate the words. This allows me some freedom to reposition the words. I adhered one on top of the other for some dimension.
I trimmed a heavy weight white cardstock at 4 1/4" x 11". I scored this at 5 1/2" on the long end to create a top folding A2 note card. I embossed the music icon stamps from the stamp set on a part of the front of this note card. I only need to add the embossing to the part that will show through the split that I will create on the next step. The embossing powder I used is Ranger Seafoam White embossing powder.
I trimmed a light weight white cardstock at 4 1/4" x 5 1/2". Using a wavy border die, I die cut a gap in this panel, more towards the left side of the panel. I made sure that the embossing on the card panel shows through this gap. I adhered this to the card panel front using foam adhesive.
I added embossing glitter powder on the music clef and the sentiment dimensional die cuts. After pouncing embossing ink on these die cuts, I added Judikins Iridescent Sparkling embossing powder to this, then poured Ranger Clear Rock Candy Glitter. I heat set this until the embossing powder melted. If needed, I repeated the process.
The music clef has a heart negative cut which I embossed with Ranger Seafoam White embossing powder.
I adhered the music staff die cut on the front of the card panel, more towards the bottom and somehow creating the illusion of connecting the two split wavy front panels. I adhered the other elements after.
The embossing powders and the dimensions added variation to this card's supposed plainness.
I hope you like my card and give it a try, create your own version. Have a blessed, brilliant and creative day!
6/2024: Altenew decided to change its affiliate program starting this month. Below is my affiliate link to the website. I don't think I can directly link the products I used with this new program. Please feel free to do a product search. I will update as I figure this out. The good thing about this new affiliate program is that I get to earn on each Altenew product you purchase and not only on the product/s I used on this project. As before, there will be no additional cost to you if you make a purchase. It is just a way to help a fellow crafter sustain her love for crafting. While in the Altenew blog, don't forget to check out their new release for this month. Thank you for your support!
Hello! Welcome back to my blog. We have a new challenge at Incy Wincy Designs. The challenge theme for this month is Valentine +/or In The Garden. I hope you join us in this challenge.
The image I am using is from Jan's Digi Stamps which is linked below, in case you are interested on it.
I re-sized the image smaller to create a background of candy hearts. I duplicated the image to print multiple hearts on a single sheet of light weight white cardstock. I printed these hearts using a toner printer which will work with foiling. I added foiling to these hearts using pink and silver foils that is compatible with a laminator. I am using a Minc Machine and the Minc foils for this. I colored the hearts following a rainbow pattern using Copic markers. I fussy cut the images leaving a white border around it. I set this aside while I work on the front card panel.
Using the same colors of markers that I used for the hearts, I created stripes of colors using the chisel tip of the marker. Where two colors meet, I used one of the markers to blend the inks. I repeated this until the whole panel is covered with stripes of colors. I flicked some Copic colorless blender to this striped panel to add some splatters.
I struggled with adding a foiled sentiment to my card design. I am using the Spellbinders Glimmer Machine for this step. On my first try, the foil moved so not all of the sentiment was foiled. Second attempt, I over-foiled the panel. I tried removing the foil off the over-foiled areas with a sand eraser but it left a stain. If this was a small portion only, it would have been forgivable but there were a lot of stained areas too hard to hide. I think what might have caused my over-foiling is when I added another shim of thin cardboard to the foiling sandwich. The third try was a charm. It is still not perfect with some over-foiled areas. It was not a lot and it got rubbed off easily with the sand eraser. The sentiment I used is from Birch Press Design Hugs Sugar Script Hot Foil Plate & Die set. Foiling can be stressful at first but I think with constant use, I will learn its tricks. After all, the foiling result is always amazing.
Because of the above boo-boos, my plan of a one layer card had to be revised. I created another striped colored panel. Using the coordinating shadow die of the sentiment, I die cut a window on this striped card panel. I adhered an acetate on the back of the window. I trimmed the panel with the foiled panel to a size large enough to cover the window with the foiled sentiment showing through. I added double stacked thin strips of adhesive foam around the window on the back side to form a well. I powdered the insides of the well. This prevents the shaker elements from sticking to the foam adhesive. I poured Pretty Pink Posh 4mm Metallic Rose Gold sequins over the foiled sentiment. I adhered the window panel to the sentiment panel making sure the window is aligned with the sentiment.
I heat embossed a sub-sentiment to the left-over striped panel. I used a dark gray dye ink for stamping and clear embossing powder. I die cut this into a strip using an Avery Elle Sentiment Strips die.
I added more double stacked adhesive foam to the rest of the card panel's back. I adhered this panel to a top folding note card.
Thank you for visiting my blog. You have the whole month of February to join the challenge. Have a blessed, brilliant and creative day!