Monday, March 30, 2020

Pastel Rainbow Message Board Card


Hello! I created this card with the front liners and first responders in mind. I am in healthcare, too, but I don't do bedside care anymore. I do work with these front liners very closely in the units that we monitor. Seeing the circumstances right now, they are in a very difficult position to be on.

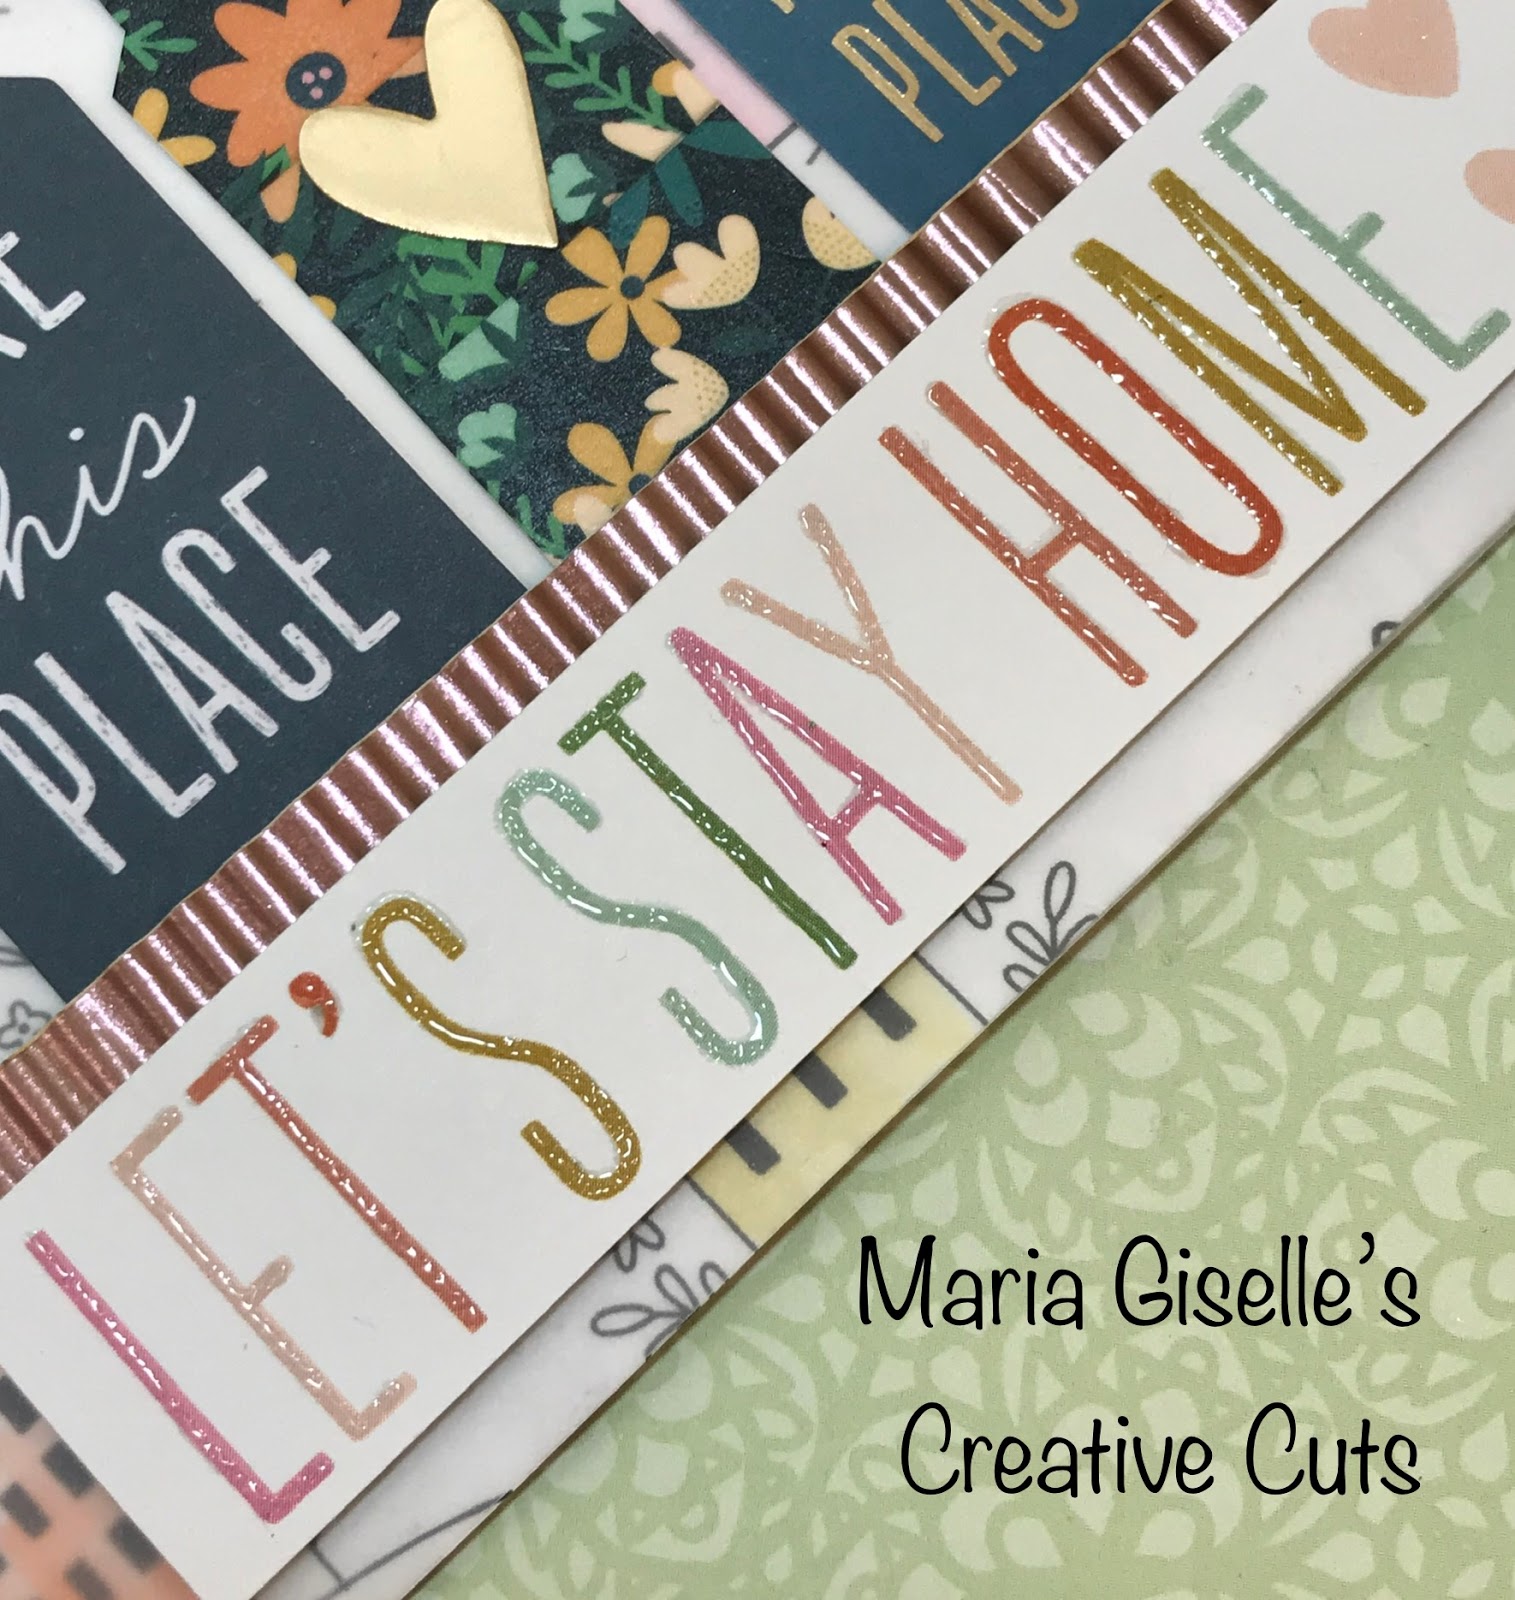
I am using the SugarPea Designs Message Letter Board die. I have used this die for several projects already. I am linking it here, in case you are interested to check it out (Vinyl on Greeting CardTeacher Inspired Letter Board Card, and Letter Board Birthday Card). I embossed the die on a Neenah Solar White cardstock. I ink blended the panel using the lines as guide. I used Tim Holtz Distress Inks in Sugar Spun, Squeezed Lemonade, Twisted Citron and Tumbled Glass. I chose these colors to match the colors of the challenge. I masked the areas that I was not blending ink on.

I die cut my sentiment using the letter die included in the SPD Message Letter Board die set. I adhered these letters close to the bottom of the message board.

I stamped the image from the retired SPD This Little Piggy stamp set on Strathmore Water color paper using Versafine Onxy Black ink. I colored the image with Karina markers. I have used these markers on Canson water color paper in which this paper had some warping. The Strathmore brand worked well with these markers. I also tried the blender pen in this project. I did not see any blending. It was the water brush that made the pigment blend. I will try this blender pen with the Karin marker on a different paper.

Back to the project, I fussy cut the image leaving a white border around it. I partially stamped the angel pig image on a heavy weight Clearprint Vellum using Versamark ink. I made sure I got a good impression of the wings. I embossed the wings with Wow! Midas Touch embossing powder. I fussy cut the wings leaving a small border on the outer border of the wings. I cut the wings next to the embossed lines where the wings meet the pig's body.


I die cut some clouds on Grafix Platinum Vellum. I used a sticker maker to add adhesive to these clouds and to the wings. I adhered the wings to the pig. I colored the wings and the letters with Nuvo Aqua Shimmer Glitter Gloss. I adhered the clouds to the letter board panel. I applied an action mini wobble spring to the back of the pig. I adhered this to the letter board panel.

I created a frame for the letter board panel using a white card stock. I adhered this to a top folding white A2 note card.

Here is a short video showing the wobbler in action.


Thank you for visiting my blog. Have a SAFE, blessed, brilliant and creative day!

Maria Giselle B.

I am sharing this creation at


Friday, March 27, 2020

Floating Image Birthday Card


Hello! I created this card to participate in Newton's Nook Inky Paws Challenge. After seeing the colors for this challenge, all I can think of are unicorns and mermaids. Good thing, I have this stamp in my stash!

I stamped the image from Newton's Nook Purr-maid Newton stamp set on Canson water color paper using Versafine Onyx Black ink. I colored the image with Gansai Tambi water color, mixing colors on a palette to make the color more pastel. My inspiration in coloring this cat is my sister's black kitten, Pikit, which means eyes closed in Filipino. Very appropriate, I can say, since the image has its eyes closed, too. I fussy cut the image, leaving a white border around it.

Working on the front panel, I embossed a 110 lb. white card stock with an embossing folder. I wanted the raised impression to resist the ink blending that I will be doing. To do this, I first treated the panel with an anti-static pouch. I traced the lines with a glue pen. I poured Wow! White Pearl embossing powder to the area. I heat set this after. I did these steps about three times. I did not want the glue to dry out and not have the embossing powder stick to it. I also made sure the heat gun was heated enough before zapping the powder, moving the heat gun so it does not melt the area with the already melted powder. 

I die cut an oval window at the center using Hero Arts Nesting Die. I also created a frame on a white card stock. I taped a transparent thread to the back of the mermaid cat. I adhered the ends of the thread to the back of the window panel. I adhered this in a way that it will be able to shake enough inside the oval window. I adhered this window panel to a yellow Lawn Fawn Rainbow Scallops 6x6 patterned paper with foam tape.


For the sentiment, I heat embossed the sentiment from Newton's Nook Newton Loves Cake stamp set on a pink card stock. I used Versafine Onxy Black ink for the ink and clear embossing powder. I trimmed this to a rectangle and adhered it to the bottom of the window. I added some Pretty Pink Posh gems for some bling.

I created a short video to show how this floating image shakes. 


Thank you for visiting my blog! Have a SAFE, blessed, brilliant and creative day!

Maria Giselle B.

I am sharing this creation at


Thursday, March 26, 2020

Easter Egg Stitched Decor


Hello! I have always wanted to use this Sitched Alphabet die from Stamp Market since I bought it but I seem not to be able to find the right project for it. Easter is coming, so I thought about finally using this die in.

I die cut the Easter egg on Neenah Dessert Storm card stock. The Easter egg die is from Paper Smooches Easter Eggs dies set. I then positioned the alphabet die on the center of the egg, slightly more to the bottom. I secured this with a washi tape, then ran it through the die cut machine. This will make holes on the card stock, perfect for stitching. I repeated this process on the rest of the eggs to spell out the word Easter.

I cross stitched the letters using DMC floss I have in my stash. I doubled the 6-strand for extra thickness. You don't have to do it this way. I just thought of doing it this way since the holes are big enough to accommodate the 12-strand.

Once I am done stitching, I inked the edges of the egg with Tim Holtz Distress Oxide inks. I matched the thread colors with whatever oxide inks I have. I flicked some Finetec Gold watercolor to the inked area. I set this aside to dry.

I die cut the ribbon using papers from my scrap stash, matching the color of the paper with the color of the thread. I used a scraper to curl the ribbon die cut. I adhered the ends of the ribbon with Gina K Connect glue, clipping the seam with a tweezer while I work on the next ribbon. I repeated this process until I am done creating this 3-part bow. I adhered this to the top of the egg.


I die cut another set of kraft card stock using the egg die. I adhered this to the back of the stitched eggs to cover the stitching. I clipped this on a white crochet thread using mini clothes pins.


What's so funny is while I was showing this to my sister through Facetime, she was able to create a new word from Easter by jumbling the letters. She actually formed her name, Teresa. What a way, sis! At least, this decor is not limited to Easter only. I can give it to you for a whole year round personalized decor.

Thank you for visiting my blog. Have a SAFE, blessed, brilliant and creative day!

Maria Giselle B.

I am sharing this creation at


Friday, March 20, 2020

Clean and Simple Shimmery Focal Point


Hello! I created this card to participate in the Pinkfresh Studio March Challenge. I am using a technique I've used on a previous card I've created (Using Negative Die Cuts to Create New Cards) in which I used double sided adhesive and glitter to the recessed areas of the die cut.

I am using the one of the dies in the Pinkfresh Floral Squares die set. I am using colors from the color challenge inspiration. I had to do a bit of die cut surgery to create a colored die cut. You may just cut this die on a white color card stock and color the elements with a marker instead of die cutting the elements on different colored card stocks. For the back panel, I placed a double sided adhesive tape on a blue cardstock. Without removing the release paper on top, I positioned the floral square die on top of the release paper and ran this through the die cut machine. The die only cuts up to the adhesive layer, and it leaves a embossed impression on the card stock layer. Using a craft knife, I carefully removed the release paper on the areas where I will be applying glitter. I poured Elizabeth Craft Designs Cool Diamond Silk Microfine Glitter over this. After I poured off the excess. I burnish the glitter with my finger and wipe off the excess with a Swiffer cloth. I continued to remove the rest of the release paper, adhering the stem and the frame. With the flowers and petals, I wanted glitter on the petals so I did the same technique as I did on the blue background. I adhered the petals first before adhering the flower.


I added yellow flock to the flower center. I applied liquid glue to the center of the flower. I poured the flock to this area. I pressed the flock to the glue, then set it to dry. Do you remember this old embellishment? Do you still have a flock in your stash.

For the card panel, I am using a top folding white A2 note card. I embossed the front of the card using a Li'l Inker Design Quilted Stitched Pattern Die. I spritz Prima Cotton Candy Color Blooms to this embossed area.

For the sentiment, I embossed a sentiment from the Pinkfresh Studio My Favorite Things To Say stamp set. I used the same colored card stock I used for the frame.

I adhered the flower frame and the sentiment to the center of the note card.

Thank you for viewing my blog. Have a blessed, brilliant and creative day!

Maria Giselle B.

I am sharing this creation at


Thursday, March 19, 2020

Home Themed Card


Hello! This is a very timely card with the social distancing being encouraged to control the spread of CoVid 19. I hope you are safe, wherever you are. 

I am using Pebbles This Is Family collection for this card. My previous post entitled Sketch Inspired Srapbook Lay Out features this collection too. 

I trimmed the house patterned paper to 5 1/2" x 4 1/4". I colored the houses with Akashiya Sai watercolor brush pens. I colored these houses using the colors on the sentiment as a guide. This sentiment is cut from one of the patterned papers. Although there are other elements in this collection that has the same sentiment, I like the font and size of this sentiment. 

I looked through the ephemera pack and found these two house shaped sentiment die cuts. There are only two house die cuts in the ephemera pack. To keep up with the rule of three's, I created a third house by tracing the skinny house on a white card stock. I covered the back part of this white card stock with washi tape. I cut the house by following the pencil lines. I added a goid foiled sticker to the center of the house.


I traced the letters on the sentiment with a We R Memory Keepers Quill Glue, poured clear embossing powder to it, then heat set it. I applied some shimmer to the hearts using a clear Nuvo Aqua Shimmer Glitter pen.


To mute down the colored background, I cut a 5 1/2" x 4 1/4" vellum. To create a ground for the houses, I adhered the copper colored washi tape to a scrap strip of card stock. I added texture to this washi strip by running it through the crimper tool. I have not used this tool for a really long time. Do you still have yours?

I adhered the vellum panel to the water colored patterned paper by applying adhesive to the back of the embellishments. This hides the adhesive and secures the vellum to the water colored patterned paper. 

Thank you for visiting my blog. Have a blessed, brilliant and creative day! Stay safe!

Maria Giselle B.

Sketch Inspired Scrapbook Lay Out


Hello! I created this lay out to participate in a blog challenge. I did not meet the deadline, and I did not want the idea to be put to waste so I just went ahead and pursued the project. After all, a scrapbook lay out is for keeping. I used the sketch below from Freshly Made Sketches. For me, having a sketch is helpful in providing some direction on the creation process. I sometimes sketch ideas before I create. I also write in my sketch what material and what technique I plan to use on a part of the sketch.


I created a collage of my sons' photos. I am using Pebbles This Is Family Collection for this lay out. I usually go through the patterned papers in the collection. I got excited to see that there are two colors of the same diagonal pattern which I used in this lay out.

I then look at the ephemera pack. I will try out the ephemera I chose on the lay out until I find the one that works well with the lay out.

After this, I work on the title lay out. I have chosen more ephemera pieces for the title but a lay out title can be made of stickers, die cuts or cut apart from patterned papers.


Now, it is time to add details where ever I can but before I undo the arrangement, I take a photo of it to guide me when I put the lay out elements all back together.

Strips of sentiment washi tape from the same collection adhered around the lay out creates an illusion that the lay out has a matte.

It is very fulfilling to finish a scrapbook lay out since I don't usually make a lot of it.

Thank you for visiting my blog. Have a blessed, brilliant and creative day!

Maria Giselle B.


I am sharing this creation at


Monday, March 16, 2020

Flower Spring Card


Hello! I am the author of today's challenge at Incy Wincy Designs Challenge Blog. Being blog author, our very nice blog moderator, Hev, allows us to come up with our own blog challenge theme. I chose a spring theme challenge. According to Google, spring officially starts on March 20. I like spring because it is when the flowers start to bloom. It is also the time to work on the garden. What I don't like about spring is the allergies. 

Our sponsor for this challenge is Fabrika Fantasy. Their images come with an uncolored and colored option. So, if you are not into coloring or not in the mood to color, and yet, you need to create a card, the colored image option is always a go to option.

I printed the image on Neenah Solar White cardstock. I colored the image with Copic marker. There is not a lot of shading required for this image since the spaces are small in most areas. I added a few details here and there. You can see some of these details on the photo below. 

I blended Tim Holtz Distress Oxide to the background using a small Picket Fence Life Changing Brush which I really like when adding color to the background. These brushes allow me to skip the step of creating a mask just to blend in some colors. It also adds some texture to the background.

I created a frame using the Pretty Pink Posh Scallop Frames dies. This frame die create a rectangular frame so I partially die cut the yellow card stock to create a customized square frame for the digital image.


For the panel, I trimmed a light blue card stock to a 4 1/4" x 5 1/2" panel. I have this paper pad with intricately die cut card stock which I bought from Michael's a while back. I sprayed a mint flowered panel with a shimmer spray then dried it with a heat gun. I adhered this to the blue panel using liquid adhesive. I trimmed off the excess. I could have added more layers but I didn't think about this until I was almost done with the card.


For the sentiment, I used the Lawn Fawn Ready, Set, Shake stamp set. I straightened this clear stamp, since it comes slightly curved. I stamped this using an orange dye ink, with the last inking using Versamark ink. I poured clear embossing powder to this then heat set it. I cut this into a strip using Avery Elle Simple Sentiments Elle-ments. I die cut a couple more strips using white card stock. I blended a yellow ink on the embossed sentiment. I stacked the strips on top each other to create dimension. I cut off any excess. I adhered this to the front panel. I added flower sequins to the sides of the sentiments.

Thank you for visiting my blog. Be safe out there. Try and find pleasure in the limited things we can do right now. Have a blessed, brilliant and creative day!

Maria Giselle B.

Monday, March 2, 2020

Zig Clean Color Marker and Finetec Gold Watercolor Colored Goldfish

Hello! We have a new challenge at Incy Wincy Designs. Our challenge is on Hand Coloured Images. I prefer coloring my images except if the challenge sponsor only provides pre-colored images. Our sponsor for this challenge is Beccy's Place. I printed the image on Canson watercolor paper. I printed the fish twice, one larger than the other. I was going to use both of it on a card but my design went on a different direction, making me end up with two cards. Not too bad, right?

I colored the fish using Zig Clean Color markers and adding Finetec Gold watercolor. I fussy cut the fish, leaving a white border around it.


For the first card, I created a fish bowl scene using the Cricut Design Space. I blended inks to the greenery. I spritz some shimmer spray to the blue background paper. I embossed Hero Arts Sand embossing powder to the fish bowl ground. I created a shaped card using the CDS. I heat embossed the sentiment on a cloud bubble sticker. I added Ranger Enamel Accents for the dots of the speech bubble.


For the second card, I blended ink on the negative cut created on my first card with the fish bowl cut. I splattered water then picked it up with a paper towel to create water droplets. I embossed a white shimmer card with an embossing folder. I added a wooden embellishment for a sentiment which I backed with a black shimmered card stock just to make the letters pop.

I enjoyed creating these two cards. I enjoyed coloring the fish. I also enjoyed looking through my stash and using products that I rarely use these days (the sticker and the wooden embellishment).

Thank you for visiting my blog. I hope to see your hand colored images at the challenge blog. Have a blessed, brilliant and creative day!

Maria Giselle B.


I am sharing the first created card at


I am sharing the second created card at