Showing posts with label Pebbles. Show all posts

Monday, December 23, 2024

Last Minute Christmas Cards

Hello! Welcome back to my blog. We are really close to Christmas with only 2 days left. I want to share my last minute Christmas cards created and mailed.


This card was created upon a friend's request. The idea of this card is to highlight several Christmas greetings in different languages specifically Tagalog (Filipino), Italian and English. My friend who requested this card is Filipino, and she will give this card to an Italian couple.


The techniques I used on this card are: 
  1. Stamping with markers
  2. Selective heat embossing
  3. Masking
  4. Ink blending

When you are on a time crunch, one of the easiest method of creating multiple cards is using a patterned paper line and making use of the cut-apart sheet. I used an old Pebbles paper collection on the above cards. Usually the papers in a collection complement each other so it easy to mix and match. You can also use cardstock that matches a color on the patterned paper. You can go simple by just using the paper in the collection or you can go beyond that by adding embellishments, using cutting dies, using an embossing folder, etc. The sky is the limit.


I hope you like today's cards. I hope you have a Merry Christmas. Enjoy the season!

Maria Giselle B.

I am sharing this project at


Friday, May 19, 2023

Sketch Inspired Christmas Card

Hello! Welcome back to my blog. I created this card to join several blog challenges which I linked below. I also included the inspiration sketch at the bottom of this post. The paper products I used for this card is from Pebbles. 


The cup was created using a freebie die from Trinity Stamps. I love this die because it die cuts the cup outline leaving you with negative cuts that you can either not use or use and inlay it back to the outline cup. The negative pieces that I inlaid to the outline cup are washi tapes from the Pebbles paper collection. I adhered this to a white cardstock before strategically die cutting it using the outline cup die. I pieced it back to the outline cup securing it with transparent tape on the back. 

The poinsettia and candy canes are stickers from the paper collection. I adhered it to a white cardstock before fussy cutting it.

The bows were cut on gold mirror cardstock using dies from Waffle Flower.

I really enjoyed creating this card since I was able to use some of my craft stash stickers. I look forward to using more of my patterned paper stash.

Have a blessed, brilliant and creative day!

Maria Giselle B.

I am sharing this creation at


Monday, August 1, 2022

Monochromatic Holiday Card


Hello! Welcome to another challenge @ Incy Wincy Designs. The themes for this month are Food and Drink +/or Monochrome. Our challenge sponsor is Limited Runs. The image I used on this card is linked below. 

I printed the image on watercolor cardstock. I colored the image with Tim Holtz Distress inks. 

I created a stitched framed for the image by first, partially die cutting two frames from the Altenew String Art Rectangle die set to create a pierced square panel. To make this into a frame, I cut off the center using a craft knife to create a window. 

Using DMC floss, I sewn a zigzag pattern on the frame using two brown flosses for some contrast. 

I embossed a sentiment on the the watercolored panel with a Ranger Copper embossing powder. I blended some Tim Holtz Distress ink in Tea Dye on the sides of the cup to dull the bright white of the watercolor paper.

I adhered the frame to this and cut off any excess.

For the background panel, I cut a typing paper at 5 1/2" x 4 1/4". I adhered two kraft patterned papers from Pebbles to this. 

I adhered the stitched focal point to the patterned paper panel.


Thank you for visiting my blog. I hope you join us in this month's challenge. Have a blessed, brilliant and creative day.

Maria Giselle B.


I am sharing this creation at


Saturday, May 21, 2022

Sketch Inspired Christmas Card (Craft My Stash #22)


Hello! Welcome back to my Craft My Stash series in which I feature my oldie but goodie craft products. It has been a long time since I last added a post in this series. I am just so glad to get back on the swing of things.

I also created this card for the following reasons:

  • To join in the Caffeinated Christmas Card Challenge on Flowers.
  • To join in My Favorite Stamps Sketch Challenge. 
  • To join Simon Says Monday Challenge on Add Texture.
I started off by choosing my patterned papers from Pebbles Merry Merry paper pad. I die cut a brown patterned paper using the MFT Die-namics Mason Jar Mug. I have scraps of mason jar mug die cuts which I adhered to the back of the brown mason jar mug die cut for some dimension. I inked the edges with a brown dye ink. I keep those scraps inside the die sleeve. You never know when it can come in handy.

I snipped a part of the cut apart paper from the same paper pad. I trimmed off a part of the edges and rounded the corners to make it fit the mason jar. I applied shimmer to some of the flowers using clear Spectrum Noir shimmer pen.

For the panel, I trimmed a dotted green patterned paper from the paper pack into 4 1/4". The length does not really matter because I will die cut a stitched curved line into this using the Mama Elephant Borderline Trios Creative Cuts. For the background panel, I trimmed a green cardstock to 4 1/4" x 5 1/2". I am trying out Jennifer McGuire's technique on Adding Color with Embossing Folder but I only have Perfect Pearl to use so there is not much of an impact to the embossed panel other than adding shimmer to some areas. I adhered the curved patterned paper to the top left of this panel.

For the poinsettia, I die cut this on red pearl cardstock using Paper Smooches Merry Motif die set. I secured the die cut to the negative cut with tape. I stamped the matching image to the die cut using a red dye ink. Since the paper is glossy, I stamped it several times for a darker impression. I set this aside to dry. For the leaf, I die cut this on green pearl cardstock using Concord & 9th Lace Leaf die set. I stamped the matching leaf on this using a darker colored green ink. I set this aside to dry.

For the sentiment, I got inspired by a Pebbles glittered sticker sheet so I re-created this using the Mama Elephant In Line Letters stamp set. I used the Misti Stamping Tool so I can re-stamp the letters just in case I did not get a good impression the first time I stamp it. I stamped the letters on white cardstock using Versamark ink. I poured Ranger Red Tinsel embossing powder to the letter, then heat embossed it. I fussy cut the letters, leaving a small white border around it.

For the sub-sentiment, I heat embossed this on white cardstock using white embossing powder. The stamp is from Mama Elephant Happy Everything stamp set. I trimmed this into a skinny strip.

I adhered the mason jar to the center of the panel, a little more to the top to leave space on the bottom for the sentiment. I adhered the poinsettia and leaves next to the mason jar, tucking some of it under the mason jar. I adhered the letters next, using the dot embossing as a guide in lining it up straight. I adhered the sentiment strip after. I zhuzh the flowers and the leaves for some dimension.


Thank you for visiting my blog. I hope you have a blessed, brilliant and creative day!

Maria Giselle B.

I am sharing this creation at


Saturday, February 12, 2022

Valentine's Class Giveaway


Hello! Welcome back to my blog. For today's post, I am featuring my 4th Grader's Valentine's giveaway. It is a goodie bag created with papers and stickers from Paper Source.


The goodie bag was created using the We R Memory Keepers Goodie Bag Guide. I added an embossed belly band on the goodie bag. I added heart embossing using the We R Memory Keepers Next Level Hearts embossing folder. I used a Pebbles' Cut-Apart sheet for the Valentine's cards. I die cut this with a stitched rectangle die. I was not able to show it in the photos, but Ryan signed the cards using the We R Memory Keepers Foil Quill Freestyle Pen. This is such a good way to use up those foil scraps as long as the foil is compatible with the pen. 

I stamped the heart stickers using a Martha Stewart Alphabet Rubber stamp. I used Stazon ink for the stamping. 

Thank you for visiting my blog. Have a blessed, brilliant and creative day!
Maria Giselle B.

I am sharing this creation at


Saturday, December 11, 2021

Recipe Challenge Inspired Greeting Card (Craft My Stash #20)


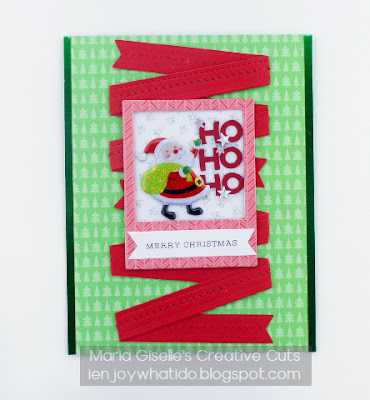
Hello! Welcome back to my blog and to another Craft My Stash post. I created this card to join in one of Scrapbook & Cards Winter Issue Challenges. I love to join their challenges.

For this card, I am using products from Lawn Fawn, Pebbles and some Christmas stickers that has been in my stash for some time now.

There are four recipes to the challenge: a 6x6 paper pad, stickers, chipboard frames and a metal die. 

I created a chipboard frame by stacking six polaroid frame die cuts. The polaroid frame die is from the Lawn Fawn Selfie Frames die set. The top layer is paper from the LF Snow Day Remix 6x6 paper pad, which is the paper pad I am using on this card to complete the recipe.


I added a layer of vellum on top of the background to mute the pattern of the paper. I adhered a Santa Claus puffy sticker and the Ho, ho, ho sentiment to this panel. I fussy cut the Ho, ho, ho since the sticker came with a horizontal orientation. I want it to go downward so it will fit inside the window. 

I die cut a red cardstock using the longest banner die from the LF Fancy Folded Banners die set. I die cut the banner four times and connected two of the banners. I ran this again through the die cutting machine to add details to it using the LF Stitched Borders die. 

For the card panel, I trimmed one of the patterned papers at 4 1/4" x 5 1/2". I trimmed off a sliver from each side before adhering this to a green top folding A2 notecard. I adhered an eighth of an inch of green mirror cardstock to each side. 

I adhered the banner on the center. I adhered the polaroid frame over this. 

For the sentiment, I took one of the stickers from the Pebbles Merry Little Christmas mini sticker book and adhered it to a cardstock. I trimmed off the excess and cut this into a fishtail banner. I adhered this to the polaroid frame.

Thank you for visiting my blog. Have a blessed, brilliant and creative day!

Maria Giselle B.

I am sharing this creation at


Wednesday, March 17, 2021

Weaved Washi Tape Greeting Card (Craft My Stash #14)

Hello! Welcome back to another Craft My Stash post. Today, I am featuring the Pebbles This Is Family Collection and The Stamp Market Weaving Cards Die.

I die cut a heavy weight cardstock using the smallest die in the set. I added a white crochet thread for weaving.


I adhered the washi tape to strips of cardstock for some stability as I weave it through the crochet thread. Some washi tapes are translucent. It will pick up the color of the paper you decide to use as backing. You can appreciate this on the above heart. I used one washi tape but backed it with a patterned paper and two different colored cardstock strips. I weaved these strips through the crochet thread. 


I trimmed several patterned papers from the collection into 4" x 5 1/4". I die cut a heart window on these panels using a die from the Hero Arts Nesting Hearts Infinity Dies. 

I trimmed several colored cardstocks to matte the window panel. I temporarily taped the weaved washi tape on the heart window front. I added foam tapes around the weaved washi tape. I added liquid adhesive to the back of the weaved washi. I positioned this on the colored cardstock panel and pressed the weaved washi to it. Now, I can remove the backing of the foam adhesive and adhere it to the colored cardstock making sure it is on the right spot. 

I adhered sentiment banners from the coordinating ephemera set to the front panel. 

I adhered this to a top folding note card. 

Thank you for visiting my blog. Have a blessed, brilliant and creative day!

Maria Giselle B.

Saturday, November 28, 2020

Scrapbook Lay Out Using A Card Kit (Craft My Stash #7)


Hello! Are you a card kit subscriber? I am always tempted to subscribe to a card kit but I have fears of not being able to commit to it that I end up with months of untouched supplies. I have purchased maybe two card kits in my whole crafting life. The one I am using here is a Simon Says Stamps card kit that I have managed to keep in its original box except for the stamp set, which I have already used and placed it together with my other stamp sets. This is what I am featuring in this Craft My Stash post.

I have a Hallmark photo album and I ran out of the clear page protectors. I am left with the magnetic album refills which is standard to the photo album when I bought the album. The magnetic album refill measures 9" x 12". I trimmed my cardstock to 8 3/4" x 11 3/4" so I have some space to adhere the protective film to the magnetic sheet. The only setback with using magnetic album refills in scrapbooking is that adding dimension to the lay out can be a challenge when replacing the clear plastic film to the magnet. 

My photos are 3" x 4". The paper that comes with the kit is a 6x6 patterned paper pad from Pebbles. Instead of matting the photos with two different patterned papers, I cut a 6x6 patterned paper into half diagonally. I adhered each triangular half to a corner of a photo. 

Below are more close-up photos of the lay out and a brief description of the cluster of embellishments.

These strips are originally sized at 3" x 3" and a part of a cut apart sheet. Using a craft knife, I carefully cut the sentiments to create these strips.

I die cut another cut apart sheet using a Simon Says Stamp This Is The Life Frames cut die which cuts both the label and the outline frame. Since this sentiment is my main sentiment for this lay out, to make it stand out, I die cut a solid green cardstock for the outline frame. 

The card kit comes with these leaf sequins which I tucked underneath a gold foiled butterfly sticker that is also in the kit. I die cut a green cardstock using a scallop edged die from the Mama Elephant Borderline Trios Creative Cuts.

The numbers in this photo are a part of an alphabet/number patterned paper sheet which can be used as is or use the numbers to highlight a year.

I added a bit of journaling to complete the memory. I really enjoyed creating another scrapbook lay out that I can add to my album. I should really do more of this. I just need to learn how to print my photos in a smaller scale using my printer.

Thank you for visiting my blog. Have a blessed, brilliant and creative day!

Maria Giselle B.


Monday, November 16, 2020

Christmas Gift Card Holder Tag


Hello! We have a new challenge at Incy Wincy Designs Challenge Blog. The theme for this challenge is Pockets Or Tags. I created a two in one for this challenge, a pocket and tag in one. 

My patterned paper is from Pebbles Merry, Merry collection. I die cut a tag using solid green and dotted green patterned papers from the collection. The tag die is from Avery Elle A Tag For All Elle-ments die. I partially die cut the green paper which will serve as the pocket. Since I cut off the top portion of the tag, I lost the stitching detail on that end of the rectangle. To add stitching to this end, I positioned this end on the rectangle edge of the die then ran it again through the die cut machine. 

I embellished this panel first before assembling it into a pocket. I heat embossed the sentiments using Simon Says Stamp Believe stamp set. I have not used these stamp sentiments before. I did not notice that these two sentiment stamps have a defect on it. The 'e' on the believe and the 'h' on the small 'the' and 'Christmas' are not the same height as the rest of the letters. So no matter how much re-stamping I did using the Misti, these parts of the sentiment won't leave an inked impression. To connect the letters, I used a Versamark pen on the bold sentiment. I am not good at lettering so my first try in fixing this letterdid not turn out well. For the thin lettered sentiments, the Versamark pen will not work due to its broad tip. So I used a .5 gold gel pen to write the missing parts of the letter h, then poured the same embossing powder to it. The embossing powder I am using is Wow! Metallic Gold Rich Embossing Powder.

I spritz this panel and also added splatters of gold using Prima Color Bloom Tea Stain Spray Mist. I used the corner of a paper tower to pick up the excess ink and set this aside to dry. 


The image I used is from SheepSki Designs. I printed this on kraft cardstock and colored it with Faber-Castell Polychromos. I fussy cut the image leaving a small border around it. I added details to the snow hat with a red Spectrum Noir Sparkle pen, clear Spetrum Noir Sparkle pen and Wow! White Puff Powder embossing powder. For the eyes, I added white Sakura gel pen and black Sakura Glaze pen. For the nose, I added white Sakura gel pen to the two reindeers on the side, and black Sakura Glaze pen with red Stickles to the dog at the middle. I adhered this to the panel with foam adhesive. 

I die cut another patterned paper from the paper pack using Avery Elle Pierced Mat Elle-ments die. I also die cut a white cardstock using this die. I used the We R Memory Keepers Envelope Notch punch to add slots to insert a gift card. On the white cardstock, I stamped the 'to' and 'from' using Tsukineko Delicata Golden Glitz pigment ink. These stamps are from Paper Smooches Merry Motifs stamp set. I set this aside to dry before adhering it to the back of the red striped patterned paper making sure I avoid putting adhesive on the slots. 


I die cut an extra tag using a green cardstock. I adhered this to the back of the dotted patterned paper to make the tag sturdy. I adhered the panel for the pocket to the front of the tag. I placed extra adhesive to the bottom of this pocket to act as a stopper and allow the gift card holder to show on the front.

I added a kraft hole reinforcer on the tag using a die from Paper Smooches Toppers die set then added a ribbon from my stash. 


Thank you for visiting my blog. I hope to see your creations at the challenge blog. Have a blessed brilliant and creative day!

Maria Giselle B.


I am sharing this creation at