Saturday, February 24, 2024

Create a Panel Using Left-over Die Cuts


Hello! Welcome back to my blog. I have a lot of square negative die cuts from a plaid die. I was using that die a lot so I accumulated all of this square die cuts which I decided to keep for later use. 

I trimmed a typing paper at 5 1/2" x 4 1/4" to use as a back panel for the square die cuts. I grouped my square die cuts by color and pattern to give me an idea on how much squares I have for each color and pattern. I used an L-ruler to help with the alignment of the squares while I start building the pattern of squares from a corner. I made sure that the alike colors are not too close to each other. I used a liquid glue to adhere the squares to the typing paper. I left this panel aside while the glue dries with something heavy placed on top of it. 

I treated this tiled panel with an anti-static tool. Using the Misti Stamping Tool, I stamped the Blank Page Muse Floral Spray Sunflowers Chrysanthemum Line Art rubber stamp to the tiled panel using Wow! Embossing ink. Since this is a large stamp, I pressed the stamp to the paper with enough pressure so as to transfer the sticky ink to the tiled panel. The Misti Stamping Tool is very helpful with this step. I was able to re-stamp the image a couple of times until I was able to get the whole image stamped. 

In between stamping, I poured glittery black embossing powder to the sticky ink. I heat set the powder making sure I move the heat gun while melting the powder to avoid flattening the already melted powder. 


I created a frame for the panel using a fringe scalloped rectangle die and a rectangle die. I cut strips of purple cardstock and adhered this to the back of the frame. This color will show thru the fringes when the fringes are lifted up. 


I created a sentiment strip by heat embossing the sentiment on the same red cardstock I used for the frame. I trimmed this off into a strip and adhered it to the tiled panel.

I adhered the frame to the tiled panel, then adhered this to a 5 1/2" x 4 1/4" red cardstock. 


I hope you like today's card. Thank you for visiting my blog. Have a blessed, brilliant and creative day!

Maria Giselle B.

Blank Page Muse is generously offering a 15% discount to their online store to YOU, my blog readers. Just use the code BPMMaria when you check out. Enjoy!


Sunday, February 18, 2024

Another Stitched Card


Hello! Welcome back to my blog. Today's card is another stitched card. I would like to thank @shannon.christine.designs for sharing this pattern in her IG account. 

I stitched the design on a light gray cardstock. I used the Waffle Flower Piercing Panel die to add holes for stitching. I used two strands of DMC floss for stitching. I substituted some of the colors so I can use a floss from my stash. 


Somehow the white stitching does not show really well on the gray cardstock. I only noticed this after I am done with all of the stitching. I did not want to undo the white stitching because of the risk of ripping the paper. I did not want to pitch the stitched panel after all that hard work. To try and save it, I outlined the white stitching with a light pink DMC floss. It looks much better.


To create this into a card, I trimmed a patterned paper to 4 1/4" x 5 1/2". I die cut a square window at the center. I added pierced details to this panel using The Greetery Aida Cloth texture plate. 

I adhered a patterned washi tape to the stitched panel to frame it for a pop of color. I adhered the window patterned paper to the stitched panel. 

To take this project up a notch, I blanket stitched the edges. Some of the holes are very close to the edge of the paper that it ripped during stitching. You can notice this on the top border of the window panel where there are uneven blanket stitches.


I hope you like today's project. Thank you for visiting my blog. Have a blessed, brilliant and creative day!

Maria Giselle B.

I am sharing this creation at


Inspired by the XOXO.


Sunday, February 11, 2024

Card & Envelope Set Using Digital Printed Paper (Series 3)


Hello! Welcome back to my blog. I created a card and envelope set using the Blank Page Muse Digital Page with Small Calendar and Versatile Love-themed Images 2024 February Pam Bray Designs on my card. This is a very affordable digital download which includes paper pattern strips and ephemera that you can resize based on your crafting need. 


Isn't this gnome adorable? I fussy cut the gnome leaving a thin white margin around it. You can further embellish the images by doodling on it and adding shimmer to it. I added Ranger Glossy Accents to the heart held by the gnome.


You can easily mix and match the elements of the digital download. I layered several ephemera. I altered the heart wreath by cutting off the sentiment attached to it. 


Best of all, you can use items from your craft stash with this digital download. I used a rotating stamp to add more sentiments to the card panel. I adhered tiny heart sequins to the heart wreath. I used a Martha Stewart heart punch to add a trim to the top and bottom edges of the panel.

The matching envelope, which you will appreciate more on the video below, was created using the paper strips included in the digital download. I cropped the patterns and resized it so I can die cut the patterns using The Stamp Market A2 Standard Envelope die. 


I hope you like today's project. Below are links to the other two sets I created using Blank Page Muse Digital Downloads. I hope you check it out.


Thank you for visiting my blog. Have a blessed, brilliant and creative day!

Maria Giselle B.

Blank Page Muse is generously offering a 15% discount to their online store to YOU, my blog readers. Just use the code BPMMaria when you check out. Enjoy!

I am sharing this creation at


Inspired by the XOXO.


Friday, February 9, 2024

Spotlight Stitching


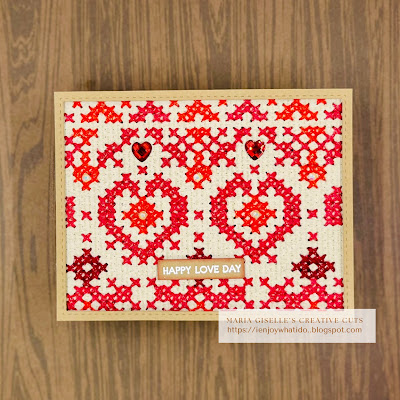
Hello! Welcome back to my blog. I am in constant search for cross stitching patterns that I can use on paper with my stitching dies. One of my resources is the DMC website. Most of their patterns are large scaled ones like the one I used on my card (Heart). To be able to stitch it on my card panel, I marked the center of the cross stitching pattern. I counted the squares from the center going left, going right, going up and going down to cover the number of squares my stitching die created. The stitching die I am using is from The Greetery Aida Cloth texture plate.

I used the recommended embroidery floss for the project, the DMC Mouline, which is absolutely gorgeous because of the glittery addition to the project. Too bad, the photos are unable to capture the sparkle of the embroidery floss. 


I created a frame for the stitched panel to cover the edges that have no stitching on it. The next time I use this texture plate, I plan to cut the card base larger than 5 1/2" x 4 1/4" so I can maximize the stitching on this panel. 

I added a simple sentiment so that the focus will remain on the stitching. 

I added gems to the panel for a bit of embellishment.


I hope you like today's project. Have a blessed, brilliant and creative day!

Maria Giselle B.

I am sharing this creation at


Thursday, February 8, 2024

Let's Flamingo! Shaker Card


Hello! Welcome back to my blog. I am up on the Blank Page Muse blog featuring the Flamingo Row Red Rubber Art stamps.

This stamp set comes on a 5" x 7" solid sheet. I cut off images that I used on this card from the stamp sheet. The red rubber stamp is unmounted. There are several techniques to stamp this unmounted red rubber stamp. The mounting techniques I used for this card are:
  • Using an acrylic block by spraying temporary adhesive to the back of the red rubber stamp. I used this technique in stamping the rows of flamingos. Not my preferred choice since the temporary spray adhesive left some residue to my acrylic block which I was not able to fully remove even with the use of adhesive removers.
  • Using a sticky mat and a Misti stamping tool. The sticky mat holds the red rubber stamp. I temporarily adhered the paper to the door of the Misti with a tape adhesive. This is my preferred technique since the temporary adhesive is easier to remove from the Misti. Best of all, there is an opportunity to re-stamp the image if needed.
I stamped the flamingos with a khaki colored dye ink. Coloring the row of flamingos can be overwhelming. To make the coloring easy and quick, I stamped the row of flamingos on a scrap cardstock. I fussy cut off some of the bodies of the flamingos to create a paper mask. I lined the opening to the flamingos, and blended the ink to this open space. 

I used color pencils for the beaks and legs. These are very small areas so coloring it wasn't not tedious at all. I used a black marker to add details to the eyes and the beaks.

For the larger flamingo, I did the same ink blending technique for some consistency in the coloring. I fussy cut the flamingo leaving a small border around it. 


I trimmed the flamingo panel to 5 1/4" x 4". I die cut a heart window on this panel. I also die cut a gold heart frame for the heart window. I positioned the flamingo on this heart window, adding adhesive to the areas that touch the panel. I adhered an acetate to the back of the panel. I added foam tape to the back of the panel. 

For the back panel, I trimmed a patterned paper at 5 1/2" x 4 1/4". I used a gel pen to add details to the wave print on the patterned paper. I poured several sequins to the area that will show through the heart window on the other panel.

I powdered the side of the foam adhesive lining the heart window. After I removed all the foam tape release paper, I adhered this window panel to the patterned paper. 

The sentiment I used is from the same stamp set. I heat embossed this using a blue embossing powder. I die cut the sentiments into strips using a die. I adhered this to the panel. Sine the sentiment strip is partly adhered to the acetate, I added a shorter piece of the sentiment strip to the back to make the sentiment strip leveled with the front panel. 

I hope you like today's project. Thank you for visiting my blog. Have a blessed, brilliant and creative day!

Maria Giselle B.

Blank Page Muse is generously offering a 15% discount to their online store to YOU, my blog readers. Just use the code BPMMaria when you check out. Enjoy!

I am sharing this creation at

Thursday, February 1, 2024

All Die Cut Card


Hello! Welcome back to my blog. We have a new challenge at Incy Wincy Designs. The theme for this month's challenge is/are Valentine/Love and/or No Pictures. I created an all die cut card.

I die cut the x and o's using dies from Sugar Pea Designs. It looks like a lot of work but the plus side of it is that I was able to use my scrap paper. 


The red cardstock back panel was cut at 5 1/2" x 4 1/4". I added detail to this panel using The Greetery Aida Cloth Texture plate. It is hard to appreciate this in the photos but in real life, the added texture adds some wow to the card.

I laid the die cut letters on the red cardstock panel. To keep the placement of the die cut letters intact, I used a Glad Press 'N Seal to pick up the letters from the panel. Most of it will stick to the Press 'N Seal. For the letters that fell off or did not stick, I just repositioned it to the space that I assigned it. I used a T-ruler to make sure the letters are adhered on a straight line. After I filled up the whole panel with the die cut letters, I set this aside to dry. I trimmed off any excess hanging over the red cardstock panel. 

For the main die cut sentiment, I stamped the heart from the Pretty Pink Posh Sparkle Dot Patterns 1 stamp set on a white cardstock. I poked holes on the dots created by the heart stamp. I added a chain stitch to the holes using a variegated DMC embroidery floss. I drew a line around the heart and cut the heart out using this line as a guide.


I die cut the letters using the Pretty Pink Posh Hugs coordinating die. I die cut this on white cardstock and on white glitter cardstock. I adhered the glitter letter die cut on the white letter die cut for some dimension. I adhered these letters and the stitched heart to the panel.

I adhered a ribbon die cut on the same white glitter cardstock, and a Pretty Pink Posh Cherry red pearl to the center of the stitched heart. 

I hope you like today's card, and I hope you join this month's challenge. Happy Valentine's everyone!

Have a blessed, brilliant and creative day!

Maria Giselle B.

I am sharing this creation at