Wednesday, December 29, 2021

Color Inspired New Year's Card


Hello! Welcome back! Today's post will be short and hopefully, sweet. I received several Christmas cards on the eve that I was not able to mail out response Christmas cards since I know that Christmas is over by the time they receive my card. So I worked on creating a Happy New Year's card. The colors are inspired by the latest Color Hues challenge. Although they are traditional Christmas colors, it does not mean you cannot use this color combination for other occasions. Changing up the shade of red and green makes a difference. 

Like a mentioned, this is a very short post. Let us all pray for a better year this 2022! Thank you for visiting my blog. Have a blessed, brilliant and creative day!

Maria Giselle B.

I am sharing this creation at


Papercrafter's A Year in Review 2021 Blog Hop & A Giveaway


Hello! If you are coming from Kate's blog, you are in the right path. I am one of the participants in a blog hop featuring our favorite creations this year. I am having a hard time choosing my favorites. I think it will be easier for me to choose my least favorite versus my favorite, so I went with my most visited blog posts. I have a brief description below of each project including the links to the blog post, in case you are interested on how I created it. Projects 1 to 4 have a short video clip to show off its interactive feature. I do hope you check it. Thank you, Ellie, for letting me be a part of this blog hop.


1. I created this Pop-Up Vase Card as a Mother's Day giveaway to my fellow co-worker moms. This is one of my favorites because I was able to re-create the vase using a scoreboard and a bone folder without needing a die that can cut this vase. 


2. I created this 3D Stand Up Shaker Paper Snow Globe to take part in one of my favorite challenge blogs, Lawnfawnatics. The challenge theme was All Things Ocean. If you look closely, the background of the shaker is cross-stitched, which is one of the favorite techniques that I like to incorporate to my projects.


3. I created this Pop-Up Mini Christmas Trees with the Pop-Up Vase Card as guide in creating it. I entered this project in the Lanwfawnatics Challenge on 3D Cards which successfully got cited as one of the Featured Fanatics for that challenge. 


4. Mama Elephant is one of my favorite stamp companies. I created this Christmas Tree Standing Pop Up Card to join in their Guest Designer Call. I did not make it but the journey in creating this is truly a joy. I also love coloring cats because it gives me an opportunity to color it using my sister's cats as models. These are not all her cats, just most of them over time since some of them already went to heaven.


5. Unlike the first four projects, this is the only non-interactive card that made it to my Top 5 Most Favorite and Viewed Post. I created this to join in Waffle Flower's Challenge on Greenery. I misunderstood the theme. I thought it was about anything green, explaining the color scheme. Only to find out that the theme is on Leaves. With this Mandala Inspired Greeting Card, I did a lot of die cut surgery to create the gradient of colors on the Mandala. 

I hope you like the projects that made it to my Top 5 List. Do you have any favorite/s? Leave a comment in my blog. A random commenter will win a $25 gift card from an online crafting store of your choice. Commenting closes on 1/5 0000 CST. The winner will be announced on or before 1/6 on a separate post.

Next stop in the blog hop is Misty. If you get lost on the hop, below is the complete list of participants:


Debbie - Blog: Secrets to Stamping
Ellie - Blog: Ellibelle's Corner
Helene - Blog: Mummylade
Kate - Blog: Small Bits of Paper
Maria Giselle - Blog: Maria Giselle's Creative Cuts
Misty - Blog: A Card a Day


Thank you for visiting my blog and to all your support. Have a blessed, brilliant and creative day!
Maria Giselle B.


Tuesday, December 21, 2021

Mood Board Inspired Nativity Greeting Card (Craft My Stash #21)


Hello! Welcome back to my blog and to another Craft My Stash post. For today, I am using an Authentique 6x6 Faith Collection paper pad and a Honey Bee Christ Is Born stamp set from my craft stash. 

I did a no-line coloring on the images. It has been a while since I did this technique. I am using Karin markers for the coloring. I stamped the image on watercolor paper using Tim Holtz Antique Linen Distress ink. I applied a light wash of color to the image before applying another layer of colors. When I use Karin markers, I usually pick the pigment from the palette so I have more control on the blending. I fussy cut the image, cutting the image right at its edge.

For the background, I concentrated on inking the house first using a black ink. I stamped this on one of the patterned papers on the pad. A Misti Stamping Tool is truly helpful when doing selective stamping. I stamped the buildings on the background using a dark brown dye ink. Using mini-cube inks work when you just want to ink a certain portion of a stamp.  I added Versamark ink to the stars and heat embossed this with white embossing powder. The bright star and rays were embossed using Wow! Metallic Gold Rich embossing powder. 

I blended Tim Holtz Gathered Twigs Distress ink to the panel. I wiped off the ink from the embossed stars and rays. 

For the ground, I selectively inked that area on the stamp. I stamped this on another patterned paper. I blended a Tim Holltz Distress Ground Expresso Ink on this. I fussy cut the ground. 

For the panel. I die cut another patterned paper from the pad using a stitched rectangle die. I like this patterned paper because it reminds me of the stained-glass windows in the church. 

I partially die cut the inked panel with an oval die. I trimmed the bottom part straight. This creates an arched panel.

For the sentiment, I heat embossed this on another patterned paper from the pack. The stamp is from Honey Bee Christmas Blessings stamp set. I used the same embossing powder. I trimmed the sentiment to size. I adhered this to a scrap piece of cardstock for some dimension. I trimmed off the excess.


I adhered the arched blended panel to the stitched panel. I glued the ground by lining it up with the lines on the bottom of the house. I adhered the sentiment on the bottom. I adhered the image with foam tape.

I also got my inspiration in creating this from the Scrapbook & Cards Winter Issue Mood Board Challenge. You can see the mood board below. I was inspired by the wooden theme that I created a wood inspired nativity scene. 

Thank you for visiting my blog. Have a blessed, brilliant and creative day!

Maria Giselle B.

I am sharing this creation at


Monday, December 20, 2021

Sketch & Colour Inspired Greeting Card


Hello! Welcome to a new and the last challenge for the year at Incy Wincy Designs. This time it is a sketch and color palette challenge. The colors are very similar to last challenge's colors, so if you still have your color supplies out, might as well use it for another card or creation for this challenge.

I printed the image on white cardstock. I colored the image using Copic markers, keeping the colors close to the colour palette as seen below.


For the sketch part, I rotated the sketch and did some modification. 

For the background panel, I blended several Tim Holtz Distress Oxide inks (Tattered Rose, Worn Lipstick and Wilted Violet), the colors of which were inspired by the colour palette. I used a Strathmore Bristol paper. I layered a gray Recollections Dahlia paper on top of it. I die cut this using a 4 1/4" x 5 1/2" rectangle die.

I die cut a light blue patterned paper using the Li'l Inkers Fringed Scalloped Rectangle die. I created this into a frame using a craft knife. I adhered a pink vellum on the back, carefully avoiding the fringed areas since I popped these fringes up. 

For the banner, I die cut a white crepe paper with a die from the Ellen Hutson Never Ending Fringe die set. I machine stitched the top with a silver thread. I trimmed a bit off these fringes to shorten it. 

For the sentiment, I heat embossed this on a gray cardstock strip using TH Distress Oxide Wilted Violet and clear embossing powder. The sentiment came as a one liner sentiment which I cut off in three parts after heat embossing it. I circle punched the plus sign and adhered it to one of the flower centers on the detailed cut background. 

I fussy cut the image leaving a small border around it. I added some Lawn Fawn Chunky glitter to the trim of the hat and the dress. I added a pompom to the tip of the hat. 


Assembling the card, I first adhered the stitched crepe fringed paper to the card panel. I next adhered the framed panel with skinny foam adhesive so it will not show through the popped-up fringe on the frame. I then adhered the image to the panel with foam adhesive. The sentiment strips were adhered to the top right corner. I added three pink gems near the sentiment strips to mimic the sketch. 

Thank you for visiting my blog. I hope you join our challenge. As we start the next year, there will be revisions on how the challenge will be conducted. Please visit the challenge blog for more details. At the same time, the DT will take a break so this challenge will run until the end of January giving you enough time to join. On behalf of the Incy Wincy DT, we all wish you a Merry Christmas and a Happy New Year!

Have a blessed, brilliant & creative day!
Maria Giselle B.


I am sharing this creation at

Sunday, December 19, 2021

Die Cuts As Background


Hello! Welcome back to my blog. I had so much fun creating the card on my previous blog post that I decided to make another card using die cuts for the background. This card was also inspired by the latest Lawnfawnatics challenge which is a sketch challenge.

I started off by die cutting the wreath from the Lawn Fawn Mini Wreath die set on three shades of green cardstock so I can layer it. While my die cutting machine is out, I also die cut the bows on red cardstock.

I layered each shade of the wreath die cut on top of each other. I flipped the middle layer, with the back side up so the leaves will be pointing the other direction. This side of the die cut is not smooth since my bottom cutting plate is all warped up. But it's alright. This gets hidden underneath the next wreath layer. 
 
I worked on the bows next. I used my tweezer to pinch the center of the bow for better adhesion while the glue is drying. After I assembled the bows, I added some sparkle to it with a shimmer pen. I adhered this to the wreath. I also added some Trinity Stamps gold baubles to the wreath.

For the card panel, I die cut a white cardstock with the LF Lattice Backdrop die. I die cut this twice. I adhered this on top of the other. I adhered this to a cream cardstock cut at 4 1/4" x 5 1/2".

For the sentiment, I heat embossed this on vellum using Wow! Gold embossing powder. The stamp is from the LF Christmas Offset Sayings Stamp set. I created this into a strip and created fishtail tips on each end of the sentiment strip. 


Assembling the card, I adhered the wreaths to the panel. I trimmed off the excess hanging over the side. I adhered the sentiment strip, adding some clear dimensional tape towards to ends of the banner.

Thank you for viewing my blog. Have a blessed, brilliant and creative day!
Maria Giselle B.

I am sharing this creation at


Saturday, December 18, 2021

Die Cuts As Background


Hello! This is my last month as a Trinity Ambassador. I don't want to end my term without creating another card to show off the Trinity Ambassador logo. It sure is a pleasure to be one of the Ambassadors. I would like to thank Taniesa for the opportunity. 
I also created this card to participate in the International Tea Day Guest Designer Search. I am using a cup die that I got as a freebie from Trinity Stamps which came with my order. I die cut several patterned papers using this die. The patterned papers came from a pack, so the colors and the designs coordinate really well with each other. 

I created my own heart stencil on vellum. I got this idea from Jennifer McGuire. It was such a good timing when I watched her video. I felt that I have something lacking on my card design and her idea actually filled that design void.


I inked the heart on the center of the cup using Tim Holtz Distress Oxide inks. I matched the color of the ink with the color of the cup. Since Distress Oxide inks tend to be wet for a while, I pounced some Ranger Perfect Pearl Powder on the heart. I also matched the color of the powder with the color of the ink. I rubbed off the excess powder around the heart using a Swiffer cloth. The heart is from the Trinity Stamps Frame and Fold Slimline Die Set. This set also comes with a heart die that does not cut the heart out but adds a heart shaped stitched impression on the paper. I carefully line this stitched heart die to the pearlized heart then ran it through the die cut machine. 

For the card panel, I trimmed a blue cardstock at 5 1/2" x 4 1/4". I stamped a text background to this using Avery Elle Silver Fox Pigment ink. I adhered the cup to this creating a pattern. I trimmed off an eighth of an inch on each side, making this into a 5 1/4" x 4" panel. I adhered this to a green cardstock cut at 5 1/2" x 4 1/4".

For the sentiment, I stamped this on the right lowermost cup using Tim Holtz Blueprint Sketch Distress Oxide ink. I utilized the Misti Stamping Tool in stamping the sentiment. The sentiment is from TS A Latte Love stamp set. 

Thank you for visiting my blog. Have a blessed, brilliant and creative day!
Maria Giselle B.

I added below the link to the Trinity stamp products I used on this project. Unfortunately, I could not find a cup similar to the one I used on this card, so I am linking a coffee cup instead as a substitute to the cup. There will be no additional cost to you should you decide to purchase this die set. While you are at the Trinity Stamps website, do check out the other amazing Trinity Stamps products including their newly released products. 

I am sharing this creation at


Tuesday, December 14, 2021

Cat Scene Gift Tag


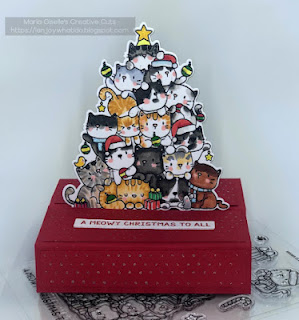
Hello! Welcome back to my blog. I created this tag with several inspirations. I am joining the Newton's Nook Blog challenge, thus, explain the cat image. I am also joining Ellen Hutson's 12 Tags of Christmas. And lastly, when there's a cat image, it is automatic that one of my sister's cats will be the model. For this time, I colored the cat with one of her kittens, Lit, as the inspiration.

We know how kittens can be very playful especially around a Christmas tree. I chose my stamp images based on this idea. I made sure that the area I will be stamping my scene on fits inside the frame that I use to create the tag. I stamped the cat on a white cardstock. I created a mask of this cat image as well. The image is from Newton's Nook Designs Flower Garden stamp set. I partially inked the stamp since in the stamp, the cat is smelling a butterfly. I covered the butterfly with some tape to avoid inking it while I apply the ink to the cat image.

I stamped the tree, also doing some partial stamping. The stamp is from Ellen Hutson Homespun Holiday stamp set. The stamp image is of a tree spine on a bag. I just added ink to the tree spine. I used a light dye ink for the stamping since I will be stitching on this tree.

I colored the cat with Copic markers. 


I poked holes on the tree for stitching. I used DMC Diamant Gold and Black, and Green Metallic Threads. For the ornaments I die cut a red mirror cardstock using a die from the Lawn Fawn Mini Wreath die set.

To mute the stark white background, I colored the background with Copic marker.

I stamped the sentiment on the panel which was double stampe. I did not like the green colored sentiment, so I decided to stamp it again with a red ink. The thing is, I removed the stamp and the panel out of the Misti. I did my best to align the stamp over the stamped sentiment. But you know, sometimes you got this stained stamp. Not to forget my poor eyesight sums up to an offset re-stamp. Uuggh! But it looks like it was stamped that way, so I let it be. 

I die cut a green pearl cardstock using the Li'l Inker Designs Fringed Scalloped Rectangle die. To make this into a frame, I used a smaller rectangle to die cut the window. I adhered this frame to the colored panel. I trimmed off the excess. 

To make this into a die, I added the ribbon/twine holder by die cutting a red pearl cardstock with the Concord & 9th Bags and Tags die set. I die cut two pieces and adhered this together, with the wrong sides facing each other. I adhered this to the back of the colored panel making sure it is centered. To keep the layering even, I adhered two layers of scrap cardstock to the back of the colored panel. 


For the back panel, I don't have a rectangle die that matches the size of the front-colored panel. I lightly traced the edges of the colored panel to a white cardstock. I trimmed this cardstock using these traced marks as guide. I stamped the To and From sentiments to this panel. The stamps are from Avery Elle Holiday Circle Tags clear stamp set. I stamped these using a red dye ink. I adhered this to the back of the layered front panel. I cut off the edges.

I threaded a Lawn Fawn Gold Sparkle Single Cord through the hole of the tab.

Thank you for visiting my blog. Have a blessed, brilliant and creative day!

Maria Giselle B.

I am sharing this creation at


Monday, December 13, 2021

Stitched Monogram Paper Embroidery Hoop Ornament/Tag


Hello! Welcome back to my blog. For today, I created these stitched monogram paper ornaments or tags to give as a gift for a family who always send us Christmas cards every year. Each ornament has the stitched letter of their names.

I started off by die cutting a circle on white cardstock. I stamped the Honey Bee Buffalo Plaid Clear stamp set on these circles using Delicata Golden Glitz pigment ink. The Misti Stamping Tool was very useful in this step since I re-stamp the plaid background more than once on the circle die cut to get a crisp impression.


I die cut the letters using The Stamp Market Stitched Alphabet Dies on the circle die cuts. Then, I stitched away using a DMC red embroidery floss. I added green sequins and seed beads for some accent. 

I die cut the embroidery hoop using The Stamp Market Embroidery Hoop die set on kraft cardstock. I die cut two hoops per letter. The die set does not come with a solid circle die. Luckily, one of the circle dies from the MFT Circle Stax die set matches the size of the embroidery hoop. I die cut this circle on kraft cardstock too.

I die cut the screw of the embroidery hoop on holographic cardstock. I die cut two screws per letter. I adhered the screws together with the shiny side facing outward.

I adhered an embroidery hoop on the die cut circle. I adhered the die cut screw on the top. Next, I adhered the stitched circle panel with a strong double adhesive tape. I adhered the other embroidery hoop on top, making sure I lined it up with the other embroidery hoop.


I added a twine and a red bow to the top of the embroidery hoop. I added a jingle bell by threading a gold embroidery floss from the back, thru the bell, then to the back again as inspired by Angela Simpson and Brenda Noelke's tags as linked below. 

Thank you for visiting my blog. Have a blessed, brilliant and creative day!

Maria Giselle B.

I am sharing this creation at


Saturday, December 11, 2021

Recipe Challenge Inspired Greeting Card (Craft My Stash #20)


Hello! Welcome back to my blog and to another Craft My Stash post. I created this card to join in one of Scrapbook & Cards Winter Issue Challenges. I love to join their challenges.

For this card, I am using products from Lawn Fawn, Pebbles and some Christmas stickers that has been in my stash for some time now.

There are four recipes to the challenge: a 6x6 paper pad, stickers, chipboard frames and a metal die. 

I created a chipboard frame by stacking six polaroid frame die cuts. The polaroid frame die is from the Lawn Fawn Selfie Frames die set. The top layer is paper from the LF Snow Day Remix 6x6 paper pad, which is the paper pad I am using on this card to complete the recipe.


I added a layer of vellum on top of the background to mute the pattern of the paper. I adhered a Santa Claus puffy sticker and the Ho, ho, ho sentiment to this panel. I fussy cut the Ho, ho, ho since the sticker came with a horizontal orientation. I want it to go downward so it will fit inside the window. 

I die cut a red cardstock using the longest banner die from the LF Fancy Folded Banners die set. I die cut the banner four times and connected two of the banners. I ran this again through the die cutting machine to add details to it using the LF Stitched Borders die. 

For the card panel, I trimmed one of the patterned papers at 4 1/4" x 5 1/2". I trimmed off a sliver from each side before adhering this to a green top folding A2 notecard. I adhered an eighth of an inch of green mirror cardstock to each side. 

I adhered the banner on the center. I adhered the polaroid frame over this. 

For the sentiment, I took one of the stickers from the Pebbles Merry Little Christmas mini sticker book and adhered it to a cardstock. I trimmed off the excess and cut this into a fishtail banner. I adhered this to the polaroid frame.

Thank you for visiting my blog. Have a blessed, brilliant and creative day!

Maria Giselle B.

I am sharing this creation at


Monday, December 6, 2021

Color Inspired Greeting Card

Hello and welcome back! It is time for a new challenge at Incy Wincy Designs. For this challenge, the theme is Colour Palette Or Use Only Warm Colours. We have two sponsors for this challenge.

For my card, I opted to follow the challenge's colour palette as seen above. I colored the image with the first four colors on the palette. It is not the typical color of an elf but we can always go out of the norm. I colored the image with Prisma color pencils. I fussy cut the image leaving a small border around it. I added details to the image with metallic gel pens, glaze pen and shimmer brush.

I could not find a cardstock in my stash that matches the last two colors of the palette. So, I created my own by blending Tim Holtz Distress Inks on two separate Strathmore Bristol Paper cut at 5 1/2" x 4 1/4". I used blue hues on one (love that Blueprint Sketch), and blue-green hues on the other. I spritz Prima Color Bloom Teal Spray on the panel. I dried this panel with a heat gun. After which, I die cut this panel with Lawn Fawn Fancy Lattice Backdrop die. I adhered the blue panel to the back.

For the sentiment, I heat embossed this on vellum using Tim Holtz Blueprint Sketch Distress Oxide and Judikins Iridescent Sparkle embossing powder. I adhered this on a white cardstock before fussy cutting it, leaving a small border around it. I stamped the sub-sentiment on a white cardstock using the same Tim Holtz ink. I die cut this into a strip using Avery Elle Simple Sentiments die. 

I adhered the vellum sentiment and sentiment strip to the lattice panel. I created a ground for the image with a left-over sand embossed cardstock and adhered this to the panel. I adhered the digital image with foam adhesive. Using the same lattice die, I die cut scraps of holographic cardstock. I pieced in the diamond shaped die cuts to the teal lattice backdrop for some sparkle.

Thank you for visiting my blog. I hope to see your creations in the challenge blog. Have a blessed, brilliant and creative day!

Maria Giselle B.

Image Sponsor


I am sharing this creation at