Wednesday, September 30, 2020

Ryan's Sun and moon cool colors and hot colors And Halloween cat in a pumpkin!!


So today I will show you my sun and moon I hope you love my sun and moon I made this in art class she made a nice one so we made one I forgot I am now in 3rd grade and 8 years old. There is a cat a halloween theme and witches and ghost and other stuff!


New Craft Stash #6: Letter Dies, Cut & Fold Die

Hello! I am back with another New Craft Stash Post featuring products from Trinity Stamps. I am using the Frame and Fold Die Set and the Marshmallow Die Set. 

I created this card to join in the Trinity Stamps Friendship Challenge and the Karin Colors IG Challenge.

I temporarily adhered a 5 1/2" x 4 1/4" watercolor paper to a board. I added a wash of colors using the Karin September Colors of Burgundy 075, Copper Brown 282 and Olive Green 281. I positioned the alphabet dies to spell out the sentiment, 'virtual hugs.' The color was too pale, so I directly colored the letters with the markers using a gradient pattern. 

I made this into a slim line card. I cut an 8 1/2" x 3 1/2" brown cardstock for the back panel. I die cut a green cardstock using the mini card die in the Frame and Fold Die Set. This will be placed on the leftmost part of the brown cardstock panel. I trimmed a Simple Stories Autumn Splendor patterned paper at 6" x 3", then cut this in half. One half will cover the back side of the mini card, while the other half will be adhered to the right of the mini card to create a continuous pattern. 


I die cut a stitched heart from the same patterned paper pad. I used the Lawn Fawn Stitched Heart Stackables die to cut the heart. I inked the edges of the heart using Tim Holtz Vintage Photo Distress ink.


I taped the patterned papers together so I can start adhering the letters. I adhered the heart first since the letters will be overlapping the heart. I adhered the letters making sure I did not adhere any letters on the fold. 

I adhered the mini card and the patterned paper to the dark brown cardstock. The tape on the back held the two pieces together, keeping it aligned. I added gold flower sequins to the panel, covering the hole with Nuvo Glitter Drops Golden Sunset. I set this aside to dry.

Thank you for visiting my blog. Have a blessed, brilliant and creative day!

Maria Giselle B.

I am sharing this creation at


Saturday, September 26, 2020

Fall Greeting Card


Hello! I created this card for the Scrapbook & Cards Today Fall Issue Challenge Week Day 2: A Sketch Challenge. There are two sketches in this challenge. My card is inspired by the sketch below. I am using products from the Simple Stories Autumn Splendor Collection. 


I trimmed a woodgrain patterned paper to 4" x 5 1/4". I inked the edges with Tim Holtz Distress Ground Espresso ink. I am  using one of the cut apart elements for the focal point. I trimmed off the sides to make it slimmer. I also inked the edges of this panel using the same ink. I cut off varied strips of the orange plaid patterned paper. Before I stitched this on the woodgrain paper, I stamped the floral bundle from the SS Autumn Splendor stamp set on the woodgrain paper using Hero Arts Unicorn White pigment ink. I machine stitched the strips using a DMC gold embroidery floss. I flicked black pain on the panel. I picked the extra paint with a paper towel.


I stamped the sentiment from the stamp set on a green plaid paper using Versamark ink. I embossed this sentiment with Wow! Metallic Gold Rich Pale embossing powder. I fussy cut the sentiment, then adhered this to a gold vellum paper. I fussy cut this again leaving a small border around it. I stamped the floral bunch on a dark brown cardstock with Versamark ink. I heat embossed this using Wow! White Pearl embossing powder. I fussy cut this leaving a small border around it. I stuck the end of this floral bunch behind the focal point panel. I adhered the vellum sentiment with a foam adhesive.

I die cut a dark brown cardstock using a stitched rectangular die from Mama Elephant Peek A Frame Creative Cuts. I adhered the patterned paper panel to this then adhered this to a top folding note card. I added clear Wink of Stella Shimmer pen to the sentiment on the cut apart paper. I added Glossy Accents to it and set this aside to dry.

Thank you for visiting my blog. Have a blessed, brilliant and creative day!

Maria Giselle B.

I am sharing this creation at


Faux Mosaic Background Greeting Card


Hello! I created this card to join in Scrapbook & Cards Mood Board Challenge for their Fall Issue Challenge Week Day 1. When I saw one of the photos on the mood board, I cannot let go of this card idea and I am glad I went through the process of creating it.

I am using a Li'l Inker Designs Geometric Snow Cover-up die. I only found out lately that the online store has closed. I am saddened but I know it was a tough choice to make for Laura, owner and creative director of Li'l Inker.

Back to card, I embossed a Ranger watercolor paper with the cover-up die. To do this, I ran the paper and die through my Sizzix Big Shot with my embossing mat, embossing plate and cutting board. To add more depth in the embossing, I added a re-purposed leather journal cover to my embossing sandwich. 

I colored the panel using the embossed outlines as guide for coloring, and using the photo on the top right as inspiration for the colors. I am using Karin markers for the coloring. 

Using the same die, I die cut an 80 lb. Neenah Solar White cardstock. I adhered this on top of the watercolored, embossed panel.


For the sentiment, I die cut the grateful die from Concord & 9th Lace Leaf die on a black cardstock. I die cut this three times and adhered one on top of each other to create a chipboard-like embellishment. 

I added a die cut, embossed vellum to the back of this sentiment to mute the busy background since the die cut seem to have gotten lost in the busy background. I die cut the vellum using The Stamp Market Nested Long Label die. I embossed the vellum using a tiny dots embossing folder.

I heat embossed more sentiment words on a white cardstock. I am using stamps from Concord & 9th Lace Leaf stamp set. This ink I used is Versafine Onyx Black ink. I trimmed this off using a craft knife.

I adhered the sentiments to vellum, then adhered this to the faux mosaic background panel.

Thank you for visiting my blog. Have a blessed, brilliant and creative day!

Maria Giselle B.

I am sharing this creation at


Monday, September 21, 2020

Weaved Background Funny Halloween Card


Hello! We have a new challenge at Incy Wincy Designs. Our challenge is on Funny and/or Let's Celebrate. We have two sponsors for this challenge. I am using Dr. Digi's for this card. 

I printed the image on Neenah Solar White cardstock. I colored the image using Karin decobrush. I used a palette where I picked up the pigment using a water brush to color the image. I tried the direct to paper technique but I was not able to control the pigment. I don't think I will be able to do any blending using this technique. Not that I did not have a hard time using the water brush in blending. I have two kinds of water brush, one that spews out water too freely and one with too much control on the water. Between the two, I am able to blend using the too wet water brush. I just had to dab the brush bristles on a rag before picking up the pigment if I want less water and more color. After I finished coloring the image, I fussy cut the image leaving a white border around it.

I recently bought The Stamp Market The Weaving Cards die. I die cut a heavy weight gray cardstock using the largest die on the set. I wrapped a Halloween twine through the slots. I weaved my left over Halloween paper strips through the twine...up, down, up down...until I filled up the whole panel with paper. What a way to use those scraps! I cut off the excess paper on the sides.

I created a frame on a gray cardstock. I stamped the corners of this frame with a spiderweb stamp from My Mind's Eye Lost And Found Collection using Hero Arts Neon Green dye ink. I adhered this to the weaved panel with foam adhesive. 

I die cut a thin frame on a black cardstock using a die from Simon Says Stamp This Is The Life Frames Wafer die set. I adhered this thin, black frame to the inside of the gray frame. 

For the sentiments, I fussy cut a My Mind's Eye Halloween paper and adhered that to the bottom of the frame with foam adhesive. 

To make the card funny, I added a speech bubble vellum with an embossed sentiment. The sentiment is from Paper Smooches Spookalicious stamp set, and the speech bubble die is from Lawn Fawn Into The Woods coordinating die. I outlined the speech bubble with an orange Wink of Stella brush marker.


Thank you for visiting my blog. I hope to see your creation on the challenge blog. Have a blessed, brilliant and creative day!

Maria Giselle B.


Friday, September 11, 2020

Cricut Cake Toppers


Hello! I created cake toppers for two different occasions this Sunday. 

First, it is my Inang's (mother in Filipino) 88th birthday. Happy Birthday, Inang! I cannot wait to visit you again there in Manila. Hopefully, we have a vaccine next year and that COVID is finally under control so we can come and visit you.

Another occasion to celebrate on Sunday is National Grandparents' Day in the US. All of my sons' grandparents are at the Philippines. We will have the boys virtually greet them this Sunday. 

Both cake toppers are designed in Cricut Design Space. I cut the balloon and mirrored it so I can sandwich the toothpick in between these balloons for more stability. I cut the letters for the word lola twice so I can create a drop shadow for the letters to make it pop out. For more accent, I added some Spectrum Noir Red Sparkle Glitter on the top of the letters and spreading this out with a clear glitter pen.

For the banner, I applied Zig Wink of Stella Orange Glitter Brush. I added Uni Ball White Signo Broad Gel Pen accents to the word grandparents after adhering it to the banner. To make it pop out, I outlined the letters with a brown Sakura Gel pen. 

The cake is Japanese Cheesecake from La Patisserie Cake & Pastry Shop. I had a feeling that the owner is a Filipino and I confirmed that when I picked up my ordered cake! I am so excited! What is also exciting is that she makes Sans Rival and Brazo De Mercedes, two of the my favorite cakes in the Philippines. I have to wait for the next occasion to order another cake which will be on my Amang's (father in Filipino) birthday on December. 

Thank you for visiting my blog. I hope you have a blessed, brilliant and creative day! Let us make our grandparents feel special on their day.

Maria Giselle B.

I am sharing this creation at


Wednesday, September 9, 2020

School Inspired Greeting Card, Craft My Stash #4

Hello! I am featuring several products from my stash:

  1. Lawn Fawn Party Panda Stamp & Lawn Cuts
  2. Lawn Fawn Check This Out stamp set
  3. Lawn Fawn Grassy Hillside Borders
  4. Lawn Fawn Really Rainbow Scallops 6x6 Inch Petite Paper Pad
  5. Lawn Fawn Stackable Stitched Square
  6. Lawn Fawn #awesome stamp & die sets
  7. Lawn Fawn Flippin' Awesome die set.

I am also featuring the LF Hello die which is new to my stash. 

I created a background for my panel by stamping the library return card using a blue pigment ink and heat embossing this with clear powder. I masked off some of the edges to overlap the library return card. This was not to hard too do since the edges are straight. All I had to is cover the edge with a Post-It Note. Using the same masking paper, I inked each library card using various Tim Holtz Distress Inks. 

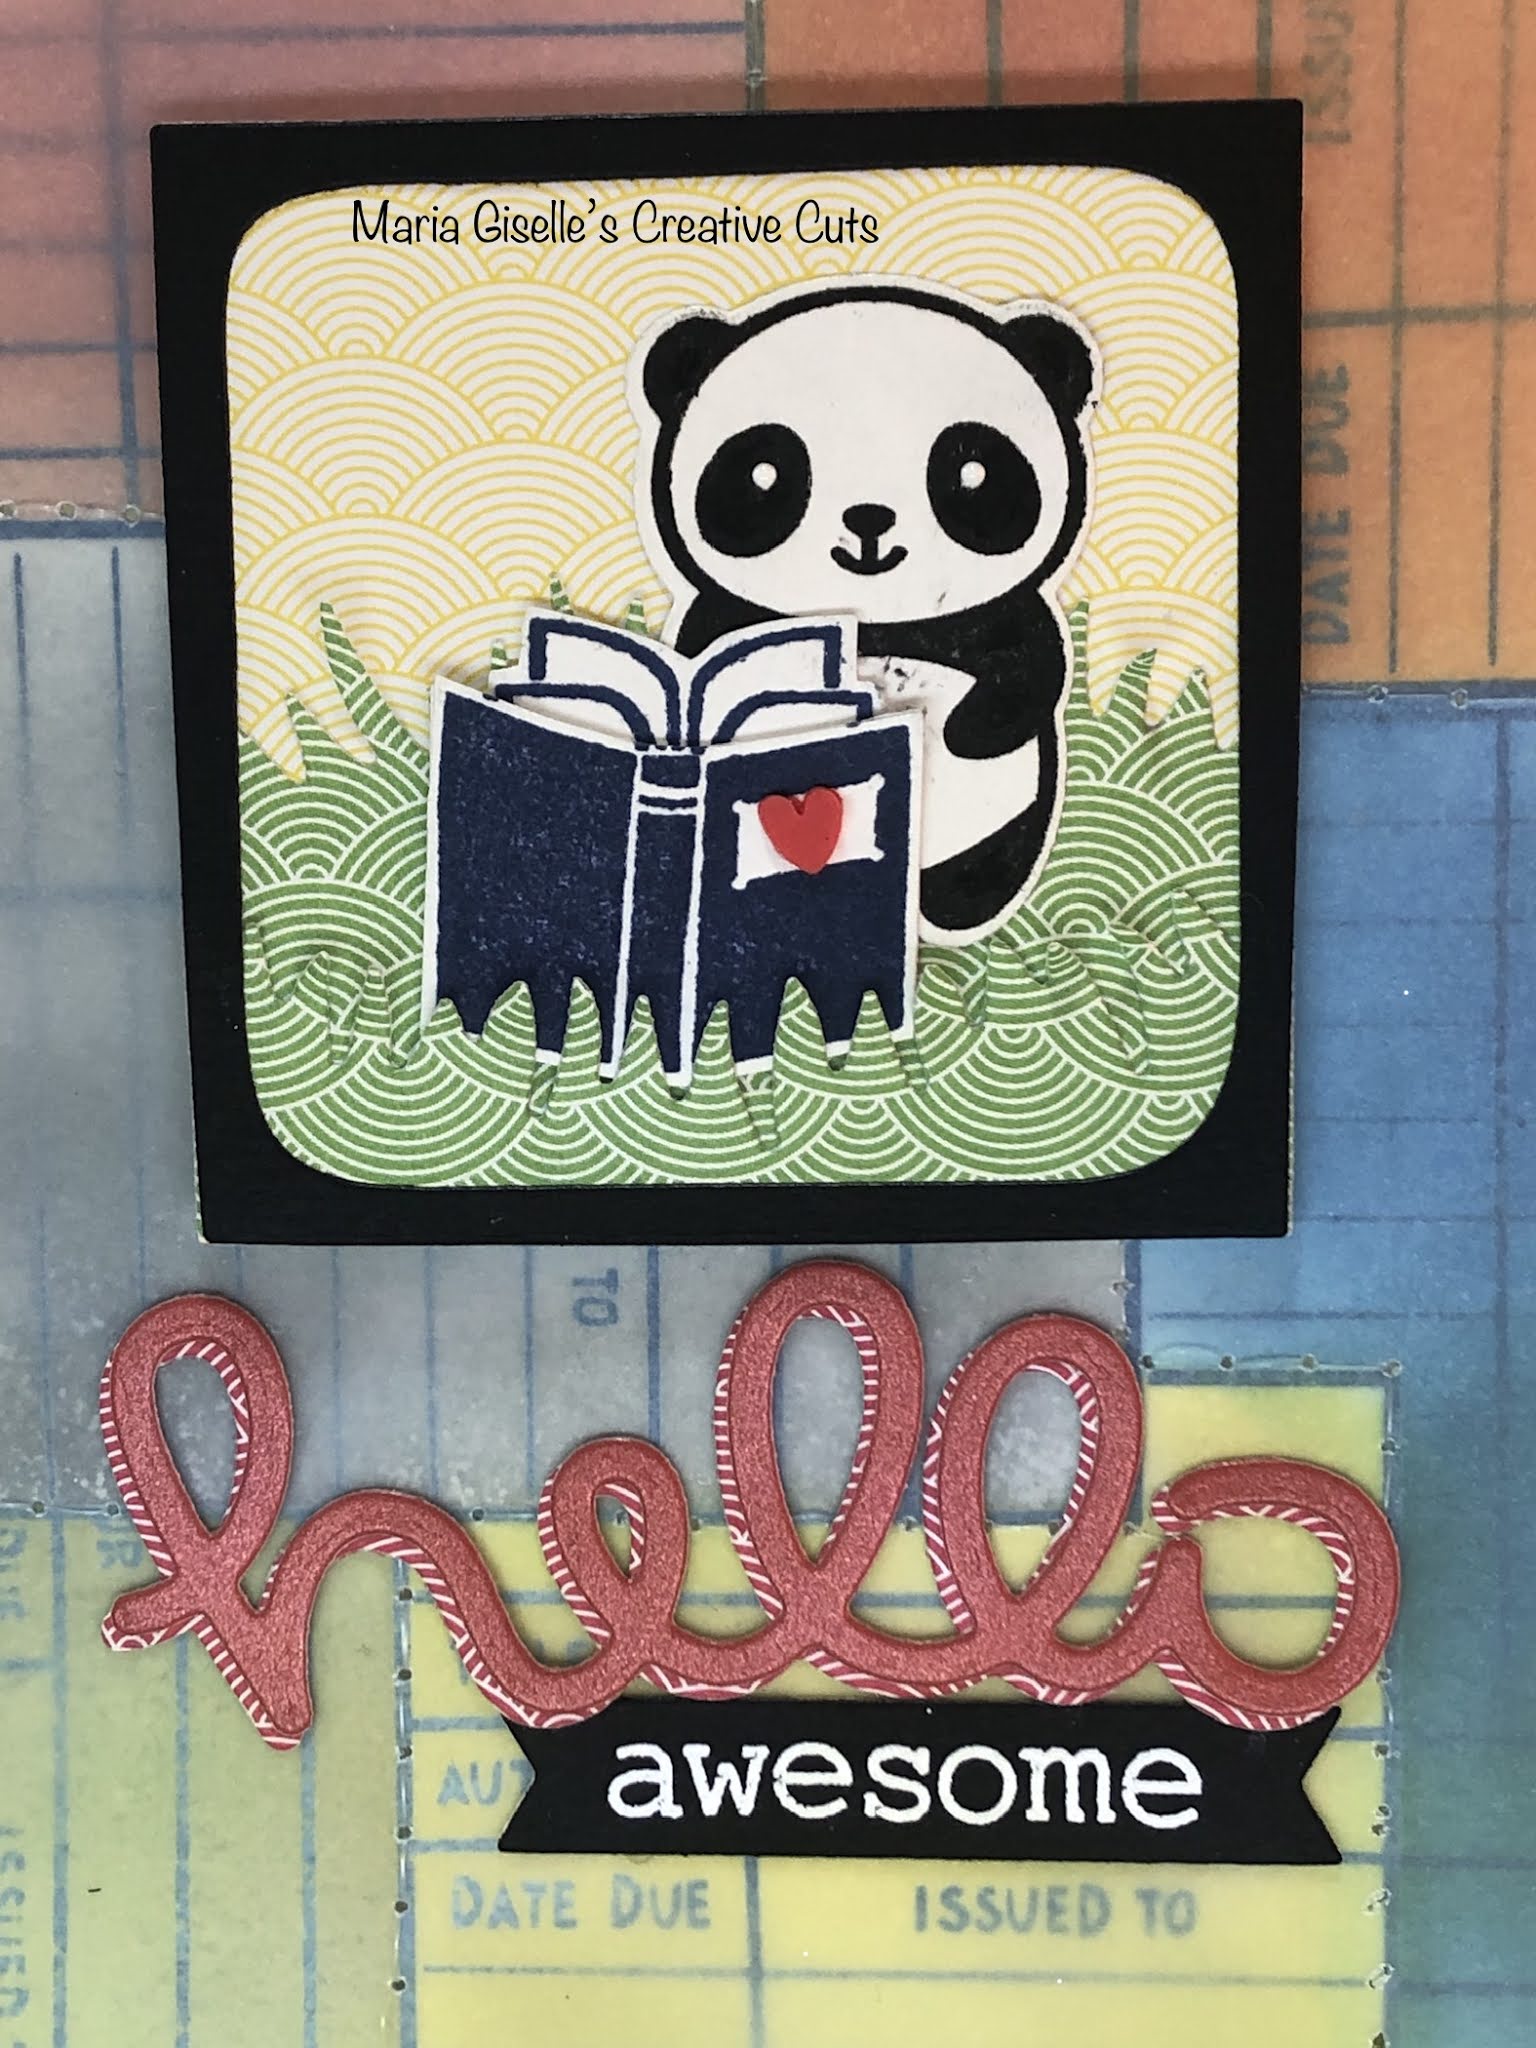
For the main focus of the card, I stamped the panda on Neenah Solar White cardstock using Versafine Onyx Black ink. After this has dried, I die cut the panda using the matching die.

I stamped the book from the LF Check This Out stamp set on Neenah Solar White cardstock using Hero Arts Navy Shadow ink. I fussy cut the book leaving a little white border around it. I cut off the book pages to lessen its height. After I've adjusted this to the desired height, I taped this on the inside of the book. 

To build the scene, I die cut a square using the patterned paper and the stitched die. From the same paper pad, I die cut the grassy hills. I used both positive and negative cuts to create layers. I die cut a black cardstock to create a frame using the die from the LF #awesome die set. I could have skipped using the stitched square die since the stitching detail got covered by the frame but I did not have plans of adding a frame to the lay out while I was creating this card. 

For the sentiment, I die cut a red pearl cardstock and a red patterned paper from the patterned paper pad using the LF Hello die. I used the patterned hello die cut as a shadow for the solid hello die cut.

I stamped the sentiment awesome on a black cardstock using Versamark ink. I heat embossed this with white embossing powder. I made this into a label using a label die from LF Flippin' Awesome die set. 

The panel was too busy for the framed focal point. I placed a vellum overlay over the panel to mute it down. To adhere the vellum, I squirted a small amount of glue to the back of the vellum where the focal point will be adhered. This will be covered so I am not too worried of the liquid glue. I set this aside to dry. After which, I stitched over the lines of the library return card with a transparent thread to secure the vellum and also, for some added interest. 

I adhered the focal point with foam adhesive. I adhered the hello die cut sentiment and tucked in the label sentiment underneath it.

I added Ranger White Enamel dots to the eyes of the panda. I adhered a red clay heart to the book. 

Thank you for visiting my blog. Have a blessed, brilliant and creative day!

Maria Giselle B.

I am sharing this creation at


Monday, September 7, 2020

Summer Themed Greeting Card


Hello! I created this card for the latest Incy Wincy Designs Challenge on Girls, Girls, Girls. We have two sponsors for this challenge. This is my second card for the said challenge featuring one of the sponsors, All Dressed Up. I can't believe I was able to pull another card for the challenge. I usually create one card only.


I printed the image on Neenah Solar White cardstock. I colored the image using Faber Castell Polychromos. I added details to the girl's bathing suit using Sakura White Gelly Roll pen. I used a gold gel pen for the sunglasses frame. I fussy cut the image leaving a white border around it. 

For the background, I pounced Versamark ink to a kraft colored cardstock. I embossed this using Hero Arts Sand embossing powder. I die cut this using a die from the Avery Elle Cutsom Panel Elle-ments. 

For the blue part of the scene, which can be the sky or the ocean, I watercolored this using different blue shades of Karin marker. I heat set this to dry.

For the sentiment, I am using stamps from Lawn Fawn Violet's ABCs for the word 'Hello' and a freebie stamp from Ellen Hutson. I heat embossed this using Paper Source Navy embossing powder.

I adhered the sand embossed cardstock to the blue watercolored cardstock with foam adhesive. I also adhered the image with foam adhesive.

A lot of us may have missed summer due to the pandemic. We are one of those families who decided to skip summer this year, stay home and make the best of being together during our staycation. We will be hopeful for next year. Although beach is not a part of our supposed summer plan but just thinking of the beach will make us look forward to next year's summer. 


Thank you for visiting my blog. I hope to see your creation on the challenge blog. Have a blessed, brilliant and creative day!

Maria Giselle B.


I am sharing this creation at


Patterned Paper Collection Inspired Colored Image


Hello! We have a new challenge at Incy Wincy Designs. The theme for the challenge is Girls, Girls, Girls-Majorly Girly/Tomboy. I am using an image from one of our two sponsors, My Besties, for this challenge.


I printed the image on Neenah Solar White cardstock. I colored the image using Copic markers. I got my color inspiration from an old American Crafts paper pack, My Girl. I fussy cut the image leaving a small border around the printed image. Since this is a large image to fussy cut, I took a break in the middle of the cutting to rest my hand.

I am using scraps from the 6x6 AC My Girl paper pad. I created a simple collage of the scraps by adhering it to a 4 1/4" x 5 1/2" typing paper.

I am taking out the We R Memory Keepers Sew Easy Stitch Piercer from my craft chest. I ran this through the collage for a running stitch but this is less noticeable after I covered the panel with vellum. I am using another WRMK Sew Easy Heart Stitch Piercer. I ran this on one of the scrap patterned paper and stitched the hearts with DMC floss. To make the hearts pop, I inked the inside of the heart with Tim Holtz Distress ink and pounced a brush with Ranger Perfect Pearl powder. I created this into a border by fussy cutting the top portion of the hearts. I grounded the colored image to this heart border.

I covered the collage of patterned papers with vellum to mute this busy background and make the image pop. I die cut the vellum using a stitched rectangle die from Mama Elephant Peek A Frame Creative Cuts. I adhered the stitched heart border to the bottom of the panel. I adhered a cut along sentiment from the paper pack and cross stapled this to the top of the panel. I adhered the image with foam tape.


Thank you for visiting my blog. I hope to see your creations in the challenge blog. Have a blessed, brilliant and creative day!

Maria Giselle B.


I am sharing this creation at


Thursday, September 3, 2020

Smiley Face Speech Bubbles Greeting Card


Hello! I have several inspirations in creating this card. First, I miss joining the Lawn Fanatics Challenge. It has the same schedule as Incy Wincy's post, where I am a DT member. This week, I am  done early with my post for Incy Wincy's next challenge. Now, I have time to join Lawn Fawn's Challenge. My other inspiration for this card is the Simon Says Stamp Sending Smiles die which is a part of their Stamptember release. I thought of creating a card using this sentiment.


I went through my cardstock stash and sorted it by color. I die cut the letters for the word 'sending' using the Lawn Fawn Cole's ABC, in rainbow order. For the 'smiles', I am using a die from LF Selfie Frames die set. I die cut the word smile twice. I trimmed off a part of the letter 's' from the second smile die cut. I trimmed a part of the 'e' on the other smile sentiment so the letter spacing will be the same. I die cut the background for these letters using LF Outside In Stitched Rectangle die on LF Perfectly Plaid 6x6 paper.

For the speech bubbles, I die cut several speech bubbles using white and colored cardstock. The die is from LF Selfie Frames die set. I die cut the smiley faces on the white speech bubble die cut using the LF Make Me Smile. I adhered the colored cardstock to the back of this white speech bubbles.
I am using a cream cardstock for my card panel. I added stitching to the edge using Mama Elephant Peek A Frame Creative Cuts. I adhered the sentiment panel to the center. I adhered the speech bubbles around the sentiment panel. I added clear Kuretake Zig Wink of Stella to the large letters and the smiley faces.


Thank you for visiting my blog. Have a blessed, brilliant and creative day!

Maria Giselle B.

I am sharing this creation at