Thursday, February 24, 2022

Background Using Small Stamps


Hello! Welcome back to my blog. I created this card to participate in the Caffeinated Christmas Card Challenge. I got the coloring technique inspiration from Yana Smakula's video

Had a little trouble with the focal image. I almost forgot that I needed one for Christmas. 


Thank you for visiting my blog. Have a blessed, brilliant and creative day!

Maria Giselle B.

I am sharing this creation at


Monday, February 21, 2022

Valentine's And Easter Cards Using Photo Play

Hello! Welcome back to my blog. This will be a photo filled post since I am featuring 4 cards today. I am using Photo Play products on all the cards. For the Valentine's cards, I am using Tulla & Norbert's Love Story Collection. On the Easter cards, I am using Hop To It Collection.


The first card is a shaker card. This is very easy to replicate since all you need is one of the cut-apart patterned papers. Not only that. I used one my extra clear plastic packaging to house the shakers. Just cover the panel with the clear plastic packaging. Secure the edges with a double adhesive tape. Remember to leave one side unsealed. This will be where you pour the shaker elements you want to add to complete the shaker card. I rubbed an anti-static dryer sheet to the inner side of the plastic packaging to prevent the sequins from getting stuck to the plastic. I also adhered some hearts to the cut-apart panel. 


The second card is a slimline card. The pennant banner on this card was inspired by the pennant ephemera included in the pack. I don't have mine in my pack, so I recreated this using some patterned paper and dies. The sub-sentiment banner is also from the ephemera pack. One thing that I like about Photo Play is that they have a pre-colored print-out of the same images in the stamp set. If you are not a colorist, this is the perfect product for you! All you need is the die set which matches these images just like the stamps. 


Now, it's time for the Easter cards. I am using products from the Photo Play Hop It Collection. This is their Easter/Spring collection. For the third card, I created another slimline card. I die cut one of the patterned papers in the collection using a slimline die that cuts scalloped windows. I created scenes on each window using the stickers from the sticker sheet. Isn't the bunny adorable? 


The fourth card is an interactive card with a spinning element. The sticker sheet includes two stickers with a bunny on a basket, one facing front, and one facing backwards. It was not a perfect match when I lined it up but very close enough. If I am going to do this all over again, I will choose a smaller oval for the window. I feel that the window is too big in comparison to the bunny sticker. I added floral sequins to the spinner floss. 


Below is a video showing the bunny spinning.


Thank you for visiting my blog. Have a blessed, brilliant and creative day!

Maria Giselle B.


Friday, February 18, 2022

One Layer Card


Hello, and welcome back. For today's card, I challenged myself to create a one-layer card and do some masking. Masking for ink blending is my least favorite because my masks tend to peel off while I blend inks. I always hear on other crafter's videos that these can be re-used. Mines tend to be a one-time use only. Maybe it depends on the kind of masks. After I use up the brand of masking paper that I have, I will try another brand.

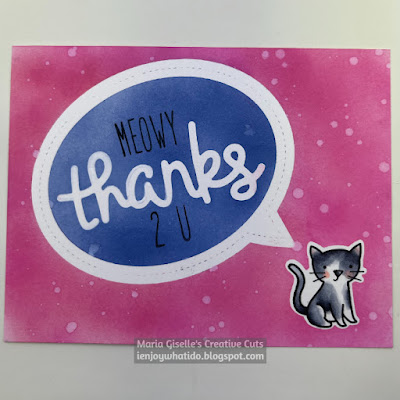
To create my card, I die cut the Lawn Fawn Stitched Speech Bubble Frames die, LF Sripty Thanks die and a cat die from the LF Spooktacular coordinating die on sheet of masking paper. I left the masking paper on the release paper. I only peeled off the speech bubble negative masking paper cut. I blended the Tim Holtz Faded Jeans Distress Oxide to this area being careful that I do not peel off the intricate scripty masking paper die cut. No matter how careful I was, some of it peeled off, having a bit of blue ink bleed which I have a fix later on.

I replaced the speech bubble negative cut then removed the background negative cut masking paper, making sure I leave the cat masking paper die cut adhered. I blended TH Picked Raspberry Distress Oxide Ink to this area. I flicked some water to this inked area, allowing the water to seep in before lifting it off with a dry paper towel.


I removed all the masking paper which is always like Christmas morning with the reveal. This is the best thing about masking, and my favorite so far, the revelation including any errors in blending. To fix the blue bleed on the white sentiment, I used a white Sakura Gelli Roll pen to cover up the areas with the blue ink. 

I stamped the cat on the area of the panel where the cat masking paper used to be. I colored the cat with Copic markers. For this card, Peppy is my model cat.

I added supplement sentiments to the large focal sentiment using LF Milo's ABCs. 

Thank you for viewing my blog. Have a blessed, brilliant and creative day!

Maria Giselle B.

I am sharing this creation at


Wednesday, February 16, 2022

Plaid Background Birthday Card


Hello! Welcome back to my blog. The inspiration for this card is my youngest son who celebrated his birthday last week. It is on My To Do List but never got to creating it but the idea is there. Belated Happy 10th Birthday, Ryan!

I got the idea of the background from Channin, who used the same background stamp from Honey Bee.

I stamped the image on Neenah Solar White cardstock and colored it with Faber Castell Polychromos pencils. The stamp is from the Your Next Stamp Silly Fun Birthday stamp set. I fussy cut the image leaving a white border around it.


I added details to the image as you can see on the photo above.

I created a sentiment strip using one of the sentiments on the stamp set.

I die cut a yellow glittered star. I die cut several more stars and adhered this to the back of the glittered star. 

Thank you for visiting my blog! Have a blessed, brilliant and creative day!
Maria Giselle B.

I am sharing this creation at


Colored Image on Cards


Hello! Welcome back to my blog. We are past halfway the month of February. I created another card for Incy Wincy Design's February Challenge. The theme is Red +/Or Pink (50%) and/or Valentine's. Last day for entry submissions is on the 25th of this month.

I am using an image from one of our sponsors, The Paper Shelter, for the challenge. I love to color but sometimes, I also like to use pre-colored images on a card. It makes cardmaking easier!

I die cut a heart on an Authentique patterned paper. This paper is double sided so I used the B side of the patterned paper for the heart. To add some detail to this heart, I used the next smallest heart die to emboss the heart impression on the heart die cut. I inked the edges of this heart to make it pop a bit. I inlaid the heart to the patterned paper panel. I die cut the sides of the panel using a 5 1/4" x 4" rectangle die. I saved the negative cut and used the B side to frame the positive die cut. It makes it look like I matted the patterned paper panel.  


I heat embossed the sentiment on the heart using Versafine Onyx Black ink and clear embossing powder. The stamp is from Mama Elephant Confetti stamp set. 

I fussy cut the colored image leaving a white border around it. I adhered the colored printed image to the panel. 

I hope you join us on our latest challenge. Thank you for visiting my blog. Have a blessed, brilliant and creative day!
Maria Giselle B.


I am sharing this creation at

Tuesday, February 15, 2022

Valentine Cards Using Simple Stories Happy Hearts Collection


Hello! Welcome back. It is February, the heart month. I have two cards created on this post using the Simple Stories Happy Hearts Collection. 


I used the stencil in the collection to dry emboss the pattern on a pink cardstock. I also used the same stencil to create a background to the dotted pink patterned paper in the collection.


I trimmed a line off the text patterned paper to create text strip framing the stenciled patterned paper. I also cut a part of that text patterned paper to add a sub-sentiment to the main sentiment. One of the patterned papers has label prints that can be cut apart. This is what I used for the main sentiment by die cutting one of the sentiments on the label, while adhering the other die cut sentiment to another label.


Thank you for visiting my blog. Happy Valentine's to you. Have a blessed, brilliant and creative day!

Maria Giselle B.


Monday, February 14, 2022

Stitched Valentine's Card


Hello! Welcome back to my blog. Happy Valentine's! Today's card was created for my husband. I got the inspiration after attending an online Michael's class last week featuring Lizzy from Stitch People. The pattern I used on this project is free. I customized the people to closely match me and my husband. 

Although I cross stitcher on cloth, lately, I've been enjoying stitching on paper. Most of the time, I use the Paper Smooches Cross Stitch die to poke the stitching holes on a lightweight cardstock. This pattern requires a larger area of cardstock and will require thicker floss to cover the holes. So instead of using my usual cross stitch die, I am using the Waffleflower A2 Piercing Panel die. This die creates piercings that you can poke holes thru with the use of a thin needle. Somehow, it resembles a large count Aida cloth. 

Doing half stitches can be difficult when doing it on paper. A very thin needle to poke the hole in between the piercings is a must so as not to rip the paper from this poked hole to the closest piercing. Doing certain embroidery stitches can also be a challenge. I modified the stitch on the embroidery embellishment. I was hesitant to do the Lazy Daisy stich on paper. I might practice doing it in the future. 

Another disadvantage on stitching on paper is that mistakes are not forgivable. Once you poke the piercing, it does not heal back like a cloth. That's why a thin needle will be best to use so that even if you made a mistake on the hole that you poked, the hole created is small enough to be noticed. 


The sentiment is also a freebie from the Stitch People website. There are other patterns to choose from, some freebies and some for purchase. As I've mentioned, the half-stitch which can be seen on the letter V can be a challenge on paper. 

Thank you for visiting my blog. I truly enjoyed creating this card not only because it is customized and handmade for my husband, but I love to stitch. Being able to stitch and create it into a card brings me joy.

Have a blessed, brilliant and creative day! 
Maria Giselle B.

I am sharing this creation at

Hero Arts Blog~February Challenge


Sunday, February 13, 2022

Stand-up 3D Spinning Photo Flower Display


Hello! Welcome back to my blog. Today's project is a remake of my Pop-Up Mini Christmas Tree but this time I created a flower in time for spring. Just like the Christmas Tree, this Flower Display folds and fits an A2 envelope.

The flower was created by die cutting a cardstock with a Lawn Fawn Stitched Flower Frame. I die cut 6 pieces of the flower. I folded this on the center. I adhered the flower's back side against each other leaving the two edges open so I can adhere the stem die cut and the string for the interactive circle.

The spinning circle was created by punching a circle inch photo and adhering a clear 1" bubble cap over it. I punched two more circle cardstocks. I heat embossed one of the cardstocks with the sentiment and smiley face from LF Critters In The Attic stamp set and LF Love Letters stamp set. I sandwiched a transparent thread in between the cardstocks on the back of the bubble cap circle. I adhered the ends of the thread to the open portion of the flower.

For the stem, I die cut several stems from the same flower die set on brown cardstock. I adhered this on top of each other. I adhered a part of this to the open portion of the flower. I adhered these flower ends together to hide the thread and the stem.

For the vase, I die cut a patterned paper and an inked stenciled heavy weight cardstock with the Honey Bee Double Stitched Polygons die. I created a I adhered the patterned paper to the heavy weight cardstock. I made this into a vase by creating a cardstock tab that will hold these two pieces of die cut together. Using a scrap cardstock, I scored this at 1/2", 1", 1/2" and 1". I snipped off the end leaving a bit of an excess where I will put the glue on. I also created a holding tab insert which is scored at 1/4", 1" and 1/4". I glued it in between the polygon die cuts as you can see in the photos below.

Top view
Bottom view

I added glue to the tip of the stem and adhered it to the holding tab. I added leaves to the sides of the stem.
 

This flower display can be placed inside an envelope which you can mail to the recipient.

Thank you for visiting my blog. Have a blessed, brilliant and creative day!
Maria Giselle B.

I am sharing this creation at


Saturday, February 12, 2022

Valentine's Class Giveaway


Hello! Welcome back to my blog. For today's post, I am featuring my 4th Grader's Valentine's giveaway. It is a goodie bag created with papers and stickers from Paper Source.


The goodie bag was created using the We R Memory Keepers Goodie Bag Guide. I added an embossed belly band on the goodie bag. I added heart embossing using the We R Memory Keepers Next Level Hearts embossing folder. I used a Pebbles' Cut-Apart sheet for the Valentine's cards. I die cut this with a stitched rectangle die. I was not able to show it in the photos, but Ryan signed the cards using the We R Memory Keepers Foil Quill Freestyle Pen. This is such a good way to use up those foil scraps as long as the foil is compatible with the pen. 

I stamped the heart stickers using a Martha Stewart Alphabet Rubber stamp. I used Stazon ink for the stamping. 

Thank you for visiting my blog. Have a blessed, brilliant and creative day!
Maria Giselle B.

I am sharing this creation at


Sunday, February 6, 2022

Stitched Heart Greeting Card

Hello! Welcome back to my blog! For today, I created a stitched heart as the focal point of the card. I die cut an 80 lb. white cardstock with the Paper Smooches Cross Stitch die. On this panel, I die cut a heart using the Lawn Fawn Stitched Heart Stackables. I started stitching on this heart with the LF Perfectly Plaid Paper as the color inspiration. After I am done stitching, I adhered another die cut heart to the back to prevent the ends of the floss from being undone. I adhered this stitched heart to an embossed white cardstock. I adhered this to a pink cardstock die cut with the LF Outside In Stitched Scalloped die. 

For the sentiment, I die cut a banner using the LF Fancy Folded Banner die set. I snipped off the ends so I can adhere it to the back of the heart. I heat embossed the message on this. The stamp is from the LF Love Letters stamp set.

I stamped the images on white cardstock using Memento Tuxedo Black ink. The images are from the LF Yay! Kites stamp set. I colored the images using Copic markers. I fussy cut the image. 

I adhered the banner to the center of the heart, then adhered the images to the bottom. 

I adhered tiny heart sequins to the cross stitching, matching the color of the sequin with the color of the embroidery floss.

Thank you for visiting my blog! Have a blessed, brilliant and creative day!

Maria Giselle B.

I am sharing this creation at

Lawn Fawn Challenge Blog

Simon Says Stamp Wednesday Challenge: With Love

Simon Says Stamp Monday Challenge: Use An Embossing Folder