Monday, October 31, 2016

Customized Stamped Ziplock Halloween Treat Bag


I am in a time crunch to create goodie bags for my 5th Grader. He requested Swedish Fish for treats and I can't find individually packed Swedish Fish at Target. I only found out that Amazon sells it. I'll keep that in mind for next year.

We accidentally bought the snack sized Ziplock bags which we rarely use. Got to find some use for it, right?

First, I stamped an image onto one side of the Ziplock. I plan to make the snack sized bags smaller, so I stamped the image twice using Stazon ink. I am using an old Recollection rubber stamp. I was mass producing this goody bags, that I was putting one on top of the other, not realizing the impression got distorted when it got in contact with another Ziplock.

To make this into a smaller sized bag, I used the WRMK Fuse Tool. The Ziplock is thin that when I ran the Fuse Tool at the center, that line didn't only get sealed but it also cut the snack bags into two individual mini-bags. It didn't work the same way with the side where the opening of the bag is. I ran the fuse tool a couple of times and just cut the mini-bags apart with a pair of scissors.


Then, it is time to fill up the goody bags.

Thanks for visiting my blog. Have a blessed & brilliant day!

Maria Giselle B.

Halloween Gable Box


For this Halloween, I created Halloween Gable Boxes to giveaway to the class. I only created this for my pre-schooler's class. I used the Close To My Heart Cricut Artiste Cartridge to create the gable box. I bought this already linked which means I cannot use it with Cricut Design Space. Good thing, I still have my Cricut Imagine.

According to the manual, the gable box should be cut at 4". I don't know with you, but I felt it was too small to fit in the goodies I would like to put inside it. I cut the gable box using an 8 1/2" x 11 black cardstock. I chose the 'cut to fit' size. The gable box turned out to be about 2" tall when assembled.

The cut came with tick marks where it needs to be folded. The intricate part to fold in this cut is the handle. Even when assembled, I feel that it can easily get ripped especially if the contents of the box are heavy. This box can be assembled without using any adhesive. It will hold up to its shape. But if you prefer to use adhesive, it is also okay.


I used scraps of Halloween patterned paper from old giveaway projects to embellish the box. I adhered an inch of it around the box, sort of like a belly band.

I have a variety of images in this project. I used images from last year's project that I wasn't able to use. The stamps are from Lawn Fawn and Paper Smooches. I colored it with either Copics and Zig Clean Color markers. I used clear Spectrum Noir Sparkle pen to add interest to some of the images, just like in the ghost image. For the first Jack O' Lantern by Paper Smooches, I heat embossed that with black embossing powder. With the Lawn Fawn Jack O' Lantern, I applied Glossy Accents to the eyes and mouth, then poured Distress Glitter on top of it. The sentiment was stamped on black strip of cardstock.

This gable box can hold 2 small sized Play Doh and a small candy.

Thanks for visiting my blog. Have a blessed & brilliant Halloween!

Maria Giselle B.

Thursday, October 20, 2016

Shaker See Though Wedding Card


My son's 5th Grade teacher is getting married at the end of this month. I volunteered to create a card for her. I am on a time crunch since my promise day is Wednesday. Between fulfilling a promise to my pre-schooler and helping my 5th Grader create his favorite book character pumpkin, I was left with Tuesday night to create the card.

I made a little research on the would-be couple. Thanks to the web, I saw her wedding announcement. Thanks to my friend, Lindsay. for helping me out with the color theme of the wedding which are the colors of the couple's online wedding announcement.


I cut the wedding rings using Cricut Life's A Party cartridge. I cut 6 pieces of this image with one as a mirror image. I cut this on a gold Recollection cardstock. I stacked the 5 wedding rings on top of the other. I adhered a vellum and acetate to the back of the first layer. I adhered another acetate to the back of the mirror image. The vellum was stamped using a gem stamp from Studio Calico. I cut off the excess after I adhered it to the gem portion of the ring.


To create the windows, I used a circle die slightly smaller than the rings from the My Favorite Things Stacked Circle dies. I used the negative cut as a guide for positioning the circle die. I cut this on a navy blue cardstock and a cream cardstock which is the base of the wedding card. This is a card slightly larger than an A2 card. I embossed the navy cardstock with a Li'l Inker Designs embossing plate. My initial plan was to have the card front all covered with the navy cardstock. The embossing folder is smaller than the navy panel. I tried to continue the embossing but the plate shifted, so you know how that turned out, right? I was left with this navy cardstock that is slightly shorter than the card. This time, I was able to continue the pattern without any shifts. I would have pursued the sides of the panel too but since this is what is left of my navy cardstock, I just left that portion plain.

I adhered the navy panel to the card base. I adhered the mirrored ring die cut to the inner panel otf the card base. Working on the front of the card, I poured some clear Martha Stewart hear sequins to the center of the ring. I adhered the stacked rings to cover the window and create the shaker windows. I was using Ranger Multi Matte Medium to adhere this but I was having little luck on sealing the edges of the ring even if I applied a clear block on top of the rings while the glue is drying. I think one of the reasons why it is failing is because I have a groove in between the stacked and mirror imaged rings. I used a thin double sided tape, and finally, I can shake the card without any sequins falling.


This is a trifold card. I cut another card base using the same cream cardstock, with the score on my right. I cut the largest heart from the Lawn Fawn Stitched Hearts die on a Navy Pearl cardstock, also from Recollection. I stamped the panel using a garland stamp from Studio Calico. I used a Hero Arts Soft Vanilla dye ink. I adhered the heart to this panel making sure that the navy color is showing thru the ring window panel. I die cut the sentiment from Paper Smooches Always and Forever dies using the reverse side of the Recollections gold cardstock. I applied copper Wink of Luna to the words Always and Forever for highlight since these words are overlapping the ampersand.


For the middle panel, I stamped the names of the bride and groom, and added the homerooms of the kids for a personal touch. I didn't add the photo to this post. I want to save that portion for the couple to view first and hopefully, enjoy. I used a  Concord & 9th Sophisticated Script stamps. I used the Misti Stamping Tool to re-stamp the letters for a bolder impression. These kinds of stamps are on trend now a days. To connect the letters, like it is handwritten, I put an acetate on the area to be stamped on. I position the letter next to the already stamped letter, making sure that the tip of that letter is covered by the 'to-be-stamped' letter.  Then, I pick the stamp with a block or in this case, I use the Misti. The acetate stabilizes the letter since it is hard to sometimes hold these single letter stamps upright.


And what is a handmade card without a handmade envelope?

Congratulations, Miss Goehring! 

Thanks for viewing my blog. Have a blessed & brilliant day!

Maria Giselle B.

I am sharing this creation with


Monday, October 17, 2016

Candy Inspired Coloring


We are currently having an 'Inspired By Your Favorite Candy' Challenge at Incy Wincy Designs. Seeing the Ice Cream Shop image by Polkadoodles, I got my inspiration from the Gingerbread House and all the candy decorations that come with it. My youngest son asked for one last Christmas, and I felt bad that it got sold out pretty fast. We will make one this year for Christmas and Halloween. Yeah, that's right. Target sells a Halloween version of the Gingerbread House which is also sold out at the moment. Can you believe that?

Back to the project, it is such a challenge to color this one. There are too many elements to color, so I got challenged by color choice and the size of the elements. This is the second piece that I am coloring so I was extra careful not to mess it up. I used Copics to color the images. I am not really good in taking note of what colors I used since I tend to just pick the markers from the box, then put it back when I am pulling new ones out.


I added the Magda Polakow critters to complete the scene. I colored the critters with Copics. I fuzzy cut the images. I love the way they fit into the scene by having them look like they are sitting on the stools. I added Ranger Glossy Accents to the eyes.


To add more details to the scene, I stamped the background with clouds from Lawn Fawn Into The Woods stamp set using Simon Says Stamp Sea Glass dye ink. I stamped some grass from Mama Elephant Just Hatched stamp set using SSS Apple Green dye ink. I added some ice cream from LF Party Animal stamp set. I stamped the ice cream, colored it with Copics and fuzzy cut it. (It comes with a matching die which I don't have.) I cut a fence using Cricut Wrap It Up cartridge on a Recollection Woodgrain embossed specialty paper.


For the sentiment, I die cut a red cardstock using Little B Handwritten cutting die. I embossed this using Wow! Ultra Thick clear powder and I adhered this to a white strip of cardstock. I embossed this strip with LF Stitched Borders die. I snipped one edge to create a fishtail banner.

I adhered this panel onto a red cardstock slightly larger to create a mat. I then adhered this to a kraft colored card base.

Thanks for visiting my blog. Have a blessed & brilliant day!

Maria Giselle B.


Image Sponsors

I am sharing this creation with


Wednesday, October 5, 2016

Partial and Extended Embossing


I always forget to request an off for World Card Making Day. The thing is, I work every weekend, Friday to Sunday, night shifts. I will plot this on my calendar so I will remember to be off next year. I want to be off so I can join in those one day challenges. I think it is fun.

Winnie & Walter held a Craftie Challenge that day which is still open for a few more days. I only own a stamp set of their brand. The challenges are not limited to using W&W products only, as long as it is a new creation.

I started off by stamping the 'thanks' sentiment from the W&W The Big, Bold and You stamp sets. I stamped the word at the center of a Strathmore Bristol paper. I pre-treated the area with anti-static powder first. I used the Hero Arts Ombre Tide Pool to Navy ink. I did the chacha motion to apply the ink from left to center, since the word sentiment is longer than the ombre dye pad. I flipped the ink to continue the pattern of the ink. I am also using a Misti Stamping tool to stamp the sentiment to the paper. The Misti Tool allowed me precise re-stamping in case the first impression didn't work out well, re-stamping for a crisper stamped sentiment, and also to apply Versamark ink on top of the dye ink stamped impression. I used Wow! Clear Ultra High embossing powder. This has larger granules compared to other embossing powders. To melt the granules, I heat the powder from the back so as not to blow it away if I directly heat on it. Once I saw the granules melting, I heat the front side.


I did a wash of colors over the sentiment to create a stripe pattern of the colors included in the Colour Combo challenge. I allowed this to air dry and embossed the sentiment again using the Wow! embossing powder. Can you see how raised it is? I trimmed this down so I can adhere this to the center.

Most embossing folders come in 4 1/4" x 5 1/2" size. The one I used, American Crafts Amy Tangerine Love Spun embossing folder, is no exception. My card is horizontally oriented and the hearts design orientation is vertical. This is where I had to extend the embossing by repeatedly running the sandwich into the embossing machine. What I mean by this is I initially emboss one side which the folder covers, then move the folder towards the other side, making sure I match up the design with the grooves created by the embossing. I secured this with a non-tacky tape on the back so it wouldn't shift.

I did not only extended the embossing design but I also partially embossed the card front. I did not want any embossing on the part where the sentiment strip will be adhered to.

I die cut a neon green cardstock using the stitched scallop die from Mama Elephants Borderlines Trio Creative Cuts. I adhered this to the edge of the sentiment strip, then adhered this to the cardbase. To finish off the card, I adhered some Pretty Pink Posh Sequins.

Thanks for visiting my blog. Belated Happy Cardmaking Day to everyone!

Maria Giselle B.

I am sharing this creation to:


Monday, October 3, 2016

Creating Two Cards With Positive & Negative Die Cuts


I've been on the look out for pink snowy background. To each his own, right? I just want to get away from the traditional blue snowy background. Other than that, I wanted to create a plaid pattern for today's digi image. I blended a variety of pink Tim Holtz Distress inks on a Strathmore Bristol paper to create an ombre pattern. I die cut this panel using Pretty Pink Posh Scallop Frames Die.

To create the snow background on the negative cut, I used a Simon Says Stamp Falling Snow Stencil. I applied Hero Arts Unicorn White Pigment ink to the holes using a sponge dauber. I wiped the ink off the stencil and positioned it back on top of the panel, slightly offsetting it. I applied transparent Wendi Vecchi embossing paste to the stencil. I lifted off the stencil and poured Judikins Iridescent Sparkle embossing powder to the panel. I allowed this to dry.

I started working on the digital image. I colored the image with Copics. To create the plaid pattern, I carefully drew lines horizontally and vertically using a dark grey Copic Marker. I then drew lines in between the gray lines using a white Uni-ball Signo Broad pen. After which I drew lines on top of the gray lines using a black Copic Multiliner pen. I also used this to line the outline of the image. I applied clear Wink of Stella to the cap bow and the scarf. I fuzzy cut the image leaving a small margin.


To create the ground, I die cut two scrap white cardstocks using a die from Avery Elle Custom Panels die set. Then, I die cut the bottom edges with the Pretty Pink Posh die I've used earlier just to match things up. I pressed Versamark ink pad to these cuts and poured Wow! Snow Puff embossing powder. This is the first time I've used this powder and I am very impressed on how it can add detail to the scene I am trying to create.

I wanted the borders to be raised. Instead of using foam adhesive, I die cut two more pieces of white cardstock using the PPP die. For contrast, I die cut a Doodlebug patterned paper. This is an old graduation line, The Graduates. Yes! You don't have to stick to a paper line's intended occasion.

To assemble the card, I cut a white cardstock at 4 1/4" x 11" and scored it @ 5 1/2" to create a top folding card. The frame die measures 4"x5". I trimmed 1/4" off the bottom just to leave an equal white border around the frame once I adhere it. I started adhering the layers, starting with the white frame, then working my way up to the embossed snow slopes. I used liquid adhesive to adhere the slopes.


I added the digi image, adhering it with foam adhesive. Even if the snow slopes are just stacked cardstocks, the embossing gave it enough dimension that raised it up a bit. The card is close to being finished at this point. I was unsure if I should put a sentiment on the front or not. I chose not to put a sentiment. I was afraid it will ruin the scene. What do you think? I stamped a sentiment inside, which I rarely do, using a stamp from Mama Elephant Season's Greetings stamp set. I stamped the sentiment using Avery Elle Raspberry pigment ink. I used the Misti Stamping tool to stamped the sentiment repeatedly for a crisp impression. I also stamped some snowflakes from the same set using a silver Hero Arts dye ink.

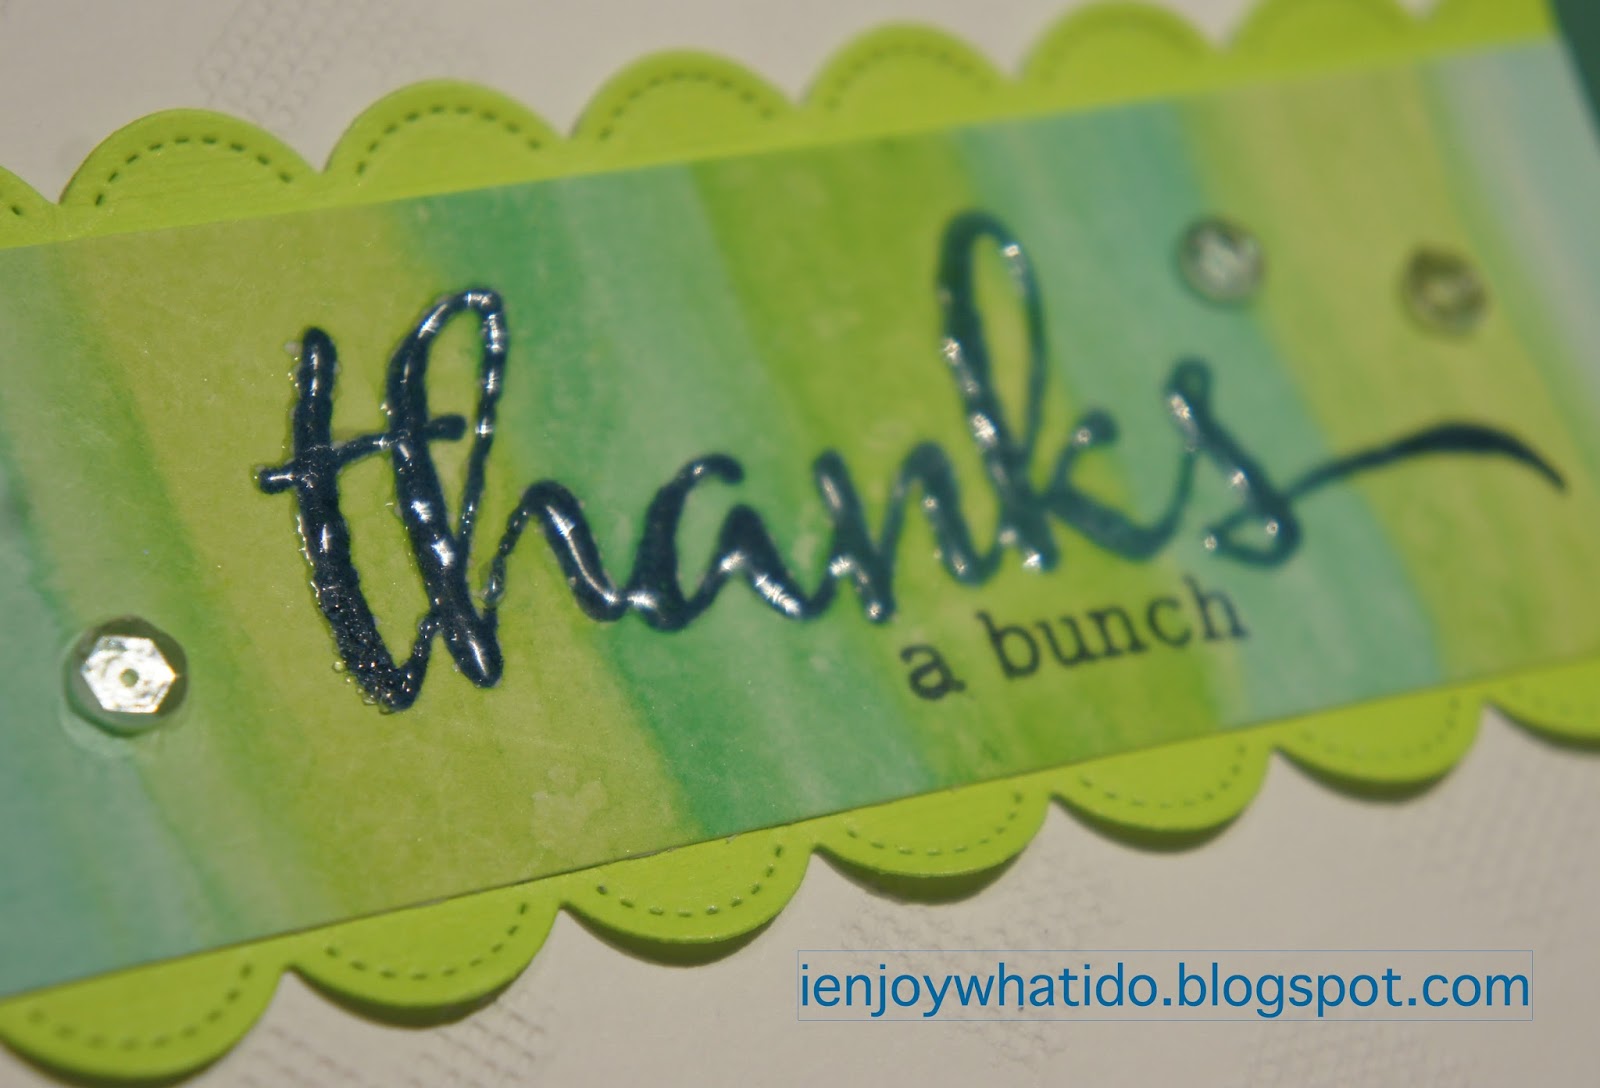
Well, I am left with scraps that I didn't want to add to my scrap stash. Plus, my supplies are already out, so might as well use it some more. I created a second card using the same materials minus the digi image. I stamped another sentiment from the same ME stamp set onto the negative cut of the DB patterned paper. I pre-treated the paper with EK Success Anti-Static powder. I stamped the image using Versamark ink, then poured  Wow! Gold Rich Pale embossing powder to it and heat set it. I didn't like the gold on the shimmery silver dotted paper. I cannot see the sentiment because of the busy background. So, created a shadow by stamping the sentiment, slightly offsetting it, then heat embossing this using Ranger Copper powder. I am still not happy with the result. So I stamped over the gold impression using Versafine Onyx Black and heat embossed this using black powder. The sentiment did pop out but I have imperfections with the stamping even if I used the Misti Tool to repeatedly stamp the sentiment. To fix this, I used a black Sakura Glaze pen writing over the areas without embossing.


I stamped the same snowflakes around the sentiment using the same pigment ink. I spritz this with WPlus9 shimmer spray. I adhered the pink frame to the card base, then stacked the white cardstocks until the sentiment panel is adhered on the top.


Now, I have two cards all at once, slightly different but using the same supplies and using left over die cuts. Try to look at the scraps of your intended card and create something new from it. Because if you are like me, these scraps will remain scraps for a while until I come up with a project that I can use it. Now, that won't be a problem.

Thanks for visiting my blog. Have a blessed & brilliant day! Don't forget to join us at Incy Wincy Designs for All That Glitters challenge.

Maria Giselle B.


I am sharing this creation with