Saturday, August 20, 2022

Loose Background Using a Brayer and Painting with Ink Pad

Hello! Welcome back to my blog. Today's post features my 8th AECP assignment featuring two inking techniques, using a brayer, and direct to paper inking.

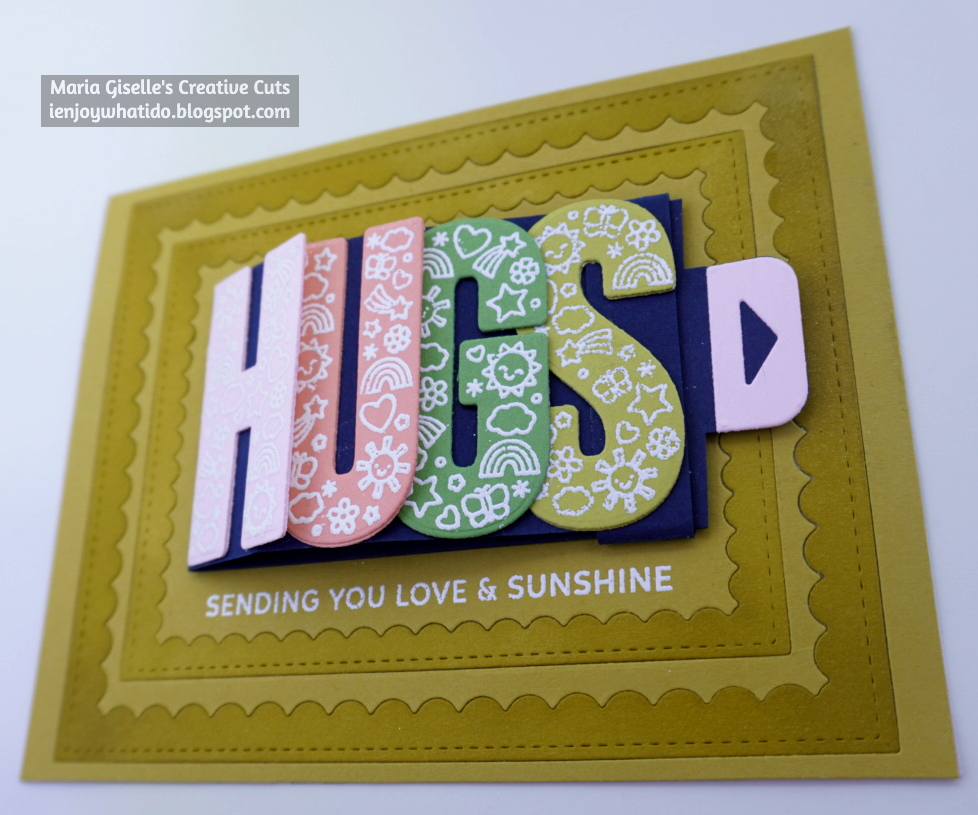
For inks, I am using Tim Holtz Distress Oxide in Cracked Pistachio and Walnut Stain. Starting with the green color, I pressed the ink pad on a craft sheet. I sprayed a bit of water on the ink, then picked it up with the brayer. I rolled the inked brayer on a watercolor paper cut at 4 1/4" x 5 1/2". I repeated this process using the brown ink. I did not have a pattern when I was applying the inks. I just let the brayer create the pattern. I heat set this to speed dry it.

The next step is embossing. To make sure that the background panel is ready for this step, I did a trial of pouring embossing powder to the panel. If no powder sticks to the panel, then it is ready for embossing.

I am using the Altenew Hennah Elements stamp set on this card. I stamped the images more on the left of the panel. I stamped the images with Versafine Onyx Black ink. Since the watercolor paper is a very textured paper, I used the Misti Stamping Tool so I can re-stamp the image, if needed. I poured black embossing powder over the wet stamped images, then heat set it. I stamped one image at a time, pouring the powder after each stamping. I heat set this after stamping a cluster of images.

I filled the area using the smaller stamps included in the set, stamping these images with the same black ink and black embossing powder. Just be careful not to expose the embossed images to the heat so as not to flatten the embossing. 


I lifted the color from the flowers by applying water to the flowers. The wells created by the embossing traps the water inside the image. I picked this water with a paper towel. I repeated this process until I am happy with how light the color of the image is. At one point, I applied a pearlized water to add shimmer to the flowers.

I flicked opaque white paint to the panel and allowed this to dry.

I die cut this panel using a double stitched rectangular die from Simon Says Stamp. This die creates a frame and a panel with stitching detail on the edges of both die cuts. I die cut another cardstock using the same die. I applied glue to the frame die cut and adhered this to the back of the watercolored frame die cut to create a bit of dimension. 

For the sentiment, I die cut the word hugs on the panel using a die from the Altenew Hello and Hugs die set. I am planning to in-lay this back to the panel.

I lifted the ink from this word die cut but somehow, the sentiment is hardly noticeable when in-laid. Not giving up right away, I die cut this word three times on a brown cardstock. I adhered this brown colored die cuts to the back of the watercolored word die cut to create dimension. I still can't see my sentiment. For my third try, I added the green ink directly to the die cut. What's so nice about the oxide inks is that it kept the brown details on the die cut. I was afraid that I was going to lose that detail. 

But I am still not happy with the look. So as my last attempt to save this project, I used the hugs shadow die included in the set to die cut a brown vellum. I adhered the stacked sentiment on this, then adhered it over the opening created for my supposedly inlay sentiment. Much better, what do you think?

I adhered the frame to a side folding A2 note card, using the corner of the Misti Stamping Tool as a guide to make sure the frame is straight. I also temporarily inlaid the main panel inside the frame to help in positioning. I adhered the main panel after. I embellished the panel with several brown sequins.

Whew! I thought I won't be able to pull this one through. The rewards of perseverance. This card has a chalky feel because of the Oxide inks. I bet, it will have a different look if Distress inks are used. Want to give it a try? Thank you for visiting my blog. Have a blessed, brilliant and creative day!

Maria Giselle B.

I am sharing this creation at


Thursday, August 11, 2022

Create a Frame Using a Large Stamp

Hello! Welcome back to my blog. I got my inspiration for today's card from Newton's Nook's latest challenge blog which I linked below. I can't keep myself from joining the challenge. This is one of my favorite challenge blogs.

I cut my card base at 9" x 4 1/2". I scored this at 4 1/2" on the long side to create a top folding square card.  I stamped the sentiment on all the sides of the card front using a sentiment stamp from Newton's Nook Birthday Roundabout stamp set. I used a light gray ink to stamp this sentiment but I want the color to be lighter, so I used the second generation ink. I had to repeat this second generation stamping twice or thrice, depending on the impression I got. Thanks to the Misti Stamping Tool, it made the re-stamping very easy. Since I stamped the sentiment on the edge and since I am using the Misti, I simply rotated the card to stamp the sentiment on all sides.

I stamped the large round stamp on the center of the card front using a darker gray ink. This stamp is also from the NN Birthday Roundabout stamp set. Thanks again to the Misti, I was able to re-stamp this large stamp since I missed a couple of spots on my first try. I blended the lighter gray ink on the center of the stamped image. I set this aside so I can work on the other elements of my card.

I stamped the same large round stamp on Strathmore Bristol paper using Versafine Onyx Black ink. I heat set this to speed dry it. You can use any circle die to die cut the stamped impression but I wanted to add details so I fussy cut the outer edge of the large round stamped impression leaving a white border around it. 

Now, it's time to create this into a frame. I traced a circle on the center using a smaller circle die. I also made sure that the circle I am using is large enough for the cat image to fit in. I used my craft knife to create an opening on the center, then used my sharp pointy scissors to fussy cut and create the frame window. I blended Tim Holtz Distress Tattered Rose Oxide ink on the frame. 

For the focal image, I stamped the cat on Strathmore Bristol paper using Versafine Onxy Black ink. The image is from Newton's Nook Loves Cake stamp set. I heat set this to speed dry it. I colored the image using Tim Holtz Distress Crayons, following the colors of the cupcake in the inspiration photo. I fussy cut the image, cutting it near the outline, then running a black marker around the fussy cut image.

I added dimension to the frame using a scrap piece of a circle frame die cut that fits on the back which does not show through the front. I adhered this using liquid glue, then adhered it to the front of the card, lining the images so it will match its layout. I applied liquid glue to the back of the stamped cat and tucked it to the inside bottom frame.

I added details to the frame and background using pink and glittered pens in my stash.

To fill the space in between the sentiments, I stamped several confettis using the Tim Holtz Distress Bundled Sage Oxide ink. As last step, I rounded the corners.

Thank you for visiting my blog. Have a blessed, brilliant and creative day!

Maria Giselle B.

I am sharing this creation at


Wednesday, August 10, 2022

Embossing with Dies and Create a Background Using a Sentiment Stamp

Hello! Welcome back to my blog. This is my 7th AECP card creation. The homework is to use a die creatively. There are several ways to use a die and for today's card, I am using a coordinating sentiment die to create an embossed impression on the stamped sentiment. I am using Altenew Halftone Happy stamp set and die. I am also using the Misti Stamping Tool to create this card.

On a white piece of cardstock cut at 5 1/2" x 4 1/4", I stamped the happy outline on the center using a dark brown dye ink. I lined the halftone happy stamp to this outlined impression. The halftone happy stamp gives you an ombre look impression once stamped. To step up this look, I inked the sentiment stamp using three different shades of ink. This is where the Misti Stamping Tool comes very handy. I partially inked the sentiment then stamped it. I wiped off the residual ink. I inked the stamp with the next color shade, then re-stamped the sentiment. I continued this process one more time. If I want the inks to blend, I apply ink to that area and re-stamp the sentiment again. I just made sure that the ink gradation is not lost in the stamping process.

I created a mask for this focal sentiment. This is one of the few occasions that I wish the coordinating die creates a border around the stamped image when die cut. But since the coordinating die is an exact match of the stamped impression, I created my own mask that will have that border effect. I stamped the outline sentiment on masking paper. I fussy cut this leaving a small border around it. I adhered this to the stamped panel, trying my best to line up the sentiment on the cardstock panel and the masking paper. I could have used my light box to help with the alignment, but I didn't think about that while I was creating the card.

I stamped the celebrate stamp repeatedly on the background using varied dye inks. The stamp is from the Altenew Label Love stamp set. The colors I used was inspired by the latest Altenew Challenge which I linked below. I used the Misti Stamping Tool to create the background. It is a tedious process but it is just like playing an instrument, the repetitive process is like a stamping rhythm, position stamp  ->ink->stamp->re-stamp, if needed->clean stamp with shammy->move paper->repeat the process until the whole background is filled.

I always felt awed once I remove the masking paper that's why masking is one of my favorite techniques. 


To add the embossing, I lined the sentiment die to the matching stamped sentiment. I used a silicone mat and followed my die cutting machine's sandwiching guidelines for embossing. I tried to capture in photos the embossing but the look it created in real life is amazing, especially when you run your fingers on the embossed impression.

I added sentiment strips to complete the greeting. I blended ink to a white cardstock with the same mahogany ink I used on the sentiment and the background. I heat set this to dry before stamping with Versamark ink. I poured white embossing powder to this, and heat set it. 

I trimmed a sliver off the edges and matted this panel with a dark red cardstock. 

I really enjoyed creating this card. I hope you give these techniques a try. Have a blessed, brilliant and creative day!

Maria Giselle B.

I am sharing this creation at


Sunday, August 7, 2022

Flipping Sentiment Greeting Card with Surprise Message (New to My Stash #24)

Hello! Welcome back to my blog and to another post in my series, New to My Stash. I have not made a post in this series in a while. I am so glad to be able to feature a newly purchased craft item, which is the focus of this series. 

For today's post, I am featuring Pretty Pink Posh products specifically the Hugs stamp set and coordinating die set. I created this card to also join in the latest Ellen Hutson blog's challenge as linked below. I like the colors in this challenge.

This is not a true waterfall card since not all the letters flipped to the back of the slider. What matters is the hidden sentiment gets to be seen once it is pulled out. The hidden sentiment is from the PPP Thoughtful Greetings stamp set. 


The background panel was created by inlaying the frame die cuts created by the PPP Scallop Frames die set on a Concord & 9th Stardust cardstock cut at 5 1/2" x 4 1/4". I blended the same ink on the scalloped frames and brushed in some pearl powder for some accent. 

This was adhered to a top folding A2 notecard. 

Thank you for visiting my blog! Have a blessed, brilliant and creative day.

Maria Giselle B.

I am sharing this creation at


Monday, August 1, 2022

Monochromatic Holiday Card


Hello! Welcome to another challenge @ Incy Wincy Designs. The themes for this month are Food and Drink +/or Monochrome. Our challenge sponsor is Limited Runs. The image I used on this card is linked below. 

I printed the image on watercolor cardstock. I colored the image with Tim Holtz Distress inks. 

I created a stitched framed for the image by first, partially die cutting two frames from the Altenew String Art Rectangle die set to create a pierced square panel. To make this into a frame, I cut off the center using a craft knife to create a window. 

Using DMC floss, I sewn a zigzag pattern on the frame using two brown flosses for some contrast. 

I embossed a sentiment on the the watercolored panel with a Ranger Copper embossing powder. I blended some Tim Holtz Distress ink in Tea Dye on the sides of the cup to dull the bright white of the watercolor paper.

I adhered the frame to this and cut off any excess.

For the background panel, I cut a typing paper at 5 1/2" x 4 1/4". I adhered two kraft patterned papers from Pebbles to this. 

I adhered the stitched focal point to the patterned paper panel.


Thank you for visiting my blog. I hope you join us in this month's challenge. Have a blessed, brilliant and creative day.

Maria Giselle B.


I am sharing this creation at