Tuesday, May 21, 2019

Foiled Embellished Mandala Card


Hello. We have a new challenge at Incy Wincy Designs. The theme is Embellishments. I am using an image from one of our sponsors, YamPuff's Stuff.

I printed the image on Neenah Solar White cardstock using a toner printer. I finally invested on the Picket Fence Studio Life Changing Blender Brush set. I used the smallest brush to apply varied blue inks of Tim Holtz Distress Oxide to particular areas of the mandala image. When I used the medium sized brush to blend the background, I wasn't getting a smooth blend. I am not sure why is this so, if it was the paper or my technique. I can't really say I like it at this point. I have to use it on another kind of paper, and maybe I'll have an even blending.

I covered the image with a silver Minc foil. I sandwiched this with a folded parchment paper and placed an extra cardstock under the printed image to act as a shim. I fed this thru the Minc machine.


I added sequins and a jewel to embellish the mandala. I added Tonic Nuvo drops and Stickles for added embellishment. I love the overall shine and shimmer of the card. I did not add any sentiment to keep the attention on the image.


I trimmed this into a 4"x4" panel. I matted this with Simon Says Stamp Glimmery cardstock which is cut to 4 1/4"x 4 1/4", creating a square card. I adhered this to a top folding note card of the same size.

I created this card for my second son who is celebrating his 14th birthday today.

Thank you for visiting my blog. I hope to see your creations at Incy Wincy. Have a blessed, brilliant and creative day!

Maria Giselle B.


Friday, May 17, 2019

Fish Bowl Shaker with Floating Balloon


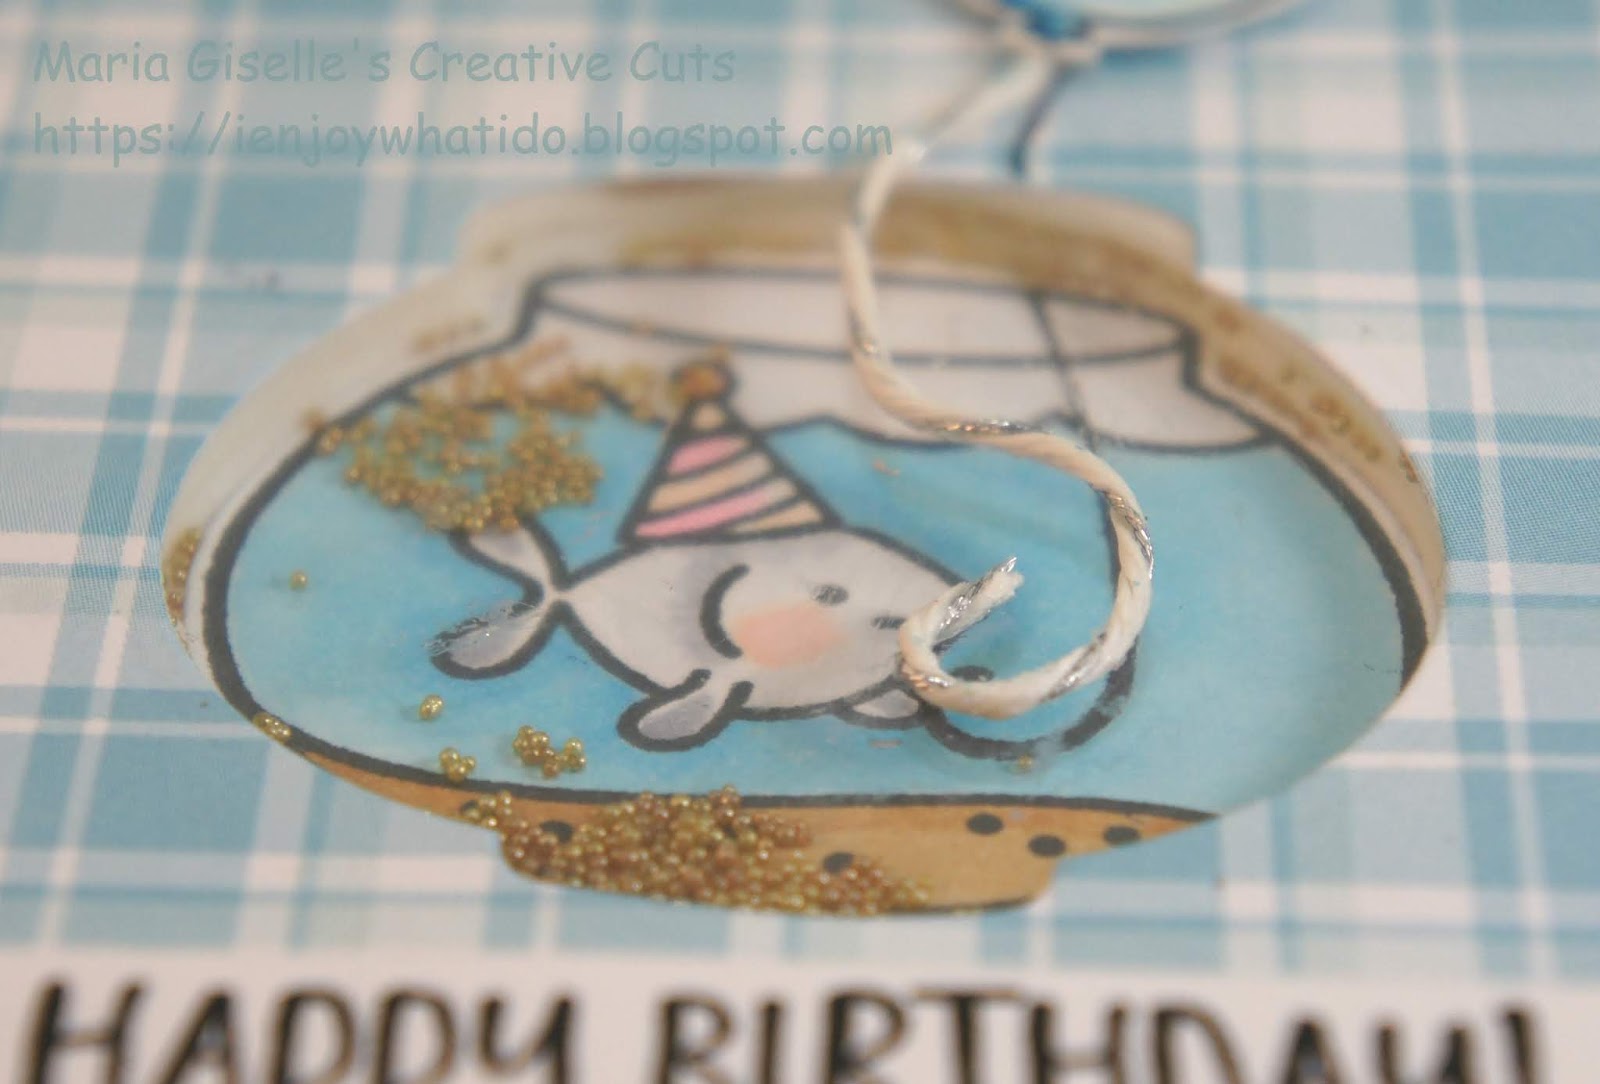
Hello! I created this card for my husband's 'tieth birthday. He loves to fish, thus explains the image. Also, I created this card to join in Lawnfawnatics' latest challenge Pet Love. My son used to want an aquarium, and with his interest in having a fish, it lead to his dad getting hooked to fishing.

I stamped the bowl on a Neenah Solar White cardstock using Memento Tuxedo black ink. The image is from Lawn Fawn Fintastic Friends stamp set. I stamped the party hat which is from LF Party Animal stamp set. I stamped the hat on masking paper, and fussy cut it. I covered th stamped party hat with the mask, then, stamped the fish from LF Fintastic Friends stamp set. I stamped the tail of the balloon next which is from the LF Party Animal stamp set. I colored the images with Copic markers.

I am using the LF Perfectly Plaid patterned paper. I cut this in 4 1/4"x 5 1/2". I positioned the coordinating fish bowl die on the center, then ran this through the die cutting machine creating a window. I adhered an acetate to the back. I also cut a small slit on the top of the fish bowl where I will place the balloon. The balloon is from the LF Party Animal stamp set. After I stamped and colored the balloon with Spectrum Noir Shimmer pens, I fussy cut the balloon. There is a coordinating die for this set but I don't have it. I also drew in the rest of the balloon string. If I will re-do this card, I will omit the balloon string. After I stamped and drew the string, then added the floating balloon element, it didn't look right with the string just being fixed.

I adhered a LF Silver Sparkle Cord to the back of the balloon with a liquid glue. I cut a doubled up foam small enough to fit the slit. I adhered this to a penny which I placed at the back of the window patterned paper. I adhered the balloon to this.


I cut thin strips of doubled up foam adhesive. I surrounded the colored fish bowl with this foam tape to create a well. I applied double up foam tape to the back of the patterned paper making sure I avoid the penny and the window areas. I poured seed beads to the well, then closed up the shaker by lining the window of the patterned paper to the fish bowl.


I squirted a small amount of glue to tip of the twine and adhered it to the acetate, lining it up with the stamped balloon string. It may be hard to notice the floating balloon since I did not shoot a video featuring this interactive element but if you take a look at the photos, you will notice that the balloon is tilted differently on each photo.

I die cut a teal cardstock to create a frame using LF Outside In Stitched Scalloped die. I used the two largest dies to create the frame.

I die cut a white cardstock using LF Fancy Folded Banners. I stamped the sentiment to this using Versafine Onyx Black ink, poured clear embossing powder, then, heat set it. The sentiment is a freebie from LF when I ordered last year during my birthday month.

 I modified the banner so it can fit on the bottom of the card panel. I cut off the ends of the banner where it was scored. I adhered it to create a bow-like banner then, placed the center part using foam adhesive.

Thank you for visiting my blog. I hope you have a blessed, brilliant & creative day!

Maria Giselle B.

I am sharing this creation at 


Monday, May 13, 2019

Mother's Day Flower Mason Jar


Hello! Belated Happy Mother's Day! I created this as a give-away to the mothers I am working with on my night shift. Just my way of greeting them on this special day.

I am using My Favorite Things Die-namics Mason Jar Mug and Fresh Cut Flowers. I scored varied colors of cardstock at 2 1/2". I positioned the mug die slightly higher than the fold. I was planning to make it into a small top-folding card but it didn't turn out that way. It did create a hole at the slit where I was able to thread through the stems of the flowers.

I did all the die cutting. After the mason jar, I die cut the flowers using felt and the stems using green cardstock.

I rubbed the powder tool to the front side of the mason jar. I stamped the sentiment on the mason jar using a stamp from Simon Says Stamp Best Mom Ever stamp set and Versamark ink. I used the Misti Stamping Tool to re-stamp this solid sentiment several times for a good impression. I poured white embossing powder to the area and heat set it.

I adhered the stems to the back of the felt flowers using a strong liquid adhesive. I threaded the stems through the hole and applied liquid adhesive to the back of the stems. I adhered Pretty Pink Posh gems to the flower centers.


I stamped the 'to' and 'from' on the back of the mason jar using Lawn Fawn Tiny Tag Sayings stamp set.

I die cut a small tag using Concord & 9th Bags and Tags Die set. I adhered a heart to this.

I wrapped a Lawn Fawn Silver Sparkle Cord around the top of the mason jar, thread the tag through, and tied a bow. I squirted a dot of glue to the knot to keep it secure.

I hope you had a memorable Mother's Day celebration with your loved ones. Thank you for visiting my blog. Have a blessed, brilliant and creative day!

Maria Giselle B.

Sunday, May 12, 2019

3D Flowers Using Cricut


Hello. It is prom season! This first flower was created for my son who is in Senior who attended his first prom last week. He requested a blue flower so this is what I came up with! The glittered paper is from Darice. The cardstock for the leaves is from Paper Source.


At the same time, it was Teacher Appreciation Week last week at my youngest son's grade school. According to my First Grader son, his teacher's favorite color is green. The cardstock for the flower is from Paper Source. The cardstock for the leaf is from Stampin' Up.


Thank you for visiting my blog. Have a blessed, brilliant and creative day!

Maria Giselle B.

I am sharing this creation at


Monday, May 6, 2019

Trifold Letter Shaped Card Using Cricut


Hello! We have a new challenge at Incy Wincy Designs Challenge Blog. Our challenge theme is creating Shaped Cards. I suggested this theme, thus, earning me blog post author too. When I came up with this theme, my idea is to create a non-traditionally shaped card. Anything but a rectangle and a square. I cannot wait to see what entries we will have for this challenge.

Our sponsor is Polkadoodles. When I was asked to suggest which images we can use, most of the images I requested are images that can be used in a Mother's Day themed-card. I always like creating one thing for two purposes. This is how I save time and maximize my creating effort.

I colored the image using Prisma color pencils. I fussy cut the image leaving a thin white border around the image.

I used the Cricut Design Space to create the letter shaped base card. I weld the letter M to the heart. I cut this twice. I ink blended the letters and the hearts with Tim Holtz Distress Oxide. I flicked water droplets to the inked area, then picked the water droplets with a dry paper towel.

I stamped the sentiments to one side of the inked heart, being mindful of placement since I want the image on the other side. The sentiment stamps are from Lawn Fawn Mom + Me stamp set. The sentiment stamps are in phrases. I did not want to cut the stamp so I masked the part which I don't need using a washi tape. After which, I removed the tape, wipe off any stray ink using my finger, then stamp the sentiment on the heart. I did not have a good impression on one of the words. No worries! I traced the letters using a thin black marker.


I adhered the image to the other side of the heart. I stacked the hearts on top of the other using a liquid glue to form the word Mom.

I added clear Wink of Stella to the bows and flowers. I also added Stickles to the heart on the letter envelope and to the flower centers.


You can fold this into a tri-fold card and it will fit a regular A2 sized envelope.


The card can also stand up if the recipient wishes to display this card.

Thank you for visiting my blog. Advance Happy Mother's Day to all the mothers out there!

Please join our challenge which is live for the next two weeks. I cannot wait to see what your shaped card is. Have a blessed, brilliant and creative day!

Maria Giselle B.