Showing posts with label Pinkfresh Studio. Show all posts

Monday, June 1, 2026

Bookmarks on a Card Sketch


Hello! Welcome back to my blog. It is time for a new challenge @ Stick It Down Scrapbook and Card Making Challenge on FB. Joining is very easy. Create a new project following this month's sketch. Upload your project to the SID FB June folder. There are 3 sketches to choose from, a single scrapbook layout, a double page scrapbook layout and/or a card. Choose one or choose all!


I got busy last month with a huge project that I had to set aside my paper stitching. I am so happy that I was able to add stitching to this month's card sketch. The pattern is from Just CrossStitch Magazine, Volume 44, Number 2, Summer 2026 edition. The name of the pattern is Tapestry of Twelve which is a large pattern. I did spotlight stitching on parts of the pattern.

The die I used to add the hole impressions on the cardstock is from Altenew. It created a faux 14-count Aida cloth on paper. I used an 80 lb light gray cardsotck on my project. I used 2 strands from the 6-ply DMC embroiderry floss. 

After I stitched the patterns on the cardstock, I used a craft knife to carefully trim off the excess leaving a thin border around the patterns.

I adhered this stitched panels to a darker gray cardstock using a double adhesive tape. I trimmed off the excess using the stitched panels as a guide. Now, there are two bookmarks created. 


I made this into an A6 card (4.5" x 6.25") to accomodate the length of the bookmarks. I trimmed a gray cardstock at 4.5" x 6.25" for the front panel. I added details to this panel with the use of The Greetery Aida Cloth Texture Plate to tie up with the stitching theme of the bookmarks. Since the plate is smaller than this front panel, I added the impressions on a staged fashion. I partially impressed the die cut on the top half of the front panel with the die laid horizontally to it. Afterwhich, I moved the front panel so that the die will be positioned on the area where there is no impression. I matched a portion of the impressed area with the die before running it through the die cut machine. I felt it lock in place that's why I know that the position will be just right.


For the sentiment on the sketch, I used a vellum to hold the stamped and die cut sentiment. At the same time, this vellum band will keep the bookmarks in place. The sentiment stamp and die is from Pinkfresh Studio. I stamped this on a dark gray cardsotck using a green dye ink. I stamped the sentiment again with Versamark ink so I can emboss it with clear powder. I love it that the sentiment was intricately die cut especially the space on the center of the words. I die cut an extra piece to layer it on the back of the stamped die cut sentiment for a bit of dimension. The vellum band was secured with a piece of tape on the back.


To keep the bookmarks from slipping down, I created vellum photo corners using scrap strips of vellum. I want to give a shout out to Aunt Annie's Crafts for this technique. I folded the vellum strip at a 45 degree angle to form a corner.  I slipped this to the corners of the bookmark. I applied a dot of glue to the back of these vellum corners, where the slit is. I slipped the bookmarks through the vellum band and pressed the photo corners to the front panel to adhere it. I placed something heavy over the photo corners, magnets in particular, while the glue is drying. 

Below is a video showing how the bookmarks stayed in place on the front panel, what it looks like when it is removed, and how to put it back. 


I hope you like today's card and my take on the sketch. I hope you join this month's challenge. We can't wait to see your projects.

Have a blessed, brilliant and creative day!

Maria Giselle B.

I shared this card at


Friday, November 21, 2025

Color Inspired 18th Birthday Card


Hello! Welcome back to my blog. I have been commissioned to create a birthday card for a debutante. When I am tasked with creating a card, I usually ask about the recipient to customize the card. The only info I got is the party has a garden theme. I turned to the internet, specifically blog challenges, for inspiration. The Pinkfresh Studio Monthly Challenge was a great help in putting this card together. 

I stamped the floral cluster stamp from the PFS Best Thing stamp set on white cardstock. This stamp piece does not only have the floral cluster. It also has the bird. I only inked the cluster using a brown dye ink. I used the stencil to blend ink to the cluster. The colors I used are from the color palette in the monthly challenge. I die cut the cluster using the coordinating die. I created 6 pieces of this cluster.

For the card panel, I cut a blue cardstock at 4 1/4" x 5 1/2". Using the same cardstock, I trimmed a 3" x 4" panel. I die cut a design on this panel using a die from the PFS Classic Tags with Fillable Elements die set (retired). I backed this with a metallic green vellum.


I die cut the numbers on the same blue cardstock. I die cut multiples so I can adhere the number on top of each other for some dimension. I pounced Versamark ink on the top layer of the numbers. I poured iridescent blue embossing powder on the sticky ink then heat set it until the powder melted.

The sentiment is from the PFS My Favorite Things To Say stamp set. I did some masking to come up with the 'you' sentiment. I inked the words with the blue ink and Versamark ink and stamped the words on white cardstock. I used the same embossing powder I used on the numbers. Since the font of the word 'celebrate' is thin, not a lot of powder stuck to it. I fussy cut the word 'celebrate' leaving a small white border around it. I die cut the word 'you' into a strip. 


I positioned the floral clusters on each corner of the cardstock panel. Once I am happy with the placement, I lifted these pieces off the panel using a Glad Press 'N Seal. I adhered the vellum panel, then adhered the floral clusters, making sure the vellum panel is showing through the center opening created by the clusters. The clusters will have some overhang on the sides which I later on snipped off. 

I adhered the numbers, then the sentiment. I added blue sequins to the panel.


I hope you like today's card. Thank you for visiting my blog. Have a blessed, brilliant and creative day!


I shared this project at


Thursday, January 23, 2025

3D Floral Birdcage


Hello! Welcome back to my blog. Today's project was inspired by Pinkfresh Studio Blog's January Challenge in which you are given the opportunity to create a project based on any of the challenges held last year. My project is a mash up of the May, August and November challenges. May's challenge theme is Flower Power. August's challenge theme is Washi Tape. And, November's challenge is Thank you. 

I created a 3D Birdcage by die cutting 4 pieces of the cage from the PS Best Thing die set. I die cut this on a white cardstock. To connect the cage die cuts, I scored the base part of the cage that is sticking out. I folded this, squirted a small dot of glue on this portion and adhered another cage die cut making sure that these parts are aligned with each other. 


I trimmed a white cardstock at 1/2" x 2 3/4" to create the tabs that will hold the flowers. I scored this at 1/4" and 2 1/2". I adhered the folded piece to the bottom part of the cage. The tabs provided support to the intricate 3D cage.

I adhered the PS Garden Bouquet washi tape to a white cardstock. Using the coordinating die, I die cut the flowers. I adhered the ends of the flowers to the tab. I only used the small flowers on this project. 


I squirted a small dot of glue on the top edge of the cage die cut where the two cage die cuts meet to close the 3D cage. Surprisingly, the glue worked! I threaded a cream twine through the holes on the top of the birdcage to close it up. I knotted the twine, then threaded a pearl gold heart before tying the twine into a bow.

For the sentiment, I heat embossed a sentiment stamp from the PS Humbled & Grateful stamp set on vellum. I used Wow! Pearl Gold embossing powder. I die cut the sentiment using the matching die. I die cut another piece of vellum with this die and adhered this to the back of the stamped vellum die cut. I adhered the sentiment to the front of the 3D cage.

I adhered a couple of mini heart sequins to the rails of the bird cage. 


I hope you like today's project. Thank you for visiting my blog. Have a blessed, brilliant and creative day!

Maria Giselle B.

I am sharing this project at


Friday, November 1, 2024

BetterPress Letter Press & Glimmer Hot Foil


Hello! Welcome back to my blog. It is a new month! I can't believe it is November already. It is an Anything Goes challenge at Incy Wincy Designs with an optional twist, create a Christmas Card with a Handmade Background. I used both themes on my cards for today's post.

Have you tried the BetterPress Letterpress machine by Spellbinders? This is my first time to use this machine. Just like any other new tool/machine, I have to learn the tricks in using it effectively. 

Although Spellbinders came out with inks for the BetterPress system, I used dye inks from Altenew for the inking. I used the Spellbinders BetterPress specialty cardstock (Cotton Card), which is a heavy weight cardstock (220 lb.), to do the letter press technique. 

On my first try, I did not get a bold impression. I thought it was because of the light blue ink that I used. I repeated the process and still was not getting a good impression. On my third try on re-inking and letter pressing, the cardstock shifted creating a double image of the background. Oh, well. 

On my fourth try with a new cardstockck, I added a thin cardboard as a shim on the top of the BetterPress platform. This time, the shim added extra pressure to push the inked press plate towards the heavy weight cardstock. I just discovered the right BetterPress recipe for my Sizzix machine. Doing it using a darker blue ink was easier now that I know the right BetterPress sandwich for my die cut machine.

The Pinkfresh Studio Decorative Frames Press Plate that I used for the background has a dual purpose. It can be used for both BetterPress and Glimmer Machines. I hot foiled the background on a light blue cardstock using a light blue foil. 

The Pinkfresh Studio Decorative Frames Press Plate has a coordinating die which I used to cut the frames apart. If you are going to use a full background press plate or hot foil plate, I suggest using a cardstock larger than A2. The extra space allows you to get full coverage of the background design when foiling and letter pressing. 


I tried transferring the left over design on the foil to another cardstock using the Waffle Flower Solid Hot Foil Plate. I failed on this part. I should have used a light weight, non-textured cardstock and/or I should have used a shim. 

I interchanged the frames to create a multi-colored background. With this I was able to create three cards right away. Extra cards created are always great. 


I created a fringed multi-layered Christmas tree on the card above. I used a fringe scissors to cut the fringes. I added impressions to the top layer of the tree and the trunk. The triangle die I used is from Honey Bee. The star was die cut using a Lawn Fawn coordinating die. I adhered blue gems to the tree. I inlaid the decorative frames, using all of the pieces including the drop negative cuts for a seamless finish.


For my second card, I cross stitched the Christmas tree on dark green cardstock. The Christmas tree pattern is from The Magic of Christmas to Cross Stitch by Veronique Enginger. I framed the cross stitched Christmas tree using the second to the largest frame of the decorative frames. I also removed the in-between frame cuts on this card. I embellished the tree with star sequins and gems that glow in the dark. I adhered star sequins on the top of the tree.


For my third card, I poked a hole on the Christmas tree. I threaded a green glitter thread through the holes. I added dash lines in between the glitter thread using a Sakura Stardust pen. I also did stitching on the trunk using a metallic embroidery floss. I added a gold glitter star on the top of the tree. I die cut the star using the same Lawn Fawn coordinating die I used on the first card. I added different colored gems to embellish the tree. 

I hope you like today's projects. Please join us in this month's challenge at Incy Wincy Design. It is a very good motivation to start working on those Holiday cards.

Have a blessed, brilliant and creative day!

Maria Giselle B.

I am sharing this project at


Tuesday, September 3, 2024

Framed Art


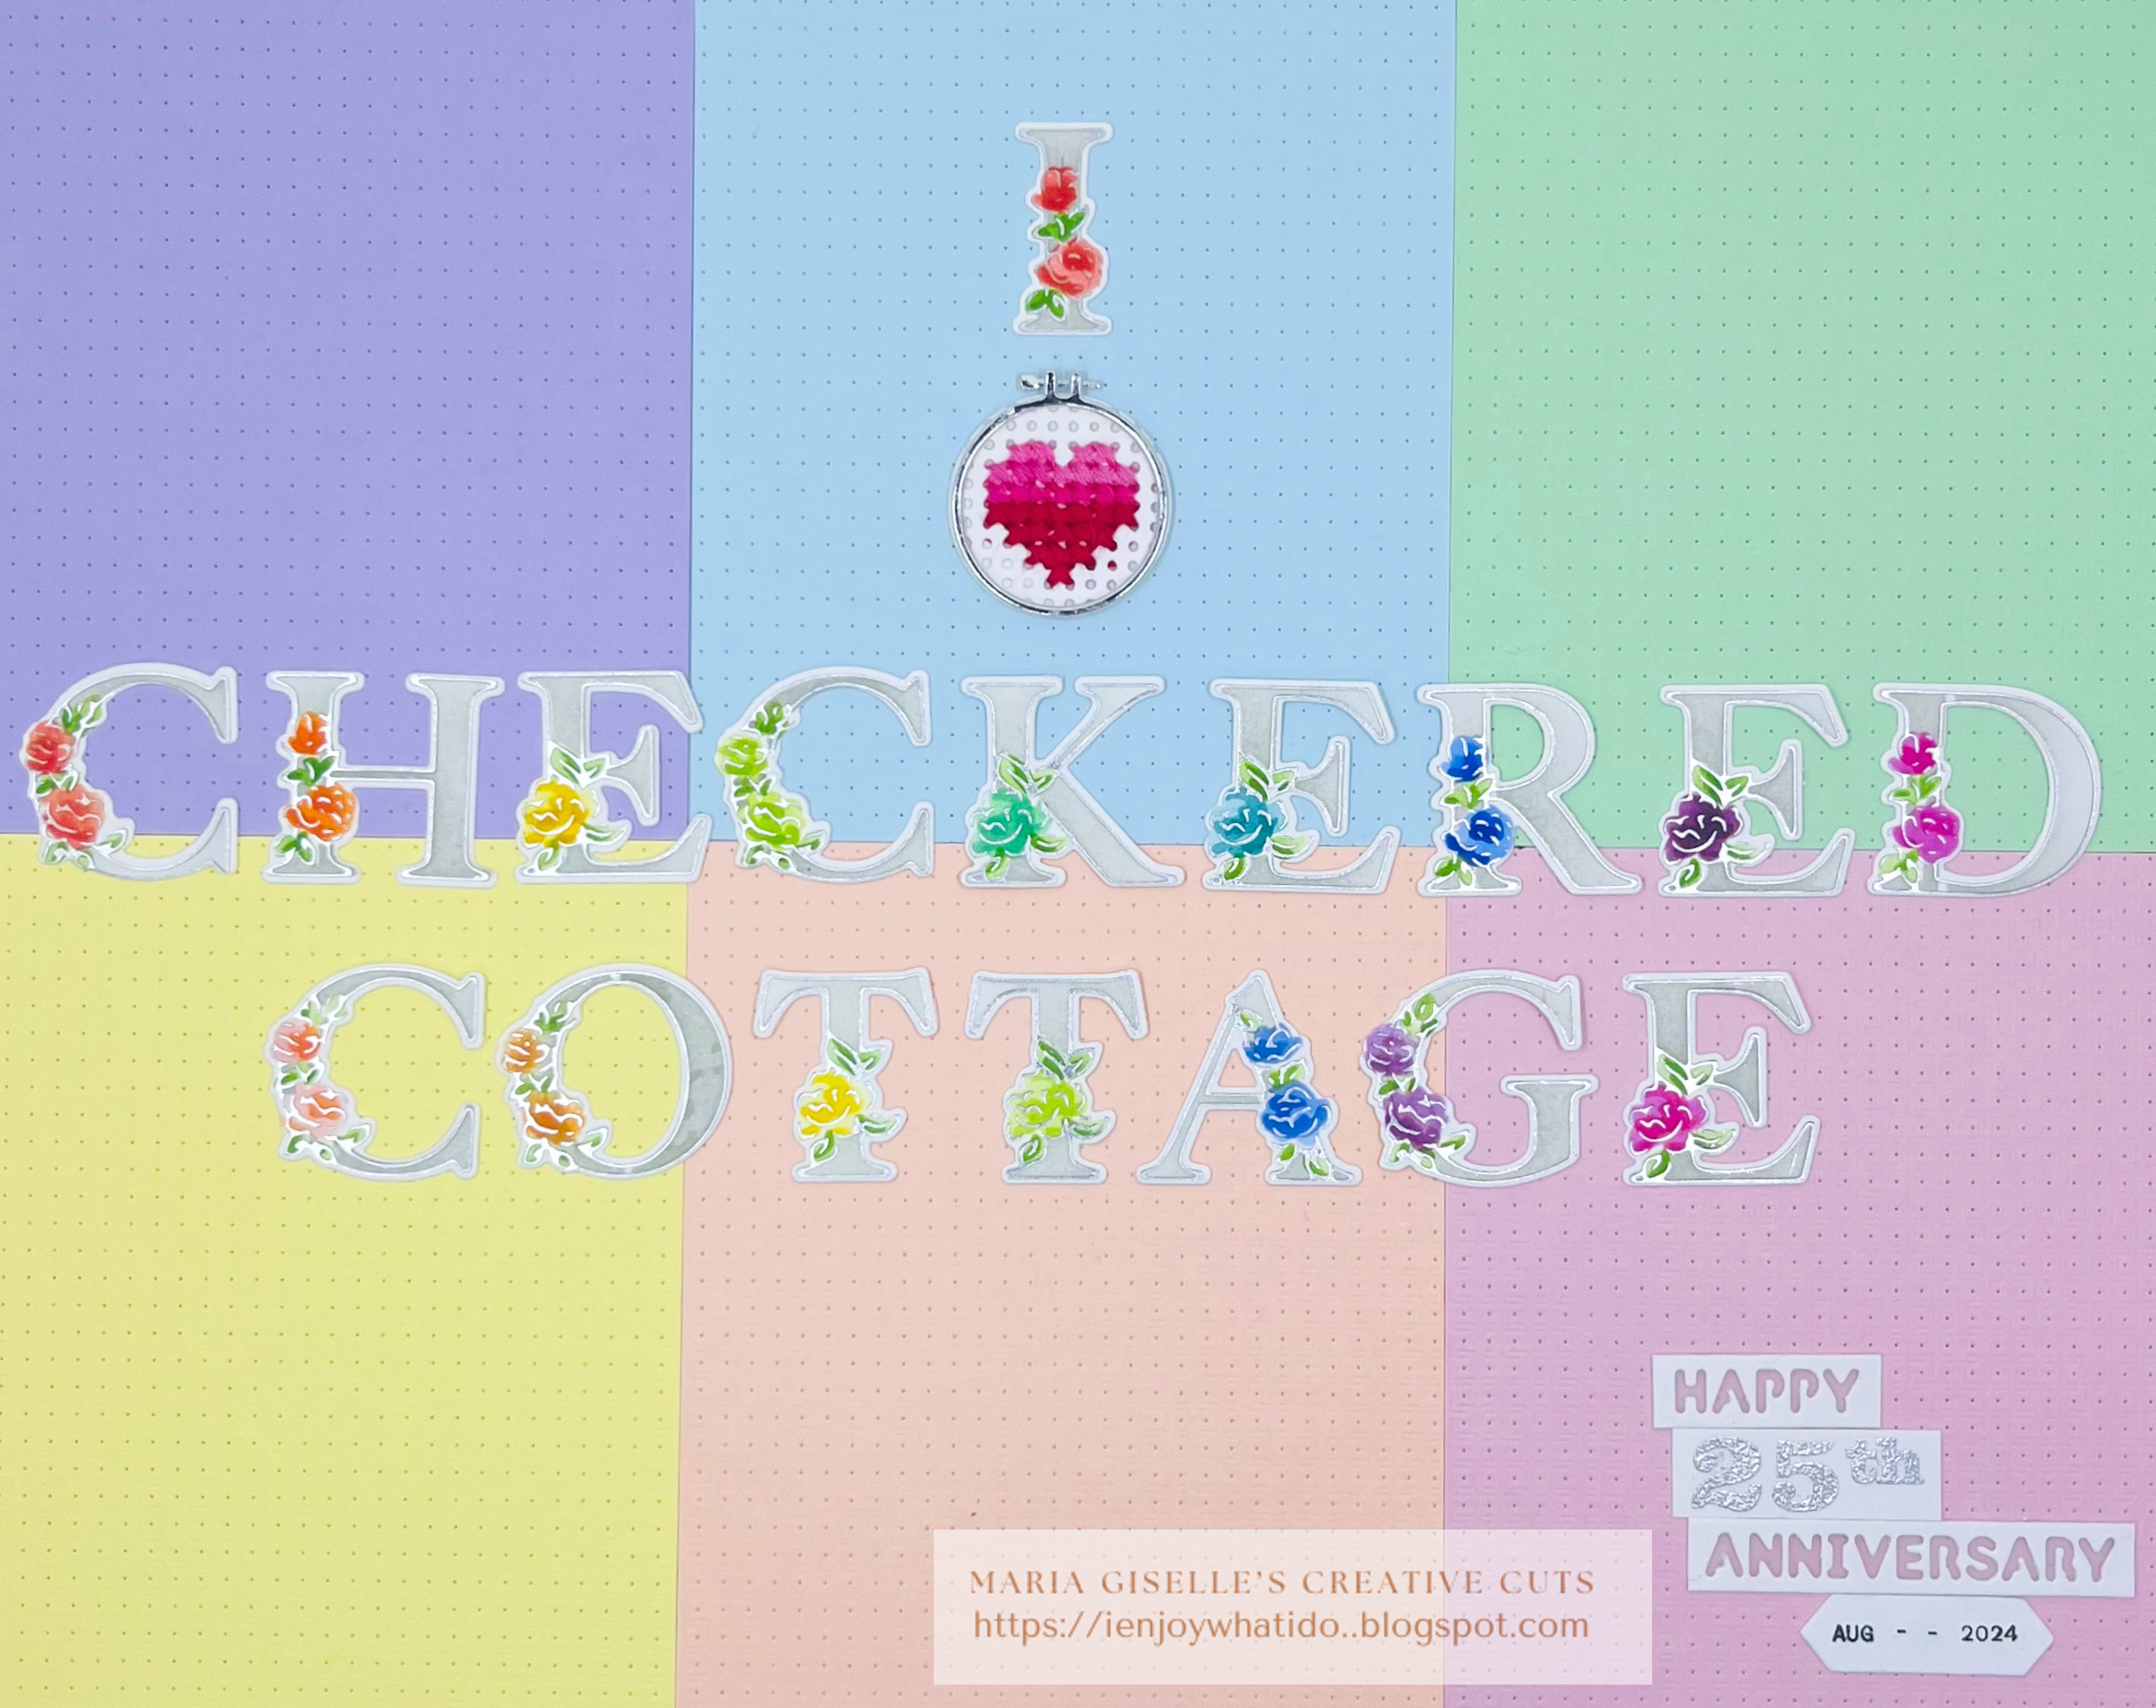
Hello! Welcome back to my blog. Today's project is a gift to the only locally owned brick & mortar craft store here in St. Louis, Checkered Cottage. They celebrated their 25th anniversary last August. This store is owned by three wonderful ladies, Susan, Robyn & Linda with the support of their staff and class instructors. If you happen to pass by St. Louis, how about stopping by this store?

My favorite section of the store is the Recreate where gently used craft items are sold. I love finding treasures here especially craft tools. I also love their wide array of products. It takes a lot of discipline not to splurge on craft items but sometimes, I cannot help it especially when they have the latest releases of my favorite brands. 

Back on the project, the letters are foiled using the Pinkfresh Studio Inna Alpha: hot foil set, layering stencils and die set. I purchased the first two items from the Checkered Cottage. I agreed to show them a project using the stencils. This has been a while. But isn't this the best opportunity to show them  how the stencils work and make them keep it, too?


There is another discovery I made in the process of creating this project. I have not been using my Spellbinders Glimmer Machine because of my failure of getting a good foiled impression. I found out that Spellbinders carry a Glimmer specialty paper. The Checkered Cottage does not have this specialty paper. They only have the Betterpress specialty paper. I went ahead and purchase this to foil on. What is there to lose, right? If it doesn't work then I can use the cardstock for other purposes. But what a nice surpise! This cardstock worked really well with the Glimmer Foil despite its textured and matte finish. 

I used Tim Holtz Distress inks in blending ink on the flowers and a gray dye ink for the letters. Since the flowers and leavers are small, I only used one color for each flower on a letter. I started with a light hand in blending the ink on the first stencil. You achieve a darker shade of the color as you go along with layered stencils.


I stitched a heart using the smallest embroidery hoop die from The Stamp Market Embroidery Hoop Dies. I used a red DMS Variegated embroidery floss for the stitching. I die cut the embroidery hoop on silver mirror cardstock to tie in with the silver foiling of the letters. 

For the background, I trimmed varied pastel colored cardstocks at 4 1/4" x 5 1/2". I added details to these panels with The Greetery Aida Cloth Texture plate to tie in with the stitched heart. I adhered these panels to a 12" x 12" white cardstock and trimmed off the excess. The frame size is 11" x 14". I trimmed 1/4" off each edge for a clear border around the panel. 


I die cut the Happy Anniversary on white cardstock. I adhered a vellum to the back. The die I used is the Altenew Essential Sentiment Strips die set. I embossed the 25th using a retired My Favorite Things stamp set. I embossed this using silver embossing powder. I stamped the date on white cardstock using the Heidi Swapp Roller Date Stamp. I die cut this into a decorative strip using a die from Concord & 9th. 

I hope you like today's project. Checkered Cottage was nice enough to make an FB post with a photo of this framed art and ME! (Checkered Cottage) They also have this framed art on display (Checkered Cottage 2). 

Have a blessed, brilliant and creative day!

Maria Giselle B.

(The link to the Altenew product I used on my Framed Art is Altenew Essential Strips Die Set . My affiliate link is: https://altenew.com/6358517. There will be no additional cost to you should you decide to purchase this product. It is just a way to help a fellow crafter sustain her love for crafting. While in the Altenew blog, don't forget to check out this month's release. Thank you for your support!)


Sunday, January 21, 2024

1-For-3 Scrapbook Layout


Hello! Welcome back to my blog. We always hear 2-For-1 projects in which we are able to create two projects using the same supplies. Today's project is the reverse of that. I am calling it a 1-For-3 layout. Why did I call it that way? This project was created for 3 reasons which is listed below making it a 1-For-3.

1. I am so honored to be invited again to the Coffee and Cards with Celeste and Deb. My project, even though it is not a card, was created  based on the sketch below. 


I was planning to make a photo card for the collaboration but I printed the photo larger than how I wanted it to be. I did not want to waste the photo so I moved ahead with the project. 

The coffee I chose is Dulche de Leche from Revocup Coffee, a locally owned Ethiopian coffee shop. I love the aroma of the coffee. It has a unique taste incomparable with Starbucks. 


Please don't forget to visit Celeste's blog, and Deb's blog to see how they interpreted the sketch on their projects.

2. It is my sister's birthday this Friday. I think this is a great way to celebrate her by creating a layout of her. I usually struggle in creating a scrapbook layout. Maybe because I don't create it too often. 

3. I also created this to take part on PinkFresh Studio's January Blog Challenge with the theme A Year in Review. I was inspired by March's layers and color challenge on my layout. 

Now, that you know what made this project a 1-For-3, let's me talk about the elements of the layout.


The circular frame seen above was created using a PFS slimline die. It die cuts 3 scallop windows on a slimline frame. I used a circle die larger than the circular stitching  around the scallop window to die cut this into a frame. 

The flower was created using a PFS square die. I trimmed the flower off the square frame. I die cut the flower on a light green PFS patterned paper, and on a pink, yellow and white cardstock. I cut the flower off the stem. I adhered the pink flower and the green stem/leaf on the white flower die cut. I adhered a double adhesive tape on the yellow cardstock before trimming the flower petals off. I poured yellow flock powder to the adhesive to add a bit of texture to the flower. 

The sentiment was heat embossed on white cardstock. I stamped the sentiment using an orange dye ink followed by a Versamark ink. I poured clear embossing powder to this, then heat set it. I die cut the sentiment using the coordinating die. I cut another piece to add a bit of dimension to the sentiment die cut. I love sentiment stamps coordinating dies. No more fussy cutting!


I really should be using my Spellbinder Glimmer Machine more often. With just like any other tool, the more you use it, the more proficient you get in using it. This is the product of my second try on foiling on vellum. Not too bad, right? I foiled the PFS Delicate Rosebuds on vellum using an aqua glimmer foil. Isn't it pretty? A heavy weight vellum is necessary to be able to foil on it. I used a light weight vellum on my first try and the foil did not transfer well to the vellum. I am not sure if I should have added an extra shim for a better transfer. 


The sentiment strips are from the PFS Delightful collection 6x6 paper pad. The paper pad includes a cutaway sheet. I fussy cut this sentiment strip. I layered the strip on a blue patterned paper cut into a strip. I cut one end into a fishtail tip.


I die cut a tag using a green patterned paper from the 6x6 patterned paper. I added an orange heart die cut to accent the hole of the tag. I added a white embroidery floss through the hole and tied this into a bow.

I used the B side of a PFS patterned paper for the back panel. I flick a yellow ink to this paper before adhering the elements of my layout. 

The layer above the tag is a stamped panel which I created with stamping the PFS Delicate Rosebuds using a light pink dye ink. The stamp sentiment I used above came from this set, too. 

This panel was supposed to be my back panel for the project but since I didn't want the elements to be packed on this panel, I used a larger panel for the layout. If could have used this panel if the photo is a bit smaller. 

Well, that's it for today. Thank you for visiting my blog. Have a blessed, brilliant and creative day!

Maria Giselle B.

I am sharing this creation at


Monday, May 22, 2023

Double Paged Rainbow Color Inspired Layout


Hello! Welcome back to my blog. Early this month, we celebrated National Scrapbooking Day. Pinkfresh Studio's NSD challenge motivated me to work on this layout. I have not scrapbooked in a long time. I am more into cardmaking. I truly enjoyed creating this double paged layout that I see myself doing more scrapbooking in the future. Not to forget, I am so happy that my photo printer is back in action again so I can print the photos that I want to scrap about. Thanks to my husband who fixed the connection issues of my printer. 

I am using Pinkfresh Studio products in this layout. The patterned papers and the ephemera are from the Let's Stay Home collection. The squares are from one of the patterned paper from this collection. I cut these squares apart and re-arranged it to fit my double paged layout. 

The main title of the layout was created using the PS Inna Alpha Hot Foil Plate, Layering Stencil and Die Set. I had this collection for a while and I could not believe that I waited this long to play with it. At first, it looks intimidating to use it but once I started playing with it, I had to stop myself from wanting to create more projects using it. 

The foiling part was also a challenge since I have not used my Spellbinders Glimmer Machine in a long time. I had some waste of materials at first because I had to re-orient myself on how to use the machine. After two over foiling, I finally got it. 

I used the stencil to add colors to the foiled letters, following the color of the square the letter will be adhered to. I only used two shades of color for each letter. The flower has three layering stencils. I only used one ink for that just lightly applying ink on the first layer then adding the ink heavily on the next succeeding layers. 


After I adhered the colored squares to the panel to form a rainbow grid, I started planning the rest of the elements of the layout. I also added the color coordinating embroidery flosses that I will be using to stitch on some of the colored boxes. 

It is very tempting to stitch on all the boxes but I didn't want to take the eye away from the photos and the embellishments. 


I hope you like today's project. Have a blessed, brilliant and creative day!

Maria Giselle B.

I am sharing this creation at