Hello! Welcome back to my blog. I have a tons of inspiration in creating this card. I am able to join blog challenges again. I miss doing this. This is the reason why I got myself hooked into cardmaking and also into creating a blog. Designing commitments put me on a standstill in participating in blog challenges. I am very glad that I was able to fulfill my responsibilities quick enough to give me some extra time to create and participate in challenge blogs.
I enjoyed putting this card together. The difficult part is choosing the right elements that complement each other. I got my color theme for rainbow by doing a search online for a three colored rainbow. Luckily, I have a 6x6 patterned paper pad that includes all the colors of the three colored rainbow. Knowing your crafting products helps lot in creating a card. I have products from way back that I still use up to now. Another reason why I enjoyed creating this card is that I was able to do some stitching on this card which I enjoy a lot.
I was planning to use a neutral colored patterned paper from the same 6x6 patterned paper pad I used for the rainbows. I already die cut the letters but I didn't like the way it looked with the patterned paper rainbow die cuts. I die cut some plain cardstock and that seem to do the trick of making the sentiment pop. I adhered the patterned paper letter die cuts to the back of the cardstock letter die cuts to add a bit of dimension. Might as well put these die cut letters to good use rather than stashing it in my scrap box.
Off setting the alphabet die cuts gives it a different look, just like the flower die cut. Replacing letters with image die cuts can make the sentiment look playful.
Adding embossing to a plain panel can add more interest to the card. Flicking paint can give it more texture and not too clean looking. I think I overdid my splatters. What do you think?
Thank you for visiting my blog. Have a blessed, brilliant and creative day!
Hello! Welcome back to my blog. I created this card to join Newton's Nook Designs current challenge. I got busy with my card making responsibilities that I am not able to join in blog challenges. Newton's Nook's current challenge is too hard to pass because the cat in the photo inspiration reminds me of my sister's cat, Bibi.
I colored the image using Copic markers. The stamp image is from Newton's Nook Designs Newton Loves Cake stamp set. I don't have the coordinating die for this stamp so I fussy cut the images leaving a white border around it. Using a craft knife, I cut slits on the ears of the cat so I can tuck in the party hat behind the cat's ears. I added some puffy embossing on the cream of the cake using Wow! embossing powder.
For the panel, I adhered a 4 1/4" x 5 1/2" white cardstock to the NNK Confetti stencil. Using the Altenew Detailed Blending Brushes, I inked the confetti with different colors. Using a small tipped blending brush allowed me to do multi-ink blending without needing to mask areas of the stencil. There is some bleeding in the the color but this does not bother me at all.
I trimmed a sliver off the long and short sides of the stenciled panel so it will fit nicely inside the A2 Full Front Shaker card pockets from Kat Scrappiness. I scored the tabs on the plastic film before inserting the stenciled panel. The clear sleeve comes with adhesive on the tabs. I remove the release panel and adhered this to the back of the stenciled panel. I poured sequins inside, then adhered the last tab to close up the shaker.
I die cut a yellow vellum using a deckled edge die. I heat embossed the sentiment to this vellum using white embossing powder. The sentiment is from NND Birthday Roundabout stamp set. I adhered the colored cat to this vellum, then adhered this to the front of the shaker.
Below is a short video of the shaker card. Nothing is more satisfying than hearing the shakers on a shaker card. Thank you for visiting my blog. Have a blessed, brilliant and creative day!
Maria Giselle B.
I added below a links to the products I used on this card. There will be no additional cost to you should you decide to purchase any of these products. This is just one way of helping a crafter sustain her love for crafting. Thank you very much!
Hello! Welcome back to my blog! Today's card has an interactive feature that I am hoping you will like.
The focal image is the cute Quokka from the Kat Scrappiness Easter Quokkas stamp set. I know Easter has passed but it does not mean you cannot look beyond your occasion themed stamps and give it a new life. This is exactly what I did with this Quokka stamp. The original image of this stamp is a Quokka inside a half broken decorated Easter egg. I covered the egg with tape before applying ink to the stamp. Before stamping the image to the watercolor paper, I removed the inky tape and covered the egg portion with tape again to prevent the ink from transferring to the watercolor paper, just in case it had some ink on it. If I did not get it perfectly the first time, I repeat the process. You can also use a black marker to darken the imperfect line impressions should you not want to re-stamp and go through all this process again.
The stamped images and umbrella canopy die cut are all watercolored using Zig Clean Color Real brush markers.
This card went a long way from just having the umbrella at the center of the card to making the umbrella swing. This slows down my creation of a project but the extra effort is truly worth it.
Below is a short video showing the interactive feature of this card. Have a blessed, brilliant and creative day!
Maria Giselle B.
I added below links to the Kat Scrappiness products I used and alternative products that can be used on this card. There will be no additional cost to you should you decide to purchase this/these product/s. While you are at the Kat Scrappiness website, do check out their wide array of products especially the exclusive Kat Scrappiness products. They have a new release, too! You can also use flower sequins or sprinkles instead of a flower stamp. These are also available at Kat Scrappiness.
Hello! Welcome back to my blog. I created this card to give to a special person who is celebrating her birthday soon. That special person is no other than me! Yes, I am turning half a century year old. Thank you for celebrating it with me.
I started off with die cutting a Simple Stories patterned paper using a scalloped stitched die. I die cut two pieces of different patterned paper.
On the scalloped patterned paper that I will use for the front, I partially die cut a double stitched rectangle on the front center. I left the top part uncut. This creates the slider.
I scored the top most part of the slider window. I also scored a 1/4" from the bottom of the slider. I did another score at the middle of the these two scores. I folded and gave these folds a good crease using a bone folder.
For the slider mechanism, the piece that will open the slider, I die cut a rectangle on an acetate that is slightly wider than the slider. The length of this rectangle should be at least long enough to reach the 1/4" score up to the scalloped part, not longer than the scalloped panel. I punched a tab opening on the top of this acetate which will hold the ribbon that will help pull the slider.
I adhered a strong double adhesive tape to the back of the 1/4" fold on the slider. I adhered the acetate slider mechanism to this, making sure that it is flushed at the edge of the slider, and that it is centered on the sides of the slider. I thread a silk ribbon through the opening and adhered this with a strong double adhesive tape.
I stamped a greeting on the other scalloped panel using the slider panel as guide. The sentiment should show through the opening when the slider is pulled. I heat embossed the sentiment using Versamark and white embossing powder.
To assemble the slider to the scalloped panel. I adhered a double adhesive tape to the sides and the bottom parts of the slider but not too close to the opening so as not to interrupt with the mechanism of the slider. I also added dots of glue to the scallops. I lined the slider to the scalloped panel. I tried the slider mechanism out. Once I see it is working, I worked on the focal image of the card.
I die cut the Kat Scrappiness Build A Cake Craft die on white cardstock. This cake die set can create a cake with three tiers but I only created for a two-tiered cake for this card. I created a trim using a scalloped border die and die cut it on yellow cardstock. I adhered the cake layer die cuts on a white scrap cardstock to create a backing for the cake. Once the glue has dried, I carefully cut the cake die cut around the edges. I adhered the scalloped borders, trimming it to size.
I die cut the numbers 5 and 0 on a yellow patterned paper. These number dies are from the KS Condensed Numbers die set. I die cut two more pieces of each number using white cardstock. I adhered the yellow die cut numbers on the top of the cake. I adhered the other number die cuts to the back of the yellow numbers, making sure it is aligned.
I adhered the cake to the slider mechanism, adding liquid glue only to the back of the cake that will be adhered to the center fold of the slider.
Once the glue has dried, I embellished the cake and the numbers with some floral sequins. I added Nuvo Glitter drops to the center of the floral sequins.
Have you created a card for yourself? We are always used to creating card for others. I don't think it is a bad idea to make something for yourself every now and then. Below, is a short video showing the interactive feature of this card. Thank you for visiting my blog and celebrating with me through this post. Have a blessed, brilliant and creative day!
Maria Giselle B.
I added below links to the Kat Scrappiness products I used and can be used on this card. There will be no additional cost to you should you decide to purchase this/these product/s. While you are at the Kat Scrappiness website, do check out their wide array of products especially the exclusive Kat Scrappiness products. The flower sequins are also available at Kat Scrappiness. I only linked one below but there are a lot of flower sequins to choose from.
Hello! Welcome back to my blog. First & foremost, I want to apologize for a very long post. This is a celebration of me completing the AECP 2. I consider this the final exam of the program.
Unlike the AECP 1, the final challenge for AECP 2 is less intense. I guess it is because I have gone through the courses so it is more easy for me.
My chosen components for AECP 2 are as follows:
Impressive Heat Embossing. Embossing is one of my favorite cardmaking techniques. A juicy sticky ink pad brings out the best results in embossing. The stamp positioner is a very helpful tool in re-stamping an image in case of missed spots. Don't forget to pre-treat the area that you will be embossing with an anti-static tool. Heat embossed images can act as a resist to inks, applied either by blending or watercoloring. An image with embossing preserves the color underneath it. Cards 1, 3 & 4 have some embossing done on it.
Magic Marker. Who does not have a stash of markers and/or pens? I am guilty of this. Using markers to accent your stamped images is one way of using markers or pens. On my second card, I used a marker with a stencil.
Masking Unleashed. There are lots of ways to mask. You can use a masking paper, a masking glue or just simply emboss the image. This technique is further explained on my 3rd card.
Easy Blending Techniques. With all the blending brushes out in the market, there are lots of possibilities in blending. Use a bigger brush for a large area and a detailed brush for a smaller area. Blending also allows you to experiment with colors. Just remember to always blend with a light hand. It is easier to add color to a lightly ink blended area vs. a heavily ink blended area. Pouncing your blender brush or sponge on a scrap paper first before blending the ink to your project usually removes the excess ink off the blending tool. Cards 1 & 3 both have ink blending done on it.
CARD 1: Coloring an image with Ink Blending and Color Pencils
Examine your image before heat setting the powder. Do not commit to heat setting the image if there are spots without powder. Pour powder again on these areas. If the powder still tends to slide off, it means that part of the image has no sticky ink on it for the embossing powder to stick on. If it is a huge part of the image, simply brush off all the powder onto a paper or to your embossing powder container. Re-stamp the image with the sticky ink. This is when a stamp positioner is very helpful. Pour embossing powder to the image. If the image is fully covered with powder, heat set it.
Embossing and using a small blending brush are very helpful in keeping the colors within the lines. The blending above is not perfect but it gets better later on, I promise. This is what I call an undertone. With this image I did a sweeping motion of ink blending.
To add highlights, I used a color pencil. Be gentle when coloring near the embossed lines. We don't want to scrape off the embossing. But if it does get scraped off, I retouched the line with a white gel pen.
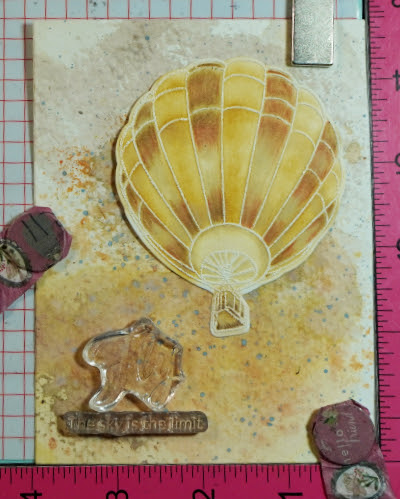
I smooshed ink on the background. I rubbed an ink pad on a glass mat and spritz this with water. I smooshed a watercolor paper on the ink. I dried this with a heat gun before smooshing the water color paper to another color. Just make sure you are using complementary colors or else you will end up with a muddy color. I flicked some pigment on the area too. On the photo above, I positioned the balloon so I would know where to stamp the sentiment.
Despite re-stamping this sentiment, there seems to be a gap on that part of the letter F. So I retouched this using a black sign pen.
CARD 2: Adding Details using Markers
Secure the stencil to the cardstock with a non-tacky tape. This prevents shifting of the stencil during ink blending. For more intricate stencils, use a repositionable spray to temporarily adhere the stencil to the cardstock.
Stencil over an area larger than your intended card size. This gives you an option to choose which part of your stenciled cardstock to use. Use the leftover piece, if you can, for another card. Initially, I was struggling with this stencil on how to make the end result 3D looking. Despite the instructions included in the packaging, my end result is different from what the image in the packaging looks like. If you have struggles with a product you have, visit the manufacturer's website. Watch videos on how to use the product. This was very helpful to me in making me figure out what I was doing wrong. Write notes on a sticky note and insert this inside the package of the product for future reference.
I used a marker to add highlights to the stenciled panel. I used the stencil as a guide to add lines. Felt pens dry quicker than gel pens. Let the gel pen dry first before taking the stencil off to avoid smearing the ink.
Once I trimmed the stenciled panel to 4 1/4" x 5 1/2", I used the Misti Stamping Tool to stamp the sentiment on the panel. I used a light dye ink for the stamping so I can use a marker to write over the sentiment. Pardon my messy inky Misti. It just shows how much I use this tool in my crafting.
After I colored in the sentiment with a marker, I added an outline around the bold sentiment using a silver marker. The sub-sentiment is a one lined sentiment stamp. I masked a word to stamp one word at a time to change the stamp sentiment's look into a two-lined sentiment. Another option is to cut the one lined sentiment on the space between the words.
CARD 3: Create a silhouette image using a detailed stamp
I usually lay out my stamp and/or die to know its placement on my card lay-out.
I stamped the image using the Misti Stamping Tool with a Copic friendly ink. I colored the image with a black Copic marker to make this detailed image into a silhouette image as seen below.
I am going to blend ink for the background. You can stamp the image on a masking paper and fussy cut it on the line. For my card, I applied sticky ink to the silhouette image using a Versamark pen. I poured clear embossing powder to it. I could have used a black embossing powder, too.
Using a Post-It note, I created a mask so I can create a background scene for the silhouette couple. I finished off this card by adding an embossed window cardstock panel over the scence. I sanded the embossed floral image then lightly blended a dark brown ink over the raised embossed area and also over the outer edge of the window panel. I also die cut an oval frame using brown cardstock which I also sanded and blended dark brown ink over it. The sentiment was die cut using white cardstock. I blended blue-green ink over the bottom half of the sentiment strip die cut to match the embossed window panel. I die cut extras so I can stack the sentiment strip die cuts on top of each other for a dimensional look.
CARD 4: Using floss for a window filler
I repeatedly stamped the star on a 4 1/4" x 5 1/2" green cardstock to create a background.
I heat embossed some stars to add interest to the background.
To another green cardstock panel, I did partial die cutting to create the stitching holes. I don't need to use the whole panel to add the floss. Also, I wanted the floss to meet at the center of the star shaped window.
To make sure that the star window will be die cut on the right spot of the embossed panel, I added a non-tacky tape to the non-cutting side of the star die. I laid this on the stitched panel, with the cutting side of the die facing up. I lined the embossed panel to the top of this stitched panel. I gently rubbed some pressure over the flipped embossed panel to make sure the tape will secure the star die to this panel.
I gently flipped the panels sandwiching the star die, gave it another gentle rubbing pressure. I removed the stitched panel. Tada! The star die is adhered to the embossed panel just where I want it. The key here is to have both panels cut at the same size, and to make sure the stitching holes are centered on the panel.
I heat embossed a sub-sentiment on a strip of green vellum. I adhered this to the back of the star window panel to create a floating sentiment strip. I used the Misti Stamping Tool to help me with lining up both panels. Butting the card panels on one of the corners assured me that my panels are aligned. I also use this trick when I adhere my card panels to a note card. If you don't have this kind of stamping tool, a score board's corner can also be used for this purpose.
Now, the panels are aligned. The main sentiment is also heat embossed. Some parts of the sentiment were heat embossed over the already heat embossed stars. To be able to emboss over an embossing requires more than one stamping, thus, the stamping tool was very helpful in this regard. I used a dark green dye ink for the sentiments which is a fast drying ink. To be able to emboss this sentiment, after cleaning the sentiment stamp, I re-stamped the sentiment with a clear sticky ink, poured clear embossing powder over it and heat set it.
Upcycle a Box into a Craft Storage Organizer
This is how I organize my craft supplies. I re-use sturdy boxes from grocery products.
Using a cardboard cutter, I cut the flaps off the box. I also cut the sides in an angle, with the front of the box lower than the rear portion of the box. If you have rough edges, use a sander to smoothen it out.
I painted the box with a white chalk paint.
The bottom of the box has a rectangular hole where the seams did not quite meet. I covered this hole with one of the scrap cardboard cut up. I used a glue gun to adhere the scrap cardboard to the bottom of the box.
I trimmed one of my sons plastic binder divider and used it to cover the bottom of the box.
I painted each side of the box with Mod Podge glue using a sponge brush.I cut the tissue paper included in my Altenew order and adhered this to the side of the box.I smoothed out the tissue paper using a scraper.
Now, I have a dedicated box for my Altenew products.
Thank you for visiting my blog. I hope you learned something from the cards I created. If you have any questions, feel free to post it in the comment section.
6/2024: Altenew decided to change its affiliate program starting this month. Below is my affiliate link to the website. I don't think I can directly link the products I used with this new program. Please feel free to do a product search. I will update as I figure this out. The good thing about this new affiliate program is that I get to earn on each Altenew product you purchase and not only on the product/s I used on this project. As before, there will be no additional cost to you if you make a purchase. It is just a way to help a fellow crafter sustain her love for crafting. While in the Altenew blog, don't forget to check out their new release for this month. Thank you for your support!


.jpg)


.jpg)


