Showing posts with label In Lay Technique. Show all posts

Friday, May 2, 2025

Plaid Greeting Card


Hello! Welcome back to my blog. Today's card uses products from Kat Scrappiness. I got my inspiration after joining an IG Hop for another company's products release. I would like to thank @larissaheskettdesigns for the colors and card design inspiration. I like her work so much that I created my own version of it. 

I die cut a red shiny textured cardstock using the KS Buffalo Plaid Background craft die. I kept the red square drop outs which I used later. A tip for a successful one pass cut using this die is to add a metal shim to your cutting plate sandwich. It works each time for me. 

I measured the width of the two columns of the plaid and use this measurements to trim a blue cardstock. I was initially going to adhere this cardstock over the two rows of the plaid background but changed my mind. I placed it behind the plaid cover die cut. To add some depth and detail to this piece, I embossed the plaid pattern to this panel. To use your metal die cuts for embossing, add a silicone mat underneath the cardstock when you layer your die cut sandwich. This pushes the metal die to the paper, thus, transferring the design to the paper. You have to play with your die cutting machine to know what plates are needed to get this effect without ruining your machine and your paper. 

I adhered this to the back of the plaid cover die cut, aligning the embossed design with the opening of the plaid die cut. It is hard to see in the photos but the embossed design added a pillow effect on the openings. 

I adhered the red square negative die cuts to the back of the vented portion of the plaid die cut.

I adhered a white cardstock to the back of the open columns. I pieced in white square negative cuts to the open areas. I used this cover die a lot that I accumulated a lot of these square negative cuts.

I stamped some of the images from the KS Wok On stamp set to a smooth watercolor paper. I used Karin markers to color the images. I added details to the images using a white gel pen and white enamel glue to the eyes. I fussy cut the images. I arranged the images on the panel, mostly placing it on the blue area of the plaid panel. I adhered the images with foam tape for some dimension.


I prepped a piece of white cardstock with an anti-static tool. I stamped the sentiment to this piece using Versafine Onyx Black ink. I poured black embossing powder to it and heat set it. I created this into a strip using a sentiment die. I adhered this sentiment strip to the same blue cardstock I used on the panel. I used a craft knife to gently cut the blue cardstock creating a matte around the white sentiment strip. I adhered this to the panel.


I hope you like today's card. Thank you for visiting my blog. Have a blessed, brilliant and creative day!

Maria Giselle B.

I added below links to the Kat Scrappiness products I used on this project. There will be no additional cost to you should you decide to purchase this/these product/s. While you are at the Kat Scrappiness website, do check out their wide array of products. Enjoy!

I am sharing this project at

Thursday, May 1, 2025

Alcohol Inked Alphabet


Hello! Welcome back to my blog. I attended a virtual workshop by Ishani (@quill_ish) last Saturday. I enjoyed creating live with her and the rest of the attendees. 

One of the techniques I learned in the class is about creating a background using alcohol markers. I don't have any Altenew alcohol inks. I only have Copic, which is an alcohol based marker. Since I prefer not to start a new collection of a different brand of alcohol ink, I used Copic refills as a substitute for the Altenew alcohol inks. I added drops of colors on a Yupo paper. I don't have an alcohol ink blower so I just used my heat tool to move the ink. Once I am happy with the pattern, I heat set it to dry the ink. 

I created two alcohol blended panels, one red-pink base for the flower, and another blue-green base for the leaf. I die cut these panels using the Altenew Layered Rose die set. I used the drop outs on this project but I kept the outline die cuts for future use. The best way to keep the drop outs in its original placement is to use a masking paper to pick up the pieces from the die or the plate. This will make the next step easier.

I die cut the image outline on pink mirror cardstock. I die cut the solid piece using a scrap white cardstock. I adhered the mirror outline die cut to this and inlayed the alcohol die cuts to the outline die cut. This is the second technique we learned in the workshop. 


I die cut the letters on both the alcohol panel and the mirror cardstock. I adhered the mirror die cut to the back of the alcohol letter die cut offsetting it for a shadow effect. I went off the instructions on the letter M on the left. The mirror letter die cut was supposed to be offset towards the left, not to the right. I only realized my mistake when I was adhering the letters to the weaved panel. 


For the weaved panel, I rubbed pink dye ink on the flat side of the Altenew Wicker Texture 3D embossing folder. I sandwiched a pink cardstock cut at 4 3/4" x 3 3/4" inside and ran this through my embossing machine. What it does is the inked flat side is pushed to the deeper crevices of the embossing. Such a cool technique shared by Ishani during the workshop. No worries with the cleaning. Just wipe the inked side of the embossing folder with a damp cloth and the excess ink should come off. 

I matted this embossed panel with the same pink mirror cardstock. If I had more time during the workshop, I would have cut this piece into a frame so I can use the middle portion of the mirror cardstock for something else.

I adhered this to the same pink cardstock I used on the embossing which was cut at 5 1/2" x 4 1/4".

I added a sentiment strip using a stamp from the Altenew Wild Hibiscus stamp set. I stamped this using a red dye ink on the same pink cardstock which I die cut into a strip. 


I hope you like today's card. Thank you for visiting my blog. Have a blessed, brilliant and creative day!

Maria Giselle B.

I am sharing this project at

Saturday, March 22, 2025

World's Best Dad & Best Mom Ever Greeting Cards


Hello! Welcome back to my blog. I mixed several techniques in today's cards. I did the eclipse technique on a panel created with cardstock strips. I also did my all time favorite technique which is paper stitching. 

I created a dad card and a mom card which can be given any day, not only on Father's or Mother's day. That's why my subsentiment is a non-holiday/occasion sentiment. 

I started of with planning my color combinations for each card. I usually do a search online for color combos that will appeal to me. After going through my cardstock stash for the colors that I need, I trimmed these cardstocks into strips at 4 1/4" x 1/2". 

I adhered a double adhesive sheet on a printer paper cut at 4 1/4" x 5 1/2". I created two pieces of this panel. I adhered the cardstock strips to this panel making sure that each strip is butted to each other. After filling the whole panel with the cardstock strips, I burnished the panel with a scoring tool just to make sure that the cardstock strips are adhered well to the double adhesive sheet.


I die cut the letters from the Spellbinders Stitched Alphabet Etched dies on the panel. I kept every piece that fell off with the die cutting. I added stitching to these letters using DMC embroidery floss. I die cut two more pieces of each letter on black cardstock which I will use to add dimension to the stitched letters. 

I adhered another scrap piece of typing paper to the back of the striped panel. I pieced in the black die cut letters to the negative space on the striped panel. I pieced back the drop out pieces of the striped panel. I pre-treated the striped panel with an anti-static powder tool. I stamped a floral background to the mom panel using Versamark ink. The stamp I used is from Honey Bee. For the dad panel, I stamped several stars using stamps from the Altenew Halftone Stars stamp set. I used Versamark ink in stamping. I poured clear embossing powder to the sticky ink then heat embossed it.

I trimmed an 8th of an inch from each side of the panel. I adhered this striped panel on a 4 1/4" x 5 1/2" cardstock.

I adhered the rest of the letters to the panel by aligning the letters to the letters already pieced in the panel.

I stamped a subsentiment on a cardstock strip using dye inks. I adhered this to the panel.


I hope you like today's cards. Thank you for visiting my blog. Have a blessed, brilliant and creative day!

Maria Giselle B.


Altenew is holding its annual card drive which aims to send homemade cards to the elderly who lives in nursing homes or shelters, and let them know that they are not forgotten. After losing my parents, I feel this is the best way to honor them by making other parents feel special. I hope you consider joining this drive. Please visit the Altenew Celebrating Parents Card Drive 2025 post for details. 


Wednesday, December 18, 2024

In Lay Technique Card Panel


Hello! Welcome back to my blog. For today's project, I used the Kat Scrappiness Stained Glass Poinsettia Window Craft Die. This die will cut a full front panel of a 4 1/4" x 5 1/2" card. There are lots of possibilities in using this die. This is actually my second project using this die. The first project I created using this die is a luminary Please check it out, if you have time. 

What is in lay technique? An in lay technique results in a flat panel. It involves die cutting several pieces of different colored cardstock then piecing this die cuts back to the die cut window just like a puzzle. The easiest way to do this technique is to die cut the window die on a whole panel of cardstock depending on how many colors of cardstock you intend to use. In my case, I used 3 colors of paper to piece in to the window panel. A lot of waste, you might say, and I totally agree with you. One way of avoiding waste is to interchange the colors of the inlay die cuts. In this way, you will end up with 4 cards. 

Another way is to selectively die cut the elements of the die on the cardstock. This method entails more work since you have to cut the cardstock to a size that fits the element of the window die. It also involves frequent passing of the die thru the die cut machine which can warp the die (ask me how I know). There is also a chance that the paper will not match the area of the window die that you want to cut or your paper shifts so you have to do the die cutting again. This method also requires frequent cleaning of the die in between die cutting since some of the scraps get stuck to the die. Whichever method you choose, the most important thing is the result. 

I die cut the window die on black mirror cardstock. I adhered this window panel to a double sided adhesive sheet. I trimmed off the excess. 

I die cut the poinsettia on white pearl cardstock. I inlaid these pieces to the matching open areas on the window die cut. Since there is already adhesive on these open areas, all I needed to do was match the poinsettia die cut pieces to the window panel. I die cut the leaves on gold cardstock. I die cut the background on green vellum paper. 

Once all the open areas are filled with the die cuts, I burnished the panel with a scoring tool to make sure that the pieces adhere well to the adhesive. Don't worry. If a piece falls off, just squirt a tiny dot of glue to the open area, then inlay the piece that fell off. 


I adhered KS Champagne Jewel Mix on the center of the poinsettia. This panel was adhered to an A2 note card. I decided not to add any sentiment to the front of the card to keep the focus on the image. 


I hope you like today's project and give this technique a try. A lot of work but the outcome is truly worth the time and effort. Thank you for visiting my blog. Have a blessed, brilliant and creative day! Merry Christmas, everyone!

Maria Giselle B.

I added below links to the Kat Scrappiness product I used on this project. There will be no additional cost to you should you decide to purchase this product. While you are at the Kat Scrappiness website, do check out their wide array of products. They have a new release, too! Enjoy!


I am sharing this project at

Wednesday, May 17, 2023

Graduation Card


Hello! Welcome back to my blog. My 2nd son is graduating high school this Sunday. So excited for him on this milestone.

The background panel involves a lot of die cutting. I die cut the plaid cover panel on an ink blended background. I pieced in some of the square negative cuts to provide contrast to the white sentiment die cuts. The words and numbers are die cut in multiples and adhered on top of each other for some dimension.


I enjoyed creating this project a lot since it is a mash up of cardmaking (based on the supplies used and the size), and scrapbooking. I think this is something doable for me compared to the large scale scrapbook layout. 

Thank you for visiting my blog. Have a blessed, brilliant and creative day!

Maria Giselle B.

I added below links to the Kat Scrappiness products I used on this card. There will be no additional cost to you should you decide to purchase any of these products. While you are at the Kat Scrappiness website, do check out their wide array of products especially the exclusive Kat Scrappiness products. They have a new release, too!  


Saturday, August 20, 2022

Loose Background Using a Brayer and Painting with Ink Pad

Hello! Welcome back to my blog. Today's post features my 8th AECP assignment featuring two inking techniques, using a brayer, and direct to paper inking.

For inks, I am using Tim Holtz Distress Oxide in Cracked Pistachio and Walnut Stain. Starting with the green color, I pressed the ink pad on a craft sheet. I sprayed a bit of water on the ink, then picked it up with the brayer. I rolled the inked brayer on a watercolor paper cut at 4 1/4" x 5 1/2". I repeated this process using the brown ink. I did not have a pattern when I was applying the inks. I just let the brayer create the pattern. I heat set this to speed dry it.

The next step is embossing. To make sure that the background panel is ready for this step, I did a trial of pouring embossing powder to the panel. If no powder sticks to the panel, then it is ready for embossing.

I am using the Altenew Hennah Elements stamp set on this card. I stamped the images more on the left of the panel. I stamped the images with Versafine Onyx Black ink. Since the watercolor paper is a very textured paper, I used the Misti Stamping Tool so I can re-stamp the image, if needed. I poured black embossing powder over the wet stamped images, then heat set it. I stamped one image at a time, pouring the powder after each stamping. I heat set this after stamping a cluster of images.

I filled the area using the smaller stamps included in the set, stamping these images with the same black ink and black embossing powder. Just be careful not to expose the embossed images to the heat so as not to flatten the embossing. 


I lifted the color from the flowers by applying water to the flowers. The wells created by the embossing traps the water inside the image. I picked this water with a paper towel. I repeated this process until I am happy with how light the color of the image is. At one point, I applied a pearlized water to add shimmer to the flowers.

I flicked opaque white paint to the panel and allowed this to dry.

I die cut this panel using a double stitched rectangular die from Simon Says Stamp. This die creates a frame and a panel with stitching detail on the edges of both die cuts. I die cut another cardstock using the same die. I applied glue to the frame die cut and adhered this to the back of the watercolored frame die cut to create a bit of dimension. 

For the sentiment, I die cut the word hugs on the panel using a die from the Altenew Hello and Hugs die set. I am planning to in-lay this back to the panel.

I lifted the ink from this word die cut but somehow, the sentiment is hardly noticeable when in-laid. Not giving up right away, I die cut this word three times on a brown cardstock. I adhered this brown colored die cuts to the back of the watercolored word die cut to create dimension. I still can't see my sentiment. For my third try, I added the green ink directly to the die cut. What's so nice about the oxide inks is that it kept the brown details on the die cut. I was afraid that I was going to lose that detail. 

But I am still not happy with the look. So as my last attempt to save this project, I used the hugs shadow die included in the set to die cut a brown vellum. I adhered the stacked sentiment on this, then adhered it over the opening created for my supposedly inlay sentiment. Much better, what do you think?

I adhered the frame to a side folding A2 note card, using the corner of the Misti Stamping Tool as a guide to make sure the frame is straight. I also temporarily inlaid the main panel inside the frame to help in positioning. I adhered the main panel after. I embellished the panel with several brown sequins.

Whew! I thought I won't be able to pull this one through. The rewards of perseverance. This card has a chalky feel because of the Oxide inks. I bet, it will have a different look if Distress inks are used. Want to give it a try? Thank you for visiting my blog. Have a blessed, brilliant and creative day!

Maria Giselle B.

I am sharing this creation at


Sunday, August 7, 2022

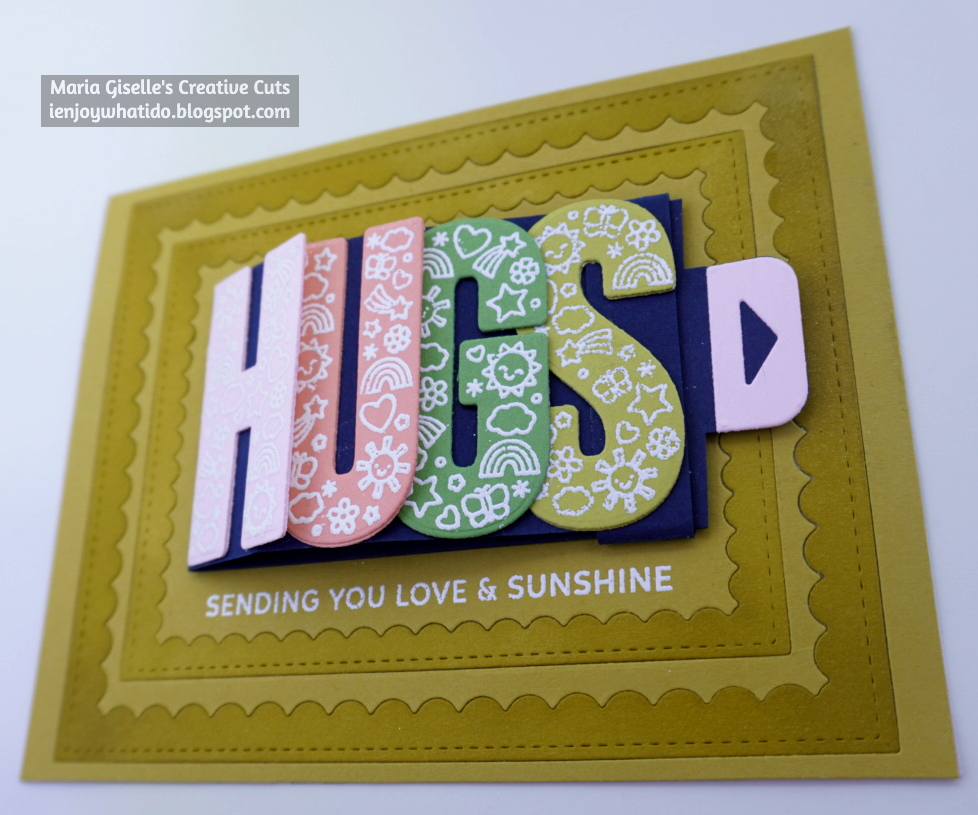
Flipping Sentiment Greeting Card with Surprise Message (New to My Stash #24)

Hello! Welcome back to my blog and to another post in my series, New to My Stash. I have not made a post in this series in a while. I am so glad to be able to feature a newly purchased craft item, which is the focus of this series. 

For today's post, I am featuring Pretty Pink Posh products specifically the Hugs stamp set and coordinating die set. I created this card to also join in the latest Ellen Hutson blog's challenge as linked below. I like the colors in this challenge.

This is not a true waterfall card since not all the letters flipped to the back of the slider. What matters is the hidden sentiment gets to be seen once it is pulled out. The hidden sentiment is from the PPP Thoughtful Greetings stamp set. 


The background panel was created by inlaying the frame die cuts created by the PPP Scallop Frames die set on a Concord & 9th Stardust cardstock cut at 5 1/2" x 4 1/4". I blended the same ink on the scalloped frames and brushed in some pearl powder for some accent. 

This was adhered to a top folding A2 notecard. 

Thank you for visiting my blog! Have a blessed, brilliant and creative day.

Maria Giselle B.

I am sharing this creation at


Friday, June 3, 2022

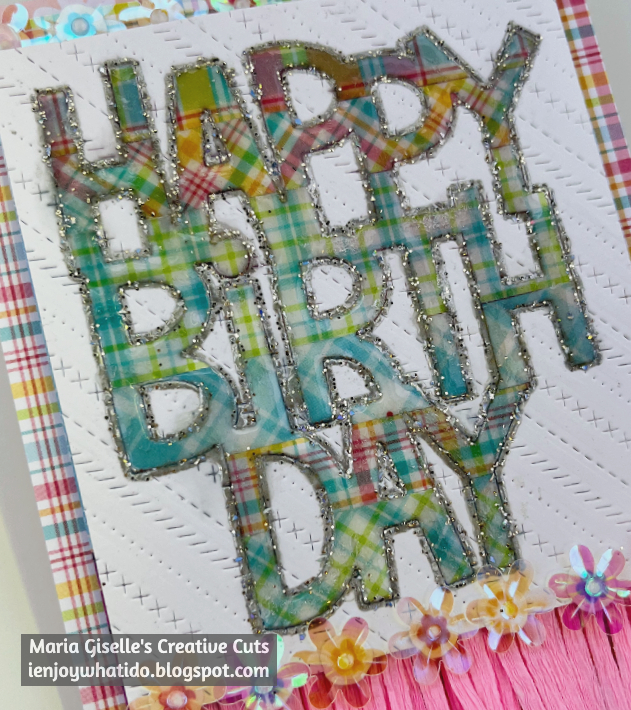
Glittered Outline Inlaid Sentiment Die Cut

Hello! Welcome back to my blog. For this card, I was trying to make use of the negative cut left over by the  Lawn Fawn Giant Happy Birthday die which I used on a previous card. It did not quite turn out the way I wanted so I ended up die cutting a new sentiment. I did put to use some of my paper scraps of the LF Perfectly Plaid patterned paper, using it for the sentiment die cut. I trimmed a scrap paper large enough so the sentiment fits. I adhered the scraps of patterned paper to this, then die cut the sentiment using it. 

For the negative die cut, since I already adhered this to a patterned paper, I added details with the use of the LF Stitched Borders die. I taped the border dies together so I can create four patterns right away with just one passing through the die cut machine. 

I pieced in the sentiment die cut to the negative die cut piece. I prepped this for embossing using a powder tool. I added shimmer to the sentiment with Spectrum Noir Clear Shimmer pen. I outlined the letters of the sentiment with an embossing pen. I poured Wow! Midas Touch Embossing powder to this, then heat set it. This created a well for me to paint embossing fluid to the letters using the Wow! Mixed Media Embossing Brush. I poured Wow! Clear Gloss Ultra High to the embossing fluid then heat set it. 

I die cut a pink crepe paper with Ellen Hutson Never Ending Fringe die. I adhered this to the bottom back of the sentiment panel. 

I trimmed one of the plaid papers to 4 1/4" x 5 1/2". I adhered the sentiment panel to this with foam tape. 

I stamped a flower from the LF Chirpy Chirp Chirp stamp set on white cardstock using colors from the patterned paper. I die cut the flowers using the matching die. I adhered this behind a Crystal flower sequin. I adhered these flowers to the bottom edge of the sentiment panel to create a border between the panel and the fringes. I also adhered these flowers to the back of the sentiment panel on the top border.


Thank you for visiting my blog. Have a blessed, brilliant and creative day. 

Maria Giselle B.

I am sharing this creation at


Monday, April 19, 2021

Heat And Dry Embossing In Lay Card


Hello! We have a new challenge at Incy Wincy Designs. Our challenge theme is Colours Of Spring And/Or Embossing-Wet Or Dry. I am using one of the images provided by our sponsor.


I printed the image on Neenah Solar White cardstock. After looking online for a spring themed dress, I chose to go with a white dress with different floral prints. I colored the image with Copic markers, using B000 and 0 to create shadows on the white hat and dress. I doodled flowers with Sakura Souffle pens and Pilot Juice Pastel Gel Ink pens. I fussy cut the image, leaving a small white border around it. I colored this white border with a C00 Copic Marker to create a shadow that will make the image pop out. 

For the background panel, I trimmed a light blue cardstock at 5 1/2" x 4 1/4". I prepped the area with an anti-static pouch. I stamped the My Favorite Things Rose All Over Background stamp. I embossed this using Wow! Gold Pearl embossing powder. 

I die cut the word 'hi' on this embossed panel using The Stamp Market Hi die. I die cut an extra piece on white cardstock. This die cuts an outline and the letters. I set aside the outline. I am going to dry emboss on the letters.

I am using a floral embossing folder. I lightly brushed a light blue ink on the raised side of the embossing folder. I maintained the positioning of the letters with a Full Stick Post-It Note. I sandwiched this inside the embossing folder and ran it through the die cut machine. This technique created an inked, de-bossed impression of the flowers on the letters.

I inlaid the letter outlines and the letters on the negative space of the blue embossed panel. I secured this together with tape. 


I added a secondary sentiment by stamping over this inlaid panel. I used the Misti Stamping Tool so I can stamp repeatedly since I have to get to the nooks and crannies of the embossed impression on both the blue cardstock and the letter h. I prepped the area with an anti-static tool. I stamped the sentiment from My Favorite Things You Got Mail stamp set using dark blue dye ink and Versamark ink. I used Paper Source Navy embossing powder. 

I trimmed a sliver from each side of the panel. I adhered this to a top folding wide A2 note card. I added shimmer to the outline using a cleark Kuretake Zig Wink of Stella. I added gems to the center of the de-bossed flowers. The gems are from Pretty Pink Posh.

I blended Tim Holtz Distress inks on the blue background to mute down the embossed background. I adhered the digital image with foam adhesive. 

Thank you for visiting my blog. I hope to see your creations at the challenge blog. Have a blessed, brilliant and creative day!

Maria Giselle B. 


I am sharing this creation at