Showing posts with label Mother's Day Card. Show all posts

Sunday, May 11, 2025

A Mother's Day Gift

Hello! Happy Mother's Day! I am celebrating this day with a project made for two co-worker moms of mine. I hope you like it.

This project was supposed to be a part of a DT project but the colors are not matching so I decided to work on my DT project later and went ahead to finish this project. After all, I have been itching to sew for a while.

The pretty foiled patterned paper is from Spellbinders. I trimmed this based on the size of the stitched scallop rectangle die from Pretty Pink Posh. This paper is very light weight. I won't be able to support any stitching on it. I adhered a cream cardstock behind it to make this paper thicker.

I used The Stamp Market Stitched Alphabet dies to die cut the stitching holes. Initially, I was planning to stich on the patterned paper directly but I tear one of the papers when I was peeling off the tape that kept the letter dies in place. I die cut the letters again on the cream cardstock this time to cover the poked holes on the patterned paper. I cut the letters using a craft knife. 

I used a DMC embroidery floss and a DMC metallic threat do add cross stitching to the poked holes. I adhered this on the patterned paper.

I die cut a total of 6 pieces of the scalloped frame. I adhered 3 pieces on top of each other, stacking it for dimension. I adhered this on the patterned paper.

I used a Stampin Up rubber stamp to spell out the names of the recipients. I stamped the letters using  Wow! embossing pad then poured Wow! gold embossing powder over it. I heat set this. I punched the letters using the square punch included in the stamp set.

I adhered the letters underneath the stitched letter. 


I die cut 6 pieces of the scalloped frame. I adhered 3 pieces on top of each other, stacking it for some dimension. I adhered this on the patterned paper panel. 

I adhered a cream cardstock on the back to cover the stitching. I trimmed off any excess.


I used a die from The Stamp Market Scalloped Frame die for the easel. I die cut 6 pieces total. I trimmed the tabs off on 4 the easels. I adhered 2 of these pieces on the tabbed easel piece. I repeated this on the rest of the easel die cuts. I applied glue to the tab. I aligned the triangle/arrow tip of the easel to the bottom corner of the frame, then pressed the glued tab to the back of the panel. I set this aside to dry. 

I adhered the mini circles included in the die cutting to mimic the screws of the easel.

Thank you for visiting my blog. Have a blessed, brilliant and creative day! Celebrating all the mothers out there. Yay!

Maria Giselle B.

Thursday, May 1, 2025

Alcohol Inked Alphabet


Hello! Welcome back to my blog. I attended a virtual workshop by Ishani (@quill_ish) last Saturday. I enjoyed creating live with her and the rest of the attendees. 

One of the techniques I learned in the class is about creating a background using alcohol markers. I don't have any Altenew alcohol inks. I only have Copic, which is an alcohol based marker. Since I prefer not to start a new collection of a different brand of alcohol ink, I used Copic refills as a substitute for the Altenew alcohol inks. I added drops of colors on a Yupo paper. I don't have an alcohol ink blower so I just used my heat tool to move the ink. Once I am happy with the pattern, I heat set it to dry the ink. 

I created two alcohol blended panels, one red-pink base for the flower, and another blue-green base for the leaf. I die cut these panels using the Altenew Layered Rose die set. I used the drop outs on this project but I kept the outline die cuts for future use. The best way to keep the drop outs in its original placement is to use a masking paper to pick up the pieces from the die or the plate. This will make the next step easier.

I die cut the image outline on pink mirror cardstock. I die cut the solid piece using a scrap white cardstock. I adhered the mirror outline die cut to this and inlayed the alcohol die cuts to the outline die cut. This is the second technique we learned in the workshop. 


I die cut the letters on both the alcohol panel and the mirror cardstock. I adhered the mirror die cut to the back of the alcohol letter die cut offsetting it for a shadow effect. I went off the instructions on the letter M on the left. The mirror letter die cut was supposed to be offset towards the left, not to the right. I only realized my mistake when I was adhering the letters to the weaved panel. 


For the weaved panel, I rubbed pink dye ink on the flat side of the Altenew Wicker Texture 3D embossing folder. I sandwiched a pink cardstock cut at 4 3/4" x 3 3/4" inside and ran this through my embossing machine. What it does is the inked flat side is pushed to the deeper crevices of the embossing. Such a cool technique shared by Ishani during the workshop. No worries with the cleaning. Just wipe the inked side of the embossing folder with a damp cloth and the excess ink should come off. 

I matted this embossed panel with the same pink mirror cardstock. If I had more time during the workshop, I would have cut this piece into a frame so I can use the middle portion of the mirror cardstock for something else.

I adhered this to the same pink cardstock I used on the embossing which was cut at 5 1/2" x 4 1/4".

I added a sentiment strip using a stamp from the Altenew Wild Hibiscus stamp set. I stamped this using a red dye ink on the same pink cardstock which I die cut into a strip. 


I hope you like today's card. Thank you for visiting my blog. Have a blessed, brilliant and creative day!

Maria Giselle B.

I am sharing this project at

Sunday, May 12, 2024

Split Stamped Image


Hello! Welcome back to my blog. Before anything else, I would like to greet all the mothers a Happy Mother's Day! This is my tribute card to me and to all of you out there on this special day.

I am using the Blank Page Muse Floral Spray Sunflowers Chrysanthemum Line Art Rubber Stamp on today's project. This is a large stamp that measures 4" x 5". It fills up a card front very easily. Today's card shows another way of using this stamp set.

I stamped the image on the center of a 5 1/2" x 4 1/4" Bristol Vellum paper using Versamark ink. I prepped the area with an anti-static tool before stamping the image to control any stray embossing powder which I poured over the sticky impression. The embossing powder I used is the Altenew Peach embossing powder. 

I colored the image using Altenew Woodless Watercolor pencils. I added the concentrated pigment on the center of the image and spread it off to the edges using a watercolor brush to achieve a pastel color.


Once I've colored the entire image. I cut the panel in half on the center both lengthwise and crosswise creating four mini-panels. I rotated the panels so that the embossed image will be at the outer corner when adhered together. 

I flicked the same pink ink I used for the flowers on the panel.


For the focal point, I am using a stitching die from Spellbinders. I die cut the stitching piece on pink cardstock. I stitched a lazy daisy on the holes using a white embroidery floss. I alternated the holes on where I stitched. On the holes without stitching, I stitched a straight stitch using a light pink embroidery floss. I added a pink gem on the center of the stitched holes. 

I die cut the shadow of the letter on blue cardstock. I embossed this piece using a dotted embossing folder. 

I adhered the stitched piece on the shadow die cut using liquid adhesive.

I heat embossed the word mom on green cardstock. I used the same embossing powder I used on the flowers. I fussy cut the word leaving a small border around the word. The stamp is from Lawn Fawn. I adhered this to the bottom portion of the stitched letter. 


I hope this project inspired you. Thank you for visiting my blog. Have a blessed, brilliant and creative day!

Maria Giselle B.

Blank Page Muse is generously offering a 15% discount to their online store to YOU, my blog readers. Just use the code BPMMaria when you check out. Enjoy!

I am sharing this project at


Sunday, May 14, 2023

Tri-fold Mother's Day Card


Hello! Welcome back to my blog. I created this card for a friend of mine at work who I appreciate so much especially her genuineness. The focal point of this card is the small letter L. Please don't tell me that you thought it was a number 1. The die I used to cut this stiching alphabet die is from Spellbinders. This die has a number version, and the number 1 is different from the letter L. I die cut the elements of this card on various shades of blue cardstock, which is my friend's favorite color. 


Adding my friend's name to the card adds a touch of personalization to this card. 


I hope you like my card. Happy Mother's Day! Don't forget to make your mom feel special. This is my mom's first mother's day celebration in heaven. I believe she is still very much around watching over us. 


Have a blessed, brilliant and creative day!

Maria Giselle B.


Saturday, May 13, 2023

Slimline Mother's Day Card


Hello! Welcome back to my blog. I stitched the letters I used on this card a while back. I wasn't able to make it into a card until now. I hope you like it.

The stitched letters are made using a die from Spellbinders. If you have been following my blog, I love to stitch. When Spellbinders came out with these alphabet dies, I added it to my wish list until finally I was able to purchase it. I die cut the letters on patterned paper which can be flimsy and won't stand the frequent handling while stitching. That's why I die cut duplicates of the letters on cardstock and adhered the patterned paper die cuts to this to make it sturdy.

The slimline background die is from Pinkfresh Studio. Same with the floral embellishments which actually is a washi tape. I adhered the washi tape to a white cardstock, burnish it to remove any air bubble, and fussy cut it. This washi tape has a coordinating die cut I don't have it. 


I added a burlap die cut to the back of the scallop windows. I die cut this on kraft cardstock. The die I used is from HoneyBee. To add some interest to the burlap die cut, I added gold foiling by heat setting sticky embossing powder to several parts of the burlap. I burnished the foil on the stick areas. Not all foil will work using this technique. Only the non-heat activated foil works on this technique. I used the Deco Foil transfer sheets. This is also one way of using those left-over scraps of foil. Even ones that are already used since you are not foiling a large area.

I also added gold gems from Pretty Pink Posh. The sentiment strip was made by heat embossing the sentiment using a stamp from Lawn Fawn. The strip die I used is from Avery Elle.

I adhered this panel to a top folding kraft slim line card. 


Thank you for visiting my blog. Happy Mother's Day! Have a blessed, brilliant and creative day!

Maria Giselle B.

I am sharing this creation at


Thursday, May 11, 2023

Sketch Inspired Mother's Day Card


Hello! Welcome back to my blog. I created this card with the sketch below as inspiration. The sketch was made for a scrapbook layout which can also be used for a card. 


I started off by applying watercolor to scrap strips of watercolor paper. I have plenty of these strips because I trim the watercolor paper to 8 1/2" x 11" especially when I will be feeding this paper through a toner printer. I set this aside to dry.

Once the strips are dry, I die cut the strips using the Kat Scrappiness Stitched Slimline Strip. Most of the strips are about the same size as the width of the strip die. I just wanted to add the stitched detail to the watercolored strips.

Following the sketch, I created a chevron pattern using the strips. I adhered this to a scrap piece of paper following a rainbow order for the colors. I trimmed off the excess scrap paper without any strip adhered to it.

I die cut the banners from patterned paper. I trimmed a dark blue patterned paper at 4 1/4" x 5 1/2". 
For the sentiments, I stamped these on white cardstock. I heat embossed the main sentiment and fussy cut this leaving a white border around it. I die cut the sub-sentiment using a strip die. I die cut several pieces of these strips and adhered one on top of each other with the stamped sentiment strip on top of the pile. This creates a chipboard-like embellishment. 

I adhered the card elements to the dark blue patterned paper panel starting with the rainbow chevrons. I trimmed off the excess hanging over the back panel. I adhered the banners and the sentiments. I added flower sequins. Using an acrylic marker, I added color to the butterfly sequins. I folded the butterfly sequins at the center. I added glue only to the scored line so the butterfly's wings are raised. I added white pearls to the butterflies to cover the holes. I added black glitter glue to the center of the flower sequins.


Thank you for visiting my blog. Have a blessed, brilliant and creative day!

Maria Giselle B.

I added below a link to the Kat Scrappiness products I used on this card. There will be no additional cost to you should you decide to purchase any of these products. While you are at the Kat Scrappiness website, do check out their wide array of products especially the exclusive Kat Scrappiness products. They have a new release, too!  


I am sharing this creation at

Sunday, May 9, 2021

Pop-Up Vase Card


Hello! It has been a while since I last created something to share for Mother's Day. After seeing Jennifer McGuire's video tutorial, I got inspired to create what Jennifer created. At first, I was going to use whatever supplies I have on hand. But after visiting my local craft store, I was not able to resist buying  the supplies I used for this project. 

The supplies I used for this project are:

  • Altenew Craft-A-Flower: Daisy Layering Die Set
  • Memory Box Sunny Orange 110lb 6x6 Cardstock Paper Pad
  • Memory Box Lush Green 110lb 6x6 Cardstock Paper Pad

I die cut the daisy using the colored cardstock, layering it from dark to light. I used a slider die to create the stem. I doubled the stem/slider die cut to make it sturdy. I adhered a solid daisy die cut to the back to make it seamless, covering the tip of the stem/slider die cut. I added dots to the flower centers using a Sakura Black Glaze pen. I think die cutting and adhering the layers are the most tedious tasks for this project aside from the addition of details here and there. 

I don't have the die that creates the vase which Jennifer used in her video. I created my own vase by trimming a white cardstock into 5 1/2" x 3". I scored this at 1 1/4", 2 1/2", 3 3/4" and 5". After I folded the cardstock at the scored line, I adhered the ends together by adding double adhesive tape to the 1/2" tab. I added a layer of silver cardstock to each side of the vase. Each silver panel was cut at 1" x 2 3/4". I created the holding tabs for the flower by trimming a white cardstock at 2 1/4" x 1". I scored this at 1/2" and 1 3/4". After folding the scored lines, I added liquid adhesive to these tabs and adhered it to the inside of the vase.

I arranged three flowers per vase. I added the leaves after. I would have wanted to make the stems seamless too by covering the back part where the leaf is adhered, but this will cause some problems with the mechanism of the pop-up so I decided to go against it.

I decorated the vase with an embossed sentiment strip which I layered with two more sentiment strip die cuts. I punched a hole on one side of the sentiment strip so I can thread the ribbon through it. 

I wrapped the sheer ribbon around the vase. I threaded the ribbon through the hole of the sentiment strip. I adhered a silver glitter foam bow die cut using a glue gun. I added a gem to the center.


Now, it is ready to be given away.

Thank you for visiting my blog. Happy Mother's Day! Have a blessed, brilliant and creative day!

Maria Giselle B.

I am sharing this creation at


Monday, May 3, 2021

Card Remake


Hello! We have a new challenge at Incy Wincy Designs. The challenge theme is Mother's Day And/Or Flowers. We have two sponsors for this challenge. 


I am remaking a card I made two years ago as seen above (https://ienjoywhatido.blogspot.com/2019/05/trifold-letter-shaped-card-using-cricut.html). I was cleaning my supplies when I came across the extra cut out letters I created for that card. I decided to card-lift my own creation and make use of these cut outs.

My first version of this card was flimsy. Luckily, I have extra cut outs. For this card, I layered two cut outs to make it sturdy. I had to trim a sliver off the letters and the heart, on the side of the fold line, so there will be no issue when folding this trifold card. 

Instead of ink blending, I adhered floral patterned papers from My Mind's Eye to the letters and the heart. I trimmed off the excess.


I printed the image on Neenah Solar White cardstock. I colored the image with Prismacolor colored pencils. My inspiration in coloring the image is a Japanese maid waitress. I fussy cut the image, leaving a small white border around it. 

Back to the trifold shaped card, I added flowers and leaves to the letters. These were die cut using a Paper Smooches die. I spritz the flowers with Tim Holtz Distress Oxide spray. I layered these flowers to add more dimension.

The sentiment is from Trinity Stamps So Appreciative Stamp set. I created a sentiment strip by heat embossing the sentiment on one of the patterned papers in the paper pad. I die cut this using an Avery Elle Simple Sentiments Elle-ments die. I blended a dark gray ink to this strip. I wipe off the excess ink from the embossed sentiment. I die cut two more pieces of a scrap cardstock using this sentiment strip die. I adhered these cardstock strips to the back of the sentiment strip.

I adhered the image to the heart using foam adhesive. I adhered the sentiment next. I added Pretty Pink Posh gems to the heart. 

Funny that I have the same sentiment, although from different stamp sets, for  both cards. I also adhered the image to the left of the heart on both cards. I only found out about this after I searched for my first card in my blog so I can post it here. 


Thank you for visiting my blog. I hope to see your creations in the challenge blog. Have a blessed, brilliant and creative day!

Maria Giselle B.


I am sharing this creation at


Monday, May 6, 2019

Trifold Letter Shaped Card Using Cricut


Hello! We have a new challenge at Incy Wincy Designs Challenge Blog. Our challenge theme is creating Shaped Cards. I suggested this theme, thus, earning me blog post author too. When I came up with this theme, my idea is to create a non-traditionally shaped card. Anything but a rectangle and a square. I cannot wait to see what entries we will have for this challenge.

Our sponsor is Polkadoodles. When I was asked to suggest which images we can use, most of the images I requested are images that can be used in a Mother's Day themed-card. I always like creating one thing for two purposes. This is how I save time and maximize my creating effort.

I colored the image using Prisma color pencils. I fussy cut the image leaving a thin white border around the image.

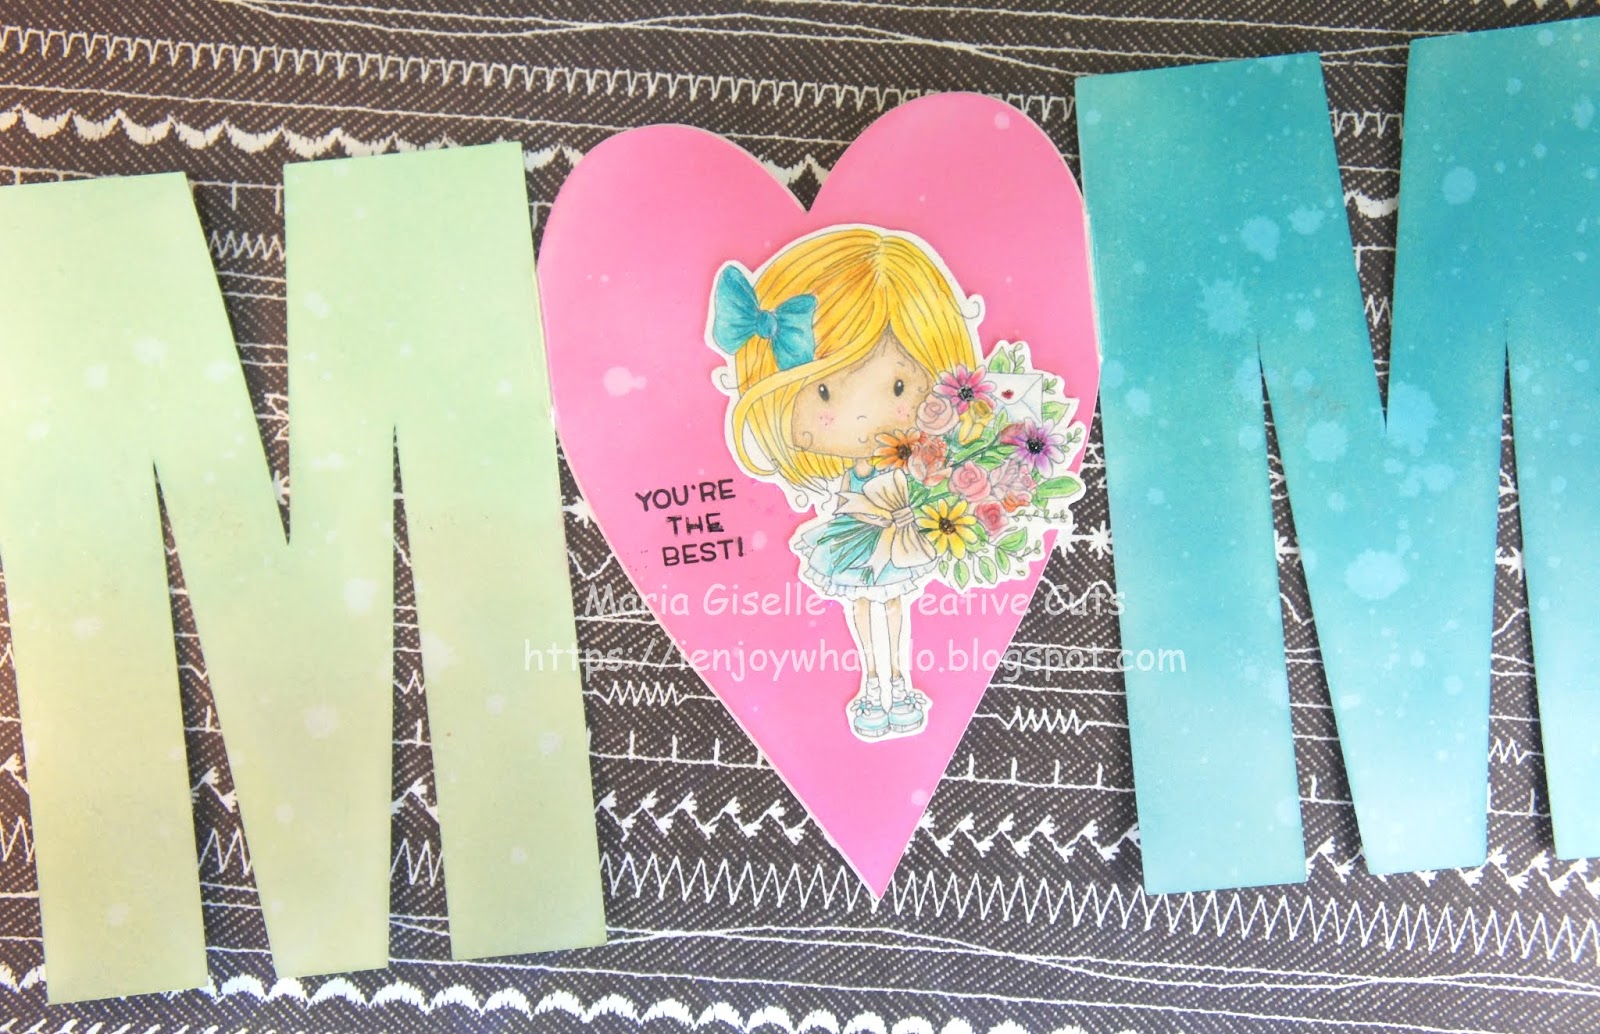
I used the Cricut Design Space to create the letter shaped base card. I weld the letter M to the heart. I cut this twice. I ink blended the letters and the hearts with Tim Holtz Distress Oxide. I flicked water droplets to the inked area, then picked the water droplets with a dry paper towel.

I stamped the sentiments to one side of the inked heart, being mindful of placement since I want the image on the other side. The sentiment stamps are from Lawn Fawn Mom + Me stamp set. The sentiment stamps are in phrases. I did not want to cut the stamp so I masked the part which I don't need using a washi tape. After which, I removed the tape, wipe off any stray ink using my finger, then stamp the sentiment on the heart. I did not have a good impression on one of the words. No worries! I traced the letters using a thin black marker.


I adhered the image to the other side of the heart. I stacked the hearts on top of the other using a liquid glue to form the word Mom.

I added clear Wink of Stella to the bows and flowers. I also added Stickles to the heart on the letter envelope and to the flower centers.


You can fold this into a tri-fold card and it will fit a regular A2 sized envelope.


The card can also stand up if the recipient wishes to display this card.

Thank you for visiting my blog. Advance Happy Mother's Day to all the mothers out there!

Please join our challenge which is live for the next two weeks. I cannot wait to see what your shaped card is. Have a blessed, brilliant and creative day!

Maria Giselle B.