Thursday, December 29, 2022

Christmas Cards using Simple Stories Simple Vintage Christmas Lodge Patterned Papers

\ 

Hello! Welcome back to my blog! This is a photo filled post. I won't be sharing a lot of narrative about these cards. I don't want to take most of your time. If you have any questions, feel free to post it in the comment section. 

I know Christmas is over but you can never run short of Christmas cards, right?


This Santa card was created based from a sketch linked below. The Santa panel is from the 3x4 elements sheet from the collection. Using a craft knife, I cut off the sentiments from another 3x4 element. I inked the edges with a black dye ink to cover the white core of the patterned paper. I pounced sticky ink over it and poured Wow! Clear Gloss Ultra Hight embossing powder to it, then heat set it. I repeated this twice for a smoother finish. Looks like an enamel sticker, right? 


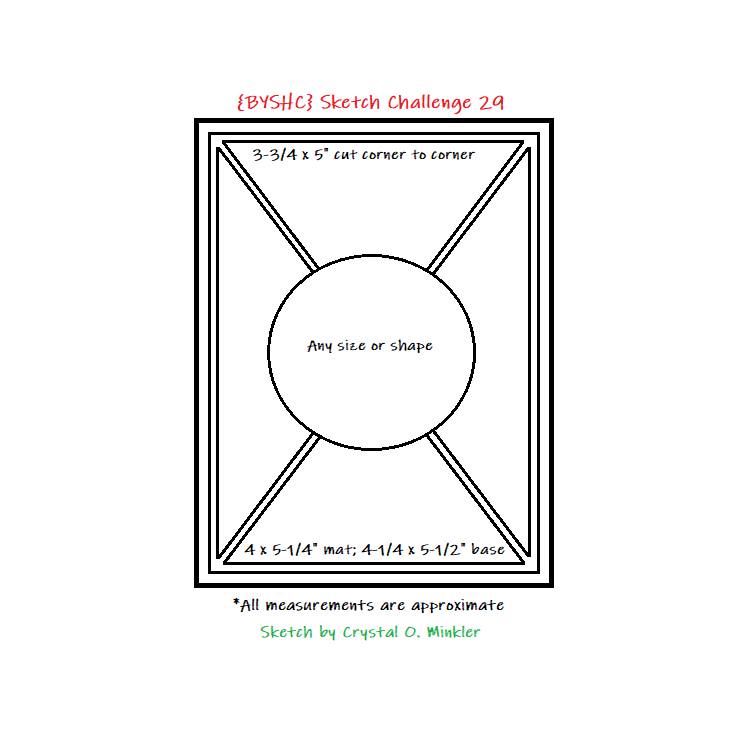
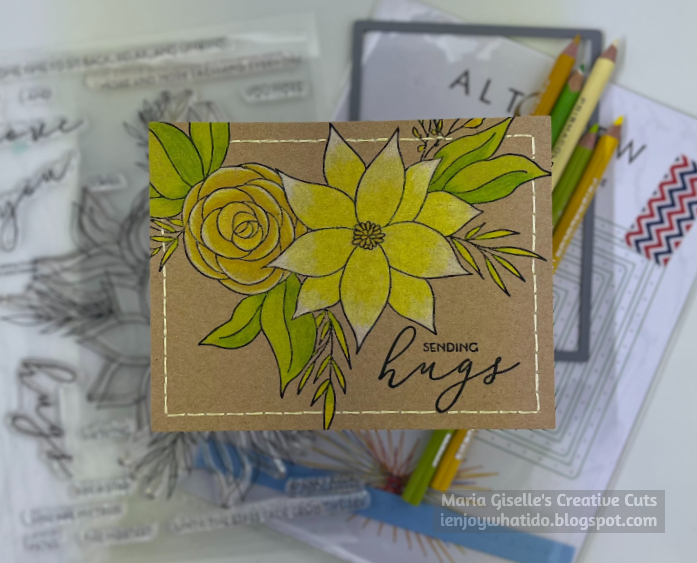
This floral card involves a bit of fussy cutting. I fussy cut the floral border from the 4x6 elements sheet. The sentiment is from the same 4x6 panel. I left a bit of a border when I fussy cut. I added details to the sentiment with the use of a green shimmer pen and a white gel pen. This card was also created based on a card sketch linked below.


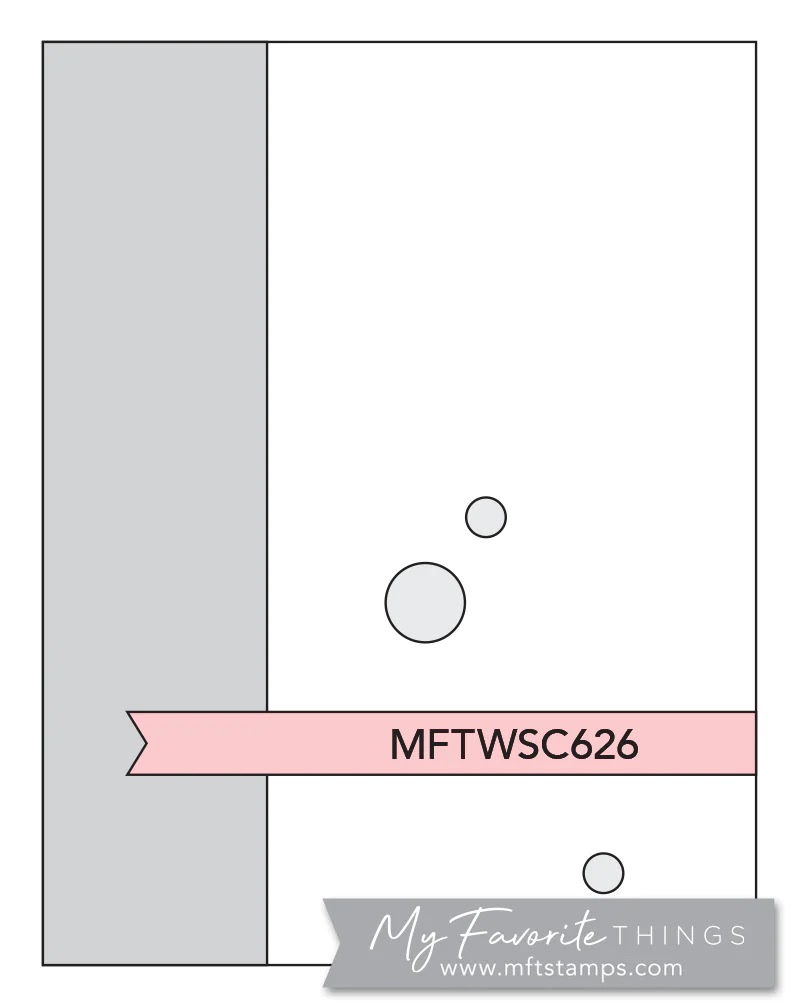
Nobody can resist a shaker card, right? I made a boo-boo on the sentiment of this 4x6 element. To cover it up, I used a sticker from the Simple Stories Holly Jolly sticker sheet. It perfectly fits the space I am covering. Just like with the first card, I made this into an enamel looking like embellishment doing the same process I did with the first card. The circle window outline is from a paper from the Simple Stories Wood Basics 12x12 paper collection. 

Thank you for visiting my blog. Have a blessed, brilliant and creative day!

Maria Giselle B.

I am sharing this creation at


Tuesday, December 27, 2022

Floating Sentiment Shaker New Year Platform Card

Hello! Welcome back to my blog. Today's card is created to welcome the coming year. 

I die cut a yellow cardstock using a stitched rectangle from the Lawn Fawn Platform Pop-up die set. I heat embossed the sentiment using a Versafine Onyx Black ink and a clear embossing powder. The numbers are from the LF Violet's ABCs stamp set. 

I die cut the platform on black cardstock. I masked the top portion of the platform so I can flick gold paint on the sides of the platform. I set this aside to dry. I also diecut the T-shaped tab piece from the die set on black cardstock.

For the floating sentiment, I die cut the letters on gold glitter cardstock. I used the LF Cole's ABCs die set to cut the letters. I added a double adhesive tape to the back of the fun foam. I die cut the letters on this fun foam. You also have the option of adding another double adhesive tape on the top before die cutting the foam. This just makes adhering the gold letter die cuts easier. I just used liquid adhesive to adhere the gold letter die cuts to the fun foam. The double sided adhesive comes clear behind the acetate unlike the liquid glue that's why I chose to use it. 

I die cut two acetates with a rectangle die cut. Make sure the acetate you are using is stiff enought so it will remain upright on the platform. I added stitching holes on the edges of the acetates using a string art rectangles die. 

I peeled the tape backing sheet off the back of the letter die cuts and adhered it one of the acetates. I stitched the acetates together using a clear thread. Before stitching the acetates shut, I poured black sequins inside the pocket. 

I stamped the birds, noisemakers and party hats on watercolor paper. The birds are from the LF Love Letters stamp set. The noisemakers and party hats are from the LF Party Animal stamp set. I colored the images with watercolor markers. I added gold paint details to the hat and white pen details to the noisemakers. I fussy cut the images leaving a white border around it. 

I assembled the platform. I only used one T-shaped tab, positioning it on the frontmost platform. The floating sentiment was sandwiched in between the platform die cuts. I adhered the critters, noisemakers and the party hats on the T-shaped tab. I adhered the sentiment on the front of the platform. 


Thank you for visiting my blog. Have a blessed, brilliant and creative new year!

Maria Giselle B.

I am sharing this creation at


Saturday, December 24, 2022

Action Characters Glow in the Dark Birthday Platform Card

Hello! Welcome back to my blog. I created this card for a boy, Ollie, who celebrated his third birthday this December. This is especially made for him since it features all his favorite action characters. It reminds me of my sons who at one point loved action characters too. 

I searched online for free downloadable pdfs of the action characters that Ollie loves. I uploaded this to Cricut Design Space. This is one great thing I love about Cricut that's why I can't give up my machine despite its unpopularity in my crafting. I had problems cutting my file as a whole despite using the flatten function. I should have opted for the jpg version of the images to avoid this problem since I have no intent to cut and layer the images. Anyway, I settled with fussy cutting the images. 

I cut the platform on blue cardstock using the Lawn Fawn Platform Pop-up die. I trimmed off the scallop border. Instead of using the back panel die included on the set for the background, I cut the building using Cricut. I also cut a building without windows by editing the same building image in CDS. To remove the windows, I used the Contour feature. The building cut image is from Cricut Going Places cartridge. I increased the width of the building to 5 1/4" which is the same width as the back panel of the platform when cut.

Using the score marks of the platform as a guide, I scored the building. I adhered the solid building cut to the back of the windowed building cut. I added Glow in the Dark Nuvo Drops to the windows. I set this aside to dry. Once dry, I adhered this to the inner side of one of the platform die cuts. 

Working on the platform, I folded it on the scored marks, reinforcing it with a bone folder for a crisper fold. I wanted the top portion of the platform to be black. I partially die cut a black cardstock twice using the platform die. I strategically positioned the cardstock to the part of the die that cuts the top portion, the one with the open slot. Since some of the sides are intended to be scored only, I used this scored line to guide me where to trim. I adhered this to the top portion of the platform. 

For the tabs that will hold the action characters upright, I die cut a tab on black cardstock and acetate. The tab die is included in the Platform die set. I adhered the Teenage Mutant Ninja print out on the black tab die cut. I cut off any excess. 

I adhered Sonic on the acetate tab using a double adhesive tape. I snipped off the excess. 

For spiderman, to make him float, I adhered him to a strip of acetate using double adhesive tape. 

For the sentiment, I die cut the birthday celebrant's name using the My Favorite Things Spell Anything Alphabet Die-namics on a darker blue cardstock. I adhered this to the front of the platform.

I die cut a banner on white cardstock using a die from the Lawn Fawn Fancy Folded Banners die set. I heat embossed the Happy Birthday sentiment on this using Wow! Flourescent Blue embossing powder. The sentiment stamp is from Simon Says Stamp Sentimental Circles. I adhered this banner to the top front edge of the platform.

I enjoyed creating this project. I was having so much fun that I finished this in one day. Can't believe it myself. 

Thank you for visiting my blog. Have a blessed, brilliant and creative day! Happy Birthday, Ollie! 

Maria Giselle B.

I am sharing this creation at


Thursday, December 22, 2022

Color Inspired Greeting Card


Hello! Welcome back to my blog. I created this card as part of my AECP 2 Color Your Day course. One of the lessons in this course is Inspired by Color. My colors are inspired by Altenew's April Inspiration Challenge as seen below. I chose April because this is my birth month and yellow is my favorite color.


I am using the Altenew Craft a Flower Daisy Layering die set. I die cut the flowers on yellow and purple cardstocks with varying shades. I adhered the layers. I added details to the top layer using a Fantastix brush tip and Tim Holtz Distress inks in Shaded Lilac and Fossilized Amber. 

I die cut the leaves on a green cardstock and adhered the layers. I also die cut the stem using a slider die.

I trimmed two pieces of the same yellow cardstock at 4 1/4" x 5 1/2". I added details to one of the panels using the Altenew Dotted Swirls debossing die. I trimmed a fourth of an inch off from each side. I adhered this to the other yellow cardstock panel. 


I adhered the flowers to this layered panel to created a floral bunch. 

I die cut a yellow strip of cardstock with the Altenew Essential Sentiment Strips die. I applied shimmer to a purple carstock strip. I adhered the sentiment die cut on a purple cardstock. I trimmed off the excess. To create this into a banner, I trimmed a strip of yellow cardstock, trimmed it at 1 1/2". I cut one edge of each piece to make into into a fishtail. I adhered this to the back of the sentiment die cut, offsetting it for the banner look.


I added green sequins for a bit of sparkle. 

Thank you for visiting my blog. Have a blessed, brilliant and creative day!

Maria Giselle B.

I added below links to the products I used on this card. There will be no additional cost to you should you decide to purchase these product/s. It is just a way to help a fellow crafter sustain her love for crafting. Thank you for your support!

I am sharing this creation at

Monday, December 19, 2022

Shaped Mini Christmas Card

Hello! Welcome back to my blog. I created this card to join the latest Caffeinated Christmas Card Challenge with the theme of snowman.

To create my card, I die cut a light blue cardstock using the Honey Bee Coffee Cup Gift Card Holder die. I die cut the whole coffee cup. I partially died the part without lid. I cut this piece twice, trimming it just right above score line created by the die. 

On one of the panels cut above, I die cut a circle window on the center. I aligned this to the whole coffee cup die cut, temporarily taping it. I positioned this in the Misti Stamping Tool. I positioned the circle snowman stamp inside the window and picked this up with the Misti door. I removed the window panel. I stamped the image using Memento Tuxedo Black ink. I colored the image with Faber Castell Polycromos color pencils. The image is from Avery Elle Holiday Circle Tags clear stamp set.

I swiped a baby wipe on the two-coffee cup die cuts. I embossed this piece with the Simon Says Stamp Refined Snowflakes embossing folder. Adding moisture to the cardstock prevents paper cracking when embossed. I adhered the window piece to the front of the coffee cup die cut, aligning the window to the stamp image. I adhered the other one to the back. 

I die cut the coffee cup lid on a a blue cardstock. I die cut two pieces of this. I adhered this to the lid portion of the coffee cup die cut.

I stamped a sentiment on the inside. You can temporarily adhere a gift card to the inner front flap, if you want to.

Thank you for visiting my blog. Have a blessed, brilliant and creative day!

Maria Giselle B. 

I am sharing this creation at


Tuesday, December 13, 2022

Color Trend Christmas Card


Hello! Welcome back to my blog. For today's card, I am jumping in with the non-traditional Christmas color trend of pink and pastels. Do you like this trend or still go for the traditional Christmas colors? The colors are inspired by the latest Scrapbook and Cards Winter Issue Color Challenge as seen below. 


This is my second project featuring the Kat Scrappiness Buffalo Plaid Backdrop die. The previous post features the other card using this die. I enjoy using this die. This die offers a lot of possibilities.

This card involves a lot of die cutting. You can use a trimmer as an alternative to die cutting the squares.

After I die cut the plaid on dark pink cardstock, I built my background with more die cutting. I strategically die cut a light gray cardstock to fill in the dark pink squares on the plaid background die cut. When I say strategically die cut, since I only need the squares cut by the open square areas of the die, I positioned the paper near the edge of the die to cut that last line of the plaid. It is a lot of passing through the die cut machine, but this is the only way I know how to save paper and also cut the squares that perfectly fit in the openings of the die cut. I could have cut the backdrop on another colored cardstock, use the negative square cuts and saved the backdrops for later use but I need a lot of gray to fill the panel, so I opted to do my selective die cutting.

I die cut a light pink and a light blue cardstock to fill in the square openings of the background die cut. I also die cut a purple cardstock to fill in the back of the diagonal openings for a pop of color showing through the vent openings. 

After all the square die cutting, I adhered the gray square die cuts first over the dark pink squares. I adhered the purple squares on the back of the vented squares. I adhered the panel to a 4 1/4" x 5 1/2" scrap white cardstock. I adhered the light pink and light blue squares after, alternating the colors. 

For the sentiment, I die cut the word Merry on grape and light gray colored cardstock. The die is from My Favorite Things Merry and Bright with all the Trimmings die set. I adhered the grape letter die cuts on top of the gray letter die cuts, slightly off setting it. I applied shimmer to the letters with a clear Spectrum Noir shimmer pen. I added dots of Marvin Uchida Snow Marker to the letters to mimic snow that settled on the letters. I heat set this to make it puff up. I adhered this to a dark gray cardstock and trimmed it to size.

I die cut the word Christmas twice on the same dark gray cardstock. This sentiment die is from the Trinity Stamps Scripty Christmas die set. I adhered one sentiment die cut on top of the other for some dimension. I applied shimmer and snow to this sentiment die cut using the same technique I used on the word Merry. I die cut the shadow of the sentiment on light gray snowflake embossed paper. I spritz some pink and light blue shimmer spray on this die cut. I adhered the dark gray sentiment die cut on this.

I adhered the sentiments on the center of the plaid panel. I replaced the tiddle of the letter I with a die cut 3D bow die cut on pink mirror cardstock. The die is from Lawn Fawn Mini Wreath die set. I adhered this and added a clear gem on top of the bow.


I layered silver and holographic snowflake sequins to the squares on the top and bottom rows of the card for additional embellishment. To adhered sequins together, I recommend using Ranger Glossy Accent.


Thank you for visiting my blog. Have a blessed, brilliant and creative day!
Maria Giselle B.

I added below the link to the Kat Scrappiness product I used on this card. There will be no additional cost to you should you decide to purchase this product. While you are at the Kat Scrappiness website, do check out their wide array of products especially the exclusive Kat Scrappiness products. Not to forget, Kat Scrappiness has an ongoing sale on all Christmas products including the die that I used on this project. 

I am sharing this creation at


Friday, December 9, 2022

Watercolour Resist Using Freezer Paper

Hello! Welcome back to my blog. For today's card, I am trying out a technique using freezer paper as a resist in watercoloring. I am using the Kat Scrappiness Christmas Tree Coverplate die on this card.

I die cut a piece of freezer paper using the coverplate die. My cutting pad is very warped that I have to add a metal shim to my sandwich for a clean cut. I trimmed a watercolor paper at 4 1/4" x 5 1/2". I positioned the freezer paper die cut over the watercolor paper with shiny side kissing the watercolor paper. I sandwiched this in a folded typing paper, then fed it to the Minc Laminator machine. I fed it twice just to be make sure that the freezer paper adheres to the watercolor paper. 

My colors are inspired by the latest Color Hues Challenge. I painted the tree with blue watercolor and painted the background with cream watercolor. The watercolor I used is Kuretake Gansai Tambi watercolors. I set the panel aside to dry in between watercoloring. I did not use a heat tool since this can deactivate the stickiness of the freezer paper. 

Once I am done coloring, I pointed the heat gun to one of the corners of the freezer paper mask. I carefully lifted this up using a craft knife. I peeled the freezer paper from the watercolor paper until I felt that I cannot peel it off anymore. I reheat the area where the papers are in contact, then repeat the process of peeling the freezer paper until all of the freezer paper is removed. 

Depending on how you die cut the freezer paper, your die cut might be the mirror image of the die which is not a problem with the die I used on this card. But if you intend to die cut a sentiment to use as a mask, just be mindful on which side of the freezer paper you are die cutting. Again, the shiny side is the waxed side that will adhere to the paper once fed through a laminator.

I die cut the watercolored panel using a postage stamp die. I added cream gems to the tree. I lightly rubbed the Versamark ink to the postage edges. I poured Ranger Enchanted Gold embossing powder to this then heat set it.

For the background panel, I die cut a shimmery blue cardstock using the Kat Scrappiness Buffalo Plaid Backdrop die. I forgot to use the metal shim so the negative cuts did not fall off. This is actually a happy accident for me. Keeping the negative cuts intact gave an embossed impression to the blue cardstock panel. I adhered this panel to a top folding A2 notecard applying a lot of adhesive to keep the negative cuts from falling off.

I die cut a banner on blue cardstock. I embossed a sentiment to this. I adhered this to the bottom portion of the tree. 

I adhered the watercolored panel to the plaid panel with foam adhesive.

My son suggested to have a star added to the scene. I don't have a cream colored star sequin. I could really die cut one but instead, I embossed a sequin star with the Ranger Enchanted Gold embossing powder. I did multiple layers of embossing. I added a Wow! Gold Pearl embossing powder next and a Wow! Ultra High embossing powder as the last finish. Heat the heat gun first before melting the powder to prevent warping the sequin. I adhered the star to the top of the tree and added a sequin to the center. 

I added a dot of blue to the centers of the gems using a Copic marker. 

Thank you for visiting my blog. Have a blessed, brilliant and creative day!

Maria Giselle B.

I added below links to the Kat Scrappiness products I used on this card. There will be no additional cost to you should you decide to purchase these products. While you are at the Kat Scrappiness website, do check out their wide array of products especially the exclusive Kat Scrappiness products. Not to forget, Kat Scrappiness has an ongoing sale on all Christmas products including the dies that I used on this project. 

Wednesday, December 7, 2022

Yellow Themed Stitched Card


Hello! Welcome back to my blog. Today's card was created as part of my AECP Level 2 journey. This is my 2nd card for the class. My favorite color is yellow, which explains the color choice of my flowers in this card. 

I stamped the image on a 5 1/2" x 8 1/4" kraft cardstock. The stamp I used is larger than 4 1/4" x 5 1/2". Since I have no specific plans yet when I started this card, I decided to stamp the whole image so I can color it. I can decide later on what to do with this panel. The stamp I used is Altenew Calming Cluster stamp set. 

I stamped the image using Memento Tuxedo Black ink. I used the Misti Stamping Tool to stamp the image  not only because this is a large image but I will be re-stamping the image after I colored the image. 

I colored the image with yellow color pencils from my stash, adding shadows and highlights on certain areas. I took my time in coloring this image. Since I am heavy handed in coloring with color pencils, my hand gets tired easily. Taking breaks is important for me especially if I have to color a large image.

I used yellow-green color pencils for the leaves. I blended the yellow and yellow-green for the floral sprays. 

I returned the colored panel to the Misti Stamping Tool, making sure it is positioned the same way it was positioned earlier. I re-inked and re-stamped the image on the colored panel to regain the crisp outline of the image.

It's time to decide on what to do with this panel. Using a 5 1/2" x 4 1/4" rectangle die as a guide, I positioned the sentiment stamp on the lower right bottom of the floral cluster. Once I committed to the placement of the sentiment, I temporarily taped the rectangle die, then ran this through the die cutting machine. 

I stamped the sentiment using the Misti Stamping Tool and the same black ink. I re-stamped the sentiment a couple of times. I only applied gentle pressure over the sentiment stamp. I don't want to press too hard and have a squished looking sentiment. I added a sub-sentiment on top of the main sentiment using the same ink. The sentiment is also from the same stamp set.

I wanted to add an outline frame to make the image pop out. I could have drawn the lines but I wanted to add stitching to the panel. I used the Altenew String Art Rectangles die set but I did not run the die over the colored panel. I don't want to add pierced holes on the flowers and leaves. To avoid doing this I created a template for adding pierced holes by cutting a vellum at 5 1/2" x 4 1/4". I positioned the die at the center of this vellum panel, temporarily taping it to the vellum. I ran this through the die cut machine. I temporarily taped this pierced vellum on top of the colored panel. I poked the holes using the pierced holes as a guide avoiding poking holes over solid images. The vellum allowed me to see which holes to avoid poking. I also added holes to the areas close to the images to keep the stitched line continuous.


I did a running stitch for the outline using a light yellow DMC floss. 

I adhered this to a top-folding A2 portrait card. 


Thank you for viewing my blog. Have a blessed brilliant and creative day!

Maria Giselle B.

I added below links to the products I used on this card. There will be no additional cost to you should you decide to purchase this/these product/s. It is just a way to help a crafter out sustain her love for crafting. Thank you for your support!

I am sharing this creation at