Saturday, December 30, 2017

Mass Produced Digital Image Angel Give-away


The first time I created this project for our DT post, I knew right away that it is something I would want to create to give-away to my Kindergartner's class on their Christmas party. I've started really early coloring the images so I was left with the cutting and detailing during the last weeks before the party. The sad thing is my grade school sons got hit by illness during their last two days of school, making them miss school including their Christmas party.

The details on how to create this ornament are in a previous post as linked here, Digital Image Christmas Ornament. This is easy to re-create with a digital image because you can resize and mirror print the image. Some stamp sets come with mirror images, making this project easy to re-create, or you can do mirror stamping technique.


Thank you for visiting my blog. I wish you all a blessed and brilliant Christmas!

Maria Giselle B.


Paper Rolled Beads Rosary


I made this a while back for my sons who had Living Rosaries as part of their 5th Grade. I made a rosary for each of my son who are now in 6th & 7th grades. They gave their rosaries to their grandparents. Back then, I was using whatever supply I have on hand, without thinking that these rosaries will be given to my parents. The string of my father's rosary broke. I was going to fix it when I visited them last year but I couldn't find an equivalent supply so I brought the beads with me.


I call these beads but it is actually made of paper. When I created this, I chose paper since I am a papercrafter. I searched the net and found templates on how to cut the beads. I created a template using a cardboard and traced this on a patterned paper. After cutting the patterned paper, I rolled the beads using a quilling tool. As I roll the paper, I applied Ranger Multi Matte Medium to the inner side of the patterned paper. I allowed this to dry by sticking a toothpick through the paper bead hole, with the other end stucked to a scrap of styrofoam.


After the paper has dried and shaped into a bead, I applied several coatings of Ranger Multi Medium Gloss to the beads and allowed it to dry in between coating. I thread the beads with a bendable wire until I completed the rosary. Now, it is ready to be returned to my father. Well, I hope the wire I used for this one will last longer since  I heard, my mom's rosary broke, too.

Thank you for visiting my blog. Have a blessed and brilliant day!

Maria Giselle B.

Felt Flower Corsage


I am behind in posting my finished projects. With the amount of posts I am doing right now, you would figure out how busy I was this past month.

I always try to create something new for my 11 y/o's band teacher for concerts. This is the first felt flower I have created for her.

I tried cutting the felt using the Cricut Explore but I failed again. On this occasion, I ironed a freezer paper to the back of the felt. I positioned this freezer backed felt to the Cricut mat. Despite using the purple mat (Strong Grip Adhesive Mat), the felt moved. I really wanted to use felt so I cut the flower image on freezer paper. I ironed this on the felt and used this as a template to cut the flower. The cut is really simple so I probably didn't need a template.


I poked a hole on the center to thread through a floral wire. Making sure the glue gun is ready, I rolled the flower and squirted the hot glue to the base of the flower. I sprayed glimmer mist to the felt flower and set it aside to dry.

For the leaves, I used the Ellen Hutson Bold Blossom Stand-Alone die. I adhered this to the base of the flower using glue gun. I covered the wire with floral tape.


I also created my personalized gift box for the flower corsage. I used the Martha Stewart Scoring Board to create the cardstock base and the acetate lid. Before I scored the acetate, I stamped the My Favorite Things Sheet Music Background Cling stamp using an Opaque White Stazon Opaque ink.

Thank you for viewing my blog. Have a blessed and brilliant day!

Maria Giselle B.

Tree Shaped Gift Tag


I hope you are having an awesome celebration with you family and friends. I am at work Christmas Eve and looking forward to Christmas Day so I can celebrate it with my family.

I created these tags to attach to the gifts for my family which will be given once I get home from work.


I searched for a Christmas Tree image in Cricut Design Space. This image is a layered cut. I cut the solid layer only. I approximately cut the image about 3"x 8". Initially, I was planning to tuck this in the boys' stockings instead of attaching it to the gift. This is the dimension of the smallest stocking. I cut this tree image on a 12"x 12" patterned paper and a green cardstock.

I was amazed at how I was able to fit all 5 trees in one 12x12 paper. On a previous post, I mentioned how I loved the CDS feature of being able to drag your image to any part of the paper or mat which is a paper and mat saver feature. They added more functions prior to cutting. You can rotate your image, and you can move images from mat to mat. Another paper saver feature! I simply love it! Thanks, Cricut!


Going back to the project, I cut a gold cardstock for the star tree topper using a Lawn Fawn Tiny Tag die. The stamp I used is from the Lawn Fawn Tiny Tag Sayings stamp set. I heat embossed this using white powder.

I was hoping to add an embossed sentiment on the tree but since the patterned paper has a busy pattern, the sentiment was not readable. Instead, I added strips of My Mind's Eye washi tape. To hide the hole created by the die on the star tag, I slid the top of the tree through it, then adhered the star using foam tape. I adhered the green cardstock to the back of the patterned paper to make the tree sturdy. I also adhered a wood grain patterned paper to the trunk of the tree.


As finishing touch, I added drops of gold Nuvo drops to mimic ornaments.

Thank you for visiting my blog. Have a blessed and brilliant day!

Maria Giselle B.

Shimmer Star Masculine Birthday Card


My Amang (father) celebrated his birthday this month. This card is created especially for him.

I am using the Altenew Halftone Star stamp set as the focal image of this card. I had this stamp on my wish list for a while. I finally gave in to buying it. I had difficulty working with this star stamp. I was trying to go for an ombre effect with embossing. I used the Misti Stamping Tool to help with the repeated stamping, using different colored inks but the final image does not look the way I imagined it. I didn't want to give up since this stamp set did cost me some.


On my next experimentation with this stamp set, I did the ombre stamping first. I allowed this to dry before I inked the star with Versamark ink, then poured some Judikins Iridescent Sparkle embossing powder over the image, then heat set it. I die cut the embossed star using the coordinating die.

For the front panel background, I embossed the Ellen Hutson Stitching Lines on a gold cardstock. I positioned the metal die diagonally. You might have to make adjustments on how to run the metal die with the cardstock on your die cut machine. I sprayed this gold embossed panel with Prima Color Blooms Gold Foil Mist. I set this aside to dry.

To create the frame, I used the Simon Says Stamp This Is The Life Craft Die. I die cut the frame on white cardstock. I applied Versamark ink using a Versamark pen. I poured Ranger Copper embossing powder and heat set the frame.

I stamped the sentiment on vellum and embossed this with Ranger Copper embossing powder. I scored the sentiment strip to create a 3D label. I also fish tail cut the edges.

To put the card together, I die cut a fun foam with the next smaller sized star. I adhered this to the back of the embossed star die cut. I adhered the frame more to the left, then centered the star onto this. I added a rolled gold floss before adhering the star. I adhered the vellum label on top of the star, applying dots of glue to the back of the embossed letters. I also used a vellum glue tape runner for the edges.

Thank you for viewing my blog. Have a blessed and brilliant day!

Maria Giselle

Thursday, December 28, 2017

Red and Green Non-Christmas Gatefold Card


I am late in creating a card for our latest Incy Wincy Designs Challenge on Red and Green. This challenge runs for a whole month! It took me an extra week to finally get to it since the holidays kept me busy and I got a bit of a flu, too. Thanks to my sons! I am glad to be back.

Do you have one of those days wherein you already have a plan for your card but decided to do something else, only to find out that you will go back to your original plan because the new plan didn't work? This is one of those projects. I changed my original plan after I've put together all the supplies I was planning to use. I wanted to try out the new dies I've bought that's why I changed my design.  After several tries and changes, it still wasn't working. Thanks to my eldest son, to whom I frequently ask for feedback, I went back to my original design.

I am using an 8 1/4" x 5 1/2" white cardstock. I scored this at 2 1/8" on both ends creating a gatefold card. When folding, make sure the ends meet so there will be no gap in between that could reveal a part of the inner card. I adhered different patterned papers on both flaps, one from Bo Bunny and the other, from Authentique.


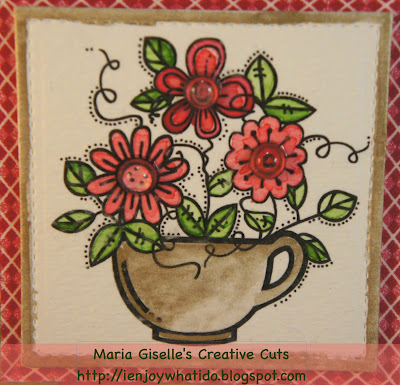
I printed the image on watercolor paper. The image is from one of our sponsors for this challenge, Bugaboo stamps. I colored the image using Gansai Tambi Kuretake watercolor, mixing the silver with the red and green to add some sheen to the dark pigmented colors. I painted this mix on the flowers and the leaves. I painted the vase gold. I die cut the image using the Lawn Fawn Stitched Square die. I watercolored the edges of this image paenl with the same gold watercolor I used for the vase.

For the sentiment, I am using a stamp from the Altenew Label Love stamp set. I embossed this using Wow! Metallic Gold Rich Pale embossing powder. I used a white Sakura Gelly Roll pen to trace the letters on the label stamped impression and make it pop.

For the layer, I adhered a red patterned washi tape around the edges of a white cardstock. For the sentiment, I covered a white cardstock with the same washi tape. I adhered the image panel and sentiment strips using adhesive foam.


To finish off the card, I applied a strong adhesive to just a side of the back of the image. For the image, I applied adhesive on the back right side. I adhered this to the left gate panel of the card. For the sentiment strip, I did the opposite. I applied the adhesive on the left side of back of the sentiment strip, then adhered this to the right gate panel.

I applied dew drops to the center of the flowers for added embellishment.

I hope you join our latest challenge. There is still a long way to go before the challenge ends.

Have a blessed & brilliant day!

Maria Giselle B.


I am sharing this creation at


Wednesday, December 20, 2017

Mass Produced Christmas Shaker Card


My eldest son asked me to create a card for him to give away to his friends before school holiday break. He requested for 8, the most cards to date. The other request he has is a shaker card.


Looking through my craft stash, I chose to use Clearly Besotted Little Elves. I stamped these using Versafine Onyx Black ink on Strathmore watercolor paper. I used the Misti Stamping Tool so I could re-stamp the images. The watercolor paper has texture on it, so re-stamping is a must. I colored the images using Zig Clean Color marker. I only blended the colors on the large areas, which is not a lot, using a water brush pen. I used a black Sakura Glaze pen for the belt. I heat embossed the pompom tip of the elves' hat with Wow! Snow Puff embossing powder. This is a less noticeable detail that you can probably skip or use another medium to add detail. I fuzzy cut the images leaving a small white border around the image.

I created the frame for the shaker card using Simon Says Stamp Stitched Rectangle die. I used the second and third largest die, securing the two dies with a tape. I used red and green cardstocks. I applied shimmer to these frames using Spectrum Noir Clear Shimmer pen. I adhered a clear acetate on the back of the frames using a double adhesive tape. I adhered thin strips of foams over the acetate, on the frame to create a well.

For the base card, I cut an A2 sized Neenah 100lb. Desert Storm cardstock. This is the same size of the frame cut. I stamped Hero Arts Tiny Flags on the front of the card using Simon Says Stamp Kraft dye ink. The sentiment is from Mama Elephant Season's Greetings stamp set. I used the Misti tool to re-stamp the sentiment stamp with Versamark ink. I heat embossed this with red Ranger embossing powder and Ranger Verdigris embossing powder.

My eldest son is into music, playing in band most of his school life. To personalize this card some more, I die cut some music notes on DCWV The Glitter Cardstock Stack using Paper Smooches Music Notes die. I just cut a few notes. Most of the shakers are snowflake and clear sequins.

I used the Misti tool as a guide to adhere the acetate to the note card. Taking out the foam board of the Misti, I positioned the acetate front panel to a corner of the Misti, poured the shaker mix, and carefully removed the release paper of the foam adhesive. Using the same corner as a guide, I positioned the note card on top of the acetate panel, sealing the shaker card.

I adhered the elf image to the front of the acetate panel.

Shaker card is not the best choice for mass production but if you have a design in mind, and work the design by steps, it shouldn't be that difficult.

Thank you for visiting my blog. Have a blessed and brilliant day!

Maria Giselle B.

I am sharing this creation at

Thursday, December 14, 2017

Shaped Shaker Gift Tag


My younger son is invited to a birthday party, his first invite. I am sure he is excited. I cannot believe how involved he wants to be. He was the one who chose the present for his friend and the main image for this tag.

I am using Lawn Fawn Ready, Set, Snow Shaker Add-on Die to cut the snow globe tag elements. I am using Strathmore Bristol paper for the back of the snow globe. I rubbed an anti-static powder tool over the paper. I stamped the balloon from Lawn Fawn Year Four stamp set. I masked some of the balloons to be able to stamp multiple balloons. I also masked the balloons to create the ray of colors. I used Tim Holtz Distress Oxide for the ink blending. I colored the balloons using Zig Clean Color Brush Markers.

The reindeer and the gift are from Lawn Fawn Party Animal stamp set. I heat embossed this image on Strathmore Bristol paper using Versafine Onyx Black ink and clear embossing powder. I colored the image using Zig Clean Color Brush Markers. I cut a slit around the hands of the reindeer to be able to insert the present in between its hands.

To keep up with the colors, I cut different colored cardstocks using the snow globe die. I inked the top layer with Tim Holtz Distress Oxide Faded Jeans. I poured Martha Stewart Crafts Iridescent Glitter on the well I created with the stacked colored cardstocks, sealing it with the snow globe with acetate adhered to it. I used a double adhesive tape to adhere the die cuts on top of each other.

The sentiment is from Lawn Fawn #Awesome stamp set. I curved the sentiment stamp with the help of the snow globe die before picking this with the acrylic block. I heat embossed this before blending Tim Holtz Distress Oxide Faded Jeans to it. I inked the edges with Tim Holtz Distress Ink Black Soot.

The Lawnfawnatics Challenge blog has a new challenge on Emboss Resist. My embossing on this tag resisted the inking I made on the background and the sentiment tag. The embossing also helped keep the colors within the area I am coloring when I colored the balloons, reindeer and the gift.


Thank you for visiting my blog. I hope you have a blessed and brilliant day!

Maria Giselle B.

I am sharing this creation at


Monday, December 4, 2017

Pearl Painted Rudolph the Red Nose Reindeer


Our new challenge at Incy Wincy Designs Challenge Blog for the next two weeks is Silver and Gold. Very timely, I should say, with the holidays fast approaching. Our sponsor is Fabrika Fantasy. I am using the Young Deer image.

I printed the image on Canson watercolor paper. I painted the image using Finetec Coliro Watercolor Pearl Gold & Silver set. I love this watercolor set. See the shimmer on the deer on the next photo. There are other Finetec sets available, and you can also purchase them individually. I painted the eyes and the mouth with Kuretake Gansai Tambi. I used an ink jet printer to print the image which reacted with the water when I painted the image. Using the original image as a guide, I used a fine tip black marker to trace the image outline and the details.


I used the Cricut Design Space to cut the antlers for this deer. I pounced this on Versamark ink and dipped it on silver Hero Arts embossing powder. I repeated this process twice to make it thicker. I cut these antlers twice. I adhered the extra antlers to the back of the embossed antlers for extra dimension. I adhered these antlers to the head of the deer.

I added red Stickles to the nose of deer. Now, my deer looks like Rudolph the reindeer.

For the background, I am using Canson watercolor paper. I die cut this panel using Simon Says Stamp Stitched Rectangles. I masked the edges using a low tacky painter's tape. I applied a wash of water to the open rectangular area. I used the Kuretake Gansai Tambi to add color to the area, using a dark blue and purple to create the night sky. I dried this with a heat gun.

I covered the area with a Simon Says Stamp Falling Snow stencil, secured it with tape at the edges. I applied a translucent Wendi Vecchi embossing paste to the stencil, making sure I covered the holes with embossing paste. I lifted the stencil off, making sure to clean the stencil and palette knife right away. I poured Tim Holtz Distress Pumice Stone Glitter over the area to adhere to the embossing paste while pouring off the excess. I set this aside to dry.


For the sentiment, I am using a bold sentiment from Mama Elephant Season's Greetings stamp set. I stamped this on gold vellum using Versamark ink and heat embossed it with American Crafts Zing Metallic Gold embossing powder. I fuzzy cut around the sentiment leaving a small border around the words.

I applied dots of Ranger Multi Medium Matte on the back of the vellum sentiment and the painted image. I adhered this to the stitched panel.

To finish off the card, I cut a silver cardstock at 4 1/4"x 5 1/2". I added cross-stitched details on the edge of this silver cardstock using Lawn Fawn Stitched Borders. I adhered this to the front of a top folding A2 note card. I adhered fun foam to the back of the watercolored panel, then adhered this to the silver cardstock.

Thank you for visiting my blog. Let me greet you as early as now, have a Merry Christmas! Enjoy the season!

Maria Giselle B.


I am sharing this creation at