Hello! Welcome back to my blog. Today's post is a card-filled and picture-filled post. As early as now, I want to thank you for your time in reading this post, looking at the pictures or even just browsing through. I appreciate your time.
I finished my AECP Level 1 Courses. If you want to see those cards again, just search for AECP on the search bar. I created a total of 9 cards for the course.
So for this post, I am featuring the Final Challenge of AECP Level 1 which consists of 2 sets of cards. 1 with 6 masculine-themed cards, and another one with 6 feminine-themed cards. Aside from this, I created a gift box for these card sets. Not to forget, I re-purposed an item as part of this challenge.
The components I chose from the courses are:
- Basic ink blended background technique. This is a fun way of playing with inks, although you don't have to use multiple colored inks for this technique. You can opt for one color only and come up with a faux colored cardstock. Flicking water to a water-based dye ink will add texture to the background. Flick it, let the water sit for a few minutes, then pat it with a dry paper towel after. Step it up by flicking glittered water, watercolor or pearlized water to the background.
- Stamped backgrounds. This technique is a great way to use those small stamps that tend to be forgotten in a stamp set. You can mix and match smaller stamps from different stamp sets to create a customized background panel. Create a pattern, a wreath or just stamp away.
- Stenciling with dies. Stencils are such a rage now. Most stamp sets have coordinating stencils just like the one I used on the feminine card. But how about those stamp sets without a matching stencil? This is when the coordinating die comes in. Although it does not offer the same details as a coordinating stencil, the stencil created with dies can work as masks for ink blending, ink spritzing, stamping or creating a scene. This technique definitely extends the use of a die.
Here are the cards I created & some photos taken during the creation phase. I hope you like it.
I started with choosing the main stamp sets I will use for these set of cards. For the masculine cards, I am using the Altenew Halftone Stars stamp & Nesting dies. For the feminine cards, I am using the Silk Art stamp & dies. Although I have other Altenew stamps, for the techniques I chose, I am leaning towards a stamp with a coordinating die.

.jpg)
I usually start my creative process with a sketch just to guide me. It sometimes does not work the way I planned it but it helps me a lot.
Tip: If plan A does not work, don't give up! Move away from your work space. Sometimes you get enlightened during your break time as to what you could have done right or what you can do to save the project. When I come back to the project, I usually end up finishing the card.
I choose my main colors. I choose green & blue for the masculine cards, and red, orange, yellow and cream for the feminine cards.
I created cards in pairs using the same component.
Masculine Cards
 |
| Blended Backgrounds |
Tip: When using this technique, cut your paper a bit larger than the card size you are aiming for.
 |
| On this stamp & die sets, if you don't want the white edge created by the die around the stamped image (which you can see on the star on the right), use the next smallest size shaped star to die cut the star, as you can see on the stars on the left. |
Tip: If you are having difficulty in embossing large size stamps, stamp the image with a dye ink. Re-stamp the image using a sticky ink. This is when a stamp positioner, like a Misti Stamping Tool, is a big help. Then, add the embossing powder.
 |
Stamped Backgrounds
Test your dye inks if you can do second and third generation stamping with it. This is how you can achieve variation on the design despite using only one colored ink. |
Tip: Look through your stash and use stencils to help you create your background. I used a checker board stencil for the card on the left. I used a wreath builder stencil for the card on the right.
Remember when I said do not give up? I almost did on the card on the right. I was going for a one layer card for these two cards. But when I stamped the sentiment on the card front, it got lost in the busy background. Frustrating, yeah! After all that hard work on the background. After I walked away and came back to it, I covered the first stamped sentiment with a larger sentiment stamped on a blended cardstock, giving this card another life.


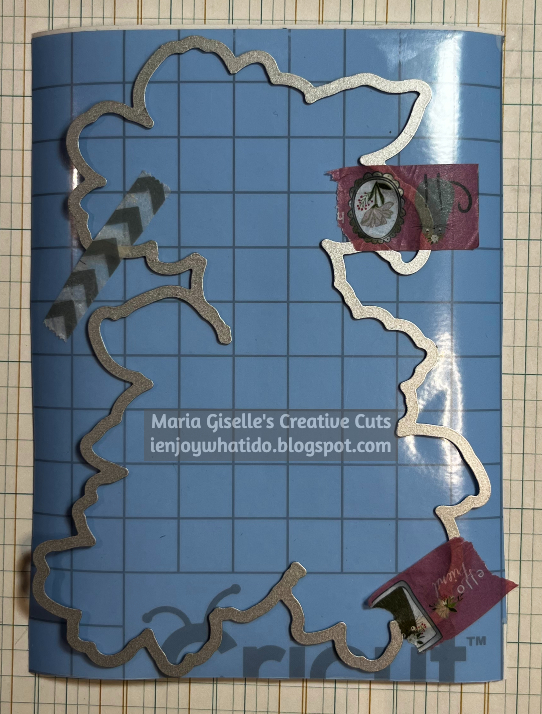
Stenciling with dies
I die cut a stencil vinyl panel to create a custom made stencil. I adhered the whole vinyl panel to the card panel. I removed the background cut, leaving the stars on the cardstock panel. I blended ink around the stars. A masking paper can also be used for this technique. Both materials can be re-used. The advantage with the vinyl is that you can wipe off the inks just like a regular stencil.
 |
| Dies can also be used to create windows on a panel. |
Tip: Save the negative cuts for a future card.
This is half of my final project featuring the masculine cards I created for the AECP Final Challenge. I hope you visit the next post to view the feminine cards I created and the card packaging I created.
Thank you! Have a blessed, brilliant and creative day!
6/2024: Altenew decided to change its affiliate program starting this month. Below is my affiliate link to the website. I don't think I can directly link the products I used with this new program. Please feel free to do a product search. I will update as I figure this out. The good thing about this new affiliate program is that I get to earn on each Altenew product you purchase and not only on the product/s I used on this project. As before, there will be no additional cost to you if you make a purchase. It is just a way to help a fellow crafter sustain her love for crafting. While in the Altenew blog, don't forget to check out their new release for this month. Thank you for your support!
Maria Giselle B.


.png)


.jpg)


