Wednesday, January 31, 2024

Masculine Birthday Card


Hello! Welcome back to my blog. Today's post is a part of Kat Scrappiness' Product Feature on Winter Dies. The focal image of my card is the deer die from the Kat Scrappiness Reindeer Duo Craft Dies.

Who says that winter themed products are limited in use? Apparently, not. I did a web research about deer greeting cards for other occasions and picked ideas from the images I saw online. This is what I came up with. A masculine birthday card! I hope you like it.


I created the deer to make it a cake topper for this birthday card. I used dies from the KS Build a Cake Craft dies for the cake. I added embossing powder to the top of the cake and the cake trim. 

For additional embellishment, I adhered some KS Mystical Leaves Sprinkles to the bottom of the cake. 


I die cut the KS Happy Birthday Shadow Sentiment Craft die on green cardstock and an additional scrap cardstock. I adhered the green sentiment die cut on the additional sentiment die cut for some added dimension.

Thank you for visiting my blog. Please check out the other KS Designers' work. We hope we inspire you to use those winter dies for other occasions other than winter. 

Have a blessed, brilliant and creative day!
Maria Giselle B.

I added below links to the Kat Scrappiness products I used on this card. There will be no additional cost to you should you decide to purchase any of these products. While you are at the Kat Scrappiness website, do check out their wide array of products especially the exclusive Kat Scrappiness products. They have a new release, too!  


I saw it on Kat Scrappiness, Inc.

Reindeer Duo Craft Dies

I saw it on Kat Scrappiness, Inc.

Build a Cake Craft Dies

I saw it on Kat Scrappiness, Inc.

Happy Birthday Shadow Sentiment Craft Die

I saw it on Kat Scrappiness, Inc.

Mystical Leaves Sprinkles


I am sharing this creation at

Wednesday, January 24, 2024

Easy Watercoloring

Hello! Welcome back to my blog. Today's card features an easy and simple watercoloring technique. It is so simple that you can use any watercolor medium you have in your stash.

I used the Blank Page Muse Mr. G & Words stamp set on my card. I stamped the image on watercolor paper using Versafine Onyx Black ink which is a watercolor friendly ink. I used the Misti Stamping Tool to restramp the image several times. Some brands of watercolor paper are textured that's why re-stamping the image is a must. I used the Ranger Watercolor Paper which has a smooth side and a textured side. I end up using the smooth side since I couldn't get a crisp stamped impression on the textured side no matter how many times I've restamped the image.

Make sure the ink has dried before watercoloring. I sped dry mine with a heat tool.

I colored my image with vibrant and bold colors. The watercolor I used is Kuretake Gansai Tambi watercolor. But as I've mentioned earlier, any watercolor brand or medium will work for this image. 

I painted the background of the giraffe with a wash of watercolor. To create this effect, using a flat brush, apply clean water to the area which will be the background. Apply the color to a palette and mute the color down with water. Apply this pigment to the wet background. Tilting the panel also helps with letting the pigment run down by itself. If you want to add more pigment, just make sure to dry the area first before applying more color. Or if you placed too much pigment, add clean water to the area, then press a dry paper towel to this area to transfer the color to the paper towel.

I used the old school Stamp-a-ma-jig tool to stamp my sentiment. I want my sentiment to fit on the white space. The Stamp-a-ma-jig helped me with the partial stamping of the sentiments to achieve this look. I also stamped the sentiment using the same ink so I can apply watercolor to the words for a color block look. 

At first, I thought I got a sentiment stamp with a factory defect because one of the words is misspelled. (Do you recognize it?) Only to find out that this is how it is spelled in British English. Nice to know, right?

This could have passed for a CAS card but I wanted to add a touch of color on the sides so I matted the panel with a light blue cardstock. 

I hope you like today's project. Have a blessed, brilliant and creative day!

Maria Giselle B.

Blank Page Muse is generously offering a 15% discount to their online store to YOU, my blog readers. Just use the code BPMMaria when you check out. Enjoy!

I am sharing this creation at


Tuesday, January 23, 2024

A CAS Flamingo Card


Hello! Welcome back to my blog. Today's card is a very simple, easy to recreate card. I am using products from Blank Page Muse:

I stamped the flamingos on watercolor paper using Versafine Onyx Black ink. I heat set the stamped image before coloring it with Altenew Woodless Watercolor pencils. I used a waterbrush to apply the pigment to the birds. I fussy cut the flamingos leaving a thin border around it. I added shimmer to the flamingos' feathers using Lawn Fawn Liquid Stardust.

I trimmed a heavy weight white cardstock at 4 1/4" x 11". I scored this on the long side at 5 1/2" to create a top folding A2 note card. 

I created a DIY heart stencil using a Lawn Fawn heart die and a re-purposed plastic from an accordion file. I die cut the heart on the plastic. I used a metal shim to add more pressure as I die cut the plastic. I reinforced the cut with a craft blade. Despite the use of the metal shim, there were parts that were not cut. 


I used the negative cut of the DIY stencil and positioned this over the notecard. I temporarily adhered this stencil to the notecard to prevent any shifting while I blend ink over the stencil. I used Tim Holtz Distress Oxide Speckled Egg and a large blender blush to apply ink on the note card. 

I added clouds to the inked heart by placing the mixed media stencil over the DIY heart stencil. I covered the open areas of the stencil that I will not be using on my card with tape to avoid blending ink over it. 

I heat embossed the sentiment on the bottom of the heart using Versafine Onyx Black ink and clear embossing powder. I temporarily adhered the flamingos to the cardfront to help me approximate where I will stamp this sentiment. 


I adhered the flamingos to the card front with liquid adhesive. I added a black dot on the flamingos' eyes using a black Sakura Glaze pen.

I rounded the corners of the card using a corner puncher.

I hope you like today's project. Have a blessed, brilliant and creative day!

Maria Giselle B.

Blank Page Muse is generously offering a 15% discount to their online store to YOU, my blog readers. Just use the code BPMMaria when you check out. Enjoy! 

I also added below a link to the Altenew Woodless Watercolor pencils I used on this card. There will be no additional cost to you should you decide to purchase this item. It is just a way to help a fellow crafter sustain her love for crafting. Don't forget to check out their new release for this month and their sale. Thank you for your support. 


I am sharing this creation at

Recycle #15
Repurposing the plastic divider of a broken accordion folder


Sunday, January 21, 2024

1-For-3 Scrapbook Layout


Hello! Welcome back to my blog. We always hear 2-For-1 projects in which we are able to create two projects using the same supplies. Today's project is the reverse of that. I am calling it a 1-For-3 layout. Why did I call it that way? This project was created for 3 reasons which is listed below making it a 1-For-3.

1. I am so honored to be invited again to the Coffee and Cards with Celeste and Deb. My project, even though it is not a card, was created  based on the sketch below. 


I was planning to make a photo card for the collaboration but I printed the photo larger than how I wanted it to be. I did not want to waste the photo so I moved ahead with the project. 

The coffee I chose is Dulche de Leche from Revocup Coffee, a locally owned Ethiopian coffee shop. I love the aroma of the coffee. It has a unique taste incomparable with Starbucks. 


Please don't forget to visit Celeste's blog, and Deb's blog to see how they interpreted the sketch on their projects.

2. It is my sister's birthday this Friday. I think this is a great way to celebrate her by creating a layout of her. I usually struggle in creating a scrapbook layout. Maybe because I don't create it too often. 

3. I also created this to take part on PinkFresh Studio's January Blog Challenge with the theme A Year in Review. I was inspired by March's layers and color challenge on my layout. 

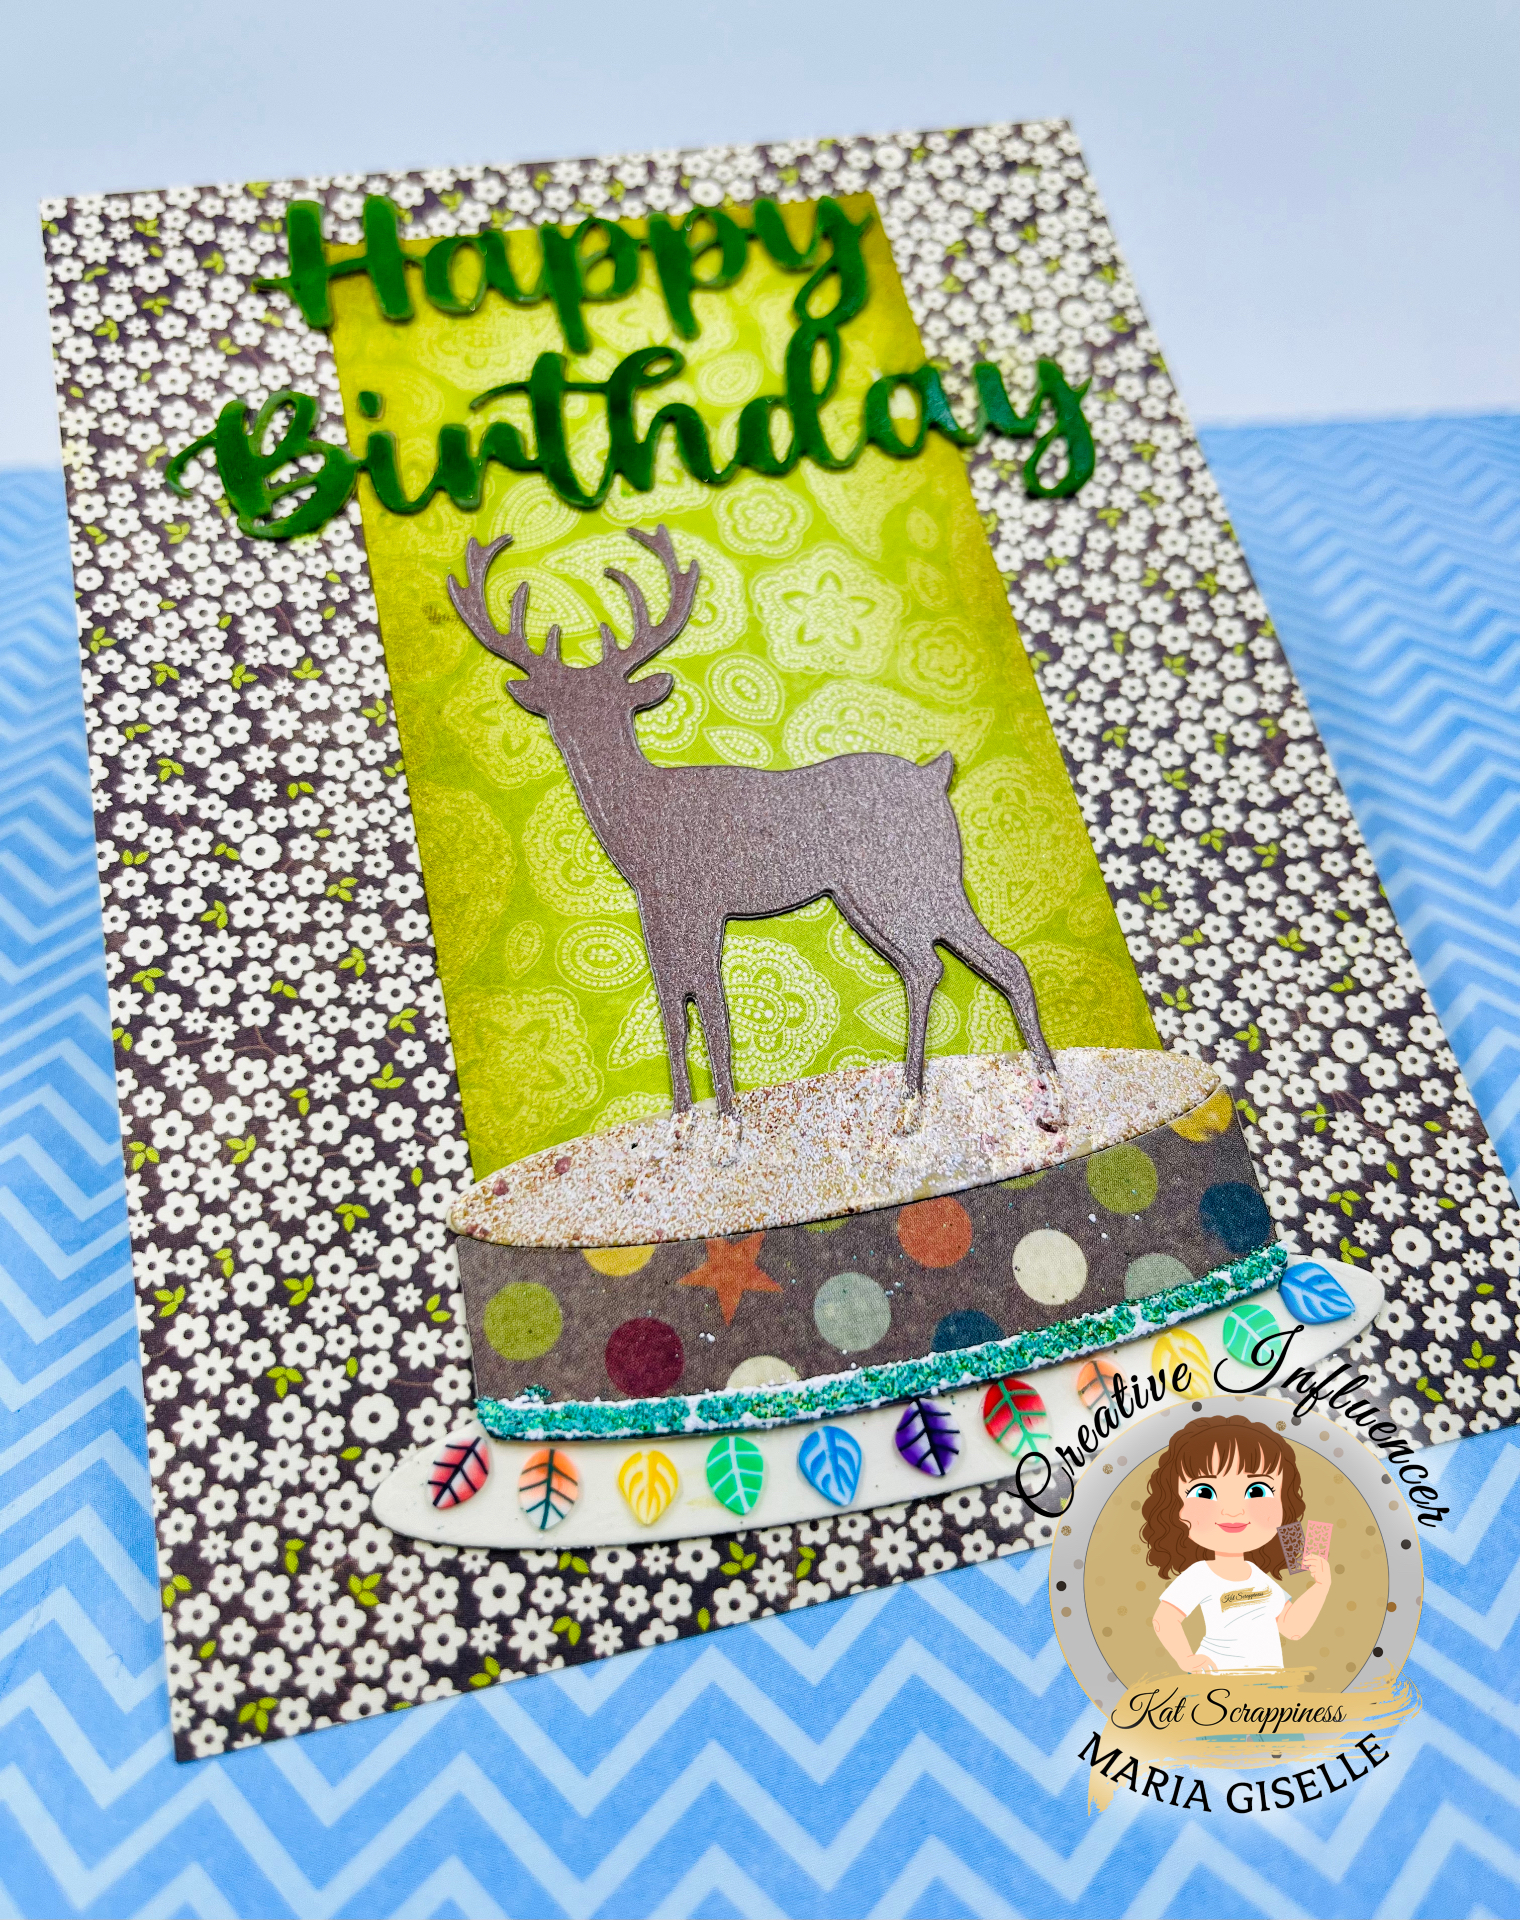
Now, that you know what made this project a 1-For-3, let's me talk about the elements of the layout.


The circular frame seen above was created using a PFS slimline die. It die cuts 3 scallop windows on a slimline frame. I used a circle die larger than the circular stitching  around the scallop window to die cut this into a frame. 

The flower was created using a PFS square die. I trimmed the flower off the square frame. I die cut the flower on a light green PFS patterned paper, and on a pink, yellow and white cardstock. I cut the flower off the stem. I adhered the pink flower and the green stem/leaf on the white flower die cut. I adhered a double adhesive tape on the yellow cardstock before trimming the flower petals off. I poured yellow flock powder to the adhesive to add a bit of texture to the flower. 

The sentiment was heat embossed on white cardstock. I stamped the sentiment using an orange dye ink followed by a Versamark ink. I poured clear embossing powder to this, then heat set it. I die cut the sentiment using the coordinating die. I cut another piece to add a bit of dimension to the sentiment die cut. I love sentiment stamps coordinating dies. No more fussy cutting!


I really should be using my Spellbinder Glimmer Machine more often. With just like any other tool, the more you use it, the more proficient you get in using it. This is the product of my second try on foiling on vellum. Not too bad, right? I foiled the PFS Delicate Rosebuds on vellum using an aqua glimmer foil. Isn't it pretty? A heavy weight vellum is necessary to be able to foil on it. I used a light weight vellum on my first try and the foil did not transfer well to the vellum. I am not sure if I should have added an extra shim for a better transfer. 


The sentiment strips are from the PFS Delightful collection 6x6 paper pad. The paper pad includes a cutaway sheet. I fussy cut this sentiment strip. I layered the strip on a blue patterned paper cut into a strip. I cut one end into a fishtail tip.


I die cut a tag using a green patterned paper from the 6x6 patterned paper. I added an orange heart die cut to accent the hole of the tag. I added a white embroidery floss through the hole and tied this into a bow.

I used the B side of a PFS patterned paper for the back panel. I flick a yellow ink to this paper before adhering the elements of my layout. 

The layer above the tag is a stamped panel which I created with stamping the PFS Delicate Rosebuds using a light pink dye ink. The stamp sentiment I used above came from this set, too. 

This panel was supposed to be my back panel for the project but since I didn't want the elements to be packed on this panel, I used a larger panel for the layout. If could have used this panel if the photo is a bit smaller. 

Well, that's it for today. Thank you for visiting my blog. Have a blessed, brilliant and creative day!

Maria Giselle B.

I am sharing this creation at


Monday, January 8, 2024

Creative Ways of Using a Stencil, DIY Stencil and a Bonus Card

Hello! Welcome back to my blog. Today's card show ways on how you can extend the use of your stencil. Let's stretch that supply!

Foiling with stencil. On a 4 1/4" x 5 1/2" 80-lb. white cardstock, I secured the stencil over this panel with the use of tape. I applied Deco Foil Transfer Gel on the stencil, making sure I applied an even coat over the open areas. I set this aside overnight to dry. Once dry, I covered the area with a teal Deco Foil Transfer Sheet. I ran this through the Minc Machine. 

Heat embossing with stencil. I pre-treated the panel with an anti-static powder tool. I repositioned the stencil over the foiled panel. The stencil shapes may overlap the foiled shape but not directly on top of each other. I pounced Versamark ink on the open areas of the stencil. I poured gold embossing powder over the panel, heat set it until the powder has melted. Make sure you move the heat gun constantly since the heat can damage the already foiled images.

Coloring with stencil. I repositioned the stencil over the panel. You can also flip the stencil. I traced the open areas of the stencil with a metallic pen. I colored these shapes with metallic and glitter markers. 

Doodling with stencil. I repositioned the stencil over the panel. I traced the open areas of the stencil with a metallic pen. This time, instead of coloring the shapes, I doodled diagonal lines inside the shapes. Feel free to doodle something else like curved lines, dots, etc. 


Embossed Impressions with Stencil. I did this technique on vellum, adding a rubber mat shim to my platform sandwich. I also added a thin cardboard for additional pressure. 


DIY Stencil. I have learned this technique from crafting guru, Jennifer McGuire. It is such a fun way to add soft colors to an image. The downside of this technique is the fussy cutting but if you used a high quality cardstock, you can use this DIY stencil again. I kept mine inside the sleeve together with the stamp set. If you are not into this, you can always color in the image with whatever medium you want. 

I created my stenciled panel on a 4 1/4" x 5 1/2" cardstock but only used a portion of it for my card. After all that work put into this panel, I did not want to throw the left over or set it aside for future use. So I created a bonus card using the same craft items.


I trimmed the stenciled panel into smaller pieces to create a tiled frame. For the center of the panel, I stamped the butterflies using sticky ink. I pounced pearl powder to these impressions. 


I heat embossed the sentiment on pearl vellum using gold embossing powder. To tie in with the tiled theme, I trimmed the sentiments into sections. 

I listed below the Blank Page Muse Products I used on this card and added the links of these products to the online store.
I hope you give these techniques a try. And if you have a stencil technique not mentioned above, please feel free to share it in the comments so I can also try it out. Have a blessed, brilliant and creative day! 

Maria Giselle B.

Blank Page Muse is generously offering a 15% discount to their online store to YOU, my blog readers. Just use the code BPMMaria when you check out. Enjoy!

I am sharing this creation at


Saturday, January 6, 2024

Dimensional Card Envelope


Hello! Welcome back to my blog. Today's project was created to fit a dimensional card I created a while back. I want to highlight the butterfly on this project. I created the butterfly using The Stamp Market's Butterfly Rosette small die. 

Isn't the butterfly pretty?


I hope you like today's project. Thank you for visiting my blog. Have a blessed, brilliant and creative day!

Maria Giselle B.


Tuesday, January 2, 2024

Happy 2024!


Hello! Welcome back to my first blog post for the year. Incy Wincy is back after a much needed break. For our first challenge of the year, the theme is New &/or Let's Celebrate. Like before, you can apply one or both themes to your project. Just a reminder, the challenge is not limited to cards only. You can create anything as long as it follows the theme/s. The new thing for this year is we don't have sponsors for our challenges. There will still be challenge winners with badges. I hope you still join our challenge despite this change.

On to my card, I am using both themes as we celebrate the new year. I got my color inspiration for my card from a blog challenge that I linked below. 


Lots of shimmer and glimmer on this card. Most of the products I am using on this card are from My Favorite Things. 


I hope you like today's card. Thank you for visiting my blog. Have a blessed, brilliant and creative day!

Maria Giselle B.

I am sharing this creation at