Showing posts with label Tim Holtz Distress Ink. Show all posts

Wednesday, October 8, 2025

Fall Themed Art Journal Page, A Blank Page Muse Post

Blank Page Must Blog


Hello! I am at the Blank Page Must Blog with this art journal page. For the month of October, the DT is doing a Pumpkin and/or Leaves theme. I used the Blank Page Muse Leaves 2 Collage Elements Stencil on this art journal page. 

Please visit the blog page for more details. 

Have a blessed, brilliant and creative day!

Maria Giselle B.

I shared this page at

Tuesday, September 16, 2025

Faux Steampunk, A Blank Page Muse Post


Hello! I am at the Blank Page Muse Blog with this card. This month, the DT is doing a steampunk theme. I don't have any steampunk items in my craft stash. After searching the web on how to steampunk a non-steampunk, I hope I was able to get close enough with this card. 

The stamp I used on this card is the Blank Page Muse You Make Me Happy Clear Stamp Set.

Please visit the blog for card details.


Have a blessed, brilliant and creative day!

Maria Giselle B.

I shared this project at


Thursday, June 19, 2025

Rainbow Greeting Card


Hello! Welcome back to my blog. Today's card was inspired by this month's Pink Fresh Studio's Blog Challenge Rainbow Reverie. 

I used the colors of the rainbow to color the frames. I used the PFS Decorative Frames Press Plate and Die for the background. I did the letter press first by inking the press plate with a black dye ink and using the Spellbinders Betterpress System and cardstock. I have not letterpressed for a while so I had a couple of rejects before coming up with this one. 

Using the coordinating die, I die cut the frames. I used a metal shim in cutting the frames since the Betterpress cardstock is thicker than the regular cardstock. 

I blended Tim Holtz Distress inks on the frames. I blend the colors where it overlaps. The colors I used are Candied Apple, Carved Pumpkin, Squeezed Lemonade, Blueprint Sketch, Mowed Lawn and Seedless Preserves. I used the reject scraps to layer behind the blended frames to add depth. 

I adhered these frames to a scrap white cardstock cut at 4 1/4" x 5 1/2". I trimmed this panel to fourths to so I can rotate it and create a different pattern. 


I stamped the flower from the PFS Lovely Blooms stamp set on vellum using Versafine Onyx Black ink. I poured black metallic embossing folder to this and heat set it. I die cut the flower using the coordinating die. I used vellum for a softer look. I colored the floral bunch using the coordinating stencil. I used the same ink colors I used on the frames.

I stamped the sentiment on vellum also. The sentiment is from PFS Humbled & Grateful stamp set. I stamped this using Versafine Onyx Black ink and heat embossed it with black embossing powder. I die cut the sentiment using the coordinating die. I love sentiments with coordinating dies since it saves me time from fussy cutting it. 


I die cut extras on white and black cardstocks. I adhered the vellum piece to the white cardstock. I used a sticker maker to add adhesive to the back of the vellum. I adhered this to the black die cuts slightly off setting it for a shadow look. 


I adhered this to the panel where the frames meet.

I hope you like today's card. Have a blessed, brilliant and creative day!

Maria Giselle B.

I shared this project at

Tuesday, September 3, 2024

Framed Art


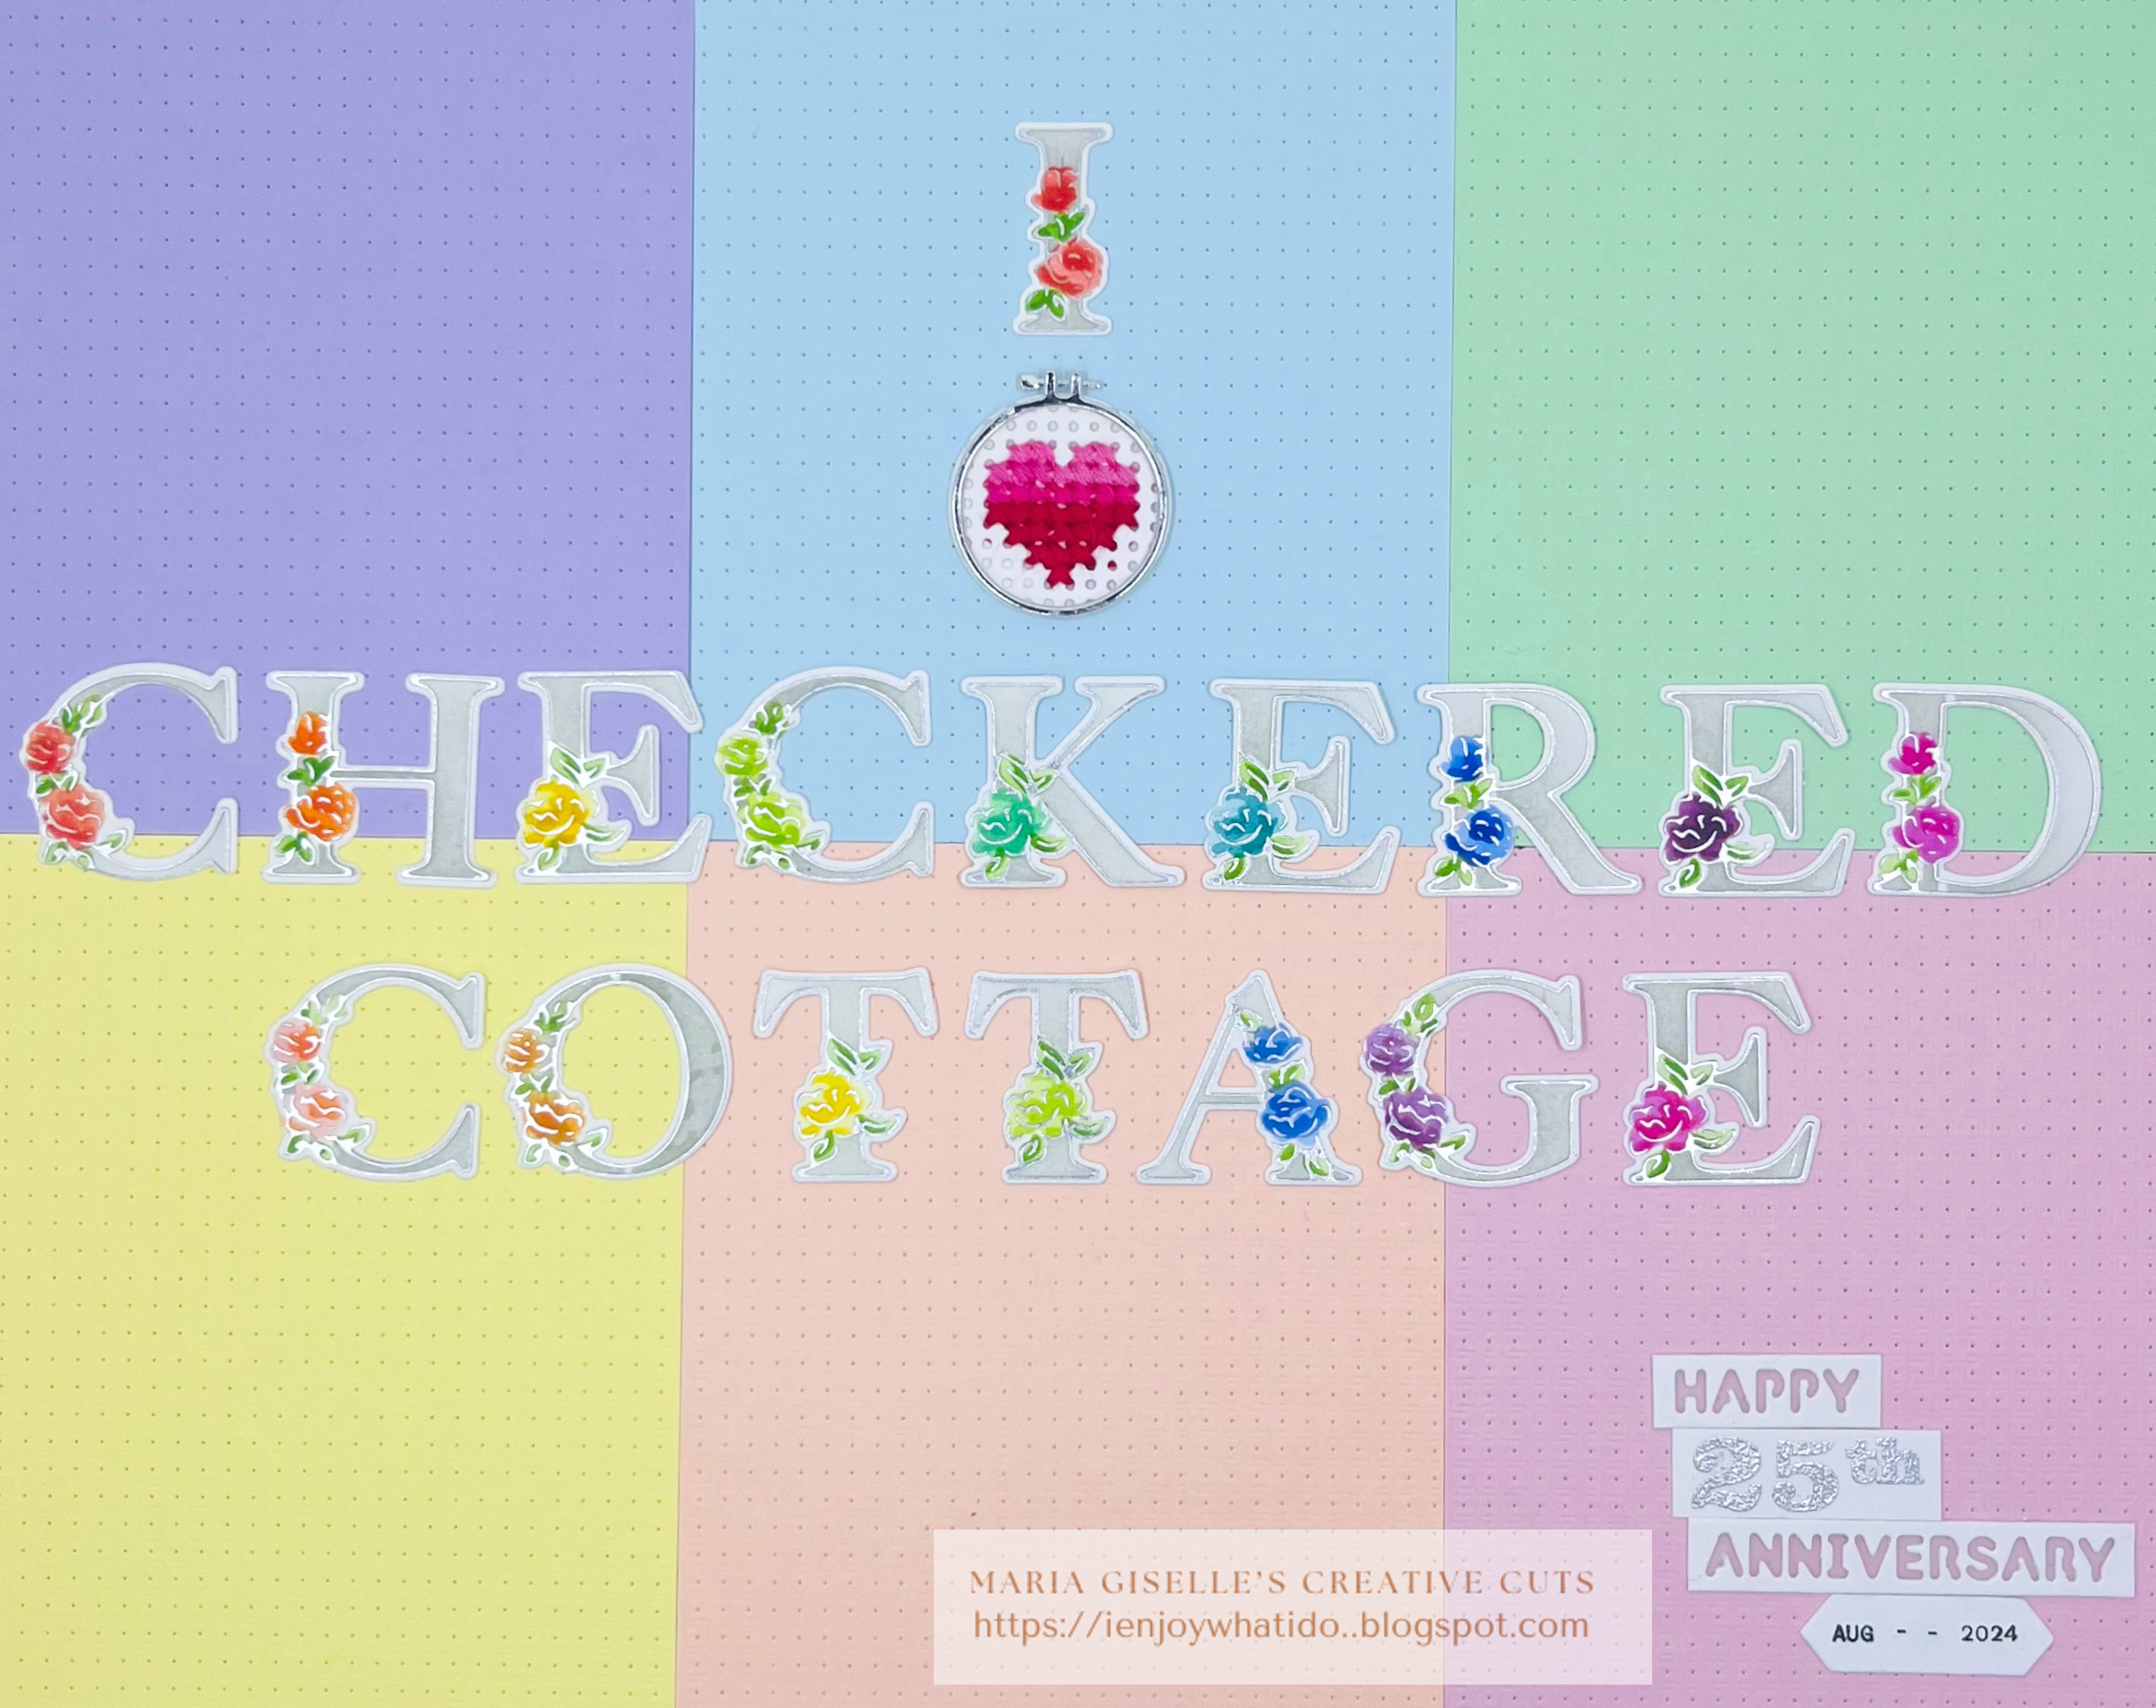
Hello! Welcome back to my blog. Today's project is a gift to the only locally owned brick & mortar craft store here in St. Louis, Checkered Cottage. They celebrated their 25th anniversary last August. This store is owned by three wonderful ladies, Susan, Robyn & Linda with the support of their staff and class instructors. If you happen to pass by St. Louis, how about stopping by this store?

My favorite section of the store is the Recreate where gently used craft items are sold. I love finding treasures here especially craft tools. I also love their wide array of products. It takes a lot of discipline not to splurge on craft items but sometimes, I cannot help it especially when they have the latest releases of my favorite brands. 

Back on the project, the letters are foiled using the Pinkfresh Studio Inna Alpha: hot foil set, layering stencils and die set. I purchased the first two items from the Checkered Cottage. I agreed to show them a project using the stencils. This has been a while. But isn't this the best opportunity to show them  how the stencils work and make them keep it, too?


There is another discovery I made in the process of creating this project. I have not been using my Spellbinders Glimmer Machine because of my failure of getting a good foiled impression. I found out that Spellbinders carry a Glimmer specialty paper. The Checkered Cottage does not have this specialty paper. They only have the Betterpress specialty paper. I went ahead and purchase this to foil on. What is there to lose, right? If it doesn't work then I can use the cardstock for other purposes. But what a nice surpise! This cardstock worked really well with the Glimmer Foil despite its textured and matte finish. 

I used Tim Holtz Distress inks in blending ink on the flowers and a gray dye ink for the letters. Since the flowers and leavers are small, I only used one color for each flower on a letter. I started with a light hand in blending the ink on the first stencil. You achieve a darker shade of the color as you go along with layered stencils.


I stitched a heart using the smallest embroidery hoop die from The Stamp Market Embroidery Hoop Dies. I used a red DMS Variegated embroidery floss for the stitching. I die cut the embroidery hoop on silver mirror cardstock to tie in with the silver foiling of the letters. 

For the background, I trimmed varied pastel colored cardstocks at 4 1/4" x 5 1/2". I added details to these panels with The Greetery Aida Cloth Texture plate to tie in with the stitched heart. I adhered these panels to a 12" x 12" white cardstock and trimmed off the excess. The frame size is 11" x 14". I trimmed 1/4" off each edge for a clear border around the panel. 


I die cut the Happy Anniversary on white cardstock. I adhered a vellum to the back. The die I used is the Altenew Essential Sentiment Strips die set. I embossed the 25th using a retired My Favorite Things stamp set. I embossed this using silver embossing powder. I stamped the date on white cardstock using the Heidi Swapp Roller Date Stamp. I die cut this into a decorative strip using a die from Concord & 9th. 

I hope you like today's project. Checkered Cottage was nice enough to make an FB post with a photo of this framed art and ME! (Checkered Cottage) They also have this framed art on display (Checkered Cottage 2). 

Have a blessed, brilliant and creative day!

Maria Giselle B.

(The link to the Altenew product I used on my Framed Art is Altenew Essential Strips Die Set . My affiliate link is: https://altenew.com/6358517. There will be no additional cost to you should you decide to purchase this product. It is just a way to help a fellow crafter sustain her love for crafting. While in the Altenew blog, don't forget to check out this month's release. Thank you for your support!)


Thursday, August 8, 2024

Creating a Scene With BPM Stamps


Hello! Welcome to another BPM blog post. Today's project shows how you can use several Blank Page Muse stamps to create a scene. 


After I planned how my scene will look like, I stamped the images on a scrap piece of paper to give me an idea on the placement of the images, and the order of stamping. 


It also gave me an idea which images I need to create a mask for. Since this is a draft, the stamping of the images need not to be straight. 

If you noticed, the stamping on the draft is different from the final project. I made a boo-boo on a step but it's alright. It still turned out well, what do you think?


Any image that will be on the front needs a mask. The fox had a mask but the mask fell off before I was able to take a photo.

Since most of the stamps I used are rubber stamps, I used a stamp positioner to know where to stamp the images. This is the limitation of rubber stamps compared to clear stamps. You cannot really see where you are stamping.

I used Versafine Onyx Blank ink, a watercolor friendly ink, in stamping the images since I used this medium in coloring the images and the background. I heat set the panel before coloring to make sure that the ink is dry before watercoloring. I used mostly Tim Holtz Distress Ink Re-inkers. For the colors that I don't have, I used the Kuretake Gansai Tambi.


Once I was done coloring the images, I free painted the background. I started painting the sky since this used a very light color. It is easier to paint over a lighter color with a darker color than vice versa. It is harder to lighten up a dark color once you have painted it.


I hope you like today's project. Have a blessed, brilliant and creative day!

Maria Giselle B.

Blank Page Muse is generously offering a 15% discount to their online store to YOU, my blog readers. Just use the code BPMMaria when you check out. Enjoy!


Friday, December 15, 2023

Cats, Sketch and Colored Inspired Christmas Card


Hello! Welcome back to my blog. My card is full of inspiration. The most important inspiration is my sister's cats, Tisoy and Bibi. I always try to color any cat images with these two in mind. I also pulled my inspiration from two ongoing challenges which I linked below.

The stamps I am using for this card is from Ink Blot Shop. When I saw these cat stamp images, I fell in love with it right away. I am so glad that I have acquired this stamp set during the Thanksgiving sale. 


I used Tim Holtz Distress Spray Stain, Distress Ink and Distress Crayons for my coloring mediums. I used a Mica paint for the green cat embellishments. I used a Mica spray for the splatters. 


I hope you like today's card. Thank you for visiting my blog. Have a blessed, brilliant and creative day!

Maria Giselle B.

I am sharing this creation at


Saturday, July 22, 2023

Monochromatic Colored Image & a Featured Guest


Hello! Welcome back to my blog. Today's image is a freebie from Beat Paper. I chose to color this image because of the cats. If you follow me, I love coloring cats because my sister has cats. Unfortunately, I am not coloring the cats based on her pet cats since the theme of this card is monochromatic pink.

I printed the image on watercolor paper. I colored the image using various Tim Holtz Distress pink inks. 

I fussy cut the image leaving a white border around it.

To make this into a card, I used scrap pink patterned papers and adhered this to a typing paper cut at 4 1/4" x 5 1/2". I lightly moistened this with a baby wipe before running it through a 3D heart embossing folder. I lightly blended a pink ink on this embossed panel so that the raised hearts will catch the ink.


For the sentiments, my son suggested adding speech bubbles to the scene. I heat embossed a speech bubble on vellum using clear embossing powder. I stamped the word 'mew' on the speech bubble using Versafine Onyx Black ink. I poured clear embossing powder to this, then heat embossed it. I fussy cut the speech bubble leaving a small border around it.

For the banner sentiment, I die cut one of the patterned papers using a banner die. I stamped the sentiment to the banner using the same black ink I used, poured clear embossing powder, then heat set it.

I adhered the elements of the card to the embossed panel.

My featured guest artist is my 11-year old son who colored the same image. He used Copic markers on his images. 

1
2

Which one do you like, 1 or 2?

Thank you for visiting my blog. Have a blessed, brilliant and creative day!

Maria Giselle B.

I am sharing this creation at


Sunday, June 4, 2023

Stitching on Silhouette Stamped Images


Hello! Welcome back to my blog. Thank you for your patience. This is the edited version of my previous post. This card was created with several blog challenges in mind. These blog challenges are linked below.

I started off by die cutting a circle using the largest circle die from the My Favorite Things Wonky Stitched Circle die set. The paper I am using is Strathmore Bristol paper. I cut this circle in half. I blended ink on these half circles using Tim Holtz Distress inks. The colors I used are Wild Honey and Carved Pumpkin. I flicked some water to these half circles, and picked these water droplets with a dry paper towel. The color inspiration is from the Simon Says Stamp IG June Challenge. The layout is from the latest MFT Sketch Challenge. 

I stamped the silhoutte flowers on these half circles. The Misti Stamping Tool was very useful in this process. After I stamped the flower on one of the half-circles, I simply replace this stamped half circle with the other half circle & re-stamped the image. If I did not get a clean stamped impression, I can re-stamp the flower with the help of this tool. The stamp I am using came from an April 2021 Hero Arts My Monthly Hero Kit. The ink I used for stamping is Versafine Onyx Black ink.

I poked holes on the stamped flowers and leaves. I added some stitching detials on these stamped images using the same colors as the color inspiration reversing it, stitching yellow on the orange background, and vice versa. I used a DMC metallic floss for the stems and leaves. 

I created the panel using a 4 1/4" x 5 1/2" Strathmore Bristol paper. I blended Tim Holtz Distress Ink in Peacock Feathers on this panel. I flicked water droplets on this panel and picked the water droplets with a dry paper towel.

Using the Misti Stamping Tool again, I positioned this blue blended panel on the Misti, and also temporarily positioned the half circles so that I will get an idea where to stamp the sentiment. I prepped the area with an anti-static powder tool. I stamped the sentiment, also from the same stamp set, using Versafine Onxy Black ink. I poured clear embossing powder to it, and heat set it.


I stamped flowers on each side of the sentiment using the same ink. I heat set this to dry. I poked holes on these flowers and added stitching to it, just like what I did on the half circles.

I adhered the half circles to the blue blended panel with foam adhesive. I adhered this to a top folding A2 note card.

Thank you for visiting my blog. Have a blessed, brilliant and creative day!
Maria Giselle B.

I am sharing this creation at


Monday, August 1, 2022

Monochromatic Holiday Card


Hello! Welcome to another challenge @ Incy Wincy Designs. The themes for this month are Food and Drink +/or Monochrome. Our challenge sponsor is Limited Runs. The image I used on this card is linked below. 

I printed the image on watercolor cardstock. I colored the image with Tim Holtz Distress inks. 

I created a stitched framed for the image by first, partially die cutting two frames from the Altenew String Art Rectangle die set to create a pierced square panel. To make this into a frame, I cut off the center using a craft knife to create a window. 

Using DMC floss, I sewn a zigzag pattern on the frame using two brown flosses for some contrast. 

I embossed a sentiment on the the watercolored panel with a Ranger Copper embossing powder. I blended some Tim Holtz Distress ink in Tea Dye on the sides of the cup to dull the bright white of the watercolor paper.

I adhered the frame to this and cut off any excess.

For the background panel, I cut a typing paper at 5 1/2" x 4 1/4". I adhered two kraft patterned papers from Pebbles to this. 

I adhered the stitched focal point to the patterned paper panel.


Thank you for visiting my blog. I hope you join us in this month's challenge. Have a blessed, brilliant and creative day.

Maria Giselle B.


I am sharing this creation at


Saturday, April 23, 2022

Ink Cube Painted Rainbow Mug


Hello! Nice to have you back on my blog. Today's card was inspired by Kristina Werner's Ink Cube Painting Technique. I usually prefer buying full sized ink pads for more coverage when inking a stamp. But with this technique, I appreciated the versatility of the ink cubes that I think I will now invest on ink cubes and reinkers instead of the full-sized ink pads. 

The solid cup stamp is from Paper Smooches. I am using Tim Holtz Distress Inks in Fired Brink, Abandoned Coral, Wild Honey, Cracked Pistachio, Mermaid Lagoon, Shaded Lilac and Salty Ocean. I used a Misti Stamping Tool to repeatedly stamp the coffee cup to a white cardstock. Just like in Kristina's video, I did direct to stamp inking, making sure the inks overlap, creating a rainbow-colored mug.

I heat embossed a snowflake on the center of the mug. The snowflake stamp is from Avery Elle Stamp Holiday Circle Tags stamp set. I used white embossing powder. 

I fussy cut the image leaving a white border around it.

I die cut a kraft cardstock with a scalloped square die from Lawn Fawn Flippin' Awesome die. I die cut a gray cardstock using a stitched square die from Mama Elephant Framed Tags-Union Square die set. This die only cuts the three sides, leaving one side uncut for a peek-a-boo effect. But I am not using this feature of the die on this card. I just needed a square die cut that fits perfectly inside my scalloped square die cut. So, I did partially die cutting by not putting the top cutting plate on top of the side that creates the crease. After running this through the die cut machine, I rotated the metal die so the side that cuts will be on the uncut side. I matched the die to the stitched lines created on the paper by the metal die. I placed the top cutting plate on top of that uncut side. I used a low tack tape to make sure the die does not shift.

I created a mask to cover the areas between the stitched lines and the edge of the square die cuts. Using a Simon Says Stamp Falling Snow stencil, I pounced Hero Arts Unicorn White pigment ink and Avery Elle Silver Fox pigment ink to the gray square die cut. I rotated the stencil to get more dots. And since the square die cut is not that large, I was able to use two corners of the stencil for each pigment ink. I used an ink dauber to apply the inks. 

I adhered the stitched squares to the kraft scalloped squares. I adhered the rainbow coffee cups on top. I adhered this to a gray Lawn Fawn Knit Picky 6x6 patterned paper cut at 4 1/4" x 5 1/2". 


I created a wide strip using another gray patterned paper from the same LF patterned paper pad. I added stitching detail to the edges using a die from the LF Stitched Borders die set. I adhered this to the center of the panel. 

I die cut the sentiment on red cardstock using My Favorite Things Merry & Bright With All The Trimmings Dies. I adhered this to the wide patterned paper strip.

I die cut some hearts on holographic paper & tucked it underneath the coffee cups.

Thank you for visiting my blog. Have a blessed, brilliant & creative day!

Maria Giselle B.

I am sharing this creation at


Tuesday, December 21, 2021

Mood Board Inspired Nativity Greeting Card (Craft My Stash #21)


Hello! Welcome back to my blog and to another Craft My Stash post. For today, I am using an Authentique 6x6 Faith Collection paper pad and a Honey Bee Christ Is Born stamp set from my craft stash. 

I did a no-line coloring on the images. It has been a while since I did this technique. I am using Karin markers for the coloring. I stamped the image on watercolor paper using Tim Holtz Antique Linen Distress ink. I applied a light wash of color to the image before applying another layer of colors. When I use Karin markers, I usually pick the pigment from the palette so I have more control on the blending. I fussy cut the image, cutting the image right at its edge.

For the background, I concentrated on inking the house first using a black ink. I stamped this on one of the patterned papers on the pad. A Misti Stamping Tool is truly helpful when doing selective stamping. I stamped the buildings on the background using a dark brown dye ink. Using mini-cube inks work when you just want to ink a certain portion of a stamp.  I added Versamark ink to the stars and heat embossed this with white embossing powder. The bright star and rays were embossed using Wow! Metallic Gold Rich embossing powder. 

I blended Tim Holtz Gathered Twigs Distress ink to the panel. I wiped off the ink from the embossed stars and rays. 

For the ground, I selectively inked that area on the stamp. I stamped this on another patterned paper. I blended a Tim Holltz Distress Ground Expresso Ink on this. I fussy cut the ground. 

For the panel. I die cut another patterned paper from the pad using a stitched rectangle die. I like this patterned paper because it reminds me of the stained-glass windows in the church. 

I partially die cut the inked panel with an oval die. I trimmed the bottom part straight. This creates an arched panel.

For the sentiment, I heat embossed this on another patterned paper from the pack. The stamp is from Honey Bee Christmas Blessings stamp set. I used the same embossing powder. I trimmed the sentiment to size. I adhered this to a scrap piece of cardstock for some dimension. I trimmed off the excess.


I adhered the arched blended panel to the stitched panel. I glued the ground by lining it up with the lines on the bottom of the house. I adhered the sentiment on the bottom. I adhered the image with foam tape.

I also got my inspiration in creating this from the Scrapbook & Cards Winter Issue Mood Board Challenge. You can see the mood board below. I was inspired by the wooden theme that I created a wood inspired nativity scene. 

Thank you for visiting my blog. Have a blessed, brilliant and creative day!

Maria Giselle B.

I am sharing this creation at