Showing posts with label No-Line Coloring. Show all posts

Sunday, March 5, 2023

March 2023 Stamp/Die/Stencil & More Release Blog Hop #2


Hello! Welcome back to my blog. Today is Altenew's March's new release. This is a huge release with lots of amazing products to choose from. All of my cards feature four products from this release. All of these products are linked below. 


The first two cards' designs are opposite versions of each other. I was planning to create the card on the left only which has an oval window on the center. After getting done with this card, I have a leftover of the oval negative die cut. I did not want to keep it for a later project, so I created a reverse design of the first card. 

For the second card, I die cut an oval on the same kraft cardstock I used on the first card. I matted the embossed oval piece with this. For the card panel, I stamped the huge flower stamp to create a background which is the background of the oval piece on the first card. I used the same washi tape to add strips to the top and bottom of the panel. The second card has more weight compared to the first card since the oval die cuts on the first card are inlaid. 


For my third card, I colored the flowers from the stamp set using Altenew Woodless Watercolor Pencils. When I color with this medium, I pick the pigment from the pencil with a water brush and put this on a palette. On this palette is where I either add more water to soften the pigment or mix pigments together to create new colors. I feel I have much more control in coloring when I do this technique. Remember to always start light with the colors. You can always add more pigment to make the image darker. For me, it is harder to lighten up a dark colored image. No matter how much water I add to the image to mute the color down, I cannot pick up the pigment anymore with a paper towel. Most likely the pigment is already absorbed by the paper. After I was done coloring these flowers, I realized that I was actually doing a technique I have learned from one of my AECP classes. The course is Beautiful Details on no line coloring. The light gray ink I used, despite being a water activated ink, did not soften with the water while I was coloring the image. Next time, I will do second generation stamping using this dye ink to lighten the ink some more.

I fussy cut the flowers, cutting it close to the outline. I die cut the solid leaves from the die set and also water colored it. I splattered green inks on these leaves. For the basket, I die cut a kraft cardstock using a circle die. I trimmed a portion of it to create the basket. I embossed this using the 3D embossing folder. I added a gold pigment ink to the embossing folder so it will transfer to the cardstock once it is embossed. For the basket handle, I created this using two nesting oval dies. 


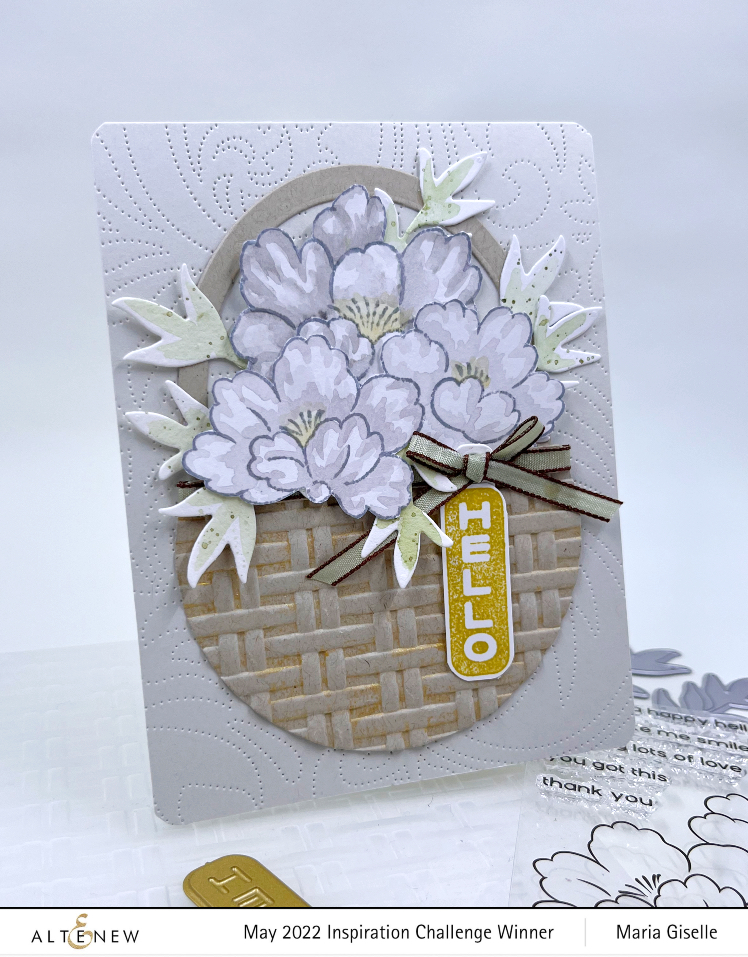
I added details to the front of an A2 gray panel with the Altenew Dotted Swirls Debossing die. The sentiment was created using the same hot foil plate I used on the first two cards. But I did not do hot foiling with this card. Instead, I added dye ink to the hot foil plate. I laid a white cardstock over it and used a brayer to transfer the ink to the cardstock. 


For my fourth card. I stamp the flower image on watercolor cardstock. I used the Altenew Woodless Watercolor pencils to color these flowers. I fussy cut the image leaving a white border around it. 


For the panel, I trimmed a grayish-blue cardstock into 4 1/4" x 5 1/2". I trimmed two pieces. I trimmed one of the panels in an angle. I embossed this using the wicker embossing folder. I rotated the paper so that the diagonal edge will be lined up with the embossing. A part of the panel was sticking out; thus, it was not embossed. It is easy to line up the embossing with the folder to emboss the rest of the panel.


I flicked gold paint on the other panel. I adhered the embossed piece on this panel. I adhered the fussy cut flower to this panel using foam adhesive. The sentiment for this card was heat embossed this time using the same foil plate. 

Thank you for visiting my blog. I hope you find inspiration in today's post and find interest in the Altenew products that I used in my cards. 

Have a blesesd, brilliant and creative day!

Maria Giselle B.

Here is a link to Altenew's March Release Products: 


Giveaway Prizes:

$300 in total prizes! To celebrate this release, Altenew is giving away a *$100 gift certificate to 1 lucky winner and a $20 gift certificate to 10 winners! Please leave a comment on the Altenew Card Blog and/or each designer’s blog post on the blog hop list below by 03/12/2023 for a chance to win. Altenew will draw 11 random winners from the comments left on each stop of this blog hop and announce the winners on the Altenew Winners Page on 03/13/2023.

*The winner of the $100 gift certificate will be chosen from comments left on the Altenew blog. 


You are invited to the Inlinkz link party!

Click here to enter

6/2024: Altenew decided to change its affiliate program starting this month. Below is my affiliate link to the website. I don't think I can directly link the products I used with this new program. Please feel free to do a product search. I will update as I figure this out. The good thing about this new affiliate program is that I get to earn on each Altenew product you purchase and not only on the product/s I used on this project. As before, there will be no additional cost to you if you make a purchase. It is just a way to help a fellow crafter sustain her love for crafting. While in the Altenew blog, don't forget to check out their new release for this month. Thank you for your support!


I am sharing this creation at


Tuesday, December 21, 2021

Mood Board Inspired Nativity Greeting Card (Craft My Stash #21)


Hello! Welcome back to my blog and to another Craft My Stash post. For today, I am using an Authentique 6x6 Faith Collection paper pad and a Honey Bee Christ Is Born stamp set from my craft stash. 

I did a no-line coloring on the images. It has been a while since I did this technique. I am using Karin markers for the coloring. I stamped the image on watercolor paper using Tim Holtz Antique Linen Distress ink. I applied a light wash of color to the image before applying another layer of colors. When I use Karin markers, I usually pick the pigment from the palette so I have more control on the blending. I fussy cut the image, cutting the image right at its edge.

For the background, I concentrated on inking the house first using a black ink. I stamped this on one of the patterned papers on the pad. A Misti Stamping Tool is truly helpful when doing selective stamping. I stamped the buildings on the background using a dark brown dye ink. Using mini-cube inks work when you just want to ink a certain portion of a stamp.  I added Versamark ink to the stars and heat embossed this with white embossing powder. The bright star and rays were embossed using Wow! Metallic Gold Rich embossing powder. 

I blended Tim Holtz Gathered Twigs Distress ink to the panel. I wiped off the ink from the embossed stars and rays. 

For the ground, I selectively inked that area on the stamp. I stamped this on another patterned paper. I blended a Tim Holltz Distress Ground Expresso Ink on this. I fussy cut the ground. 

For the panel. I die cut another patterned paper from the pad using a stitched rectangle die. I like this patterned paper because it reminds me of the stained-glass windows in the church. 

I partially die cut the inked panel with an oval die. I trimmed the bottom part straight. This creates an arched panel.

For the sentiment, I heat embossed this on another patterned paper from the pack. The stamp is from Honey Bee Christmas Blessings stamp set. I used the same embossing powder. I trimmed the sentiment to size. I adhered this to a scrap piece of cardstock for some dimension. I trimmed off the excess.


I adhered the arched blended panel to the stitched panel. I glued the ground by lining it up with the lines on the bottom of the house. I adhered the sentiment on the bottom. I adhered the image with foam tape.

I also got my inspiration in creating this from the Scrapbook & Cards Winter Issue Mood Board Challenge. You can see the mood board below. I was inspired by the wooden theme that I created a wood inspired nativity scene. 

Thank you for visiting my blog. Have a blessed, brilliant and creative day!

Maria Giselle B.

I am sharing this creation at


Thursday, September 19, 2019

Birthday Trading Card


Hello! My 7-year old son requested me to create a card for his classmate who is going to celebrate his birthday. I always get him involved with the card making. For this card, he wanted a cake with an orange icing because that is his friend's favorite color. 

For the technique, I am trying a no-line water watercoloring and resist watercoloring. The image is from My Favorite Things BB Beary Special Birthday.


For the no-line watercoloring, I stamped the image using Tim Holtz Distress Ink Antique Linen. I also colored the image using various Tim Holtz Distress Inks. 


For the resist watercoloring, I stamped the image using Versamark ink and heat embossed it with Wow! Gold Pearl embossing powder. I also colored the image with Tim Holtz Distress Inks.

I am using Canson watercolor paper. I die cut the watercolored panels with Mama Elephant Peek A Frame Creative Cuts. The sentiment was stamped using Altenew Paper Bag Crisp dye ink. I used a Sakura Black Glaze pen for the eyes.

Thank you for visiting my blog. Have a blessed, brilliant and creative day!

Maria Giselle B.

I am sharing this creation at


Tuesday, November 8, 2016

No-Line Digi Stamp Coloring


I thought the challenge for this image's sponsor, Sami Stamps, is next Incy Wincy Designs' Challenge. Aside from this, the card I created does not meet the challenge this image will sponsor. Let's just say, I fell in love with the cuteness of this owl, and that somebody who loves owls inspired me to create this card.

I printed the image on Strathmore Watercolor paper in sepia. I used Zig Clean Color and Akashiya Sai markers for coloring. I added a wash of grey on the background, making sure not to touch the already colored image.

I die cut the sentiment using Concord & 9th Grateful Leaf die. I heat embossed this with copper Ranger embossing powder.

For the panels, I cut a 4 1/4" x 5 1/2" kraft cardstock and embossed this with We R Memory Keepers 3D embossing folder. I adhered a strip of patterned paper to this. I matted the watercolored panel with patterned paper. I adhered this onto the kraft cardstock panel with fun foam.


This is just a preview of this digital image can be used. Please come and visit my blog again when the IWD Challenge sponsored by Sami Stamps is posted.

Thanks for viewing my blog. Have a blessed & brilliant day!

Maria Giselle B.

I am sharing this creation with