Showing posts with label Incy Wincy. Show all posts

Sunday, December 1, 2024

Saying Goodbye


Hello! Thank you for visiting my blog. It is the first day of the month. Usually, Incy Wincy will have a new challenge today. Sadly, this is the last post for Incy Wincy Designs Challenge. We are closing up the challenge blog. I am forever grateful to Incy. They gave me my first break in the DT world. My first post as a DT was on June 6, 2016 with the card below, Chalkboard Altered Digital Print


Whew! That was eight years of my designing life. The challenge blog evolved from having multi-sponsors per month to a solo sponsor to a non-sponsored challenge blog. From having two challenges a month, we cut back to a monthly challenge. On those 8 years, DT members have come and go. Until we were down to 5 and remained 5 for a long time despite the DT call. There were signs that the challenge blog is about to end but we held on because of our loyal followers who chose to stay despite the circumstances. We feel blessed because of them.

Back to my card, I used products from Erin Lee Creative. Unfortunately, these products are already retired but I am pretty sure you can find substitutes for it. Like any product that is new to me, I research the product online. There is a tutorial to the cardinal die by Jeannie which was very helpful to me. Unlike Jeannie's cardinal which was cut on white cardstock, I decided to cut my version on colored cardstock. I added details to the debossed portions of the bird and the wing with a Copic marker. On my first attempt, I used a very dark gray ink which did not turn out too good. On my second attempt, I used a lighter gray alcohol marker which worked out just fine in making these details pop. 

I blended red ink over areas I think there is a shadow. I used a medium sized blending brush to have a bit of control over the areas I am blending on. I used the scrap cardinal die cut as a layer to the final piece. I didn't want to waste that piece.

I also added details to the bird's beak and the bird's feet using markers. I blended a bit of brown dye ink on the bird's feet. There is really no rhyme or reason with the blending. I think the bird will still look pretty no matter what.

I assembled the bird and set it aside while the glue dries.

For the sentiment, I did hot foiling. It took me 3 tries before I got a good result. The lessons I learned with foiling are:  
1. Foiling on a smooth paper gives better results. My first attempt was on a matte, heavy weight cardstock. The result was a splotchy foiled sentiment.
2. Assess the thickness of your paper. If using a thin sheet of paper, add a shim e.g. another cardstock or a thin cardboard to add more pressure to the foiling sandwich. On my second try, I used a light weight mirror cardstock. Being thin, not all of the foil adhered to the mirror cardstock. It was okay but I feel it can still look better that's why I gave it another try, my 3rd try.

I die cut the foiled sentiment using the coordinating die.

For the card panel, I used an embossed cardstock from DCWV. I splattered white paint over the panel. I dried the paint by heat setting it.


I love the result of foiling. The beauty of foiling is that the look it gives. The colors change depending on how the foil gets hit by the light. I think foiling the sentiment on mirror cardstock also made the foiled sentiment even prettier, what do you think?

I adhered the cardinal and the sentiment to the cardstock panel. I added a dot of blank Ranger enamel accent for the bird's eye. 


Well, this is it. I hope you continue to follow me and my co-DT members as we embark on other things. We truly appreciate your support. 

Have a blessed, brilliant and creative day! I wish you a very Merry Christmas.

Maria Giselle B.

I am sharing this project at

Tuesday, October 1, 2024

A Card for You & a Card to Give Away (A 2-for-1 Project)


Hello! Welcome back to my blog. We have a new challenge at Incy Wincy Designs. The challenge theme/s is/are Autumn/More Than One Fold. I hope you join us in this month's challenge.

For today's card, I created a gatefold card with a surprise element when you open the card. 


The focal point of the card was stitched. I used The Stamp Market Embroidery Hoop die to cut the stitching circle. The pattern for the pumpkin is from Lawn Fawn. I added leaves cut from felt and some flower sequins for embellishment. The leaves were cut using a die from My Favorite Things. I used a hot glue to adhere the felt and leaves.  A bit messy but this is the only way to secure these embellishments in place. 

I matted this stitched hoop die cut with a larger circle patterned paper die cut. The patterned papers I am using is from Echo Park.

To make this into a gatefold card, I trimmed a kraft cardstock at 4 1/4" x 5 1/2". I scored the long side at 2 1/8" on both sides. 

I trimmed a patterned paper at 4" x 5 1/4". I cut this in half on the short side to come up with 2 panels of 2" x 5 1/4". I adhered these panels to the front of the gatefold side of the card. 


I adhered the stitched circle to one side of the gatefold, applying glue to half of the circle only. I adhered a sentiment embellishment from an Echo Park ephemera pack on the bottom of the gatefold opening, applying glue to the half back of this piece just like how I did it on the circle die cut. 

I adhered a kraft circle die cut to the back of the stitched circle, and a kraft rectangle on the back of the sentiment ephemera to make these two elements sturdy when opening the gatefold card.

As you can see on the photo above, the the surprise element of the card is another card. I created a top folding card that fits inside the gatefold card. The recipient of the gatefold card will have an option to send this top folding card to someone. This top folding card measures 4" x 5 1/4" to fit inside the gatefold card. 


I used the same patterned paper pad I used on the gatefold card. I die cut the pumpkin using a die from Honey Bee. I added texture to this pumpkin using The Greetery Aida Cloth Texture plate. I blended orange ink on this pumpkin to create some depth. I doubled the die cuts to create the pumpkin with some scrap cardstock for a bit of dimension. I did not want to add a lot of bulk to this card since it will be inserted inside the gatefold card. 

I created a patterned paper panel using scraps from the patterned paper pad. I adhered the strips to a scrap typing paper. I die cut this using a nesting rectangle die from Hero Arts. I used a rectangle die smaller than the note card. I added texture to this panel with a piercing plate from Ellen Hutson. I stitched the patterned paper seams using a diagonal stitch. I adhered this panel to the top folding kraft cardstock.

I adhered a sentiment from the ephemera pack to the pumpkin. I adhered the pumpkin to the panel. 


I hope you like today's project. Thank you for visiting my blog. Have a blessed, brilliant and creative day!

Maria Giselle B.

I am sharing this project at


Sunday, September 1, 2024

CAS & ATC


Hello! Welcome to my blog. I am back after a much needed month long break from blogging. We have a new challenge at Incy Wincy Designs. I am this month's challenge author, too. Thank you to co-DT Karen for suggesting this month's theme/s of ATC (Artist Trading Card) and CAS (Clean and Simple).

I stamped the dog on a white cardstock using a black dye ink. The stamp is from the Lawn Fawn Critters at the Dog Park stamp set. I also stamped this image on a Post-It note to create a mask. I fussy cut the stamped dog right on the stamped line. I applied the mask over the stamped dog image on the panel.

I stamped the letters for the sentiment. The sentiment was inspired by one of the sentiments on the LF stamp set. The alphabet stamp set I used is from Heidi Swapp. 

I colored the dog and the letters with Faber-Castell Polychromos pencil. I added details with a white Sakura gel pen.

I die cut the panel using a 3x4 stitched die from the Mama Elephant Peek a Frame Creative Cuts. 


ATC cards are easy to pull off especially if you make it a CAS one. With this card, the small size of the ATC and the white space of a CAS made this project easy to create. The most that took my time on this card is the fussy cutting and the coloring. 

I hope you like today's project and that it inspired you enough to join this month's challenge at Incy Wincy. Thank you for visiting my blog. Have a blessed, brilliant and creative day!

Maria Giselle B.

I am sharing this creation at


Monday, July 1, 2024

Framed Stitched Flower

Hello! Welcome back to my blog. It is the first of July, can you believe it? This means it is time for a new challenge at Incy Wincy Designs. The challenge theme/s is/are Round/Circles and/or Handdrawn/Sewing My project is using the circle and sewing themes. I hope you like it.

If you have been following me, you know that sewing is my jam! I used an Ellen Hutson die to poke stitching holes on a 4 1/4" x 5 1/2" white cardstock. The pattern is from a cross stitching book that I borrowed from the library. My mistake is that I photo copied the pattern and forgot to write the title of the book on the paper. I will add the title of the book here once I have the book that includes this pattern. 

I have a lot of DMC embroidery floss that I've inherited from my late mom. I prefer not to buy anymore embroidery floss. Thankfully, there is a free online conversion chart that I use to substitute a color if I don't have the embroidery floss color in my stash. 

I used 2 strands of floss for stitching since the count of the stitching holes created by the die is small. I also used a thin needle so I will not rip the paper as I stitched on it.

I created a frame using two circle dies. I die cut a heavy weight kraft cardstock. I embossed this circle frame with an embossing folder with a woodgrain pattern. I adhered this frame on the cross stitched panel. I trimmed off the excess. 


I backed this framed panel with another circle kraft cardstock cut with the larger circle die. For the easel, I die cut the same kraft cardstock using a die from The Stamp Market. 

I hope you like today's project, and that you join us in this month's challenge.

Have a blessed, brilliant and creative day!

Maria Giselle B.


Saturday, June 1, 2024

Stenciled Faux Stitched Greeting Card


Hello! Welcome back to my blog. It is the first day of the month which means it is time for a new challenge at Incy Wincy Designs. This month's theme/s is/are Winter, Snow and/or Summer Flowers. I picked the theme of Summer Flowers so I can play with The Greetery craft items I have in my stash.

The Greetery Rose Tapestry stencil I used on this project creates a floral tapestry which is right on my alley. To give it a more stitched look, I added piercings using The Greetery Aida Cloth Texture plate. 


The images were stenciled on white cardstock. To mute the bright white, I blended ink over the white panel using the lightest pink dye ink I used for the layered flowers. This technique also allowed for the sentiment to pop out.

I flicked some mica pigment over the panel. I heat set this to dry.

The sentiment was die cut on white cardstock using a die from The Greetery Stitched Sentiments die set. I die cut two extra pieces of this sentiment, then adhered this on top of each other for some dimension.

I added pink baubles to the center of the flowers.

I hope you like today's project. Please join us on this month's challenge. We can't wait to see your creations.

Have a blessed, brilliant and creative day!

Maria Giselle B.

I am sharing this creation at


Wednesday, May 1, 2024

Creating a Background Using Silhouette Die Cuts


Hello! Welcome back to my blog. It is the first of May which means we have a new challenge at Incy Wincy Designs. Our challenge theme is/are Spring +/or Animals. I incorporated both themes on today's project.

I have several inspirations for this card:
  • My card was inspired by a card Jennifer McGuire made using dog silhouette dies. 
  • My color scheme was inspired by a Simple Stories patterned paper. 
  • My sister loves cats.

I die cut the cats on floral patterned paper. I die cut extras using cardstock so I can adhere this to the back of the floral cat die cuts for a bit of dimension. Feel free to add more than one layer of die cut if you like more dimension. I lightly inked the edges of the die cuts with navy ink. After I arranged the cats on a 4 1/4" x 5 1/2" navy cardstock, I picked up the die cuts with a Glad Press 'N Seal to preserve the arrangement. I applied glue to the back of the die cuts and press this back to the cardstock panel. I trimmed off the excess and used these extras to fill in any open areas on the panel. I adhered floral sequins in between the cats to fill in the spaces. 


I heat embossed the sentiment on the same navy cardstock. I die cut this into a strip. I matted this with a pearl vellum paper and adhered it to the background. 


I hope I inspired you with today's project, and that you join us in this month's challenge. 

Thank you for visiting my blog. Have a blessed, brilliant and creative day!

Maria Giselle B.

I am sharing this creation at


Monday, April 1, 2024

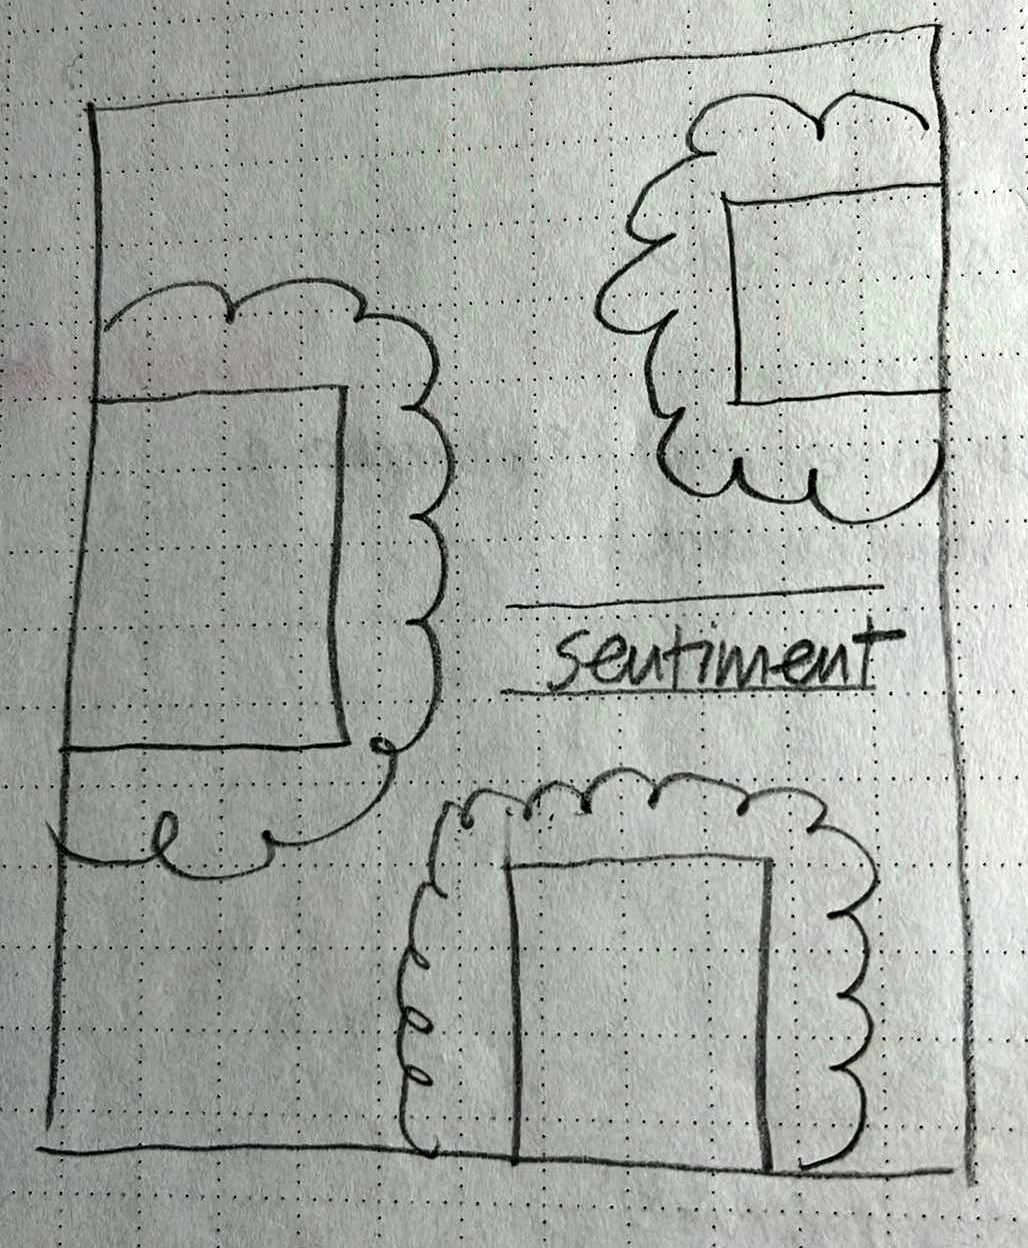
Monochromatic Card Inspired by Sketch and Song


Hello! Welcome back to my blog. We have a new challenge at Incy Wincy Designs. April's challenge theme is/are Inspired by Movie/Song/Book +/or Sketch Inspiration. I am the author of this month's challenge and the sketch illustrator as seen below. As you can see, it is a raw, unedited sketch of mine. I am not knowledgeable on how to create a digital version of my sketch. My apologies. 


Do you see those embossed flowers? Those were selectively dry embossed using a the Altenew Sixties Sunshine embossing folder. I die cut circles on white cardstock which fit each flower. I embossed the flower on the circle. I made sure that the flower is centered on the circle before running this through my embossing machine. 


I added details to this embossed flower circles by lightly swiping the Versamark ink pad to it so that only the raised edges will get inked. I poured Ranger Holographic embossing powder to the inked areas then heat set it. 

I pounced the center with Versamark ink on a sponge dauber. I poured Ranger Seafoam White embossing powder to this then heat set it. 

There are three songs sung by different artists with the same title 'Because of You.' Each is different from the other but I like it all. For the sentiment, I partially die cut strips of white cardstock to create my customized greeting. The dies I used are from the Altenew Essential Sentiment Strips Die set. I trimmed this sentiment strip making sure that the space on each side of the sentiment is equal. I pounced the Versamark ink pad to these sentiment strip die cuts. I poured Ranger Seafoam White embossing powder to this then heat set it. I adhered a black cardstock to this sentiment strip die cut. I trimmed off the excess. I traced the letters with a clear glitter pen to mute down the black cardstock. I matted the strips with vellum. 

For the card base, I am using a top folding A2 note card. I embossed the front flap of the card using the Altenew Wicker Texture 3D embossing folder. I flicked gray and black mica paint to the the embossed card front.

I added dimension to the circle flowers with scrap cardstock cut with a circle die smaller than the circle flower. I adhered these circles to the back of the circle flower, then adhered these together with the sentiment to the embossed card front following the sketch. 

I adhered white sequins to the card front, then added silver drops to the sequin centers.

I rounded the corners using a We R Memory Keepers Corner Puncher.


Thank you for visiting my blog. I hope you join this month's challenge. Have a blessed, brilliant and creative day!

Maria Giselle B.

6/2024: Altenew decided to change its affiliate program starting this month. Below is my affiliate link to the website. I don't think I can directly link the products I used with this new program. Please feel free to do a product search. I will update as I figure this out. The good thing about this new affiliate program is that I get to earn on each Altenew product you purchase and not only on the product/s I used on this project. As before, there will be no additional cost to you if you make a purchase. It is just a way to help a fellow crafter sustain her love for crafting. While in the Altenew blog, don't forget to check out their new release for this month. Thank you for your support!


I am sharing this creation at

Friday, March 1, 2024

Interactive Birthday Card

Hello! Welcome back to my blog. We have a new challenge at Incy Wincy Designs. March's challenge theme is/are Birthday &/or Funny/Humorous. Please visit the challenge blog and see how the other DT members interpreted this month's theme. We also hope you join us in this month's challenge.

I am using an Art Impression's stamp and die set called Workout Gal. The final product has a moving element that I think the recipient will enjoy.

There are instructions on the packaging insert but if you are more of a visual learner, Laura Bassen's video is very helpful in using this product. 

I colored my image using Copic markers. The set comes with two sentiment stamps, one of which I used on the card.

I blended ink on the sides of the colored panel.  Just like in Laura's video, I matted the colored panel with a patterned paper before adhering it to a side folding A2 note card. 


Luckily, I have some mini-brads in my stash. I could have colored the brads the same color as the skin and the bunny slipper but I think the movement of the leg makes this less noticeable.


Don't you think this card is both funny and fun? What do you think?

Below is a short video showing the lady in action. I hope you like it.


Thank you for visiting my blog. Have a blessed, brilliant and creative day.

Maria Giselle B.

I am sharing this creation at

Thursday, February 1, 2024

All Die Cut Card


Hello! Welcome back to my blog. We have a new challenge at Incy Wincy Designs. The theme for this month's challenge is/are Valentine/Love and/or No Pictures. I created an all die cut card.

I die cut the x and o's using dies from Sugar Pea Designs. It looks like a lot of work but the plus side of it is that I was able to use my scrap paper. 


The red cardstock back panel was cut at 5 1/2" x 4 1/4". I added detail to this panel using The Greetery Aida Cloth Texture plate. It is hard to appreciate this in the photos but in real life, the added texture adds some wow to the card.

I laid the die cut letters on the red cardstock panel. To keep the placement of the die cut letters intact, I used a Glad Press 'N Seal to pick up the letters from the panel. Most of it will stick to the Press 'N Seal. For the letters that fell off or did not stick, I just repositioned it to the space that I assigned it. I used a T-ruler to make sure the letters are adhered on a straight line. After I filled up the whole panel with the die cut letters, I set this aside to dry. I trimmed off any excess hanging over the red cardstock panel. 

For the main die cut sentiment, I stamped the heart from the Pretty Pink Posh Sparkle Dot Patterns 1 stamp set on a white cardstock. I poked holes on the dots created by the heart stamp. I added a chain stitch to the holes using a variegated DMC embroidery floss. I drew a line around the heart and cut the heart out using this line as a guide.


I die cut the letters using the Pretty Pink Posh Hugs coordinating die. I die cut this on white cardstock and on white glitter cardstock. I adhered the glitter letter die cut on the white letter die cut for some dimension. I adhered these letters and the stitched heart to the panel.

I adhered a ribbon die cut on the same white glitter cardstock, and a Pretty Pink Posh Cherry red pearl to the center of the stitched heart. 

I hope you like today's card, and I hope you join this month's challenge. Happy Valentine's everyone!

Have a blessed, brilliant and creative day!

Maria Giselle B.

I am sharing this creation at