Showing posts with label Cricut Explore. Show all posts

Wednesday, January 10, 2018

Crown and Card Gift Pair


3D

I created this for a co-worker of mine who is celebrating her birthday. I came up with the crown theme after I complemented her hairstyle is lacking a crown to make her a true queen. This inspired and challenged me to create her a crown. And, what is a gift without a matching card, right?


I used the Cricut Design Space to search for a crown image. I filtered the search to images that I own. This crown is from the Life Is A Party Cartridge. This crown cut file comes in layers and cuts the embellishments. It also cuts tick marks as a guide in adhering the small die cuts. Using the contour function, I removed the tick marks because I am not planning to use the small die cut pieces due to time constraint. I welded the detailed and base layer to save time. I cut this on gold glitter paper. The reverse side of the glitter paper is white in color. To cover it up, I mirror cut the crown on gold cardstock and adhered it to the reverse side of the glitter cardstock.

I die cut hexagons using the Avery Elle Custom Panels to create a more detailed crown since I decided not to add the hexagon embellishments included in this cut file. Do you remember the Epiphany Crafts Studio Tool to create bottle cap embellishments? I created the center gem of the crown using this tool.


For the card, I wanted it to match the crown. The Cricut Cartridge I used is all about planning a party. I die cut the detailed crown that is included in the card file version of the crown. I cut this using the glitter paper and cut it four more times using the gold cardstock. I stacked them to create a dimensional embellishment.


For the front card panel, I embossed a red cardstock using the Li'l Inker Designs Quilted Stitched Pattern die. The size of this red panel is 5 1/2"x4 1/4". I sprayed this panel with diluted Perfect Pearl in water. I die cut a red frame using Simon Says Stitched Rectangle die. The sentiment is from Mama Elephant Make A Wish stamp set. I heat embossed this on a red cardstock strip uisng Wow! Rich Pale Gold embossing powder.

To put the card together, I am using a 100lb. Neenah Desert Storm Cardstock for the card base. I adhered the red embossed panel to this. I adhered the sentiment strip to the back of the frame, then adhered this to the red embossed cardstock. I then adhered the crown to the center of the card. I die cut a hexagon using the Avery Elle die on a red mirror paper and adhered this to the center of the crown just like the 3D paper crown. I stamped a Happy Birthday sentiment inside the card. This card and crown are ready to be given.

Thank you for visiting my blog. Have a blessed and brilliant day!

Maria Giselle B.

I am sharing this creation at


Thursday, July 27, 2017

Wobbly Cricut Die Cut Thank You Card


Our chiropractor was nice enough to give us a gift card to Serendipity, a local ice cream shop here at Webster Groves, St. Louis, Missouri. My sons enjoyed the treat. To show how much we appreciated his kindness, I created this card with ice cream as theme, too.


I cut the image from Cricut Simply Charmed cartridge. I cut the ice cream cone in layers using cardstock. With the ice cream layer, I applied white Wendi Vecchi embossing paste. I didn't apply the paste smoothly to achieve the texture of ice cream. I applied American Crafts Grapefruit embossing powder. I set this aside to dry. I am not sure how long it took for this to dry but I left it overnight. After which, I heat embossed it. I adhered the layers using Ranger Multi-Matte Medium glue.

For the back layer which was cut in white cardstock, I stamped stripes using Simon Says Basic Stripes stamp set. The ink I used is Avery Elle Raspberry pigment ink. I adhered 1/8" double sided tape over the stripes. I poured Elizabeth Crafts Designs Cool Diamond Silk powder over the tape. After I shook the excess, I rubbed the glittered strips with my finger. I inked the edge of the ice cream part on this layer with the same Avery Elle ink.

To work on the card base, I am using a kraft Bazzill cardstock. I am fortunate to have a Simple Stories Beat the Heat patterned paper from the Summer Days collection which has ice cream cones on the B-side. I actually bought this patterned paper because of my obsession with clouds, which is the A-side of this patterned paper. I die cut this patterned paper using Simon Says Stamp Stitched Rectangles die. I also used the same set of dies to create a border rectangle on a pearlized paper. I also used this to die cut another kraft cardstock.


For the sentiment, I stamped the Altenew Label Love on kraft cardstock using  Hero Arts Unicorn White pigment ink. I poured white embossing powder to this, then heat set it. I trimmed off the excess. I traced the letters using a 0.3 Sepia Copic multiliner. I adhered this to the bottom of the innermost stitched rectangle. I applied a Darice Mini Action Wobbler to the back of the die cut ice cream. I adhered this on top of the sentiment.

I hope you enjoy viewing my blog. Thank you for stopping by. Have a blessed and brilliant day!

Maria Giselle B.

I am sharing this creation at


Monday, August 1, 2016

Copic Colored Atelier Mermaid Digi Stamp


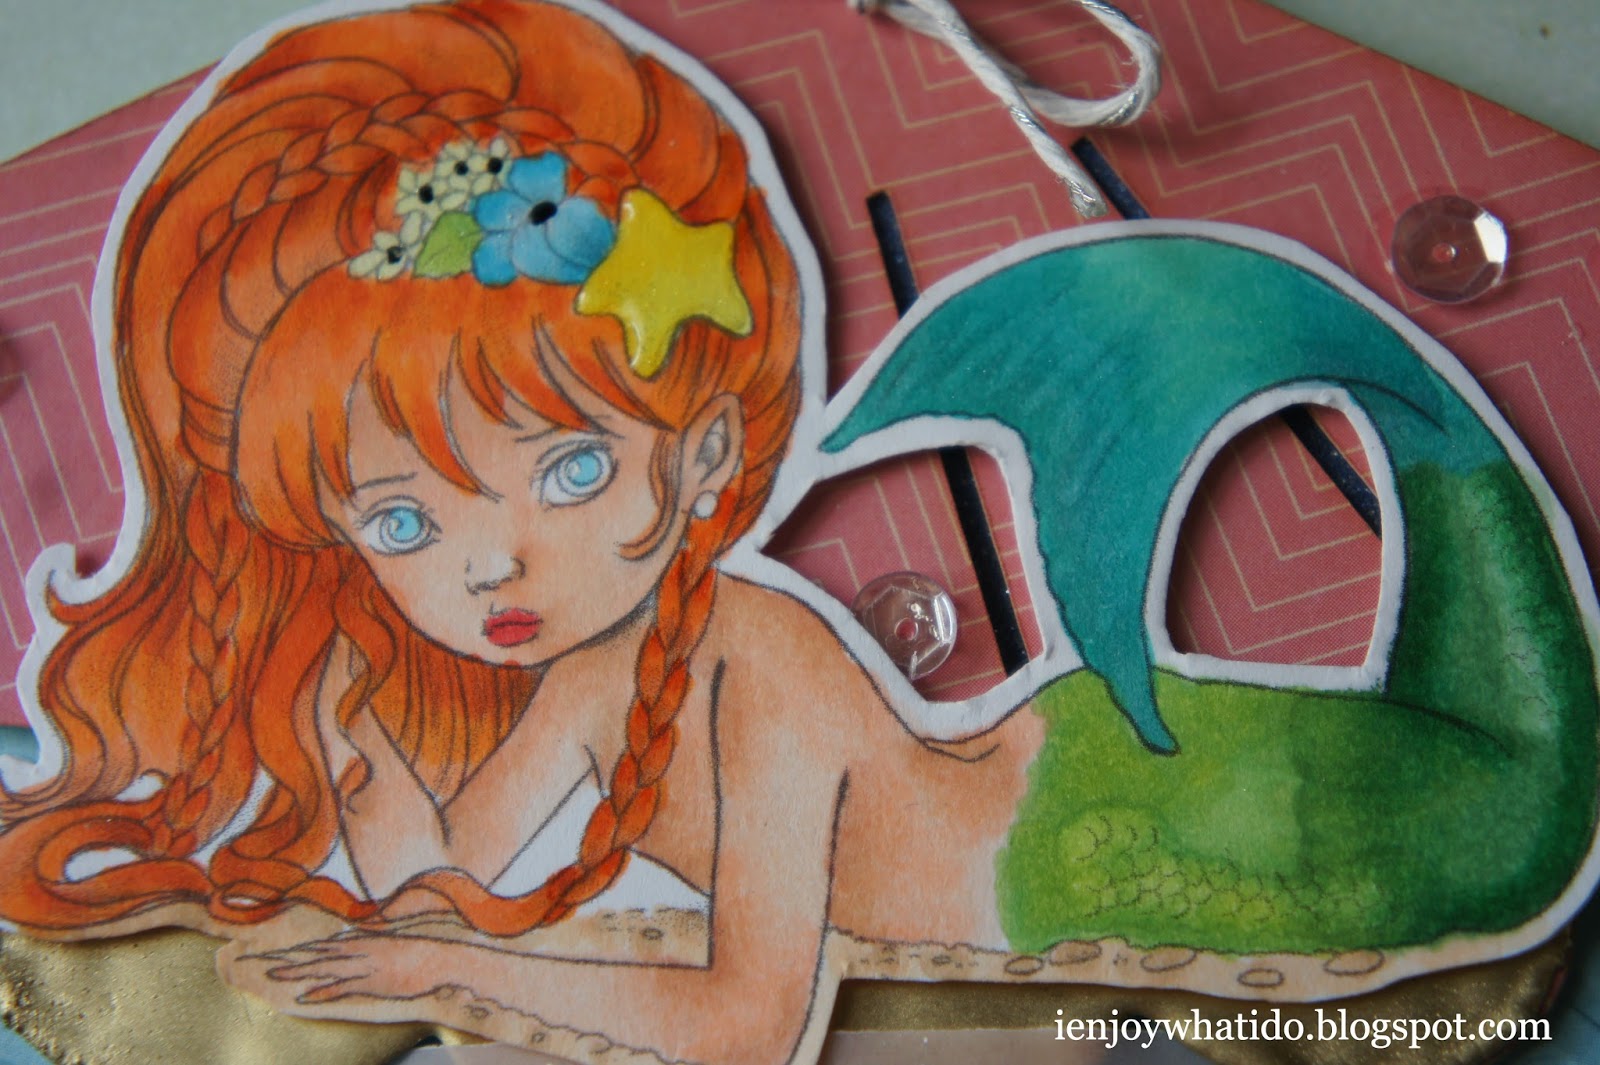
This image is very pretty and needs a lot of patience to color. The colored image in this card is my second colored image. I messed up fuzzy cutting the first one. I was trying to cut it on the line but later on realized that this is kind of hard having her hair twirled here and there. So with the one in the card, I left a small white border around the image. Believe it or not, I wasted more cardstock trying to cut the shell-shaped card with the Cricut Explore.

I started off by printing the image, then coloring it with Copic. The colors I used are listed at the bottom of this post. I was trying to color the mermaid like Ariel, The Little Mermaid. I searched the web for any Copic coloring of Ariel but nothing popped up. I colored her my Ariel way. When I showed the colored image to my sons and asked them who the mermaid is, they all answered Ariel. Their approval is good enough for me.

I applied clear Wink of Stella to the star and flower accents on the mermaid's hair, and to the mermaid's fin. I emphasized the eyes with a dot of white Sakura Gelly Roll pen. I  added some dots of black Sakura Glaze Gelly Roll pen on the flowers. I covered the blue flower with Ranger Glossy Accents and allowed this to dry.

I cut the shaped card with the help of the Cricut Explore. The image is from Cricut Create A Critter. I used the digital canvas of the Cricut Design Space to help me size the shell. This cut image only comes with two layers. I duplicated the base layer and welded two images to create the base card. I cut the top layer using a pink patterned paper. I cut the bottom layer using a light blue cardstock. I cut the shell-shaped cardbase using kraft cardstock. 

As I've mentioned, I have a lot of scraps with this project. I needed a ground for the mermaid to lay on so it doesn't seem like she's floating. I cut one of the scrap shells and heat embossed it with gold Wow! Ultra High Embossing powder. I embossed this twice to make it really raised.

For the pink layer, I inked this with Tim Holtz Distress Ink in Old Paper & Tea Dye. I dry embossed the blue layer using Lifestyle Crafts Jubilant embossing folder. I inked the edges using TH Distress Ink in Peacock Feathers. I adhered some glittered tape onto the blue layer, long enough to show through the slits on the pink layer.

I adhered the gold embossed layer onto the pink layer using Skor-tape. This layer needs a strong adhesive due to the weight of the embossing. I adhered the mermaid on top of this using foam adhesive for dimension. I adhered the pink layer onto the blue layer. I added a twine on top of the shell. I used a Lawn Fawn Gold Sparkle Trimming. I taped the twine on the back to keep it secure. Once I am happy with the bow, I squirted Ranger Multi Matte Medium glue on the knot. I dried this by clipping it with a tweezer. I also adhered clear Pretty Pink Posh sequins randomly to the lay-out. Once this is dry, I adhered this panel to the kraft shell-shaped card base.

For the sentiment, I combiined sentiments from Hampton Arts Doodlebug Design Clear Word Greeting stamp set and Avery Elle Peonies stamp set. I heat embossed this using   white Hero Arts embossing powder. I embossed this on a pink vellum strip. I adhered the end of this strip to the bakc of the embossed piece using mini glue dots.


Thanks for visiting my blog. Have a blessed & brilliant day!

Maria Giselle B.

Copic Markers used:
Hair-YR04, YR65, YR68
Skin-E000, E01, E11, E21
Fin-YG03, YG13, G07, G12, BG15, BG34
Eyes-BG01
Flowers-Y00, BG01, BG05
Star-Y04, Y08, Y35
Sand-E31, E51, E53

Image Sponsor

I am sharing this creation to:


Monday, June 20, 2016

Embossed Reindeer Digital Print


The moment I saw this image, I fell in love with it. Isn't the reindeer cute? Most of the images from JUST ME are cute so check out the other DTs creations featuring the other images.

I started off by uploading the Reindeer and tag images to the Cricut Design Space. I edited the tag by erasing the sentiment since I plan to use another sentiment. The CDS comes with a canvas that allows you to size the images depending on your project.

I love My Mind's Eye and one of their Christmas collections, the Sleigh Bells Ring, inspired me for this card. I know it is too early to think about Christmas but this is the only season where reindeers are pretty much associated with. I even search the net to check if there are other occasions reindeers are used as an embellishment in card. You are right, only during Christmas. It is never too early to make Christmas cards, anyway.


I am using an old patterned paper collection from Glitz Design. I prepared the patterned papers for embossing. I had the Cricut Explore draw the images on patterned paper using a Ranger Embossing pen. I embossed the images using Ranger Liquid Platinum embossing powder. I made sure the heat gun is hot enough before heating the powder and to move the heat gun while heating to prevent the patterned paper from warping. I fuzzy cut the images leaving a small margin around the image.


To create the wreath, I cut a ring on a transparency using My Favorite Things Circle Stax. I die cut some felt which I bought from Target using Paper Smooches Bow dies and Pocket dies. I adhered the center dot using Tombow Mono Multi glue. I tried stitching on this small dot but I wasn't coming up with the effect I wanted. The dot was too small.


I wrapped a gold twine around the ring acetate. I adhered the bows on this and allowed it to dry. I stamped the sentiment on the tag using a Hero Arts Christmas stamp. I colored the reindeer with color pencils for more accent. I adhered a red star sequin on the star hanging from the reindeer's antler.


I am using an Ellen Hutson Woodgrain cardstock for the card base. I cut another patterned paper from the same collection at 4"x5 1/2". I embossed the edges with Lawn Fawn Stitched Border dies. I adhered this to the card base. I applied liquid glue to the back of the acetate wreath and applied foam tapes to the back of the reindeer. I adhered the tag on the bottom. I applied more foam tapes to the back to secure the die cuts, doubling the foam on some of them.

This is part of the Incy Wincy Buttons and Bows challenge. Hope you come join our challenge.

Thanks for viewing my blog. Have a blessed and brilliant day!

Maria Giselle B. 


Image Sponsor

Sunday, June 12, 2016

Father's Day License Plate Card

I was asked by a friend to create a card for her husband for Father's Day. This is the same friend of who asked me to create a birthday card for her husband, too. (http://ienjoywhatido.blogspot.com/2016/02/masculine-interactive-birthday-card.html


For this card, I turned to the Cricut Design Space and browsed under the Father's Day category. I found this License Plate cut file from the Holiday Cakes cartridge. After duplicating the base cut, I rotated this 180 degrees and welded both the base cuts to create a card base. I added the scoring line on the middle.

I designed and customized the layer cut by adding my friend's husband's name on the top. I chose a font close to the fonts on the layer cut. I cut the layers three times in 3 different colored cardstocks, red, blue and white, to re-create the Illinois license plate where they live. The size of this layer is 12" x 6", just like a real license plate. With the card base, this is a huge card since the card base is slightly larger than the layer cut to matte it. I kept all the negative die cuts since I will be in-laying this later on.

Using a Post-It Full Adhesive Roll, I masked the upper portion of the white layered cut. I also applied this on the back of the layered cut. This is where I attached the negative cuts using the letter cuts as guide. I blended Tim Holtz Distress Inks on this bottom area, starting with the lighter blue shade of Tumbled Glass, then blending in Faded Jeans.


This is where the tedious process begins. I first applied a double sided tape to the back of the white layered cut. This will make the in-laying process easier. With the exposed adhesive from the double sided tape, all I needed to do is piece in the die cuts. This is why I kept the negative die cuts.


I layered the different die cuts by adhering one on top of the other using wet adhesive for more wiggle time. I made sure that the die cut color that will be on top is the same as the color of the Illinois license plate. I adhered a silver Duck Tape around the edges of the front of the card base to serve as the matte. I adhered the layer cut to the card base using a strong double sided adhesive tape for stability. For added shimmer, I applied Wink of Stella to the stars and the main sentiment, No. 1 Dad.

Thanks for viewing my blog. Have a blessed & brilliant day!

Maria Giselle B.

I am submitting this creation to:


Monday, June 6, 2016

Chalkboard Altered Digital Print


This is my first post as an Incy Wincy Design Team Member. I am excited and nervous at the same time. So I said to myself, take a deep breath, enjoy and create.


I put the Cricut Explore to the test with the Bugaboo Stamps digital image. After downloading it to the Cricut Design Space and a test run using a black Cricut marker, I tried drawing the image on black cardstock using a white Gelly Roll pen. I sized the image to 4 1/4" x 5 1/2" to fit a card front. I colored the print out with color pencils. I lightly colored the background with white color pencil and slightly rub it off with a paper towel. I applied clear Wink of Stella to the flowers and used my stash of gel and metallic pens. I fuzzy cut the oval shape off the original lay-out. I inked the edges of this piece with white ink pad.

For the background, I dried embossed another black cardstock using a We R Memory Keepers Quilted Next Level Embossing Folder. I adhered the oval flower piece on this.


For the sentiment, I cropped a part of the Oddball Art sentiment digital image and also downloaded it to the Cricut Design Space. Using the same technique, I wrote the sentiment on black cardstock using a white Gelly Roll pen. If I can do this over again, I will resize the sentiment smaller so I can trim it to a one line sentiment strip. After adding details to the sentiments, I adhered this to the bottom of the panel. I stapled the edges to add a little bit detail. I adhered this panel to a white note card. To finish off the card, I applied random dots of Glossy Accents, sort of like an enamel dot.


I chose to create a sympathy card. I tend to have none at hand when I need a card with this theme. Now, I have one handy. I also plan to re-create this card using a white background with a black outline.

Thanks for viewing my blog. Hope you join us in the Incy Wincy Alter Something Challenge.  Have a brilliant day!

Maria Giselle B.
Image Sponsors


I am submitting this creation to:


Saturday, June 4, 2016

Apple Shaped Peek-A-Boo Teacher Card


It is the last day of school for my 2 middle sons. Finally! I think they are the last ones to get off school. I wanted to create something special for my sons' teachers and at the same time participate in the Mod Squad Challenge Blog on Peek-a-Boo Cards. With the use of the Cricut Design Space, I searched for a freebie apple cut. I don't know about you but somehow when I think teacher, apples come next. Good timing because they have the Cricut Preserves free for this week. I cut the Divided Apple Image for this card. I cut it at 3.62" x 4.02". I am sorry for the odd measurements but I didn't want to distort the image.


I want to create a window card for the peek-a-boo card. The base apple cut comes with layers including a flower in the center. With the original cut, it makes tic marks on the apple base as kind of a guide where to adhere the layers. I wanted to cut the flower out to create the window and to do this, you have to hit attach after selecting the apple and the flower cuts. I cut 3 pieces of this using a dark brown cardstock. I also cut the layers.

For the window, I cut two pieces of acetate enough to cover the flower. I ran one through the Sizzix using a mini-dot embossing folder. I also embossed the red apple skin cardstock using a Li'l Inker Design Quilted Swirl Stitched Pattern die. I also inked the leaf to give it a little bit of variation from the green apple skin layer.

I wanted this to be the card itself so I scored the brown cardstock on the top, where the stem meets the apple. I adhered the leaf layer and also scored this based on that score line. I adhered the dotted acetate on top of this, then the red embossed layer, then the green layer making sure everything is aligned. I adhered the yellow circle cut on the middle of the acetate, both front and back to hide the adhesive. I embellished this circle with a clear Wink of Stella and Ranger Glossy Accents but I did this on the front circle only.

For the peek-a-boo part, I sandwich the other acetate with the remaining apple die cuts. I applied adhesive on top of the score line, where the leaf is, only. You might want to use a red sticky tape for this job to keep it stable.


I die cut one of the circles with the new Lawn Fawn Make Me Smile die. This is so stinking cute! I lined this with the front circles and adhered another circle on the back of the acetate not only to cover the adhesive but also to make the smiley face pop out since I used a darker cardstock.


For the tag, I die cut a blue cardstock using Paper Smooches Gift Tags 3 die. After preparing the area with an anti-static tool, I stamped the sentiment from Hampton Arts Clear Word Greetings stamp set. I embossed this using white powder. I tied this to the stem of the apple using a Lawn Fawn Lawn Trimmings Silver Sparkle Hemp.

Too bad, my son's teacher is sick during the last week of school so she never really get to seeing this card. My son didn't even think of leaving it at the school office. Oh, well. She will eventually get it. Just got to figure out how.

Thanks for viewing my blog.

Maria Giselle B.

I am submitting this creation to:


I embossed the acetate with a mini-dot embossing folder.

I have two patterns used for this card:
1) Twine/Image-Stamp/Tag...although I stamped the sentiment not an image so I hope it counts.
2) Emboss wet or dry/Image-Stamp/Die Cut