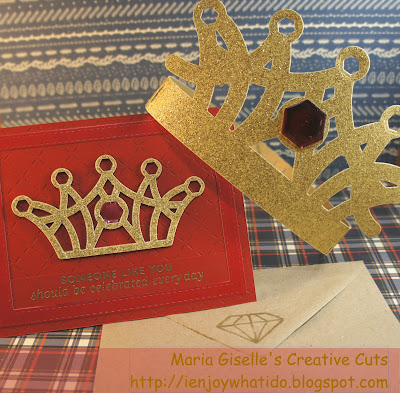
I created this for a co-worker of mine who is celebrating her birthday. I came up with the crown theme after I complemented her hairstyle is lacking a crown to make her a true queen. This inspired and challenged me to create her a crown. And, what is a gift without a matching card, right?
I used the Cricut Design Space to search for a crown image. I filtered the search to images that I own. This crown is from the Life Is A Party Cartridge. This crown cut file comes in layers and cuts the embellishments. It also cuts tick marks as a guide in adhering the small die cuts. Using the contour function, I removed the tick marks because I am not planning to use the small die cut pieces due to time constraint. I welded the detailed and base layer to save time. I cut this on gold glitter paper. The reverse side of the glitter paper is white in color. To cover it up, I mirror cut the crown on gold cardstock and adhered it to the reverse side of the glitter cardstock.
I die cut hexagons using the Avery Elle Custom Panels to create a more detailed crown since I decided not to add the hexagon embellishments included in this cut file. Do you remember the Epiphany Crafts Studio Tool to create bottle cap embellishments? I created the center gem of the crown using this tool.
For the card, I wanted it to match the crown. The Cricut Cartridge I used is all about planning a party. I die cut the detailed crown that is included in the card file version of the crown. I cut this using the glitter paper and cut it four more times using the gold cardstock. I stacked them to create a dimensional embellishment.
For the front card panel, I embossed a red cardstock using the Li'l Inker Designs Quilted Stitched Pattern die. The size of this red panel is 5 1/2"x4 1/4". I sprayed this panel with diluted Perfect Pearl in water. I die cut a red frame using Simon Says Stitched Rectangle die. The sentiment is from Mama Elephant Make A Wish stamp set. I heat embossed this on a red cardstock strip uisng Wow! Rich Pale Gold embossing powder.
To put the card together, I am using a 100lb. Neenah Desert Storm Cardstock for the card base. I adhered the red embossed panel to this. I adhered the sentiment strip to the back of the frame, then adhered this to the red embossed cardstock. I then adhered the crown to the center of the card. I die cut a hexagon using the Avery Elle die on a red mirror paper and adhered this to the center of the crown just like the 3D paper crown. I stamped a Happy Birthday sentiment inside the card. This card and crown are ready to be given.
Thank you for visiting my blog. Have a blessed and brilliant day!
Maria Giselle B.
I am sharing this creation at


What a special gift and card for your co-worker! I know she will love it! I personally know a lot of princesses who need this crown!
ReplyDeleteThanks for sharing on FCCB this week!
Cynthia, DT
gardeniasandglitterblogspot.com
What a clever crown and card-great job! Thanks for joining us at FCCB!
ReplyDeleteAwesome idea for a gift and card you are a great friend too 🙂 Thank you for joining us over at Use Your Stuff challenge blog.
ReplyDeleteTina-DT
Everyone needs a crown! Love this project. Thanks for joining us at FCCB! Dorlene DT FCCB
ReplyDeleteI really like you post good blog,Thanks for your sharing.
ReplyDeleteหนังแอ็คชั่น