Hello! Welcome back to my blog. I attended a virtual workshop by Ishani (@quill_ish) last Saturday. I enjoyed creating live with her and the rest of the attendees.
One of the techniques I learned in the class is about creating a background using alcohol markers. I don't have any Altenew alcohol inks. I only have Copic, which is an alcohol based marker. Since I prefer not to start a new collection of a different brand of alcohol ink, I used Copic refills as a substitute for the Altenew alcohol inks. I added drops of colors on a Yupo paper. I don't have an alcohol ink blower so I just used my heat tool to move the ink. Once I am happy with the pattern, I heat set it to dry the ink.
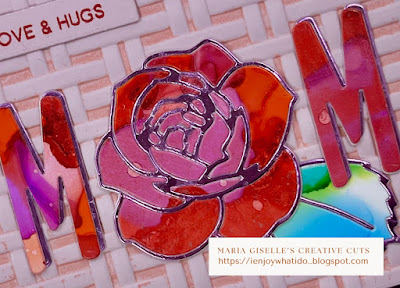
I created two alcohol blended panels, one red-pink base for the flower, and another blue-green base for the leaf. I die cut these panels using the Altenew Layered Rose die set. I used the drop outs on this project but I kept the outline die cuts for future use. The best way to keep the drop outs in its original placement is to use a masking paper to pick up the pieces from the die or the plate. This will make the next step easier.
I die cut the image outline on pink mirror cardstock. I die cut the solid piece using a scrap white cardstock. I adhered the mirror outline die cut to this and inlayed the alcohol die cuts to the outline die cut. This is the second technique we learned in the workshop.
I die cut the letters on both the alcohol panel and the mirror cardstock. I adhered the mirror die cut to the back of the alcohol letter die cut offsetting it for a shadow effect. I went off the instructions on the letter M on the left. The mirror letter die cut was supposed to be offset towards the left, not to the right. I only realized my mistake when I was adhering the letters to the weaved panel.
For the weaved panel, I rubbed pink dye ink on the flat side of the Altenew Wicker Texture 3D embossing folder. I sandwiched a pink cardstock cut at 4 3/4" x 3 3/4" inside and ran this through my embossing machine. What it does is the inked flat side is pushed to the deeper crevices of the embossing. Such a cool technique shared by Ishani during the workshop. No worries with the cleaning. Just wipe the inked side of the embossing folder with a damp cloth and the excess ink should come off.
I matted this embossed panel with the same pink mirror cardstock. If I had more time during the workshop, I would have cut this piece into a frame so I can use the middle portion of the mirror cardstock for something else.
I adhered this to the same pink cardstock I used on the embossing which was cut at 5 1/2" x 4 1/4".
I added a sentiment strip using a stamp from the Altenew Wild Hibiscus stamp set. I stamped this using a red dye ink on the same pink cardstock which I die cut into a strip.
I hope you like today's card. Thank you for visiting my blog. Have a blessed, brilliant and creative day!
Maria Giselle B.
I am sharing this project at


No comments:
Post a Comment