Showing posts with label Fuzzy Cutting. Show all posts

Sunday, September 23, 2018

MKC Digitals Fall Window Card


Hello! I am a guest designing for MKC Digitals. Thank you, Mari Ko, MKC's owner, for giving me this opportunity to join this momentous occasion of her re-launching the company. I get to know Mari Ko when she sponsored one of our challenges at Incy Wincy Designs Challenge Blog. I fell in with love her images at that moment! I especially was thrilled to win on one of her blog challenges. But sometimes, life throws us a a curve ball. What's important is she is back again. I am very happy for her. Cheers to you, Mari Ko and to MKC Digitals!

I created this card not only with Mari Ko in mind but also, my Inang (mother), and to the many things we are and can be thankful for. My mother got sick a couple weeks ago. It was very nerve racking, with distance as my biggest barrier. But we stuck together as a family. She is home right now recovering, taking each day at a time. My biggest salute to my sister who never left our mother's side. I am thankful for my sister and my mother...among a lot of things I am blessed with.

Now, on to the card. I am using the Fall Floral Arrangement digital stamp. I printed the image on Arches Cold Pressed watercolor paper. I re-sized the image to fit a top folding A2 note card. I also cropped the center flower. I colored the images using Tim Holtz Distress Oxide in Spiced Marmalade, Fossilized Amber, Peeled Paint, Lucky Clover, Vintage Photo, and Walnut Stain. I mixed Perfect Pearl 'Perfect Pearl" with these oxide inks in the palette. I am trying to create pearl paints. I would love to have more colors of Finetec but for now, I'll settle with whatever supplies I have on hand.

I added foil to the image since I printed the images using a toner ink printer. I did this technique before on a previous project, Foiled Watercolored Kit and Clowder Card. It would be nice if all of  the image got foiled but because the watercolor paper is so textured, only specks of foil attached to the image. If I really want it watercolored and foiled, the next time I do a similar project, I should try using a thick, smooth cardstock.

I fussy cut the images. I cut the cropped flowers up to the image line while I left some border on the bouquet of daisies. I ran a black marker around the fussy cut daisy for a finished look.

I am using a 100 lb. Neenah Desert Storm cardstock for a card base. On the front, I cut it at 2 3/8" from the score line and cut this extra piece at the same size. I cut a brown cardstock at 4 1/4" x 2 3/8". I embossed this using a Darice Wood Grain embossing folder. I flicked some Finetec Arabic Gold pearl paint onto this and set it to dry.

For the window, I die cut a Clearprint heavy vellum at 4 1/4" x 1". I embossed this using Darice Checkered embossing folder. I die cut the sentiment which is from the Concord & 9th Grateful Leaf dies set. I embossed this sentiment using Ranger Copper embossing powder. I embossed the sentiment twice for a more raised look.


To assemble the card, I adhered the vellum in between the two Neenah cardstock panels, making sure that the bottom piece is aligned to the bottom of the note card. I adhered the embossed brown cardstock on top of the Neenah cardstock panels. I adhered the bouquet of flowers. I adhered the sentiment on the vellum window using a liquid adhesive. I adhered the flower cut out using a foam adhesive. I place an acrylic block on top of the sentiment as the liquid glue dries. I needed to reinforce the adhesive on some areas to make sure that the sentiment die cut won't fall off.

As last embellishment, I added clear mini round gems. I did not cut the overhang of the bouquet so this card will need an envelope slightly larger than an A2 envelope.

Another thing I am thankful for is you and your time to visit my blog. I appreciate you, and I hope you have a blessed, brilliant & creative day.

Maria Giselle B.

I am sharing this creation at


Monday, September 17, 2018

Mixing Digital Stamps and Card Stitching


Hello! We have a new challenge at Incy Wincy Designs. The challenge is called Sweet N' Sassy. Our sponsors for this challenge are Bugaboo Stamps and Sticker.You.  We are also having a Design Team Call. Hope you join us in either way or better yet, on both!

As soon as I saw this image, the only person I can think of to create this card for is my sister and her cats. If you've been following my blog or have visited my blog in the past, you will see that any cat related image is colored with my sister and her cats as inspiration.

I started of by printing the image on Arches Coldpress watercolor paper. I die cut the Paper Smooches Cross Stitch die on a 4 1/4" x 5 1/2" 80 lb. Neenah Solar White cardstock.

I masked the edges of this panel. I ink blended the top portion of the holed area using Tim Holtz Distress Ink Broken China and Salty Ocean to create a sky background.

I stitched the bottom area to create a brick wall to create the scene. I used DMC Floss Blanc and 918.

I wanted to add clouds to the sky area. I stamped some clouds which are from the Lawn Fawn Yay, Kites! stamp set. I could have left the stamped clouds alone but I decided to stitch it, too. I first added some shading using Spectrum Noir Blue Topaz and Clear shimmer pens. I don't have a metallic DMC floss. To use what supply I have on hand, I added Cross silver thread to the DMC 930 floss. It was a bit of challenge using two threads with different texture but as long as you add the same amount of tension to both threads, it should be fine.

I colored the image using Tim Holtz Distress markers and Akashiya Sai watercolor brush pens. I started coloring with TH but I don't have enough marker colors so I switched to the Sai pens.

I fussy cut the image, leaving a very tiny border around the edges so I don't have to re-draw the cat's whiskers which will be hard on the holed background paper. I added details on the image using my colored gel pens.

I adhered the girl on the holed cardstock using Tim Holtz Distress Collage medium. I applied acrylic blocks over the image while the adhesive is drying.

I added Nuvo Drops Autumn Red to the heart included in the image. I stamped the sentiment on the bottom using Mama Elephant Stargazer pigment ink. The sentiment is from My Favorite Things Snuggle Bunnies.


I cut off an eight of an inch from the the top and sides. I adhered this to a white top folding A2 notecard.

Thank you for visiting my blog. Have a blessed, brilliant and creative day! See you in the challenge blog!

Maria Giselle B.


I am sharing this creation at


Monday, July 2, 2018

Digi. Stamp on Colored Cardstock


Hello! I am running late on my blog post for the Incy Wincy Designs Challenge blog. The challenge for the next two weeks is on flowers. I printed the image on different colored cardstocks from Stampin' Up. I re-sized the flower image to 1.5" and printed it four times in each colored cardstock. I colored the images using Prisma color pencils using the same color for the corresponding cardstock. Since I am layering these images, on two of the images, I only colored the petals. And for the other two, I colored the flower centers. Although, I end up not using the flower centers.

Next, I fussy cut the flowers. This is the step where I would say took most of my time in creating this card. I re-colored the images after fussy cutting to try and hide any cutting imperfections. I die cut a small circle using felt and Simon Says Stamp Stitched Circles Wafer die. I used the small circle for this since it closely matches the size of the floral circle of the digi. I color matched the felt to the colors of the flowers. I layered the two same colored flowers on top of each other by adding a blob of Tim Holtz Distress Matte Medium to the center of one flower, then lightly placed the other flower on top of it making sure it is slightly offset. You can also use a foam adhesive for this step. I set this aside to dry.

I stamped the denim pocked on blue cardstock. The stamp is from Paper Smooches Denim & Daisies stamp set. I used a Versamark ink and heat embossed this using Wow! Metallic Gold Rich Pale embossing powder. I fussy cut around the stamped image, leaving a small border around it. I heat embossed a sentiment using Hero Arts white embossing powder. The sentiment is from SSS What's Brewing stamp set. I punched holes on the top corners and hammered in some Making Memories Snaps. I love it when old embellishment put to good use.

I die cut leaves using a pearl green cardstock and SSS Beautiful Day wafer die. I did cut the leafy stem into two so I can distribute the leaves around the flowers.

For the background paper, I have some thin scrap grid patterned paper from Martha Stewart. I embossed the SSS Stitched Rectangle Wafer die. The impression is hard to see in photo but in real life, you can feel the impression created by the wafer die to the paper. I trimmed off the edges leaving a small border around it.


Onto assembling the front panel, I arranged the pocket die cut, the flowers and the leaves. Once I was happy with the arrangement, I started applying liquid glue to the back of the die cuts. Using a liquid glue allowed me to have some time to adjust the die cuts before the glue dries. The center flower was adhered using an foam adhesive.

For the note card, I am using a top folding white note card. I was going to mat my flower panel with a red cardstock but opted to use a red washi tape instead. I adhered the washi around the edges of the front of the white cardstock. I used a craft knife and a ruler to cut the inner corners and create diagonal lines for each corner where the tapes meet. I could have skipped this step since it is hardly noticeable once the flower panel was adhered on top of it.

I cut a fun foam and adhered it to the back of the flower panel then adhered this to the washi taped note card. As last detail, I added Nuvo drops to the flower centers and randomly to the the grid patterned paper.

I hope you find inspiration in my created card. Please join us in our latest challenge at Incy Wincy Designs. Thank you for visiting my blog. Have a blessed, brilliant and creative day!

Maria Giselle B.


Saturday, June 23, 2018

Summer Luggage Inspired Card


Summer for me is going out of town on a vacation with my family. This year we took our last vacation at Panama City Beach, Florida. I say last because I do not foresee our family going there again unlike the past 10 or so years when we visit this place almost every year. We will surely miss the place but there are other places to explore.

Taking off from this note, I created a card using an old Hero Arts stamp, Getaway Travel CL302. I used a Misti stamping positioner to stamp the luggage stamp several times. I masked the sentiment on the center of the luggage stamp. I initially stamped the luggage on brown cardstock using a similar brown dye ink. I treated the sentiment area with a powder tool. I inked the sentiment with Versamark ink. I poured white Hero Arts embossing powder to it. Before heat setting it, I brushed off any stray powders before heat setting it. I inked the blocked sentiment with Versamark ink and stamped this part of the sentiment on a blue cardstock. I poured white embossing powder to it and heat embossed it. I fuzzy cut this blocked sentiment and adhered it to the luggage, covering that part of the sentiment. I fussy cut the luggage. I inked the luggage handle with Versamark pen, poured copper Ranger embossing powder to it and heat embossed it. I also used this pen to color the corners of the luggage for some shading.

For the background, I created a mask for a ground for the luggage. I inked the sky with Tim Holtz Distress inks in Salty Ocean and Mermaid Lagoon on a Strathmore Bristol paper. For the ground, I used Tim Holtz Distress inks in Scattered Straw and Brushed Corduroy. I created rays coming from the center where the luggage will be adhered by inking a sponge dauber with white Hero Arts dye ink. I also sponged the center of the panel to create a halo around the luggage. I also sponged Delicata White Shimmer pigment ink in between the white dye ink rays. I also added dots using Hero Arts Unicorn White pigment ink. I set this aside to dry.

I cut this panel to 5 ¼” x 4”. I adhered the luggage using foam adhesive. I die cut a hello sentiment using Hero Arts Hello stamp and cut set. I die cut it twice, one on vellum and one on gold vellum paper. I adhered the gold die cut on top of the clear vellum, off-setting the gold for a shadow effect. I adhered this to the top portion of the luggage.

I embossed an Ellen Hutson Stitching Lines die on the front of a top folding 5 ½” x 4 ¼" note card. I adhered the inked panel to this. I punched the corners using a 1/8” We R Memory Keeper Corner Chomper.


I like the sentiment on this luggage stamp set. My 3rd son suggested that the card will be so cool if there is an airline ticket inside for the recipient of the card…for me or coming from me? Well, what is your 'Trip of a Lifetime'? I am sure there is a place or places to visit in your bucket list.

Thanks for visiting my blog. Have a blessed, brilliant and creative day!

Maria Giselle B.

I am sharing this creation at


Monday, April 16, 2018

Fuzzy Cut Customized Stamp Digi In Circle Window Dies


I created this card for our new Incy Wincy Designs Challenge on Anything Goes with a Twist, Seeing Spots or Dots or Circles (Minimum of 3). I created this card using circle windows. I colored  this image several times. I just love this image from Fabrika Fantasy called Funny Friends! The critters are just so cute!

I created windows for the critters to look out of. There are dies to create this lay out but I thought of stretching my dies to re-create a window lay out. I used the Simon Says Stamp Stitched Circles die. I drew the circles first on a note card. I used a T-square ruler to make sure the circles are aligned with each other. I aligned the metal die to the traced circle, then ran this thru the die cut machine. This was done on a heavy weight cardstock, 5 ½”x4 ¼”. I aligned a same sized patterned paper to this windowed panel, matched the circle metal die to the already cut circle window then ran it thru the die cut machine. I was able to re-create the same aligned windows on the patterned paper. I saved this  windowed white cardstock panel for future use.

I created outlines for the windows using the SSS Stitched Circles die and MFT Circle Stacked die. I inked the edges with red dye ink to hide the white core of this red shimmer cardstock. I adhered this to the windows.

I colored the image using Copic markers. I fuzzy cut the images right on the line. I lined the edges with a black marker to cover the white core of the cardstock. I adhered the critter to each window, using foam adhesive in some areas to make the critter pop, and adding liquid glue to some areas.
For the sentiment, I heat embossed it on a strip of black cardstock. The sentiment is from Mama Elephant Sunday Sentiments.  I adhered this with a foam adhesive. I rounded the bottom corners with WRMK Corner Punch as a last finishing touch.


Thank you for visiting my blog. Have a blessed and brilliant day!

Maria Giselle B.

I am sharing this creation at


Sunday, July 30, 2017

Scrapbook Page for Altenew Sketch Challenge


I have not scrapbooked for a long time. I think I have created more cards than scrapbooking layouts. I sure miss scrapbooking for I think this tells one’s story, something to cherish. I am so glad that Altenew has its own Scrapbooking blog, with a challenge, too! This will definitely motivate me to scrapbook some more.

I stamped the flowers and leaves from the Altenew Hennah Elements stamp set on Strathmore watercolor paper. I used several mediums to color the images. I would like to achieve varied shades of pink and yellow which I think I will achieve if I use different mediums. I used Tim Holtz Distress Oxide, Tim Holtz Distress ink pads, Tim Holtz Distress crayons, and Zig Color Clean marker. I was having so much fun experimenting that on the leaves, I mixed TH Distress Oxide Peeled Paint and TH Distress ink Mowed Lawn to color the leaf image. I dried the colors with a heat tool then sprayed Pearl Perfect Pearl diluted in water over it.

I fuzzy cut the images and lined the edges with a black marker to hide the white core of the watercolor paper. I have 14 flowers total as the same number of circles in the layout sketch. To add more variation to the flowers, I fuzzy cut the flowers even more to make it smaller. I didn’t want to waste the cut off flower petals so I glued this to the back of the medium-sized flower.


I die cut the photos using a Mama Elephant stitched rectangular frame die. The border is from the same Altenew stamp set. I stamped this on green cardstock using Versamark ink. I heat embossed this using Ranger Antiquities Verdigris embossing powder. This stamp came very handy for my layout. I cut the embossed strip in half using the lines on the design as a guide. In this way, I came up with two strips to adhere to the top and bottom edges of the photos.


I am using an Ellen Hutson Wood grain cardstock for my layout. I sprayed and splattered this white cardstock with Perfect Pearl Sour Apple diluted for more shimmer. I also splattered some Tim Holtz Distress Oxide Peeled Paint on some areas.

Do you remember when brads are such a craze? I still have my own stash of brads. I don’t have a yellow and pink brad for the flowers so I colored these brads with Copic markers. I poked the holes and attached the big flowers using the brads. I used Glue Dots to adhere the rest of the flowers.


The sentiment is from Altenew Super Script stamp set. I stamped the sentiment on white cardstock using Versafine Onyx Black ink. I heat embossed this using black embossing powder. I fuzzy cut the sentiment leaving a small white border around the letters. I stamped the small sentiments on vellum strips using the same ink & heat embossing it as well with clear embossing powder.

I really had fun with this project. I am looking forward to creating more. Now I have something to add to our family album showcasing our last year’s summer vacation.

Thanks for visiting my blog. Have a blessed & brilliant day!

Maria Giselle B.

I am sharing this creation at


Monday, June 5, 2017

Zodiac Card Set


Hello! Welcome to our new challenge at Incy Wincy Designs. Our challenge is Anything Goes. I am using images from Knitty Kitty, one of our sponsors for this challenge.

As soon as I saw this digital set, I fell in love with it. It reminded me of a stamp set from Mama Elephant that I have my eyes on but never get to acquiring. I was inspired by the cards made by Val using the Mama Elephant stamp set. And, when we talk about zodiac signs, I just cannot leave one image behind, right? Because if I will be asked to create a card using one image from this set, of course, I will lean towards my birthday zodiac sign which you will find out what it is at the end of this post.

I colored the images using Copic markers. I fuzzy cut the images, leaving a small border around each image. For the background, I am using a Hero Arts Star Galaxy Background rubber stamp. I played around with this rubber stamp, using different inks and different kinds of paper to ink on. I die cut this background using a frame die from Mama Elephant Peek A Frame Creative Cuts die set. The sentiment is from Hero Arts Written in the Stars stamp set. I stamped the sentiment on white cardstock using Versafine Onyx black ink and heat embossed it with clear powder. I die cut the sentiment using Simon Says Stamp Stitched Rectangle die. For the star, I used Lawn Fawn Tiny Tags die. The sentiment and image were adhered with foam tape.

For the base card, I am using a 110lb. Neenah cardstock. I embossed the front of the base card using We R Memory Keepers Next Level 3D Gemstone embossing folder. I adhered the panels on this using fun foams.

I can't believe I came up with 12 note cards right away. It took me a while to create these but once I knew how one card looked and the steps to create it, the rest was just easy to make.

Aries (March 21-April 19) & Taurus (April 20-May 20)

Gemini (May 21-June 20) & Cancer (June 20-July 22)


Leo (July 23-August 22) & Virgo (August 23-September 22)

Libra (September 23-October 22) & Scorpio (October 23-November 21)

Sagittarius (November 22-December 21) & Capricorn (December 22-January 19)

Aquarius (January 20-February 18) & Pisces (February 19-March 20)

Monday, December 19, 2016

Using Digital Image Like a Die Cut


I will be honest. I struggled a lot with the digital images for this bi-weekly challange. You have no clue how many times I've printed the images. I was close to giving up and just taking a pass on this week's post. But this is what a DT member should be. Come up with ideas for the challenge and use the resources we have. Coloring the images didn't work for me despite using different color mediums. I wasn't giving justice to the beautiful images. So, I just went ahead and printed the image in its original color. My plan is to embellish this image, add accents to it.

I fuzzy cut the image. Using a blade, I cut off the top windows. I adhered vellum at the back to cover the open areas. To accent the snow and the fluffy portion of the elf's hat, sleeves and pants, I used an Uchida Snow Marker. I added shimmer to the elf's wing and sock using Spectrum Noir Sparkle pen. I also colored the light of the candle using Wink of Stella in yellow and orange. For the, bottom windows of the lantern, I filled it in with a Sakura Glaze pen. Another option is to use Glossy Accents.

Today's Incy Wincy Designs Challenge is to use Non-Traditional Christmas Colors. With the help of Google, I came across with this website, http://www.hgtv.com/design/decorating/color/fresh-christmas-colors-12-combos-youve-never-tried-pictures.  Any idea which color combination I chose? I chose the first one, which is Green + Brown.


The image by itself has both colors. The elf has green. The lantern has brown. I cut a green and brown cardstock. I die cut one edge using Mama Elephant Borderline Trios die. I layered these two cardstocks, with the brown cardstock longer than the green cardstock. I created a window on the green cardstock using Simon Says Stamp Stitched Circle die. I spritz this cardstock with Perfect Pearl Pearl diluted in water. While this is drying, I placed a Heidi Swapp stencil on top of the brown carstock. Using a sponge dauber, I applied some Delicate White Shimmer Pigment ink to the open circle areas. You can see a few of this snow dots through the vellum and top open area. If I will re-do this process, I would have chosen a stencil with a smaller sized circle. 

I threaded a Little Yellow Bicycle Jute through the hole of the lantern. I adhered the ends to the back using tape. I secured the die cut and the jute with Ranger Multi Matte Medium. 

The sentiment is from Hero Arts Holiday Sayings stamp set. I heat embossed this on vellum using Hero Arts White Embossing powder. I trimmed this into a sentiment strip. I taped the the edges to the back. I also squirted some Ranger MMM to the back of the dots on the sentiment strip. I applied foam tape to the back of the green cardstock and adhered this to the brown cardstock. 

For the cardbase, I used Neenah Kraft cardstock. I added some x-marks to the sides using Lawn Fawn Stitched Borders. I inked the die with SSS Kraft dye ink to add more interest to the embossed border. 

For the final accent, I added Nuvo Crystal Drops randomly. 


Hope you join us in our bi-weekly challenge at Incy Wincy Designs. Thank you for viewing my blog. Have a blessed and brilliant day!

Maria Giselle


I am sharing this creation with


Wednesday, August 31, 2016

Mickey Mouse Clubhouse Spinner Card


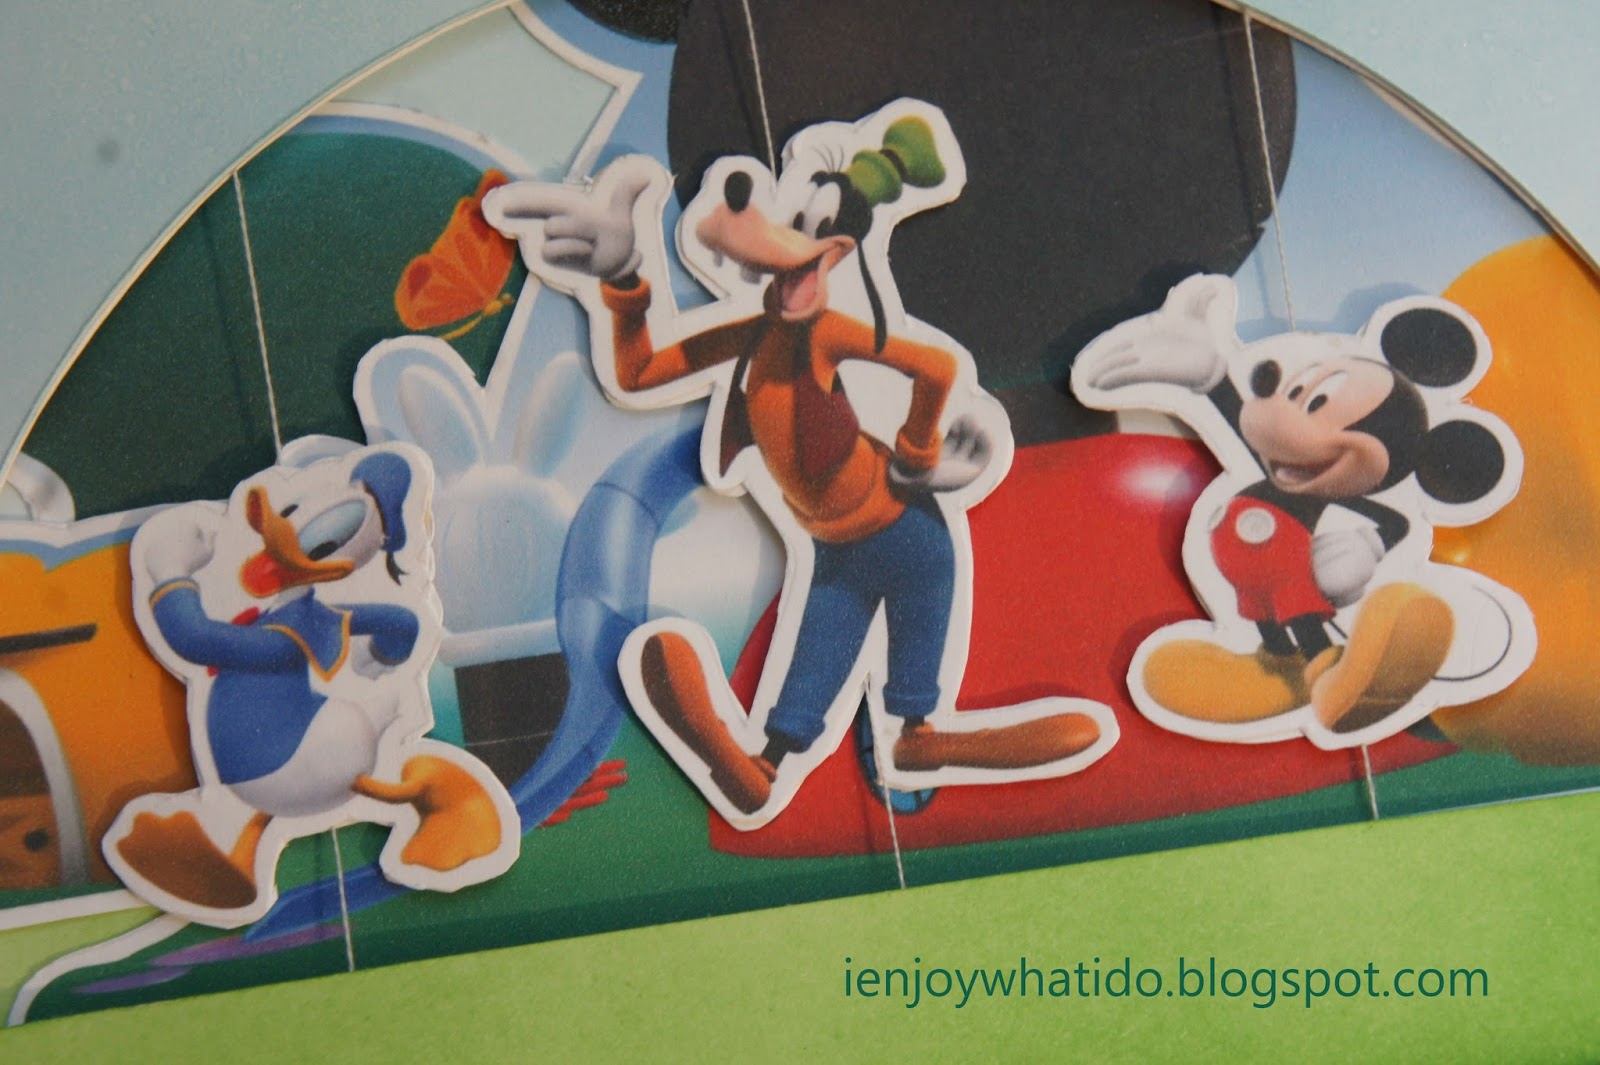
One of my friends asked me to create a card for his son's first birthday. This is an exciting milestone for a parent. Kind of reminds me on my sons' first birthdays, when you want it to be memorable. The challenge though is it has to be inspired by the Mickey Mouse Clubhouse, since this is her son's favorite and the theme for his party. She also requested an interactive card.


I was fortunate to download a Mickey Mouse Clubhouse board game pieces from the web. I resized the images, printed it and fuzzy cut it. I flipped the character images to create a window image. I adhered the same images back to back, sandwiching an embroidery floss in between the cut outs. I allowed these to dry with an acrylic block placed on top of it. I only cut the three characters the celebrant loves, Mickey, Donald and Goofy.

I cut 2 of 7" x 4 1/4" white cardstock and 1 7 1/2" x 4 1/4". I scored this last piece at 1/4" & 4". I masked these tabs. I blended these panels with Tim Holtz Distress Ink Broken China, Salty Ocean, and Mowed Lawn. I blended the colors to re-create the clubhouse's background. I covered the green part of the panel then spritz dissolved Ranger Perfect Pearl in water over the sky part of the panel. After this has dried, I cut a window to one of the panels. Do you still remember EK Success Curvy Cutters? I still have mines and it actually became handy to create the window. I cut an arched opening using the circle cutter but cutting it only halfway. I used a craft knife and ruler to complete the arch cut. I traced the window on another white cardstock and cut it off. The stringed characters were sandwiched in between the window panels.


I adhered the clubhouse to one of the inked panels. I embellished this panel further by adhering some of the images included in the file, which I also fuzzy cut.


For the back panel, I stamped the greeting using a Paper Smooches, Lawn Fawn and My Favorite Things stamps. I inked the top part of the letters with red ink and the bottom half of the letters with black ink. I use the Misti Stamping tool to stamp the letters repeatedly to make the color bold. I also used the Misti to ink the letters with Versamark ink so I can emboss it with clear powder.

I assembled the panels using a strong double sided tape. Below is a mini video on how the interactive card works.


Thanks for viewing my blog. Have a blessed & brilliant day!

Maria Giselle B.

I am sharing this creation to