Showing posts with label Embossing with Metal Die. Show all posts

Friday, May 2, 2025

Plaid Greeting Card


Hello! Welcome back to my blog. Today's card uses products from Kat Scrappiness. I got my inspiration after joining an IG Hop for another company's products release. I would like to thank @larissaheskettdesigns for the colors and card design inspiration. I like her work so much that I created my own version of it. 

I die cut a red shiny textured cardstock using the KS Buffalo Plaid Background craft die. I kept the red square drop outs which I used later. A tip for a successful one pass cut using this die is to add a metal shim to your cutting plate sandwich. It works each time for me. 

I measured the width of the two columns of the plaid and use this measurements to trim a blue cardstock. I was initially going to adhere this cardstock over the two rows of the plaid background but changed my mind. I placed it behind the plaid cover die cut. To add some depth and detail to this piece, I embossed the plaid pattern to this panel. To use your metal die cuts for embossing, add a silicone mat underneath the cardstock when you layer your die cut sandwich. This pushes the metal die to the paper, thus, transferring the design to the paper. You have to play with your die cutting machine to know what plates are needed to get this effect without ruining your machine and your paper. 

I adhered this to the back of the plaid cover die cut, aligning the embossed design with the opening of the plaid die cut. It is hard to see in the photos but the embossed design added a pillow effect on the openings. 

I adhered the red square negative die cuts to the back of the vented portion of the plaid die cut.

I adhered a white cardstock to the back of the open columns. I pieced in white square negative cuts to the open areas. I used this cover die a lot that I accumulated a lot of these square negative cuts.

I stamped some of the images from the KS Wok On stamp set to a smooth watercolor paper. I used Karin markers to color the images. I added details to the images using a white gel pen and white enamel glue to the eyes. I fussy cut the images. I arranged the images on the panel, mostly placing it on the blue area of the plaid panel. I adhered the images with foam tape for some dimension.


I prepped a piece of white cardstock with an anti-static tool. I stamped the sentiment to this piece using Versafine Onyx Black ink. I poured black embossing powder to it and heat set it. I created this into a strip using a sentiment die. I adhered this sentiment strip to the same blue cardstock I used on the panel. I used a craft knife to gently cut the blue cardstock creating a matte around the white sentiment strip. I adhered this to the panel.


I hope you like today's card. Thank you for visiting my blog. Have a blessed, brilliant and creative day!

Maria Giselle B.

I added below links to the Kat Scrappiness products I used on this project. There will be no additional cost to you should you decide to purchase this/these product/s. While you are at the Kat Scrappiness website, do check out their wide array of products. Enjoy!

I am sharing this project at

Sunday, March 12, 2023

Banner Shaped Mini-Card Front

Hello! Welcome back to my blog. Today's card features products from Kat Scrappiness. I created a shaped mini-card front. The kraft cardstock is just a panel that holds the mini-card. 

I began by die cutting different shades of green cardstock and a gold cardstock using the KS Stitched Slimline Strips dies. I adhered this to a typewriter paper which was cut a bit larger than the banner die that I used on this card. I made sure that the strips are flushed next to each other. I also created an order of adhering the strips. I die cut this using a die from the KS Nesting Fishtail Banner dies. 


To create the mini note card, I am using a top folding white A2 note card. I positioned the banner die a bit above the scored line of the note card. I ran this through the die cutting machine. I adhered the striped banner die cut to the front of this mini note card. I stamped a sentiment to the inside of mini-card.


To embellish the front of the card, I die cut letters on gold mirror cardstock to spell 'Daddy.' I adhered another set on plain cardstock, and adhered this to the back of the letters for some dimension.

I die cut the word 'Hi' on white cardstock. This die is part of the KS Nesting Fishtail Banner dies. I also die cut an extra one and adhered it together for dimension. Instead of using the tiddle, I die cut the smallest star from the same die set. I also die cut this twice and adhered one star over the other.

For the subsentiment, I heat embossed this on white cardstock and die cut this into a strip. I also die cut extras and adhered it on top of each for dimension. I used Versamark ink for stamping and Wow! Metallic Gold Rich Super Fine embossing powder. 

I adhered all of die cuts on the front of the striped mini-notecard. I added more star die cuts and small star sequins.

For the mini card holder, I trimmed a kraft cardstock at 4 1/4" x 5 1/2". I embossed this panel using the KS Buffalo Plaid Background die. To achieve this look, you will need an embossing mat. Depending on your machine, you might need to add shims to get a good, embossed impression.

I swiped the Versamark ink on the edges of the panel. I poured the same embossing powder to these areas then heat set it. 

I adhered the mini card to the panel.


Thank you for visiting my blog. Have a blessed, brilliant and creative day!

Maria Giselle B

I added below a link to the Kat Scrappiness product I used on this card. There will be no additional cost to you should you decide to purchase this product. While you are at the Kat Scrappiness website, do check out their wide array of products especially the exclusive Kat Scrappiness products. They have a new release, too! 

I am sharing this creation at

Wednesday, August 10, 2022

Embossing with Dies and Create a Background Using a Sentiment Stamp

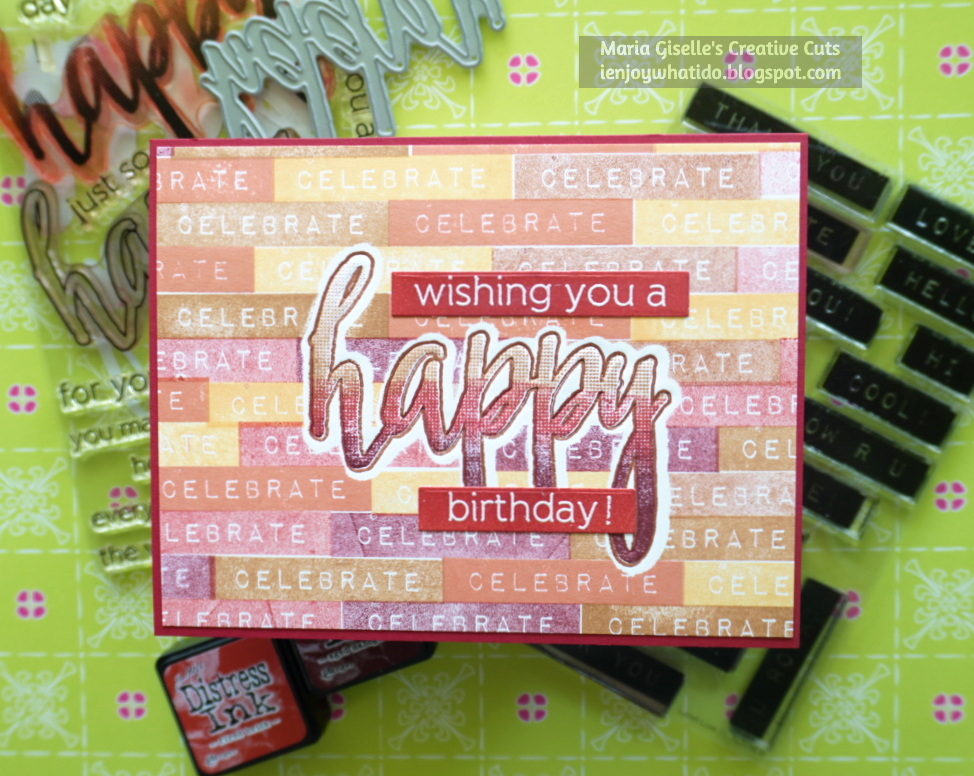
Hello! Welcome back to my blog. This is my 7th AECP card creation. The homework is to use a die creatively. There are several ways to use a die and for today's card, I am using a coordinating sentiment die to create an embossed impression on the stamped sentiment. I am using Altenew Halftone Happy stamp set and die. I am also using the Misti Stamping Tool to create this card.

On a white piece of cardstock cut at 5 1/2" x 4 1/4", I stamped the happy outline on the center using a dark brown dye ink. I lined the halftone happy stamp to this outlined impression. The halftone happy stamp gives you an ombre look impression once stamped. To step up this look, I inked the sentiment stamp using three different shades of ink. This is where the Misti Stamping Tool comes very handy. I partially inked the sentiment then stamped it. I wiped off the residual ink. I inked the stamp with the next color shade, then re-stamped the sentiment. I continued this process one more time. If I want the inks to blend, I apply ink to that area and re-stamp the sentiment again. I just made sure that the ink gradation is not lost in the stamping process.

I created a mask for this focal sentiment. This is one of the few occasions that I wish the coordinating die creates a border around the stamped image when die cut. But since the coordinating die is an exact match of the stamped impression, I created my own mask that will have that border effect. I stamped the outline sentiment on masking paper. I fussy cut this leaving a small border around it. I adhered this to the stamped panel, trying my best to line up the sentiment on the cardstock panel and the masking paper. I could have used my light box to help with the alignment, but I didn't think about that while I was creating the card.

I stamped the celebrate stamp repeatedly on the background using varied dye inks. The stamp is from the Altenew Label Love stamp set. The colors I used was inspired by the latest Altenew Challenge which I linked below. I used the Misti Stamping Tool to create the background. It is a tedious process but it is just like playing an instrument, the repetitive process is like a stamping rhythm, position stamp  ->ink->stamp->re-stamp, if needed->clean stamp with shammy->move paper->repeat the process until the whole background is filled.

I always felt awed once I remove the masking paper that's why masking is one of my favorite techniques. 


To add the embossing, I lined the sentiment die to the matching stamped sentiment. I used a silicone mat and followed my die cutting machine's sandwiching guidelines for embossing. I tried to capture in photos the embossing but the look it created in real life is amazing, especially when you run your fingers on the embossed impression.

I added sentiment strips to complete the greeting. I blended ink to a white cardstock with the same mahogany ink I used on the sentiment and the background. I heat set this to dry before stamping with Versamark ink. I poured white embossing powder to this, and heat set it. 

I trimmed a sliver off the edges and matted this panel with a dark red cardstock. 

I really enjoyed creating this card. I hope you give these techniques a try. Have a blessed, brilliant and creative day!

Maria Giselle B.

I am sharing this creation at


Tuesday, March 9, 2021

Mandala Inspired Greeting Card


Hello! I created this card for Waffle Flower's Weekly Challenge. I am using the Waffle Flower Crafts Doily Circle die. I cut several green cardstocks and a gold cardstock using the die. I trimmed the die cuts so I can layer it and create a multi-colored doily. 

I embossed the doily on watercolor paper. I painted the doily using Karin markers. I spritz this with pearlized water and dried it with a heat gun.

I adhered the layered doily die cut to the watercolor paper making sure the design matches up.

I added a pearl brad on the center. 

I embossed a sentiment on a green patterned paper using Wow! Metallic Gold Rich embossing powder. I trimmed the patterned paper into 4" x 5 1/4". I adhered this to a gold cardstock cut at 4 1/4" x 5 1/2". I adhered the doily slightly offset on the top corner of the panel.

Thank you for viewing my blog. Have a blessed, brilliant and creative day!

Maria Giselle B.

I am sharing this creation at


Monday, July 2, 2018

Digi. Stamp on Colored Cardstock


Hello! I am running late on my blog post for the Incy Wincy Designs Challenge blog. The challenge for the next two weeks is on flowers. I printed the image on different colored cardstocks from Stampin' Up. I re-sized the flower image to 1.5" and printed it four times in each colored cardstock. I colored the images using Prisma color pencils using the same color for the corresponding cardstock. Since I am layering these images, on two of the images, I only colored the petals. And for the other two, I colored the flower centers. Although, I end up not using the flower centers.

Next, I fussy cut the flowers. This is the step where I would say took most of my time in creating this card. I re-colored the images after fussy cutting to try and hide any cutting imperfections. I die cut a small circle using felt and Simon Says Stamp Stitched Circles Wafer die. I used the small circle for this since it closely matches the size of the floral circle of the digi. I color matched the felt to the colors of the flowers. I layered the two same colored flowers on top of each other by adding a blob of Tim Holtz Distress Matte Medium to the center of one flower, then lightly placed the other flower on top of it making sure it is slightly offset. You can also use a foam adhesive for this step. I set this aside to dry.

I stamped the denim pocked on blue cardstock. The stamp is from Paper Smooches Denim & Daisies stamp set. I used a Versamark ink and heat embossed this using Wow! Metallic Gold Rich Pale embossing powder. I fussy cut around the stamped image, leaving a small border around it. I heat embossed a sentiment using Hero Arts white embossing powder. The sentiment is from SSS What's Brewing stamp set. I punched holes on the top corners and hammered in some Making Memories Snaps. I love it when old embellishment put to good use.

I die cut leaves using a pearl green cardstock and SSS Beautiful Day wafer die. I did cut the leafy stem into two so I can distribute the leaves around the flowers.

For the background paper, I have some thin scrap grid patterned paper from Martha Stewart. I embossed the SSS Stitched Rectangle Wafer die. The impression is hard to see in photo but in real life, you can feel the impression created by the wafer die to the paper. I trimmed off the edges leaving a small border around it.


Onto assembling the front panel, I arranged the pocket die cut, the flowers and the leaves. Once I was happy with the arrangement, I started applying liquid glue to the back of the die cuts. Using a liquid glue allowed me to have some time to adjust the die cuts before the glue dries. The center flower was adhered using an foam adhesive.

For the note card, I am using a top folding white note card. I was going to mat my flower panel with a red cardstock but opted to use a red washi tape instead. I adhered the washi around the edges of the front of the white cardstock. I used a craft knife and a ruler to cut the inner corners and create diagonal lines for each corner where the tapes meet. I could have skipped this step since it is hardly noticeable once the flower panel was adhered on top of it.

I cut a fun foam and adhered it to the back of the flower panel then adhered this to the washi taped note card. As last detail, I added Nuvo drops to the flower centers and randomly to the the grid patterned paper.

I hope you find inspiration in my created card. Please join us in our latest challenge at Incy Wincy Designs. Thank you for visiting my blog. Have a blessed, brilliant and creative day!

Maria Giselle B.


Tuesday, November 22, 2016

Flocked Stamped Sentiment


Do you remember that time when flocking was all rage? Messy work but the fuzzy dimension is eye-catching. I am featuring the flocking powder in this project.

I embossed the Simon Says Stamp Stitched Rectangles onto the front of a top folding 4 1/4" x 5 1/2" white note card. I used an embossing mat to achieve this look. The mat prevents the metal die from cutting the cardstock. Using Tab 2 in the die platform, I applied the embossing mat, a cardboard for extra shim, and the cardstock with die sandwiched between the two plates. I adhered the die with washi tape to prevent it from shifting when I run it through the Sizzix Machine. I was only able to use the two largest rectangles of the SSS die for this card.

I prepared the middle panel for embossing. I positioned the stamp on the Misti Stamping Tool. I first tried using the Ranger Sticky Embossing Powder to attract and adhere the flocking powder. I was not quite happy with the results so I resorted to the Tsukineko Essential Glue Pad. The results with flocking are better using this.

I adhered a very thin strip of double sided tape along the scored lines, avoiding the stitched impressions. I poured Elizabeth Crafts Warm Diamond to these strips and burnished the glitter using my finger. To make this pop, I drew a line around the rectangles using a Copic Marker.
I also added Doodlebug sequins.


To burnish the flocking powder, I covered the flocked sentiment with Swiffer cloth and used a bone folder to apply pressure to the flocked area. When I lifted off the Swiffer, it also picked up the extra stray flocking powder that I was having a hard time brushing off.

Is there a supply in your craft room that you have not used in a long time? How about you take a look and use it alongside with new released embellishments.

Thanks for viewing my blog. Have a blessed & brilliant day!

Maria Giselle B.

I am sharing this creation with