Thursday, August 14, 2025
Twofer One
Friday, August 1, 2025
Shaker, Wobbler Birthday Card, a Remake
Hello! Welcome back to my blog. A new month means a new challenge at Stick It Down Scrapbook and Card Making Challenge in FB. There are several opportunities to join with three sketches to choose from.
My Favorite Things just said its goodbye to its crafting era. I am saddened to see another great crafting company close its doors. I remember my first MFT product, which I still have, believe it or not. I also remember where I bought it, a brick and mortar store here in St. Louis, which sadly closed a long time ago. I also remember joining the MFT blog challenges, winning once last November 2021. Lots of great memories. It just shows how anything is vulnerable to the changing times. I want to thank Kim, MFT's owner, for all the great things she has brought to me in the crafting world. I wish her well and maybe I will cross paths with her again in the future.
This card is a tribute to MFT using MFT products from my card stash.
This is also a remake of a card I created a long time ago. I had a bit of technical malfunction with the shaker feature of that card. I really wanted a seamless shaker card at that time but I was not able to contain the shaker beads. With the developments and improvements in crafting, I was able to figure out how to fix this problem.
I stamped the images on watercolor paper using Tim Holtz Antique Linen Distress ink so I can do a no line coloring. I used the Misti Stamping Tool to stamp the images. With the texture of the watercolor paper, I needed to re-stamp the images. The stamping tool was a big help on this part.
I stamped five images from the MFT stamp set to follow the number of balloons on the sketch.
I colored the images using a newly acquired Kuretake Gansai Tambi Watercolors Noveau Set of 24. I already have the set of 36 colors and also own several single watercolor pans. I love this watercolor brand! The new set offers muted colors which is a great addition to the 36 color set.
After I watercolored the images, I fussy cut the images leaving a narrow border around it.
I used pattern papers from Doodlebug to complete my scene. I trimmed the green checkered paper at 4 1/4" x 5 1/2". I traced the wavy road die on this panel. I cut the panel on the traced lines and erased the pencil lines.
I die cut the wavy road die on a pebbled patterned paper. Using the split panel as guide, I positioned the wavy road die cut on a 4 1/4" x 5 1/2" light weight paper. I lightly traced this with a pencil. I colored this traced road with a black marker. This black coloring will show through the wavy road die cut.
I adhered the wavy road die cut to the white cardstock panel using the traced lines as guide. I erased the pencil lines. I lined the wavy road die cut with a double adhesive tape. I wrapped this panel with a left-over plastic film packaging leaving one of the ends open. The double adhesive tape served as a trap to keep the shaker elements. I poured seed beads on this wavy road pocket. It was a bit tough with the narrow opening that's why I chose a very small shaker element, seed beads. I closed the bottom flap to seal the shaker. Now I have a seamless shaker. This is the upgraded step of my previous card.
I stamped the sentiment on the larger green checkered paper piece. I treated this first with an anti-static tool. I stamped the sentiment using a red dye ink then stamped it using Versamark ink so I can heat emboss it with clear embossing powder. I used the Misti Stamping Tool for this purpose.
I adhered the checkered paper to the wrapped panel using liquid adhesive. I set this aside to dry.
I adhered one of the bear images on the road portion of the panel using a mini wobbler. I adhered the other bear image and the larger tree with foam adhesive. I adhered the other tree and the stop sign image with liquid glue. I used a portion of the negative die cut to ground the car.
This is the old version of this card having the same shaker and wobbler elements (https://ienjoywhatido.blogspot.com/2016/02/masculine-interactive-birthday-card.html).
Below is a short video showing the interactive elements of this card. It is scheduled to go live later at 4pm CST (My 13 year old posted it that way.) I hope you come back to see it.
I hope you join this month's Stick It Down Challenge. We can't wait to see your take on this month's sketches.
Have a blessed, brilliant and creative day!
Maria Giselle B.
I shared this project at
Sunday, October 1, 2023
Digging Through My Stash And I Came Up With This
Hello! Welcome back to my blog. As the title says, this card is a product of digging through my Halloween craft stash box. I have a designated box for Halloween because I used to create class give aways for my sons' Halloween parties. My sons have all grown up. I still have a 6th grader to whom I might still be able to create give aways.
I am also motivated to create this card to participate in Woodblock Wednesday's challenge.
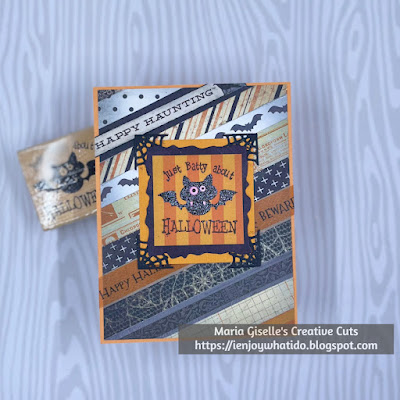
One of the left over crafts I have in my Halloween box is a die cut tag with this heat embossed bat. I trimmed the tag into a rectangle shape. I matted this with a black patterned paper die cut with a deckled rectangle die. I matted this with an orange cardstock. I added spider webs to the corners of the orange mat.
For the background panel, I arranged several scrap of patterned paper strips from my Halloween craft stash box. Once I am happy with the arrangement, I adhered this to a 4 1/4" x 5 1/2" scrap paper. I adhered the strips diagonally. I filled the whole panel with the paper strips. I trimmed off the excess hanging over the 4 1/4" x 5 1/2" panel. I lightly blended a black dye ink to the edges of this strip panel. I trimmed a sliver off each side, around 1/18". I adhered this to a 4 1/4" x 5 1/2" orange cardstock. Then, adhered it to a top folding A2 note card.
I hope today's project encourages you to look into your stash and come up with something new out of it. I enjoyed giving these strips of paper a new life. I am sure you will enjoy doing it too. Thank you for visiting my blog. Have a blessed, brilliant and creative day!
Maria Giselle B.
I am sharing this creation at
Saturday, June 11, 2022
Washi Tape Letter Die Cuts (Craft My Stash #23)
Saturday, May 21, 2022
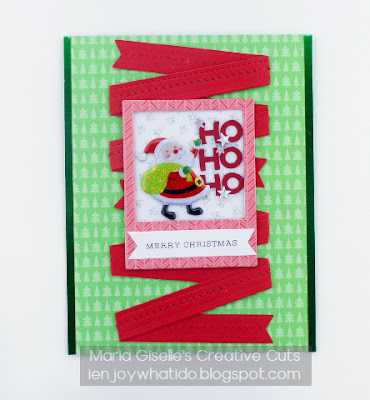
Sketch Inspired Christmas Card (Craft My Stash #22)
Hello! Welcome back to my Craft My Stash series in which I feature my oldie but goodie craft products. It has been a long time since I last added a post in this series. I am just so glad to get back on the swing of things.
I also created this card for the following reasons:
- To join in the Caffeinated Christmas Card Challenge on Flowers.
- To join in My Favorite Stamps Sketch Challenge.
- To join Simon Says Monday Challenge on Add Texture.
Saturday, December 11, 2021
Recipe Challenge Inspired Greeting Card (Craft My Stash #20)
Friday, September 3, 2021
Pop-Up Mini Christmas Tree (Craft My Stash #19)
Hello! I got motivated to create this project from the Lawn Fawnatics current blog challenge, which is on 3D Cards. I created a floral version of this pop-up card before which helped me put this project together. Check it out when you get the chance (Pop-Up Vase Card).
For this project, I am using the following Lawn Fawn products:
- Stitched Christmas Tree Frames-for the tree and the star
- Small Stitched Square Stackables-for the tree stand
- Mini Wreath-for the ornament
- Fancy Folded Banners
- Offset Sayings: Christmas
- Knit Picky 6x6" Petite Paper Pad
Friday, August 6, 2021
Waterfall Retirement Slimline Album (Craft My Stash #18)
Hello! Welcome back to another Craft My Stash post. For this post, I used a lot of my stash which made me proud of myself.
I was tasked to create something special for my friend and colleague who is retiring this year. This is not the first time I created something like this in which I asked my co-workers' participation, too. I will link the other project below.
I die cut mini note cards for people to write their message on. After I collected the cards, I created this waterfall slimline retirement card. Thanks to this tutorial by Mixed Up Craft, I was able to pull this one through. Several differences though: 1. My card is slimline sized.; 2. I have more waterfall elements.; and, 3. Each side of the card has a waterfall mechanism.
- Cosmic Shimmer Glitter Kiss Antique Rose Kiss
- Echo Park Summer Floral stencil
- Paper Smooches
- Avery Elle You die


