Showing posts with label AECP. Show all posts

Sunday, October 29, 2023

Painting with Stencils


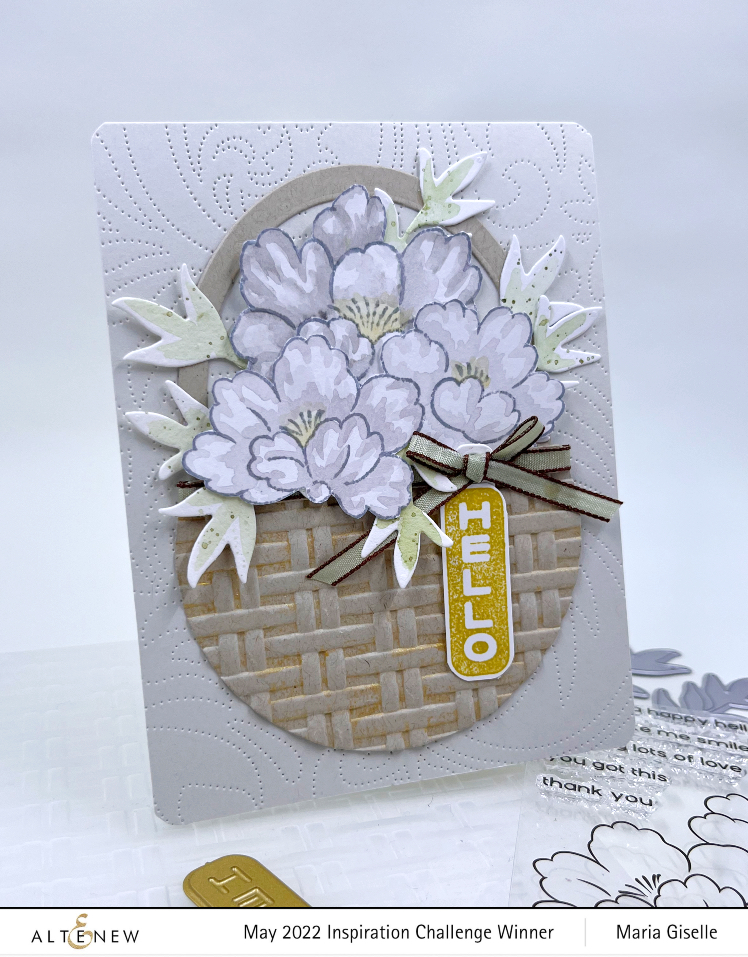
Hello! Welcome back to my blog. Today's card was created as part of my AECP 3 journey. I am showcasing what I learned from All About Layering 7, Stencils Edition. I chose Bridget's class of using watercolor with layering stencils as my inspiration in creating this card. 

I am using a black watercolor paper for my card. I trimmed it to a size that will fit the Altenew Silk Art coordinating die. I die cut this die on the black watercolor paper. As Bridget mentioned on her video, die cutting the image helps in alignment of the the stencil. I inlaid the die cut to the negative space and secured it with tape on the back. 

The stencil has some dainty parts and mines choose not to lay flat on the paper. I sprayed Pixie Spray to the back of the stencil to temporarily stick it to the watercolor paper. It didn't work on all the dainty parts, so I did Bridget's trick wherein you press the stencil down with your finger while painting around it. 

I am using Coliro Mica watercolor for the paint. As Bridget recommended, I tried my best to do a dry technique of watercoloring. If I feel that too much water seeped underneath the stencil, I lift the stencil up and dry the area with a paper towel. I used two colors for the leaves layer (layer #1), and three colors for the floral layer (layer #2). Don't forget to dry the paint in between coloring the layers. You can set it aside to dry or speed dry it with a heat tool.

I lost the details of the stamen created by layer #1 when I painted with layer #3. I added dots of white mica paint to the dots of the stamen. Feel free to paint the details or do some touch ups of the floral bunch if you wish or if you think it is needed. You don't need the stencil to do this. Just free hand paint it.

Just like in Bridget's video, I painted more leaves to a black cardstock for a layered look. I trimmed the black cardstock large enough to fit the floral die cut. I created a mask by die cutting a Press 'N Seal. This just works like a masking paper but the down sides are it is more flimsy than a masking paper, and the front side tends to stick to the stencil. But it works. I ran out of masking paper that's why I used Press 'N Seal instead. 

Using the painted floral bunch as a guide, I chose which areas I want to paint additional leaves on. I am just using an 80 lb. cardstock so I really have to keep the paint on a drier side to prevent it from warping. 


I adhered the floral bunch to the black cardstock panel. I flicked some gold paint over it. 

The floral bunch is larger than an A2 card. The floral bunch with the painted background is too pretty to have some of it cut off just to fit an A2 card. So, I created an A7 card (5" x 7"), which I rarely do. I matted the black panel with a gold cardstock.

For the sentiment, I created my own sentiment using the Altenew Sentiment Strips die set. I used two dies from this set to create my customized sentiment using partial die cutting technique. Instead of layering this die cut sentiment on another cardstock, I inlaid the letters on the sentiment die cut. I painted a scrap piece of black cardstock with the same red mica paint I used for the flowers. I die cut the letters on this painted panel, then inlaid it to the sentiment strip die cut. The watercolor paper is thicker than the cardstock which gave it a dimensional look.

I trimmed a gold cardstock strip to matte this sentiment die cut. There was too much space on the sides of the strip. I wrapped a gold embroidery floss around this strip to fill in that space. I adhered the sentiment strip on it.


I encourage you to look through your stencils and give this technique a try. Thank you for visiting my blog. Have a blessed, brilliant and creative day.

Maria Giselle B.

6/2024: Altenew decided to change its affiliate program starting this month. Below is my affiliate link to the website. I don't think I can directly link the products I used with this new program. Please feel free to do a product search. I will update as I figure this out. The good thing about this new affiliate program is that I get to earn on each Altenew product you purchase and not only on the product/s I used on this project. As before, there will be no additional cost to you if you make a purchase. It is just a way to help a fellow crafter sustain her love for crafting. While in the Altenew blog, don't forget to check out their new release for this month. Thank you for your support!


I am sharing this creation at

Sunday, April 16, 2023

Masculine Cards for AECP 2 Final Challenge

Hello! Welcome back to my blog. First & foremost, I want to apologize for a very long post. This is a celebration of me completing the AECP 2. I consider this the final exam of the program. 

Unlike the AECP 1, the final challenge for AECP 2 is less intense. I guess it is because I have gone through the courses so it is more easy for me. 

My chosen components for AECP 2 are as follows:

  1. Impressive Heat Embossing. Embossing is one of my favorite cardmaking techniques. A juicy sticky ink pad brings out the best results in embossing. The stamp positioner is a very helpful tool in re-stamping an image in case of missed spots. Don't forget to pre-treat the area that you will be embossing with an anti-static tool. Heat embossed images can act as a resist to inks, applied either by blending or watercoloring. An image with embossing preserves the color underneath it. Cards 1, 3 & 4 have some embossing done on it.
  2. Magic Marker. Who does not have a stash of markers and/or pens? I am guilty of this. Using markers to accent your stamped images is one way of using markers or pens. On my second card, I used a marker with a stencil. 
  3. Masking Unleashed. There are lots of ways to mask. You can use a masking paper, a masking glue or just simply emboss the image. This technique is further explained on my 3rd card.
  4. Easy Blending Techniques. With all the blending brushes out in the market, there are lots of possibilities in blending. Use a bigger brush for a large area and a detailed brush for a smaller area. Blending also allows you to experiment with colors. Just remember to always blend with a light hand. It is easier to add color to a lightly ink blended area vs. a heavily ink blended area. Pouncing your blender brush or sponge on a scrap paper first before blending the ink to your project usually removes the excess ink off the blending tool. Cards 1 & 3 both have ink blending done on it.

CARD 1: Coloring an image with Ink Blending and Color Pencils


Examine your image before heat setting the powder. Do not commit to heat setting the image if there are spots without powder. Pour powder again on these areas. If the powder still tends to slide off, it means that part of the image has no sticky ink on it for the embossing powder to stick on. If it is a huge part of the image, simply brush off all the powder onto a paper or to your embossing powder container. Re-stamp the image with the sticky ink. This is when a stamp positioner is very helpful. Pour embossing powder to the image. If the image is fully covered with powder, heat set it. 
 
Embossing and using a small blending brush are very helpful in keeping the colors within the lines. The blending above is not perfect but it gets better later on, I promise. This is what I call an undertone. With this image I did a sweeping motion of ink blending.

To add highlights, I used a color pencil. Be gentle when coloring near the embossed lines. We don't want to scrape off the embossing. But if it does get scraped off, I retouched the line with a white gel pen.


I smooshed ink on the background. I rubbed an ink pad on a glass mat and spritz this with water. I smooshed a watercolor paper on the ink. I dried this with a heat gun before smooshing the water color paper to another color. Just make sure you are using complementary colors or else you will end up with a muddy color. I flicked some pigment on the area too. On the photo above, I positioned the balloon so I would know where to stamp the sentiment. 

Despite re-stamping this sentiment, there seems to be a gap on that part of the letter F. So I retouched this using a black sign pen.


CARD 2: Adding Details using Markers


Secure the stencil to the cardstock with a non-tacky tape. This prevents shifting of the stencil during ink blending. For more intricate stencils, use a repositionable spray to temporarily adhere the stencil to the cardstock. 

Stencil over an area larger than your intended card size. This gives you an option to choose which part of your stenciled cardstock to use. Use the leftover piece, if you can, for another card.
Initially, I was struggling with this stencil on how to make the end result 3D looking. Despite the instructions included in the packaging, my end result is different from what the image in the packaging looks like. If you have struggles with a product you have, visit the manufacturer's website. Watch videos on how to use the product. This was very helpful to me in making me figure out what I was doing wrong. Write notes on a sticky note and insert this inside the package of the product for future reference. 

I used a marker to add highlights to the stenciled panel. I used the stencil as a guide to add lines. Felt pens dry quicker than gel pens. Let the gel pen dry first before taking the stencil off to avoid smearing the ink. 

Once I trimmed the stenciled panel to 4 1/4" x 5 1/2", I used the Misti Stamping Tool to stamp the sentiment on the panel. I used a light dye ink for the stamping so I can use a marker to write over the sentiment. Pardon my messy inky Misti. It just shows how much I use this tool in my crafting.

After I colored in the sentiment with a marker, I added an outline around the bold sentiment using a silver marker. The sub-sentiment is a one lined sentiment stamp. I masked a word to stamp one word at a time to change the stamp sentiment's look into a two-lined sentiment. Another option is to cut the one lined sentiment on the space between the words. 


CARD 3: Create a silhouette image using a detailed stamp


I usually lay out my stamp and/or die to know its placement on my card lay-out.

I stamped the image using the Misti Stamping Tool with a Copic friendly ink. I colored the image with a black Copic marker to make this detailed image into a silhouette image as seen below.

I am going to blend ink for the background. You can stamp the image on a masking paper and fussy cut it on the line. For my card, I applied sticky ink to the silhouette image using a Versamark pen. I poured clear embossing powder to it. I could have used a black embossing powder, too.

Using a Post-It note, I created a mask so I can create a background scene for the silhouette couple. I finished off this card by adding an embossed window cardstock panel over the scence. I sanded the embossed floral image then lightly blended a dark brown ink over the raised embossed area and also over the outer edge of the window panel. I also die cut an oval frame using brown cardstock which I also sanded and blended dark brown ink over it. The sentiment was die cut using white cardstock. I blended blue-green ink over the bottom half of the sentiment strip die cut to match the embossed window panel. I die cut extras so I can stack the sentiment strip die cuts on top of each other for a dimensional look.


CARD 4: Using floss for a window filler


I repeatedly stamped the star on a 4 1/4" x 5 1/2" green cardstock to create a background.

I heat embossed some stars to add interest to the background.

To another green cardstock panel, I did partial die cutting to create the stitching holes. I don't need to use the whole panel to add the floss. Also, I wanted the floss to meet at the center of the star shaped window.

To make sure that the star window will be die cut on the right spot of the embossed panel, I added a non-tacky tape to the non-cutting side of the star die. I laid this on the stitched panel, with the cutting side of the die facing up. I lined the embossed panel to the top of this stitched panel. I gently rubbed some pressure over the flipped embossed panel to make sure the tape will secure the star die to this panel. 

I gently flipped the panels sandwiching the star die, gave it another gentle rubbing pressure. I removed the stitched panel. Tada! The star die is adhered to the embossed panel just where I want it. The key here is to have both panels cut at the same size, and to make sure the stitching holes are centered on the panel.

I heat embossed a sub-sentiment on a strip of green vellum. I adhered this to the back of the star window panel to create a floating sentiment strip. I used the Misti Stamping Tool to help me with lining up both panels. Butting the card panels on one of the corners assured me that my panels are aligned. I also use this trick when I adhere my card panels to a note card. If you don't have this kind of stamping tool, a score board's corner can also be used for this purpose.

Now, the panels are aligned. The main sentiment is also heat embossed. Some parts of the sentiment were heat embossed over the already heat embossed stars. To be able to emboss over an embossing requires more than one stamping, thus, the stamping tool was very helpful in this regard. I used a dark green dye ink for the sentiments which is a fast drying ink. To be able to emboss this sentiment, after cleaning the sentiment stamp, I re-stamped the sentiment with a clear sticky ink, poured clear embossing powder over it and heat set it. 


Upcycle a Box into a Craft Storage Organizer

This is how I organize my craft supplies. I re-use sturdy boxes from grocery products.


Using a cardboard cutter, I cut the flaps off the box. I also cut the sides in an angle, with the front of the box lower than the rear portion of the box. If you have rough edges, use a sander to smoothen it out.

I painted the box with a white chalk paint. 

The bottom of the box has a rectangular hole where the seams did not quite meet. I covered this hole with one of the scrap cardboard cut up. I used a glue gun to adhere the scrap cardboard to the bottom of the box.
  
I trimmed one of my sons plastic binder divider and used it to cover the bottom of the box.

I painted each side of the box with Mod Podge glue using a sponge brush.I cut the tissue paper included in my Altenew order and adhered this to the side of the box.I smoothed out the tissue paper using a scraper. 

Now, I have a dedicated box for my Altenew products.

Thank you for visiting my blog. I hope you learned something from the cards I created. If you have any questions, feel free to post it in the comment section. 

6/2024: Altenew decided to change its affiliate program starting this month. Below is my affiliate link to the website. I don't think I can directly link the products I used with this new program. Please feel free to do a product search. I will update as I figure this out. The good thing about this new affiliate program is that I get to earn on each Altenew product you purchase and not only on the product/s I used on this project. As before, there will be no additional cost to you if you make a purchase. It is just a way to help a fellow crafter sustain her love for crafting. While in the Altenew blog, don't forget to check out their new release for this month. Thank you for your support!


I am sharing this creation at


Tuesday, March 14, 2023

Altenew Celebrating Parents Card Drive 2023 Blog Hop + Giveaway ($200 in Total Prizes!)


Hello! Welcome back to my blog. I am part of Altenew's Celebrating Parents Card Drive Hop. Altenew is hosting this card drive from 2/28/2023 to 4/17/2023. This card drive aims to honor and celebrate the fantastic parents and parental figures in our lives. Altenew will also donate $1 with every order from this collection (from 2/28/2023 until 5/14/2023) to the Food Bank of Central New York to support seniors in need. Details on how to participate in this drive is linked above. There is also a chance to win a $15 gift card to the Altenew store which is all detailed in the Altenew Card Drive blog.

I lost my parents in less than a year. My Amang (father in Filipino) last September 2021, and my Inang (mother in Filipino) last August 2022. It still hurts each time I face this realization but I find comfort in knowing that they are together and believing that a part of them is who I am right now.

The cards I created are also made in fulfillment of the AECP 2 courses. I will explain this later on in the blog.


My first card is a masculine themed card. I did an ombre embossing technique on the star which is one of the classes in the AECP 2 course on Impressive Heat Embossing. The star is from the Altenew Halftone Star stamp set. The trick to get a flawless ombre embossing technique is to use a stamping tool like the Misti which is very helpful with repeated stamping.

I added stitching to create a frame for the star. The stitching holes were created using the Altenew String Art Rectangle die set. The sentiment is from the same stamp set but I added the word 'rock' which is from the Altenew Label Love stamp set.


The next two cards are feminine floral cards. I am using the Altenew Sixties Sunshine bundle which includes a stencil set and a 3D embossing folder.


I traced the stencil on a cream cardstock using a brown gel pen, a technique inspired by the AECP Magical Marker Techniques course. The class is about drawing with stencils. To fill the background, I traced some of the flowers using a gold glitter pen. I created a holding paper for the cardstock, sort of like a jig, to temporarily adhere the cardstock I will be drawing on. I taped the stencil to this holding paper so it will not shift. Since I was using a gel pen, I traced the images slowly. 

The embossing folder pattern matches the pattern created by the stencil. I lined up the pattern of the embossing folder with the doodled pattern, then ran this through the embossing folder. I added color to the flowers by blending ink on the printed side of the embossing folder, then ran this through the die cut machine. I repeated this process for every color. Just make sure you are lining the right embossed image to the embossing of the folder. My embossing and inking are not perfect but I like it this way since I am going for an organic look. 


I am so amazed by this embossing folder that I created another card using an orange cardstock. I tried swiping a white dye ink to the embossing folder to lighten the color of the recessed areas of the card panel. I should have used a white pigment ink instead of a dye ink for a more dramatic effect. Something to think about later on. I blended a brown dye ink on the centers of the flowers for a bit of shading. I flicked Tim Holtz Distress Oxide sprays on the panel. I added stitching to the panel to tie up with the stitched sentiment.

For the sentiments, I heat embossed this on kraft cardstock. The sentiment is from Altenew Wild Hibiscus stamp set. I added stitching holes to frame the sentiment using the same die I used on the masculine card. I adhered this to the center of the embossed panels with foam tape. 

I trimmed a bit off the sides of these embossed panels. I adhered this to a vertical top folding A2 kraft note card. 

I hope you join Altenew's Card Drive. Let us show love to these parents through the power of cardmaking. Have a blessed, brilliant and creative day!

Maria Giselle B.


Giveaway Prizes

$200 in total prizes! To celebrate this release, Altenew is giving away a $50 gift certificate to 2 lucky winners and a $20 gift certificate to 5 winners! Please leave a comment on the Altenew Card Blog and/or each designer’s blog post on the blog hop list below by 03/20/2023 for a chance to win. Altenew will draw 7 random winners from the comments left on each stop of this blog hop and announce the winners on the Altenew Winners Page on 03/21/2023.


You are invited to the Inlinkz link party!

Click here to enter

6/2024: Altenew decided to change its affiliate program starting this month. Below is my affiliate link to the website. I don't think I can directly link the products I used with this new program. Please feel free to do a product search. I will update as I figure this out. The good thing about this new affiliate program is that I get to earn on each Altenew product you purchase and not only on the product/s I used on this project. As before, there will be no additional cost to you if you make a purchase. It is just a way to help a fellow crafter sustain her love for crafting. While in the Altenew blog, don't forget to check out their new release for this month. Thank you for your support!


I am sharing this creation at:

Sunday, March 5, 2023

March 2023 Stamp/Die/Stencil & More Release Blog Hop #2


Hello! Welcome back to my blog. Today is Altenew's March's new release. This is a huge release with lots of amazing products to choose from. All of my cards feature four products from this release. All of these products are linked below. 


The first two cards' designs are opposite versions of each other. I was planning to create the card on the left only which has an oval window on the center. After getting done with this card, I have a leftover of the oval negative die cut. I did not want to keep it for a later project, so I created a reverse design of the first card. 

For the second card, I die cut an oval on the same kraft cardstock I used on the first card. I matted the embossed oval piece with this. For the card panel, I stamped the huge flower stamp to create a background which is the background of the oval piece on the first card. I used the same washi tape to add strips to the top and bottom of the panel. The second card has more weight compared to the first card since the oval die cuts on the first card are inlaid. 


For my third card, I colored the flowers from the stamp set using Altenew Woodless Watercolor Pencils. When I color with this medium, I pick the pigment from the pencil with a water brush and put this on a palette. On this palette is where I either add more water to soften the pigment or mix pigments together to create new colors. I feel I have much more control in coloring when I do this technique. Remember to always start light with the colors. You can always add more pigment to make the image darker. For me, it is harder to lighten up a dark colored image. No matter how much water I add to the image to mute the color down, I cannot pick up the pigment anymore with a paper towel. Most likely the pigment is already absorbed by the paper. After I was done coloring these flowers, I realized that I was actually doing a technique I have learned from one of my AECP classes. The course is Beautiful Details on no line coloring. The light gray ink I used, despite being a water activated ink, did not soften with the water while I was coloring the image. Next time, I will do second generation stamping using this dye ink to lighten the ink some more.

I fussy cut the flowers, cutting it close to the outline. I die cut the solid leaves from the die set and also water colored it. I splattered green inks on these leaves. For the basket, I die cut a kraft cardstock using a circle die. I trimmed a portion of it to create the basket. I embossed this using the 3D embossing folder. I added a gold pigment ink to the embossing folder so it will transfer to the cardstock once it is embossed. For the basket handle, I created this using two nesting oval dies. 


I added details to the front of an A2 gray panel with the Altenew Dotted Swirls Debossing die. The sentiment was created using the same hot foil plate I used on the first two cards. But I did not do hot foiling with this card. Instead, I added dye ink to the hot foil plate. I laid a white cardstock over it and used a brayer to transfer the ink to the cardstock. 


For my fourth card. I stamp the flower image on watercolor cardstock. I used the Altenew Woodless Watercolor pencils to color these flowers. I fussy cut the image leaving a white border around it. 


For the panel, I trimmed a grayish-blue cardstock into 4 1/4" x 5 1/2". I trimmed two pieces. I trimmed one of the panels in an angle. I embossed this using the wicker embossing folder. I rotated the paper so that the diagonal edge will be lined up with the embossing. A part of the panel was sticking out; thus, it was not embossed. It is easy to line up the embossing with the folder to emboss the rest of the panel.


I flicked gold paint on the other panel. I adhered the embossed piece on this panel. I adhered the fussy cut flower to this panel using foam adhesive. The sentiment for this card was heat embossed this time using the same foil plate. 

Thank you for visiting my blog. I hope you find inspiration in today's post and find interest in the Altenew products that I used in my cards. 

Have a blesesd, brilliant and creative day!

Maria Giselle B.

Here is a link to Altenew's March Release Products: 


Giveaway Prizes:

$300 in total prizes! To celebrate this release, Altenew is giving away a *$100 gift certificate to 1 lucky winner and a $20 gift certificate to 10 winners! Please leave a comment on the Altenew Card Blog and/or each designer’s blog post on the blog hop list below by 03/12/2023 for a chance to win. Altenew will draw 11 random winners from the comments left on each stop of this blog hop and announce the winners on the Altenew Winners Page on 03/13/2023.

*The winner of the $100 gift certificate will be chosen from comments left on the Altenew blog. 


You are invited to the Inlinkz link party!

Click here to enter

6/2024: Altenew decided to change its affiliate program starting this month. Below is my affiliate link to the website. I don't think I can directly link the products I used with this new program. Please feel free to do a product search. I will update as I figure this out. The good thing about this new affiliate program is that I get to earn on each Altenew product you purchase and not only on the product/s I used on this project. As before, there will be no additional cost to you if you make a purchase. It is just a way to help a fellow crafter sustain her love for crafting. While in the Altenew blog, don't forget to check out their new release for this month. Thank you for your support!


I am sharing this creation at