Wednesday, November 29, 2023
Create a Shaped Card using a 3D Die
Friday, November 24, 2023
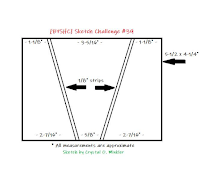
Sketch Inspired Card
Hello! Welcome back to my blog. I created a Christmas card for today's post based on a sketch and other challenge prompts.
I love that Lawn Fawn came up with stitching patterns to be used with their Embroidery Hoop die. I stitched the Cozy Cocoa Pattern for this card. I changed the colors of some of the embroidery flosses since I don't have all of the suggested colors. I modified the pattern by adding a holly to the mug.
I worked on the card base after I was done stitching. I added the sketch that I followed for this card at the end of this post. I used a Simon Says Stamp Graceful Holly 3D embossing folder on an emerald green cardstock. I applied color to the berries and leaves using Tim Holtz Distress Crayons.
For the center reverse triangle, I cut a Lawn Fawn holly pattern paper. I outlined these triangle with a gold Pebbles Merry Christmas washi tape which I adhered to a white cardstock first before adhering it to the sides of the the reversed triangle.
I die cut a stitched scallop frame using the Altenew Scalloped Circles die on a red cardstock and adhered this over the stitched panel. I adhered this to the bottom portion of the triangle.
I hope you like today's card. Have a blessed, brilliant and creative day!
Maria Giselle B.
I am sharing this creation at
Platform Pop-up Christmas Tree
Thursday, November 23, 2023
Fall Pop-up Vase Card
Tuesday, November 21, 2023
Cricut Cut Dog Shaped Ornament
Hello! Welcome back to my blog. Today's project was created for a friend, Linda, whose dog, Ollie, crossed the rainbow bridge. She has a vial encasing a snip of her dog's hair. She requested me to create something special with it.
I got this project's idea from a similar project I created for her a few years ago (More Cricut Cut Elves). I used my Cricut to create this dog. Luckily, there is a Bichon Frise file cut image in Cricut Design Space.
The image cuts the outline of the dog. I used the CDS Contour feature to create a solid cut for the backing of the dog. I also used this feature to create separate cuts for the dog's eyes, nose, lip and tongue so I can cut these pieces on a different colored cardstock.
Most of the pieces were cut on white cardstock. Without separating the positive and negative cuts of the dog, I colored the dog with gray Copic markers to add dimension to the dog. I adhered this to the solid dog piece.
I pieced in the eyes, the nose, the lips and the tongue to the digital cut. These pieces, except for the tongue, were cut on black cardstock. The tongue was cut on pink cardstock.
I added a heart to my Cricut Canvas. I resized this so it fits the dog's chest and it will fit the width of the vial.
To make it personalized, I added Ollie's name and today's year to the heart with the use of a foil pen. Cricut has a foiling pen accessory but I don't have one. Instead, I used the We R Memory Keepers Foil Quill tool to write on the heart.
Here is a link to the CDS file I used for this project, https://design.cricut.com/landing/project-detail/6557d2a6e00233f83add70a3, in case, you are interested.
It brings me joy when I make someone happy with my creations, especially if it is custom made. Thank you for visiting my blog. Have a blessed, brilliant and creative day.
 |
| Ollie |
Maria Giselle B.
I am sharing this creation at
Friday, November 17, 2023
Dry Embossing with Stencils and Some Happy Accidents
Hello! Welcome back to my blog. Today's cards were created as part of my AECP 3 journey. The course I am showcasing in today's project is from the course Stunningly Styled Stencils. I chose the technique Jenny demonstrated in her class on Dry Embossing with Stencils.
Yes! You can emboss with stencils. The impression is not as obvious as one made with an embossing folder but if you look closer at the finished product, you will see the impression created by the stencil. You can feel the subtle impression created by the stencil when you run your fingers on the embossed impression. I did my best to capture impression on photo by the stencil. I hope you can appreciate it.
Wednesday, November 15, 2023
Christmas Window Scene Card
Tuesday, November 14, 2023
Another Card & Envelope Set Using Digital Printed Paper Plus a Bonus Card
Hello! Welcome back to my blog. Today's card features a digital download printable by Blank Page Muse.
This set includes 9 Fall themed full printable sheets and 2 sheets of ephemera that are very suitable for the season. The great thing about digital print outs is that you can resize it the way you plan to use it. You can also crop a portion of a full sheet to suit your crafting needs.
I created a similar project, Card & Envelope Set Using Digital Printed Paper, using a different Blank Page Muse digital download printable. Click the link if you are interested to see it.
For the card, I cropped the plaid digital paper with the gnome. I only need the bottom part of the digital paper which has the word 'fall' on it. After cropping it, I re-sized it to 5 1/4" x 4".
I stamped the word 'happy' above the word 'fall' using Versafine Onyx Black ink. The paper I used has a shiny finish so I made sure to prep the area with an anti-static powder tool first before stamping the sentiment. I poured clear embossing to the sentiment, then heat embossed it. I inked the edges of this panel with a black dye ink.
I re-sized the orange digital paper to 5 1/2" x 4 1/4". I used this to mat the gnome paper.
I die cut a label on the same orange digital paper. I heat embossed the words 'you all' to this label strip using the same ink and embossing powder. I punched a small hole on the ends of this label die cut. I threaded a metallic embroidery floss through the holes. I cut the thread long so I it covers the width of the card front.
I adhered this panel to a top folding A2 kraft portrait note card. I added Ranger Glossy Accents to the hearts, then set it aside to dry.
For the envelope, I printed the other plaid digital paper on a full sheet of light weight 8 1/2" x 11" white cardstock. I created this paper into an envelope following the tutorial by Jenny Card Designs. There is no need for an envelope punchboard to create this envelope.
For the envelope front, I cropped and resized the other digital paper with the gnome. I heat embossed the word 'to' on the top left corner. I inked the edges with a black dye ink. I matted this with the same orange digital paper I used to mat the card. This edges of this panel was also ink blended with black dye ink. I adhered this to the front of the envelope.
Since I printed extras and while my craft supplies are out, I created another card. For this card, I cropped the yellow paper, cropping off the gnome and the pumpkins (That part of this paper was the one I used for the label on the front of the envelope.) I resized this to 4 1/4" x 5 1/2".
On the ephemera page, I cropped the wreath, the bow and the heart. I did not want to print the whole page of the ephemera that's why I cropped these images from the ephemera set. I printed these digital images on a light weight white cardstock.
I added details to the yellow panel using the Altenew Dotted Swirls Debossing die.
I die cut the sentiment on the orange digital paper. I also die cut this sentiment on black cardstock. I adhered the black sentiment die cut to the back of the orange sentiment die cut offsetting it for a shadow effect. To add a bit of dimension to this die cut sentiment, I die cut the sentiment again on a a scrap piece of cardstock, then adhered it to the back of the sentiment die cut.
I colored the top part of the sentiment die cut with an orange shimmer pen.
I fussy cut the wreath leaving a white border around it. I printed the plaid heart to use the pattern to fill the opening of the wreath. I die cut this paper with a burlap die. I added dimension between the wreath and burlap using stacked scrap cardstock.
I fussy cut the plaid bow leaving a white border around it. I used a round stylus to add curl the bow. I added a glue dot to the back of the bow, then added a metallic embroidery floss underneath it. I adhered this on the bow on the wreath using a glue dot.
I planned out the placement of my card elements. Once I was pleased with how it looks, I stamped the additional sentiment to the yellow panel. I adhered the wreath with adhesive foam. I adhered the sentiment with liquid glue.
I trimmed off the edges to make this panel into a 4" x 5 1/4". I adhered this to a top folding landscape kraft A2 notecard. I added Ranger Glossy Accent to the center of the flowers. I adhered a black bauble to the bow center. I adhered cream colored gems to the panel.
I hope you like today's cards. Thank you for visiting my blog. Have a blessed, brilliant and creative day!
Maria Giselle B.
Blank Page Muse is generously offering a 15% discount to their online store to YOU, my blog readers. Just use the code BPMMaria when you check out. Enjoy!
I also added below a link to the Altenew product I used on this card. There will be no additional cost to you should you decide to purchase this item. It is just a way to help a fellow crafter sustain her love for crafting. While in the Altenew blog, don't forget to check out their new release for this month. Thank you for your support.


.jpg)


