Showing posts with label Pop-up Card. Show all posts

Friday, June 13, 2025

3D Space Pop-up Card


Hello! Welcome back to my blog. I created this card to join the latest Lawn Fawnatics challenge. The theme is Up, Up, and Away!, create a project with fun things in the sky. 

I used a black watercolor paper for my card base. The size of my the panel is 8 1/4" x 6". It is a left over paper that's why the short end of the panel is smaller than usual but it worked.

I painted the panel with Finetec Mica paints to create a galaxy sky. I splattered white metallic paint over the panel. I forgot to tape the watercolor paper to a board so I had a bit of warping but hardly noticeable. After this panel has dried. I trimmed 1/2" off from each side of the long side. I scored this at 4 1/8" and used a bone folder on the fold for a nice crease. This painted panel will be the inside of the card.

The stamp I used is the Lawn Fawn Out of this World stamp set. I stamped the images on white cardstock and colored it with Copic markers. I stamped the images twice to create a mirror image. This stamp set comes with a coordinating die set which I don't have, but these images are easy to fussy cut. 

For the pop-up mechanism, I cut a square on acetate. I drew a spiral on a paper. This paper has the same size as the acetate. I used this paper as the template for the pop-up mechanism. I placed the paper behind the acetate and cut the acetate following the spiral line on the paper. I adhered the tip of the spiral acetate to the the right side of painted panel. I used Ranger Glossy Accents to adhere the transparency to the watercolor paper. 

I applied a dot of Glossy Accent on the center of the spiral and folded the card towards the acetate. After the Glossy Accent dried, the acetate pop-ups up when the card is opened. 

I adhered the planets to the acetate, adhering it back to back to sandwich the acetate and hide the glue. 

I created a foldable pop-up mechanism for the astronaut and the spaceship using a folded strip of cardstock. These images flatten when the card is folded and pop-up a bit when the card is opened. 

I heat embossed a sentiment using white pigment ink and white embossing powder. 


For the card front, I die cut the LF Giant Happy Birthday die on a black, starry patterned paper. I also die cut this on hollographic paper. I adhered the hollographic die cut on the back of the patterned paper die cut offsetting it for a shadow effect.

I adhered this to the front of the card. This sentiment die cut can stand alone because of its large size. Since I have an extra sun stamped, colored and fussy cut, I adhered this to the front of the card.


I die cut a smiley face from the LF Make Me Smile die set on a left over black watercolor paper.


I hope you like today's project. Below is a short video showing the pop-up mechanism of this card.


Have a blessed, brilliant and creative day!

Maria Giselle B.

I shared this project at


Sunday, October 20, 2024

Pop-up Spider Web Card


Hello! Welcome back to my blog. I created another card using my most used and favorite Kat Scrappiness product, the KS Creepy Crawly craft dies. 

I die cut the spider web on different white circle die cuts from my stash. I arranged this on a dark pink A2 notecard to create a background. I adhered the spider webs. I snipped off any spider web that is hanging over the edge of the card.


For the pop-up, I adhered a white cardstock onto a double sided adhesive sheet. I removed the release paper to expose the adhesive. I poured the Elizabeth Craft Designss Silk Microfine Warm Diamond Glitter on the adhesive. After I brushed off the excess, I burnish the powder to the adhesive by rubbing my finger on the powder. I die cut two pieces of the half spider web and the small spider on this glittered paper. I added dots of black enamel glue to the eyes of the spider.


I created the pop-up mechanism using strips of cardstock cut at 1/4" x 1.5". I scored the strip at 1/4" on the long side. After reinforcing the folds, I adhered the two overlapping ends of the strip to form a square. I created another piece of this. I adhered both pieces together, then adhered it to the inside of the card making sure the fold of the card is aligned with where the two squares meet. 


I adhered one of the glittered spider web on one of the squares making sure the straight edge of the spider web is aligned with the card fold. I adhered the other spider web to the opposite side of the card. After the glue has dried, I adhered the spider to the bottom part of the spider web.

Initially, the spider web won't open up despite when the card is opened. I think not all of the adhesive have glitter stuck to it. To prevent the spider web from being stuck closed, I brushed the spider web with a powder tool to neutralize the adhesive. 

The background was too bare for me. I don't have any KS Halloween themed stamp in my stash so I created my own stamp by die cutting the whole spider web die on a circle craft foam. I inked this DIY stamp with a pink dye ink and stamped it on the inside of the card.

I adhered washi tape to add sentiments to the card.


I hope you like today's card. Thank you for visiting my blog. Have a blessed, brilliant and creative day!

Maria Giselle B.

I added below a link to the Kat Scrappiness product I used on this card. There will be no additional cost to you should you decide to purchase this product. While you are at the Kat Scrappiness website, do check out their wide array of products. They have a new release, too! Enjoy!

I am sharing this project at

Saturday, December 16, 2023

Color Inspired Pop-up Display Card


Hello! Welcome back to my blog. I got my inspiration for today's project from the blog challenges linked at the end of this post. I also want to try out Jennifer McGuire's technique on creating Easy Pop-up Display Cards. Head on to the link for a video tutorial on how to make it.

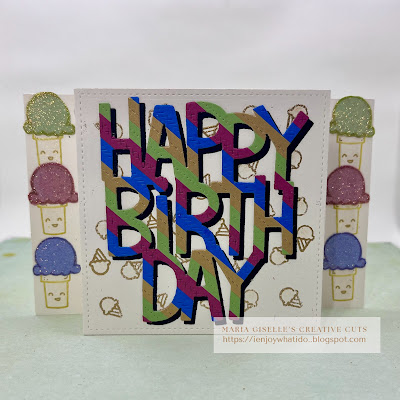
My card front for this pop-up card measures 4" x 4" which is the measurement of the Lawn Fawn Stitched Square that I used for this card. The whole length of an 8 1/2" cardstock is not enough to create the folds on the back of the pop-up card. So I had to make modifications to Jennifer's card. 

I cut a Lawn Fawn Speckled Eggshell cardstock at 4" x 8". I scored this at 2" and 6". 

For the back portion, I cut 2 pieces of 4" x 4 3/4" of the same cardstock. I scored this at 2". I trimmed a sliver off the short edge to fit into the fold of the first panel. This short edge will be the tab that will be adhered to the first folded panel.

For the front, I trimmed strips of different colored cardstocks following the colors of the Color Throwdown challenge which I linked below. I trimmed a typing paper at 4" x 4". I applied adhesive to this paper using a dot runner glue. You can also use a double adhesive tape if you prefer. I adhered the strips to this paper, making sure the strips are butted close to each other. I added stitching to the strips using the LF Stitched Borders die.

I die cut the LF Giant Happy Birthday die to this stripped panel. I also die cut the sentiment on black cardstock to create a shadow for the colored stripped sentiment die cut.

For the front panel of the pop-up card, I die cut the LF Stitched Square to a LF Speckled Eggshell cardstock as I mentioned earlier. I heat embossed the small ice cream stamp from the LF Party Animal stamp set to this panel to create a background. I used a gold embossing powder so it will tie in with one of the colors.


For the back folds of the pop-up card, I am using the ice cream stamp from the LF Here's the Scoop stamp set. I adhered double adhesive tape to the same colored cardstocks I used for the strips. I poured Elizabeth Craft Designs Silk Microfine glitter to the adhesive. I burnished the glitter to the adhesive using my finger. I stamped the outline ice cream scoop to these glittered cardstocks. I fussy cut it trimming it next to the outline.


I stamped the cone on the back fold using a Concord & 9th Stardust dye ink. I colored the cones with a Nuvo Midas Touch Aqua Shimmer pen. I also colored the small ice cream scoops on the front panel with this shimmer pen. 

I adhered the glittered scoops on top of the cones. I adhered the stiched panel to the front of the pop-up card. I adhered the shadowed die cut sentiment on the stitched panel. 

Just like Jennifer's card, I adhered a smaller stitched square to one of the flaps on the back for a place to write a sentiment. 


I hope you like today's card. Have a blessed, brilliant and creative day!

Maria Giselle B.

I am sharing this creation at


Friday, November 24, 2023

Platform Pop-up Christmas Tree


Hello! Welcome back to my blog. Today's card features a digital download printable by Blank Page Muse. 


This digital kit includes 9 printable designer papers and 2 pages of ephemera that are Christmas themed. The great things about digital kits are you can resize and crop it depending on how you will use it. 

I printed two sheets of the green digital paper at 8 1/2" x 11". I printed two sheets of the red plaid paper at 6" x 6". I cropped the snowman-music sheet, focusing on the top portion of the digital paper. I printed two pieces of this. I cropped the sentiment on the ephemera sheet.

I used a die from the Lawn Fawn Stitched Christmas Tree Frames to cut the green digital paper. I used the negative cut for this pop-up card. I die cut six pieces of the tree. 

I heat embossed one of the garland stamps from the BPM Beyond the Border Christmas set on the green digital paper. I used a silver powder for the embossing. 


I die cut the platform on the red digital paper. The die I used is the Lawn Fawn Platform Pop-up die. The die cuts a hole on the top of the platform for additional pop-ups. Since the tree is my only pop-up for this card, I covered the holes using the music digital sheet. I trimmed off any excess. I assembled this based on the instructions at the Lawn Fawn website. 

I scored each tree at the center. I folded the tree on the score line. I applied glue to the back of the scored tree, on half of it, then adhered the other half of a tree to this. I adhered the tab that will hold the tree in between the bottom of the trees. I continue this process until all six trees are glued together. 

For the star, I die cut this on a silver glitter paper. I die cut two pieces of the star. The die I used for the star is from the same Christmas Tree die set. I adhered a toothpick in between the die cut stars. I stuck the toothpick inside the folded tree.

I adhered the pop-up tab in between the platforms. I adhered the platforms together using a strong adhesive. 

I die cut the sentiment using a banner die from Lawn Flippin' Awesome die set. I adhered this to the front of the platform.


I hope you like today's interactive card. Have a blessed, brilliant and creative day!

Maria Giselle B.

Blank Page Muse is generously offering a 15% discount to their online store to YOU, my blog readers. Just use the code BPMMaria when you check out. Enjoy!

I am sharing this creation at


Friday, October 13, 2023

Weaved Christmas Tree Platform Pop-up Card (WCMD Card #3)


Hello! Welcome back to my blog. Some save the best for last. I think I did with this interactive card I created to celebrate World Card Making Day as prompted by Doodlebug's WCMD Challenges. I am using two 6x6 paper pads for this card, Frosty Friends and The Graduate. Yes, I used a graduation themed patterned paper. I will reveal which part of the card it is later on.


I die cut a plaid patterned paper using the Lawn Fawn Stitched Christmas Tree Frames die. I used the negative tree cut. I cut slits from side to side using a craft knife. I trimmed scraps of strips into a triangular shape. I threaded the strips through the slits. I glued the ends of the strips, and trimmed off the excess. I threaded glitter tape and ribbon through the strips. 

I die cut the Lawn Fawn Platform Pop-up die on gray star patterned paper from The Graduate paper pack. I die cut two pieces to create the platform and fits a 6x6 paper. This is the only paper from the The Graduate paper pad that I used for this pop-up card. Everything else is from the Frosty Friends patterned paper. 

The die creates score lines for folding. Reinforce the folds with a bone folder for a crisper fold. 

The top portion of the platform has two openings for additional pop-ups. I only have the Christmas tree as the pop up for this card so I won't be using these openings. To cover it, I traced this portion of the platform on a white patterned paper. I cut these pieces using the pencil marks as a guide. After I erased the pencil marks, I adhered these pieces to a double sided adhesive tape with the white portion adhered to the tape. I burnished the tapes with a bone folder. I removed the release paper and poured Elizabeth Crafts Silk Microfine Glitter to the tape. To activate the glitter, I rubbed it with my finger. I wiped off the excess glitter. I adhered these pieces to the top portion of the platform.

I assembled each platform using strong double sided adhesive. I adhered the tab die cut on the inner side of one of the platform pieces before adhering the other platform piece, sandwiching the tab die cut.

I adhered the weaved Christmas tree to the tab. I adhered another Christmas tree die cut to the back of the weaved tree for a clean look. 

I die cut two stars from the die set on a gray patterned paper. I embossed the stars with glitter embossing powder. I adhered the stars to the top of the Christmas tree, one on the front, and one on the back for a finished look. 

I embellished the Christmas tree with sequins. I added glitter drops to the center of the sequins. I set this aside to dry. 

I die cut the ribbon from the die set on a purple and blue patterned paper. I used a stylus to curl the ribbon for some dimension. I adhered the die cuts to the side of the platform. 


I apologize for a very long instructional post. I am still in the process of editing the process video of this card. Stay tuned! Thank you for visiting my blog. I hope you like today's project. Have a blessed, brilliant and creative day!

Maria Giselle B.

I am sharing this creation at

Monday, October 19, 2020

Faux Carved Paper Pumpkin


Hello! We have a new challenge at Incy Wincy Designs. Our challenge is on Halloween and/or Autumn-Fall Colours. We are working with a new sponsor, and I am so excited to work with their images.

The first time I saw this image, I knew it will be best to use it as a template to carve a pumpkin. The problem is I am not a pumpkin carver. So I designed a pumpkin made of paper. 


I am using a layered pumpkin image from Cricut Design Space. I uploaded the haunted house image to the CDS so I can make sure the sizes match. I used the slice feature to cut a circle window on all the layers of the pumpkin except for the back layer. I added inking to the front panel to make the pumpkin more realistic looking.

I printed the haunted house on vellum and set it aside to dry. I colored the back of the vellum using Copic markers. I die cut the image using a MFT Circle stack die. I ink blended one of the cut circles with Tim Holtz Distress inks to create a night sky and reinforce the sky of the colored digital image. 


I used cardstock to create the dimension. I was hoping I can flatten the pumpkin without distorting the dimension the folded cardstock creates but it cannot be flattened. It must be how I adhered these cubes of cardstock. Anyway, I think it would have been better to give this in a box since you have to add a tea light to complete the effect. 


I die cut a dome on the back two pumpkin panels to create a holder for the tea light. The tea light also supports the pumpkin but with the dimension, this pumpkin is sturdy. I used an oval die to create the dome cut. 


Thank you for visiting my blog. I hope to see your creations on the challenge blog. Have a blessed, brilliant and creative day!

Maria Giselle B.


I am sharing this creation at


Friday, July 21, 2017

City Pop-Up Card using Cricut


This card is inspired by my soon to be 11 year old son who loves the Cricut Destination cartridge so much. When I bought this cartridge, I knew he will love it. And, he does! He loves interactive cards, too. So I mashed those two ideas together and came up with this card.

The Cricut Design Space has been updated. It still does not work with Safari but otherwise, the upgrade is great! I am sure I have not discovered all of its features but so far, the feature that I love the most is while the current layer is cutting, I can edit where the image will be cut on the next layer. In this way, I can maximize a cutting mat more and not overuse the top corners of a cutting mat. Isn't that great?! If you have a favorite CDS feature, I would love to know it!


To create the pop-up mechanism, I cut strips of patterned paper & scored it in different widths, from a  1/4" to 1". I overlapped the ends using a strong adhesive to form a square or rectangle. I attached this to the back of the die cut and card panel. I also used square acetate in some areas for more not too obvious support in the pop-up movement. The key to this type of pop-up card is to train the scored squares and rectangles by closing the card shut, and opening it wide, pressing the scored squares rectangles at both times.


The background was splattered with gold Finetec watercolor. The Happy Birthday sentiment is from a Hero Arts Fancy Uppercase Die.


For the front, I die cut a gray cardstock using the scallop border die from American Crafts Daydreamer. I centered a globe stamp from Concord & 9th Map Love stamp set using Versamark ink. I applied Platinum Ranger embossing powder to this. I die cut the globe and a circle window using stacked circle dies from My Favorite Things. To create a flat shaker card, I cut a scrap plastic wrapping to a size big enough to cover the circle window. This gave me a plastic pocket attached only on one side. I used the We R Memory Keepers Fuse tool to secure the other edges after I poured in some Studio Calico sequins. I attached this to the back of the window using a double adhesive tape. This panel is then attached to the front of the card. I used the Altenew Label Love for the front sentiment, stamping it with Versafine Onyx Black ink and heat embossing this using clear powder.


Yrwin loves to play with the Cricut Design Space. I still have this project in my account cloud. He saw it...grrr! I told him it is for a project. He didn't asked further which is good or else the surprise is gone.

Thanks for visiting my blog. Have a blessed and brilliant day!

Maria Giselle B.

I am sharing this creation at


Tuesday, April 18, 2017

Pop-Up Scene Card


It is a new challenge at Incy Wincy Designs. The image I am using is from one of our sponsors for this challenge. The moment I saw this image, I knew I have to use it for an interactive card. I created a layered pop-up scene card! There are lots of detail in creating this card. I think the process of creating this card will be better described in a video tutorial. Too complicated and confusing if I try to post the instructions here in the blog. Anyway, if you have any questions on how certain parts of the card was created, feel free to post it in the comment section. I will get back to you as soon as I can. In the meantime, I am posting photos and a little description. Enjoy!


This is the front of the card. To unify the design of the card front and the inside of the card, I used sentiments from one stamp set, Mama Elephant. I used the same technique, heat embossing. And I used patterned papers from the same paper pad, Doodlebug Frosty Friends.


This is a shot of the card from the top showing my own created pop up mechanism. With the growing cardmaking industry, some companies sell pop-up dies to make these cards easy to create. I don't have one so I made my own pop-up mechanism using scored cardstock strips and a very strong adhesive.


A close-up of the scene. Aren't the images so, so cute? My mistake in placing my watermark on the banner but I hope you can appreciate it on the other photos.


I applied glue to the trim of the snowman's hat using a glue pen. I poured Wow! White Puff Powder embossing powder, heat set it, and look at that! 

Thanks for visiting my blog. I hope you join us at Incy Wincy Designs So,So Cute Challenge. I hope you find this creation a cute one. Have a blessed &. brilliant day! 

Maria Giselle