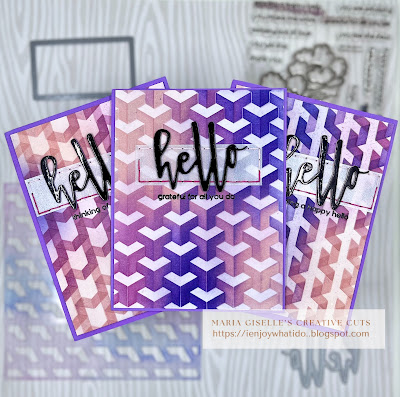
Hello! Welcome back to my blog. Today's cards were created as part of my AECP 3 journey. The course I am showcasing in today's project is from the course Stunningly Styled Stencils. I chose the technique Jenny demonstrated in her class on Dry Embossing with Stencils.
Yes! You can emboss with stencils. The impression is not as obvious as one made with an embossing folder but if you look closer at the finished product, you will see the impression created by the stencil. You can feel the subtle impression created by the stencil when you run your fingers on the embossed impression. I did my best to capture impression on photo by the stencil. I hope you can appreciate it.
I blended three ink colors on the stencil. My color inspiration came from the latest Altenew Challenge. The photos on the right are my attempt to capture the impression created with dry embossing using a stencil. It is not as noticeable on the first card compared to the next two cards.
I had quite a bit of struggle using the Altenew Weave Builder stencil. I went through 5 watercolor panels before I came up with the card above. The Altenew Weave Builder stencil is a one layer stencil that gets flipped to achieve the 3D look you see above. Somehow, with my failure with this stencil, I came up with two different patterns.
The above cards are my happy accidents in trying to create the weave pattern on the card on the first photo.
I hope you can see the impression created by the stencil on the last two cards. I think what made the impression stood out on these cards is that after ink blending and before flipping the stencil, I embossed the stencil to the card panel. With the ink blending on the flipped stencil, some of the ink colors got trapped on the impression adding more detail to the stenciled image.
After I blended the inks on both sides of the stencil, I inked the panel with the same inks to give it a mystic look. I trimmed the panels to 4" x 5 1/4" except for the weave pattern. I only trimmed an eight of an inch off each side on that panel.
I die cut the sentiment on a black mirror cardstock. I used a die from the Altenew Hello and Hugs die set. I die cut two additional scrap pieces of cardstock to layer behind the black die cut sentiment. Since I have a busy background, I created a neutral ground for the sentiment. I partially die cut a pearl vellum with a die from the Altenew String Art Rectangles die. I trimmed the excess off to create a small rectangle. I adhered the vellum to the panel. I reinforced the holes by poking it with a needle. I stitched an embroidery floss through the holes.
Before adhering the sentiment die cut, I embossed a supplemental sentiment to the panel using sentiment stamps from the Altenew Happy Blossoms Ensemble stamp set. I used the Misti Stamping Tool to precisely stamp the sentiment. I also anticipated that I will be re-stamping the sentiment because of the embossed impressions. I used Versafine Onyx Black ink for the stamping, and embossed this using clear embossing powder. I adhered the sentiment die cut to the pearl vellum making sure that the supplemental sentiment is not covered.
I adhered the panels to a DIY 4 1/4" x 5 1/2" inked light weight cardstock. I can't find a matching colored cardstock to matte my panels. So, I created my own by inking the edges of a white cardstock with Tim Holtz Wilted Violet Distress Oxide ink. I set this aside to dry.
Remember my rejected card panels? Instead of putting these back to my stash where most likely, I will forget about it, I trimmed these panels smaller than the embossed panels and adhered it to its back for a bit of dimension. I adhered this after to the DIY inked panels. These panels was then adhered to a top folding A2 note card.
I hope you like today's card. I only planned to create a card and here I am with two additional cards. I encourage you to try this technique and stretch the use of those stencils.
Thank you for visiting my blog. Have a blessed, brilliant and creative day!
Maria Giselle B.
6/2024: Altenew decided to change its affiliate program starting this month. Below is my affiliate link to the website. I don't think I can directly link the products I used with this new program. Please feel free to do a product search. I will update as I figure this out. The good thing about this new affiliate program is that I get to earn on each Altenew product you purchase and not only on the product/s I used on this project. As before, there will be no additional cost to you if you make a purchase. It is just a way to help a fellow crafter sustain her love for crafting. While in the Altenew blog, don't forget to check out their new release for this month. Thank you for your support!
I am sharing this creation at


Maria, the colours and the cards look SO cool!!! Love them!
ReplyDelete