Showing posts with label Flower. Show all posts

Friday, November 21, 2025

Color Inspired 18th Birthday Card


Hello! Welcome back to my blog. I have been commissioned to create a birthday card for a debutante. When I am tasked with creating a card, I usually ask about the recipient to customize the card. The only info I got is the party has a garden theme. I turned to the internet, specifically blog challenges, for inspiration. The Pinkfresh Studio Monthly Challenge was a great help in putting this card together. 

I stamped the floral cluster stamp from the PFS Best Thing stamp set on white cardstock. This stamp piece does not only have the floral cluster. It also has the bird. I only inked the cluster using a brown dye ink. I used the stencil to blend ink to the cluster. The colors I used are from the color palette in the monthly challenge. I die cut the cluster using the coordinating die. I created 6 pieces of this cluster.

For the card panel, I cut a blue cardstock at 4 1/4" x 5 1/2". Using the same cardstock, I trimmed a 3" x 4" panel. I die cut a design on this panel using a die from the PFS Classic Tags with Fillable Elements die set (retired). I backed this with a metallic green vellum.


I die cut the numbers on the same blue cardstock. I die cut multiples so I can adhere the number on top of each other for some dimension. I pounced Versamark ink on the top layer of the numbers. I poured iridescent blue embossing powder on the sticky ink then heat set it until the powder melted.

The sentiment is from the PFS My Favorite Things To Say stamp set. I did some masking to come up with the 'you' sentiment. I inked the words with the blue ink and Versamark ink and stamped the words on white cardstock. I used the same embossing powder I used on the numbers. Since the font of the word 'celebrate' is thin, not a lot of powder stuck to it. I fussy cut the word 'celebrate' leaving a small white border around it. I die cut the word 'you' into a strip. 


I positioned the floral clusters on each corner of the cardstock panel. Once I am happy with the placement, I lifted these pieces off the panel using a Glad Press 'N Seal. I adhered the vellum panel, then adhered the floral clusters, making sure the vellum panel is showing through the center opening created by the clusters. The clusters will have some overhang on the sides which I later on snipped off. 

I adhered the numbers, then the sentiment. I added blue sequins to the panel.


I hope you like today's card. Thank you for visiting my blog. Have a blessed, brilliant and creative day!


I shared this project at


Sunday, February 9, 2025

3D Tulips on a Square Vase


Hello! Welcome back to my blog. Today's project can be a Valentine's gift to a special person. Looks tedious to create but the end product will surely wow the recipient. 

I used the Kat Scrappiness Layered Tulip Bouquet craft dies on this project. I die cut the stem/leaf on green cardstock. I die cut extras to double up this die cut to make it sturdy for this project. Doing this step depends on what type of cardstock you are using. I used a heavy cardstock on the die cut on the right so I did not need to double it up. 

For the flowers, I cut the base layer of the tulips on pink, red and purple cardstocks. The craft die set comes with a piece to layer on top of this base die which I did not use on this project. The die set came with 3 tulip sizes. 


To achieve the 3D look, I cut a lot of this base layer. I used five die cuts per tulip. It is a lot of die cutting. I grouped the tulip die cuts, having five pieces of die cuts per group. 


I scored 4 die cuts in a group. The one that is not scored is for the backing of the flower.

I reinforced the folds using a bone folder.


I adhered one tulip die cut to the other, adhering half of the die cut with the other die cut until I adhered all of the 4 pieces. 

I set this aside to dry. I used a mini clothes pin to press the adhered tulip die cuts together while the glue is drying. I repeated this process until all tulips are assembled.

For the vase, I was going to use the KS Pop Up Box craft die but the side tabs were too short for the look that I want to achieve for my project. I did use the dimensions of the pop up box craft die on the vase. I just cut the tabs 1/4" longer than what the die cuts. The final measurements of the vase are 6 3/4" x 1 1/4" and 5 1/4" x 1 1/4". I cut 2 pieces of the longer piece. I scored these long pieces at 1/2" and 6 1/4". This will be the front and the back of the rectangular vase. For the shorter piece, I scored this at 1/4" and 5". This piece will be adhered on the center where the tulip bouquets was adhered.

I punched one of the longer pieces using a heart edge punch. I assembled the box. 


I adhered the 3D tulips to the stem/leaf die cut. I adhered the tulip that was not scored to the back of the 3D tulip.

I snipped a piece of gold mirror cardstock and adhered it to the stem. The craft die set comes with a bow die. The bow size was too large for my vase that I was afraid it will make the vase overcrowded. 

This tulip vase can be put up on display. 

I hope you like today's project. Have a blessed, brilliant and creative day!

Maria Giselle B.

I added below a link to the Kat Scrappiness product I used on this project. There will be no additional cost to you should you decide to purchase this product. While you are at the Kat Scrappiness website, do check out their wide array of products. Enjoy!

I am sharing this project at


Thursday, January 23, 2025

3D Floral Birdcage


Hello! Welcome back to my blog. Today's project was inspired by Pinkfresh Studio Blog's January Challenge in which you are given the opportunity to create a project based on any of the challenges held last year. My project is a mash up of the May, August and November challenges. May's challenge theme is Flower Power. August's challenge theme is Washi Tape. And, November's challenge is Thank you. 

I created a 3D Birdcage by die cutting 4 pieces of the cage from the PS Best Thing die set. I die cut this on a white cardstock. To connect the cage die cuts, I scored the base part of the cage that is sticking out. I folded this, squirted a small dot of glue on this portion and adhered another cage die cut making sure that these parts are aligned with each other. 


I trimmed a white cardstock at 1/2" x 2 3/4" to create the tabs that will hold the flowers. I scored this at 1/4" and 2 1/2". I adhered the folded piece to the bottom part of the cage. The tabs provided support to the intricate 3D cage.

I adhered the PS Garden Bouquet washi tape to a white cardstock. Using the coordinating die, I die cut the flowers. I adhered the ends of the flowers to the tab. I only used the small flowers on this project. 


I squirted a small dot of glue on the top edge of the cage die cut where the two cage die cuts meet to close the 3D cage. Surprisingly, the glue worked! I threaded a cream twine through the holes on the top of the birdcage to close it up. I knotted the twine, then threaded a pearl gold heart before tying the twine into a bow.

For the sentiment, I heat embossed a sentiment stamp from the PS Humbled & Grateful stamp set on vellum. I used Wow! Pearl Gold embossing powder. I die cut the sentiment using the matching die. I die cut another piece of vellum with this die and adhered this to the back of the stamped vellum die cut. I adhered the sentiment to the front of the 3D cage.

I adhered a couple of mini heart sequins to the rails of the bird cage. 


I hope you like today's project. Thank you for visiting my blog. Have a blessed, brilliant and creative day!

Maria Giselle B.

I am sharing this project at


Thursday, November 23, 2023

Fall Pop-up Vase Card


Hello! Welcome back to my blog. Happy Thanksgiving to you, all. I created this a while back but didn't get to post it until now. 

I created a similar project in the past; a smaller version for Mother's Day (Pop-Up Vase Card), and a slightly larger version for a special birthday girl (Pop-Up Vase Card and Mini Note Card). For today's project, I challenged myself to create a pop-up vase card using a larger floral stamp which will need a larger vase. I would like to thank Crystal Best for her very helpful tutorial specifically in sharing the paper size needed to create the vase and also where to score the trimmed cardstock. 

I used the Scrapbook & Cards Let's Stamp Together January 2022 kit to create the flowers and the leaves.

I stamped the solid flower on white cardstock. Instead of doing an ink to stamp technique, I used a blending brush to apply the ink to the solid stamp. I am using the Misti Stamping Tool which is a must for this kind of inking. Blending the ink to the stamp gives a softer look to the image. Depending on how juicy your ink pad is, you might have to re-stamp the image a couple of times. I used two shades of ink color per image. I blended the lighter color first before the darker one. I die cut the flowers using the coordinating die. 

To save time in die cutting, I placed a dot on a prominent part of the flower die using a permanent marker. I marked this spot on the  plastic film that comes with the stamp making sure that this dot matches the dotted spot on the metal die. 


For the floral centers, I blended the ink on white cardstock using the same ink I used on the flowers. I added the details by adding embossing paste over the stencil. Since the flower centers have small holes, it might be tedious to add the paste. Lifting the stencil somehow distorts the details. The trick to preventing this is to wipe off any excess embossing paste on the reverse side of the stencil before doing another floral center. This prevents the stencil from sticking to the paper.

After I applied the embossing paste, I poured Ranger Copper embossing powder to the embossing paste. I set this aside to dry before heat setting it. The embossing paste gives the embossing powder more dimension. I die cut the flower centers using the coordinating die. The die is also something you can fiddle with to find the perfect alignment with the floral center details but I don't think this matters a lot.

I layered the flower centers with extra die cuts for more dimension. I inked the edges to hide the white edge of the floral center. I adhered this to the center of the flower.

I worked on the leaves using the same inking technique. I die cut the leaves using the coordinating die.

For the flower stems, I used the Lawn Fawn Slide on Over die set. Who said these can only be used for sliders? I die cut the four long slider dies on brown cardstock, cutting doubles so I can layer these stems to give it some stability. I adhered this to the back of the flowers. To give it a finished look, I adhered another white floral die cut to the back of the flower. 

I trimmed a kraft cardstock for the vase using the dimensions mentioned by Crystal in her video. I assembled the vase per Crytal's tutorial.

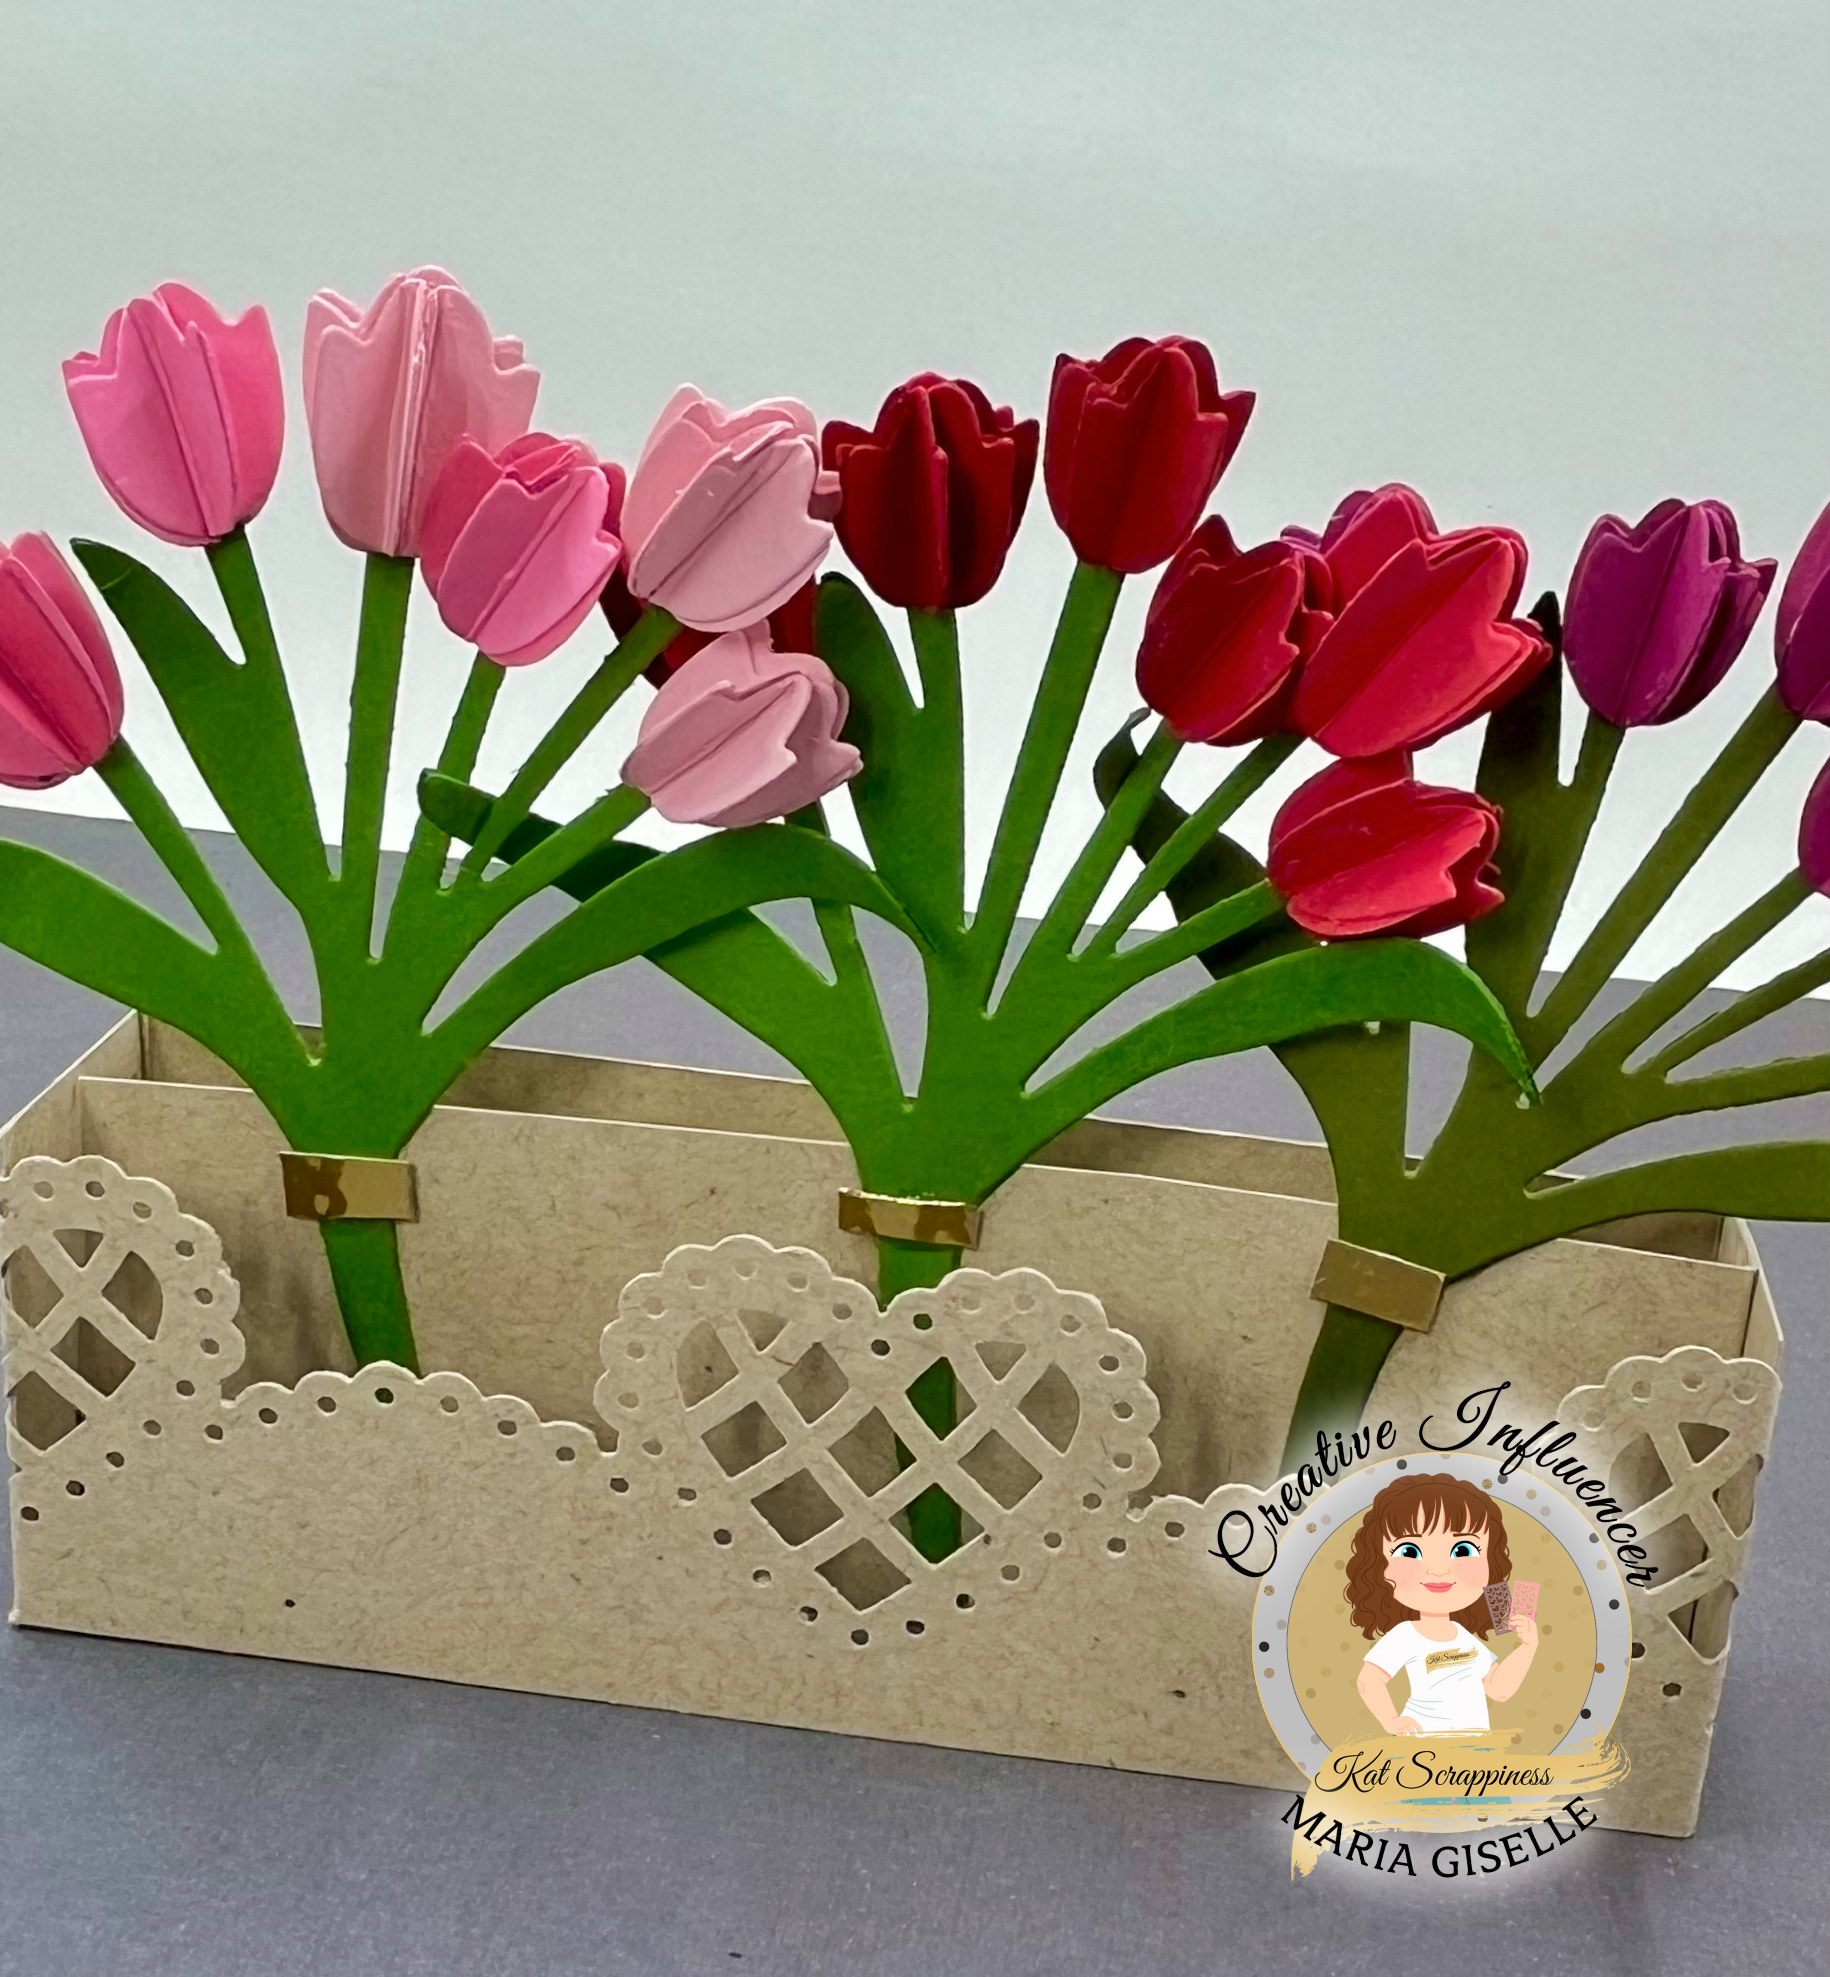
I started building my floral arrangement starting from the front and slowly increasing the height of the flowers. I was trying to limit the height of the flowers and the vase to 6", just like Crystal's, but I forgot that my vase has a wider width when flattened. I just need to make a customized envelope for this pop-up card to accommodate its size.

Adding the stemmed flowers is a messy, sticky job. I just eyeballed where I apply the liquid glue to the stem. Sometimes, the spot is not right so I have to add more glue leaving some glue residue to the area. Sometimes, the flower falls off so I have to re-glue the stem. Even my craft tweezers got glue all over it. Anyway, despite this mess, I think the end product is truly worth it. Good thing that I did not made any gluey mess on the flowers. 

Adhering the leaves is the next challenge since you only put a dot of glue to the tip of the leaf and adhere it to the back of the stem. 

Good thing that I delayed adding the vase details until after all the glueing is done. I was able to hide any adhesive mess underneath the rectangle details on the vase.

For the vase, I just trimmed an orange plaid patterned paper. I also doubled this with a light weight scrap cardstock. I inked the edges to give it a rustic look and hide the white core of the paper I used for layering.


For the sentiment, I heat embossed the sentiment stamp included in the kit on a woodgrain patterned paper. I adhered this to a kraft cardstock and used a craft knife to cut this into a rectangle. 

For the stick that holds the sentiment, I die cut this using a straw die from the My Favorite Things Mason Jar Mug die set. Yes, you read it right. I used a straw die to cut this out. You can also just trim a strip of cardstock if you don't have a die like this, or you can use a slim popsicle stick.

I also cut doubles of the straw so I can layer it to make it sturdy. I adhered the sentiment to this and adhered this to the vase. 

I hope you like today's project. I am thankful for your time in visiting my blog. Have a blessed, brilliant and creative day!

Maria Giselle B.

I am sharing this creation at

Friday, January 24, 2020

Stringed Window Card


Hello! It is my sister's _'th birthday on Sunday. It is a big milestone for her. To celebrate this, I created this card for her.

I was planning to do a no line watercoloring with the flowers from the Altenew Adore You stamp set. The result did not turn out well. Instead of putting it to waste, I lined put the flower stamp to the watercolored image and re-stamped this using the Misti Stamping Tool and Versafine Onyx Black ink. I can't believe I was able to line the stamp! I usually have troubles doing this that is why I don't have a lot of layering stamps.

The watercolor I used is Kuretake Gansai Tambi. I fussy cut the image leaving a small white border around the image.

For the card base, I am using a top folding heavy weight white A2 note card. I am using the Altenew String Art Rectangles die to pierce the holes. I also used a rectangle die to cut out the window. With the left-over rectangle die cut, I used a smaller rectangle die and a smaller string art rectangle die to create a smaller piece to be the center piece of the card. I temporarily secured this small rectangle with a piece of non-tacky tape before I started threading the floss from the frame to the center rectangle. Despite trying to keep the center rectangle at the center, it still ended up askewed, which is still okay. The card has a bit of warping after the stringing. To straighten the card, I placed the card under something heavy, like my Sizzix magnetic pad.


To hide the taped string ends and add some sturdiness to the front of the card, I die cut a frame and the same sized rectangle using white card stock. I adhered this to the back of the front of the card.


I adhered the flowers and leaves with liquid adhesive except for the middle flower, which I adhered with foam tape. For the sentiment, I stamped the Altenew Label Love stamp using a purple dye ink. I die cut this with a label strip die. I die cut a couple more of purple card stock using the same die. I adhered this to the back of the stamped sentiment strip. I traced the letters with a white Sakura Gelly Roll pen for a more pop of white. I adhered this to the center rectangle.

I truly enjoyed creating this card. I love stitching or stringing, in this case. Thank you for visiting my blog. Have a blessed, brilliant and creative day!

Maria Giselle B.


I am sharing this creation at


Saturday, October 26, 2019

Homecoming Wrist Paper Corsage


Hello! I created this flower for my Freshman's date to their Homecoming Dance. I am a first time parent to go through this experience. My older son, who is now 18 years old, did not show interest in this school event until he was a Senior. And, when he finally attended, he went with his friends.

I looked through several images in Cricut as to which flower to make. My 7-year old helped choose the flower. Of course, we could not agree on the same flower but I was able to convince him to choose the flower I like which is a Ranunculus. I used the Ranunculus image from the 3D Floral Home Decor but ended up using a different image. After two tries, I couldn't get the 3D effect that I am aiming for. My flower is no way close to the flower in the cartridge manual.

After my first failed attempt, I studied some more on how to create this flower by watching videos and reading online instructions. What I find most helpful to me is this post by Lia Griffith. I looked through my images and tried to find the closest flower image to the flower cut Lia used in her corsage. I used a flower image from Close To My Heart-Art Philosophy. I cut 8 pieces of this flower in staggering sizes using a thin white linen cardstock. I cut 3 sets using my Cricut Explore. I was going for a flower with a touch of pink. I sprayed the die cut flowers with Prima Color Bloom Cotton Candy Spray Mist. I dried this with a heat gun. I curled the petals using the Cricut Weeding Tool. I also cut a circle using a 1.5" circle punch and sprayed the same color mist to this.

I pretty much followed the technique Lia Griffith used in her video on DIY Stunning Paper Ranunculus Flower to make the flowers, and followed her technique to create the Wrist Corsage using the photo instructions I mentioned earlier.


I am glad my son liked the end product. He was quite apprehensive with this paper flower idea. Thank you for visiting my blog. Have a blessed, brilliant and creative day!

Maria Giselle B.


Thursday, May 17, 2018

Mother's Day Crepe Paper Flower


This is an extension of my previous post on Crepe Paper Flower Corsage. Since Mother's Day is a fews days away when I made the corsage, and while my supplies are out, might as well create more. For these flowers, I use an 9" 18-gauge floral wire to give it a long stem look. Otherwise, I created these flowers using the same procedure I used in the Crepe Paper Flower Corsage.


The tag is a die.cut using Paper Smooches Gift Tags 3 die. The sentiment is from Lawn Fawn Mom + Me stamp set. I heat embossed the stamp mom three times with Hero Arts White embossing powder to give it a puffed look. I inked the edges of the tag using Tim Holtz Vintage Photo Distress ink. I added a few gold flower sequins and put gold Nuvo drops to the center to cover the sequin hold. I attached this to the flower stem with a twine.


I gave these flowers to the three moms working the night shift with me. I wish I could have made more to give to moms of both shifts but I did not get to making more. I'll try again next year.

Thank you for visiting my blog. Have a blessed, brilliant and creative day!

Maria Giselle B.

Wednesday, May 16, 2018

Crepe Paper Flower Corsage


I feel like crepe paper is on trend right now, especially in creating paper flowers. I created this corsage for my sons' band teacher for their spring concert. It is an ongoing tradition that I can't seem to let go at the moment.

I got the template from marthastewart.com. If you are a visual learner, this won't be the tutorial for you. The tutorial for this flower is all in text. Also the link to the flower centers tutorial in this post does not work. I just searched the net for other flower tutorials. I created the peony in which the center is not hard at all to create.

Since this is my first time to play with crepe paper, I did no go for the nice, expensive brands available online. I bought mine from Michael's, which I got at 1/2 off. It comes in a 12x12 variety pack which is a good deal for a newbie on crepe paper.

I printed the template, following the instruction to upscale it to 33%. I folded the crepe paper, following the grain of the paper, so I can cut 6 petals right away. The template comes with several kinds of leaves. I cut several leaves.

I stretched the widest part of the petal to curl and curve it, to make it dimensional. I pinched the narrow tip. I also stretched the leaves.


I stretched a small piece of crepe paper to cover a small cotton ball, which I twirled into an 18-gauge floral wire. I secured this with floral tape. This is the flower center to which I started building the flower petals by adding one petal around it until I used up all the petals I have cut. I also attached the leaves using the floral tape then kept wrapping the floral wire until it is all covered with the floral tape. The only time I used a liquid glue is on the end of the floral tape. Somehow, the end would not adhere so I squirted a small amount of liquid glue to adhere this to the stem. The floral wire is about 9" long since it is a corsage.


I created a box to put in the crepe paper flower. I used the Martha Stewart Scoring Board to create the box. The lid of the scoring tool compartment comes with a guide on what size of paper to use and where to score for a certain finished box size. I die cut a window on the lid of box using Mama Elephant Union Square Creative Cuts. I heat embossed an acetate using My Favorite Things Music Sheet background stamp, and silver Hero Arts embossing powder.


Thank you for visiting my blog. Have a blessed, brilliant and creative day!

Maria Giselle

Saturday, December 30, 2017

Felt Flower Corsage


I am behind in posting my finished projects. With the amount of posts I am doing right now, you would figure out how busy I was this past month.

I always try to create something new for my 11 y/o's band teacher for concerts. This is the first felt flower I have created for her.

I tried cutting the felt using the Cricut Explore but I failed again. On this occasion, I ironed a freezer paper to the back of the felt. I positioned this freezer backed felt to the Cricut mat. Despite using the purple mat (Strong Grip Adhesive Mat), the felt moved. I really wanted to use felt so I cut the flower image on freezer paper. I ironed this on the felt and used this as a template to cut the flower. The cut is really simple so I probably didn't need a template.


I poked a hole on the center to thread through a floral wire. Making sure the glue gun is ready, I rolled the flower and squirted the hot glue to the base of the flower. I sprayed glimmer mist to the felt flower and set it aside to dry.

For the leaves, I used the Ellen Hutson Bold Blossom Stand-Alone die. I adhered this to the base of the flower using glue gun. I covered the wire with floral tape.


I also created my personalized gift box for the flower corsage. I used the Martha Stewart Scoring Board to create the cardstock base and the acetate lid. Before I scored the acetate, I stamped the My Favorite Things Sheet Music Background Cling stamp using an Opaque White Stazon Opaque ink.

Thank you for viewing my blog. Have a blessed and brilliant day!

Maria Giselle B.

Wednesday, May 10, 2017

Cricut 3D Flower Corsage


It is the time of the year when my son, who is in band, will have their last concert for the school year. I failed to post the flower corsage I made for his band teacher during the winter concert, so, I will post a photo of that flower corsage at the end of this post. Unfortunately, since it has been months since I made that rose, I don't have the exact measurements of that flower.

For the Spring flower corsage, I cut a patterned paper @ 8" wide. I inked the edges gently using TH Distress Oxide Worn Lipstick to hide the white core of the patterned paper. I poke a hole at the center through which I inserted a floral wire. I twirled the paper using a quilling pen. A glue gun is a must for this kind of project to secure the twirled flower to the base which also secures the floral wire. I curled the petals out to make the flower realistic looking. I sprayed the flower with pearlized water. I squirted some Nuvo Crystal on the center of the flower. I set this aside to dry.

I cut a green patterned paper for the leaves. I secured the leaves to the base of the flower using glue gun. I was afraid the leaves will be ripped since the patterned paper is not thick. I applied Ranger Multi Media glue to the back of the leaves.  I am hoping that once the glue dries, it will add some stability to the leaves. I also brushed glittered Stickles to the top of the leaves.

I wrapped the floral wire with a floral tape. I then, created a bow, using a sheer ribbon.


For the box, I cut a 7"x7" white cardstock. Using the Martha Stewart Scoring Board, I scored this at 3" and 5". I rotated the paper & scorted it on the same marks. I heat embossed my store logo to the inner bottom panel of the box before adhering the sides. I used acetate for the box cover.

I always struggle with coming up with the right measurement to create the size of flower I have in mind. Since this is 3D, the flower size in the canvas in Cricut Craft Room is larger than the size of the 3D flower once it is twirled and assembled. I added a comparison photo here between a 6" cut and an 8" cut flower.


And, here are the photos of the winter flower corsage.


Thanks for visiting my blog. Have a blessed & brilliant day!

Maria Giselle B.