Thursday, December 28, 2023

Altenew's A Year in Review IG Hop


Hello! Welcome back to my blog. I am so honored and delighted to be a part of this year's Altenew A Year in Review IG Hop. I added the link to the start of the IG hop and my IG below in case you want to join the hop which I highly encourage you to do. You don't only get inspired but you also have a chance to win a prize. 


Above are the cards that I  chose as my top most Altenew creations, three of which were created as part of my journey in AECP 2. You will learn more about what's special about each card below. I also included the link to the blog post of each card in case you are interested on the card details.


I love how this monochromatic card turned out. Using embossing powder added some texture to the card and prevent it from looking flat. My friend Janice loves this card so much that I gave it to her for her birthday this month.


I have lots of pens in my stash. Being able to use my pens on one of the cards above brought me joy since I am not limited to using my pens to writing only. Being able to stitch on a card also brings me joy since paper stitching is one of my favorite techniques.


Being able to participate in Altenew's March 2023 Stamp/Die/Stencil & More Release Blog Hop is my biggest crafting career break this year. It was such a great experience. 


I was only trying to create one card for the completion of my final course in AECP 3. The two cards on the back are happy accidents making me have 3 cards total using the same craft supplies. 


Don't forget to hop and leave some lovely comments to the designers who are participating on the blog. In return for your precious time, you get a chance to win one of the giveaways.

Thank you for visiting my blog. Have a blessed, brilliant and creative day!

Maria Giselle B.

6/2024: Altenew decided to change its affiliate program starting this month. Below is my affiliate link to the website. I don't think I can directly link the products I used with this new program. Please feel free to do a product search. I will update as I figure this out. The good thing about this new affiliate program is that I get to earn on each Altenew product you purchase and not only on the product/s I used on this project. As before, there will be no additional cost to you if you make a purchase. It is just a way to help a fellow crafter sustain her love for crafting. While in the Altenew blog, don't forget to check out their new release for this month. Thank you for your support!


Sunday, December 24, 2023

A Merry Pink Christmas

Hello! Welcome back to my blog. I created a pink Christmas card for today's post which is a non-traditional Christmas color. 

The stamps I am using for this card is from the Blank Page Muse Beyond the Border Christmas stamp set. 

On a 5 1/2" x 4 1/4" pink cardstock panel, I repeatedly stamped the snowflake border stamp but before doing this, I treated the panel with anti-static powder tool. The embossing powder I used is the Ranger Seafoam White embossing powder. 

I cut a triangle on different hues of green cardstock. I stamped the vine border stamp on these trees using the Wow! Embossing pad. I pounced a green Ranger Pearl powder to the sticky ink.

I wrapped an embossing floss around the tree.

I die cut the letters on a silver matte paper. I die cut additional letters to create dimension on each letter. I adhered this on the tree.

For the tree trunks, I used a die which is originally intended to die cut a coordinating pencil stamp. I die cut the trunks on a wooden print patterned paper. I adhered this to the back of the triangles.


I die cut the snow slope using the Lawn Fawn Stitched Hillside border die on a pink cardstock. I stamped the garland border on this slope die cut. I pounced a pearl Ranger Pearl powder to this. 

I was going to heat embossed the sentiment on the slope but the pearlized stamped impression still attracts embossing powder despite heating it with a heat gun to dry it so I just stamped the sentiment with a white pigment ink. 

I hope you like today's card. Have a blessed, brilliant and creative day!

Maria Giselle B. 

Blank Page Muse is generously offering a 15% discount to their online store to YOU, my blog readers. Just use the code BPMMaria when you check out. Enjoy!

I am sharing this creation at


Friday, December 22, 2023

Stitching on Texture Plate


Hello! Welcome back to my blog. If you've been following me, you know that I love to stitch. Today's card is an example of my love for stitching. For this card, I am using The Greetery Aida Cloth Texture Plate. The moment I saw this product released, I fell in love with it right away. 

Most of the projects I saw using this texture plate is either using it for a background or stamping on it. The plate creates these these tiny holes. There are 7 boxes or spaces in between the holes per inch on the textured plate. It is recommended to use 6 strands of floss with this count but I only used 4 strands which came out okay. The stitching pattern I used is from Lawn Fawn

I stamped the mug on white cardstock. I colored the mug with Copic markers. I fussy cut the image leaving a small border around it. I incorporated the mug to the design by adding stitching to the handle to make it look like the snowman is holding the cup. 


I die cut a snowflake frame for the stitched snowman. The snowflake die is from Hero Arts. I used a My Favorite Things circle die to cut the window. I added details to the snowflake frame using a Simon Says Stamp 3D embossing folder. I lightly swiped a gray pigment ink to the embossed details of the snowflake frame. I die cut another snowflake frame to add a layer to the embossed snowflake frame.

I trimmed a bit off the edges of the stitched panel. I matted the panel with the same blue cardstock I used for the snowflake frame. 

I embossed the sentiment using a stamp and coordinating die from Lawn Fawn. The silver embossing powder I used is from Simon Says Stamp. I die cut additional labels and layered this underneath the embossed sentiment.

I stamped several snowflakes on the Aida background for additional details using a gray pigment ink. 

I added clear gems to the tips of the snowflakes. 

I hope you like today's card. Have a blessed, brilliant and creative day!

Maria Giselle B.

I am sharing this creation at

Saturday, December 16, 2023

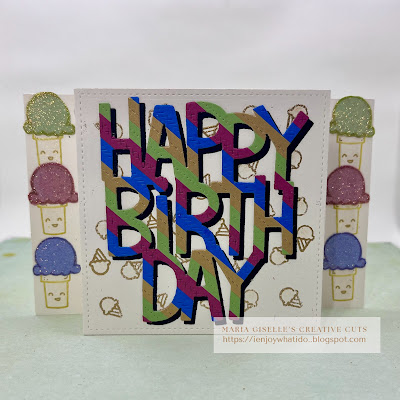
Color Inspired Pop-up Display Card


Hello! Welcome back to my blog. I got my inspiration for today's project from the blog challenges linked at the end of this post. I also want to try out Jennifer McGuire's technique on creating Easy Pop-up Display Cards. Head on to the link for a video tutorial on how to make it.

My card front for this pop-up card measures 4" x 4" which is the measurement of the Lawn Fawn Stitched Square that I used for this card. The whole length of an 8 1/2" cardstock is not enough to create the folds on the back of the pop-up card. So I had to make modifications to Jennifer's card. 

I cut a Lawn Fawn Speckled Eggshell cardstock at 4" x 8". I scored this at 2" and 6". 

For the back portion, I cut 2 pieces of 4" x 4 3/4" of the same cardstock. I scored this at 2". I trimmed a sliver off the short edge to fit into the fold of the first panel. This short edge will be the tab that will be adhered to the first folded panel.

For the front, I trimmed strips of different colored cardstocks following the colors of the Color Throwdown challenge which I linked below. I trimmed a typing paper at 4" x 4". I applied adhesive to this paper using a dot runner glue. You can also use a double adhesive tape if you prefer. I adhered the strips to this paper, making sure the strips are butted close to each other. I added stitching to the strips using the LF Stitched Borders die.

I die cut the LF Giant Happy Birthday die to this stripped panel. I also die cut the sentiment on black cardstock to create a shadow for the colored stripped sentiment die cut.

For the front panel of the pop-up card, I die cut the LF Stitched Square to a LF Speckled Eggshell cardstock as I mentioned earlier. I heat embossed the small ice cream stamp from the LF Party Animal stamp set to this panel to create a background. I used a gold embossing powder so it will tie in with one of the colors.


For the back folds of the pop-up card, I am using the ice cream stamp from the LF Here's the Scoop stamp set. I adhered double adhesive tape to the same colored cardstocks I used for the strips. I poured Elizabeth Craft Designs Silk Microfine glitter to the adhesive. I burnished the glitter to the adhesive using my finger. I stamped the outline ice cream scoop to these glittered cardstocks. I fussy cut it trimming it next to the outline.


I stamped the cone on the back fold using a Concord & 9th Stardust dye ink. I colored the cones with a Nuvo Midas Touch Aqua Shimmer pen. I also colored the small ice cream scoops on the front panel with this shimmer pen. 

I adhered the glittered scoops on top of the cones. I adhered the stiched panel to the front of the pop-up card. I adhered the shadowed die cut sentiment on the stitched panel. 

Just like Jennifer's card, I adhered a smaller stitched square to one of the flaps on the back for a place to write a sentiment. 


I hope you like today's card. Have a blessed, brilliant and creative day!

Maria Giselle B.

I am sharing this creation at


Friday, December 15, 2023

Cats, Sketch and Colored Inspired Christmas Card


Hello! Welcome back to my blog. My card is full of inspiration. The most important inspiration is my sister's cats, Tisoy and Bibi. I always try to color any cat images with these two in mind. I also pulled my inspiration from two ongoing challenges which I linked below.

The stamps I am using for this card is from Ink Blot Shop. When I saw these cat stamp images, I fell in love with it right away. I am so glad that I have acquired this stamp set during the Thanksgiving sale. 


I used Tim Holtz Distress Spray Stain, Distress Ink and Distress Crayons for my coloring mediums. I used a Mica paint for the green cat embellishments. I used a Mica spray for the splatters. 


I hope you like today's card. Thank you for visiting my blog. Have a blessed, brilliant and creative day!

Maria Giselle B.

I am sharing this creation at


Thursday, December 14, 2023

Tiled Design Christmas Card


Hello! Welcome back to my blog. The stamp I used on this card is the Blank Page Muse Beyond the Border Christmas set. The trees stamp is vertically oriented. To give this stamp a new look, I stamped the trees on different colored cardstocks. I used a slightly darker colored ink for each colored cardstock to make the trees pop-out. To make the trees pop out some more, I embossed the trees with Ranger Holographic embossing powder. I used a Misti Stamping Tool for precise stamping with the dye inks and the sticky ink. 

I trimmed the tree border close to the edge of the image. I trimmed each tree separately to create five trees. All I had to now is to create a background using these cut up trees. 

I adhered the cut up trees to a 4 1/4 x 5 1/2" typing paper. I die cut this paper into a 4" x 5 1/4" panel. I adhered this to a pink cardstock die cut at 4 1/4 x 5 1/2". I used a stitched rectangle die to die cut this pink panel.


For the sentiment, I wanted a small, simple sentiment so that focus will not be taken away from the tiled background. I stamped the sentiment on a pink cardstock, the same cardstock I used for the tree and the matte. I used the same pink dye ink I used for the tree to stamp the sentiment. I stamped the sentiment with sticky ink and poured the same hollographic embossing powder over it, then heat set it. I trimmed this into a sentiment strip. I adhered another sentiment strip to its back for a bit of dimension. 


I hope you like today's card. The holographic powder gives the the tree different kinds of shimmer depending on how the light hits it. Thank you for visiting my blog. Have a blessed, brilliant and creative day!

Maria Giselle B.

Blank Page Muse is generously offering a 15% discount to their online store to YOU, my blog readers. Just use the code BPMMaria when you check out. Enjoy!

I am sharing this creation at

Friday, December 8, 2023

Using a Border Stamp to Create a Background


Hello! Welcome back to my blog. I can't believe that we are down to the last month of the year. One of my Christmas traditions is to send out my handmade Christmas cards to family and friends. I used to create a bunch of the same cards. Now, I mail the Christmas cards that I created during the year.

I am using a stamp from the Blank Page Muse Beyond the Border Christmas set. The Christmas tree stamp I used on this card is very unique. Most tree stamps have the tree next to each other, side by side. This stamp has the trees next to each other but with a vertical orientation.

I prepped a 4 1/4" x 5 1/2" green cardstock with an anti-static powder tool. I repeatedly stamped the Christmas tree border stamp on this panel using a Wow! Embossing pad. I poured Wow! Jealous Guy embossing powder to this panel, then melt the powder with a heat tool. 

I spritz some pearlized water over this panel for some shimmer. I dried this panel with the heat tool making sure that I move the heat gun constantly so as not to activate the already melted embossing powder.

I embellished the tree with red dots using Nuvo Autumn Red Crystal Drops. I used the head of a flat head pin in applying the red glue drops to the tree. I squirted the red glue on a scrap paper and picked the glue using the head of the pin. I lightly touched the glue to the embossed tree. I set this aside to dry.

To add more bling to this panel, I adhered tiny hollographic star die cuts on top of each tree. 

The sentiment was die cut on red cardstock. 

My stamping was more towards the right side of the panel. To balance this out, I trimmed a sliver off the left side. I adhered this panel to a top folding A2 note card. I trimmed a thin strip of red cardstock, and adhered this to the left side of the panel.

I hope you like today's card. Thank you for visiting my blog. Have a blessed, brilliant and creative day!

Maria Giselle B. 

Blank Page Muse is generously offering a 15% discount to their online store to YOU, my blog readers. Just use the code BPMMaria when you check out. Enjoy!

I am sharing this creation at


Friday, December 1, 2023

Color Inspired Card


Hello! Welcome back to my blog. I got my inspiration for this card from the challenges listed at the end of the post. 

I created a full panel mask by trimming it at 4 1/4" x 5 1/2". I die cut a heart on the center using a heart die from the Hero Arts Nesting Hearts die. 

I trimmed an 80 lb. white cardstock at 4 1/4" x 5 1/2". I adhered the mask with the heart window to this panel. 

I inked the stamp concentrating the inking more on the area where the heart is on the panel. To get the best impression using this large wooden stamp block, I lay it on a flat surface, ink it and put the paper on the stamp. You can run your fingers on the paper to transfer the ink but I used a brayer instead.

I pieced in the heart paper mask before removing the full panel window mask. I used two different inks for the rest of the panel. I stamped one color at a time. I got lucky that there was no distortion on the seam where the two colors met. I think cutting the panel the same size as the stamp made the repositioning of the paper over the wooden stamp easy since all I needed to do was align the paper to the stamp.

I trimmed this panel to 4" x 5 1/4".


Using the same inks, I blended the ink to tone down the white paper. I also blended the two inks where it met for a seamless look. I embossed this panel using an embossing folder with the same triangle pattern to add some texture.

Using the same heart die I used for the mask and the next largest size heart die, I created a heart frame on peach cardstock. I die cut two pieces of heart frame. I also die cut a heart on vellum using the smaller heart die. I sandwiched the vellum in between the two heart frames.

I stamped the butterfly on white cardstock using the same inks I used for the panel. The butterfly stamp is from a past Hero Arts This Monthly Hero Kit. Using the coordinating die, I die cut these butterflies. I scored the butterfly on the center. Using this score line as a guide, I poked holes on the center of the butterfly die cuts. I hand stitched the butterflies together using a clear thread. I outlined the butterfly's antennae with a shimmer pen.

For the sentiment, I stamped this on the same peach cardstock I used for the heart frame. I stamped this using Versafine Onyx Black ink. This sentiment stamp is from the same HA This Monthly Hero Kit. I used a craft knife to cut this into a label. 


I adhered the heart frame to the panel, aligning it to the inked heart on the panel. I added liquid glue to the back of the butterfly and adhered this to the vellum portion of the heart. I adhered the sentiment label after. 

I matted this panel with the same peach cardstock I used for the frame which was cut at 4 1/4" x 5 1/2".


I opened each wing up. I added color coordinating sequins to the each butterfly. The sequins kind of help in keeping the wings slightly open.

Thank you for visiting my blog. I hope you like today's card. Have a blessed, brilliant and creative day!

Maria Giselle B.

I am sharing this creation at


Wednesday, November 29, 2023

Create a Shaped Card using a 3D Die


Hello! Welcome back to my blog. Today's card was created using items from my craft stash. Would you believe that I used a die to create a 3D gift card holder for this card? Yes! I used the Honey Bee Gift Card Present Box on this card but instead of making it into a gift holder, I used some of the dies in the set to create a card. 

The colors of the present were inspired by the latest Inspired By Challenge which I linked below.


Both front and back of the card will have the present design. So I die cut duplicates of each piece for the card.

I stamped the Honey Bee Buffalo Plaid 6 x 6 Stamp on the blue cardstock and green cardstock. (Unfortunately, this stamp has been retired.) I wanted a light toned stamping to preserve the pastel color of the cardstock. To create this look, I stamped the pieces with Hero Arts Unicorn White Pigment ink first. After I cleaned the stamp, I restamped the plaid using the color coordinating dye ink to each piece. Since the pigment ink is still wet, some of the colored pigment transferred back to the stamp. Since I need to re-stamp the plaid background, before re-stamping, I cleaned the stamp before re-inking it with the same dye ink. This step prevents contaminating the dye ink pad with the white pigment ink. A stamp positioning tool is a must to be able to re-stamp precisely. I am using the Misti Stamping Tool for this card.

For the pink ribbon, I used a Simon Says Stamp stencil to add tiny dot details to it using a dye ink. While my plaid stamp was out, I discovered another use for it aside from stamping. I used the flat back of the plaid stamp as a grip mat. Why not, right? 


I did the same technique on the bow but this time using a yellow dye ink. I curled the bow with a scoring tool before assembling this into a bow. 

To make this into a card, I am using a white top folding A2 note card. I trimmed a bit off the side using the blue die cut as a guide. The present lid is 4 1/4" wide so there will be a bit of an overhang on the top of the card. 

The green piece comes with a score line when die cut. You can trim this on the score line to come up with two pieces but I decided to keep it as is to give the lid some dimension. I trimmed a sliver off the part that will be adhered to the note card. I adhered this to the top of the note card making sure it is on the center. One piece was adhered to the front and the other was adhered to the back.

I adhered the blue piece after, making sure it is aligned on the sides of the the note card. I also made sure that this is flushed to the back portion of the scored green lid. This allows the front portion of the green piece to overlap the blue piece.

I adhered the ribbons after, creating a cross on the center of the blue piece. 


I adhered the bow after. I flattened the bow a bit so it will fit inside an A2 envelope.

I hope you like today's card. It is always fun to use old crafting products especially if used in another way stretching the use of those supplies. 


Have a blessed, brilliant and creative day!

Maria Giselle B.

I am sharing this creation at