Hello! Welcome back to my blog. This is my 7th AECP card creation. The homework is to use a die creatively. There are several ways to use a die and for today's card, I am using a coordinating sentiment die to create an embossed impression on the stamped sentiment. I am using Altenew Halftone Happy stamp set and die. I am also using the Misti Stamping Tool to create this card.
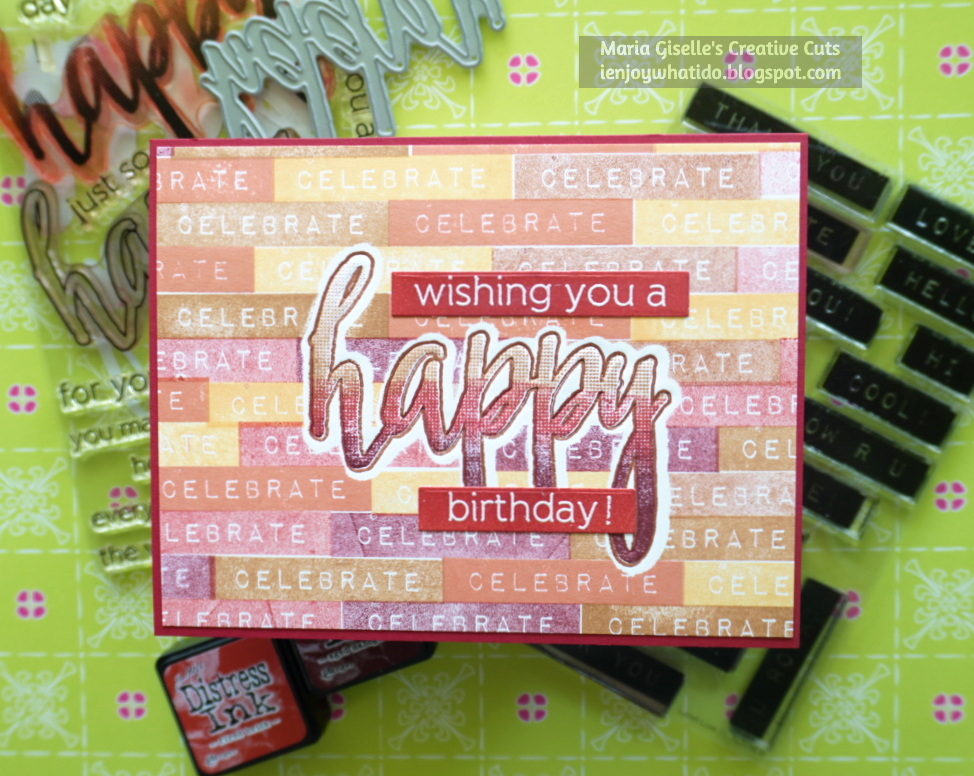
On a white piece of cardstock cut at 5 1/2" x 4 1/4", I stamped the happy outline on the center using a dark brown dye ink. I lined the halftone happy stamp to this outlined impression. The halftone happy stamp gives you an ombre look impression once stamped. To step up this look, I inked the sentiment stamp using three different shades of ink. This is where the Misti Stamping Tool comes very handy. I partially inked the sentiment then stamped it. I wiped off the residual ink. I inked the stamp with the next color shade, then re-stamped the sentiment. I continued this process one more time. If I want the inks to blend, I apply ink to that area and re-stamp the sentiment again. I just made sure that the ink gradation is not lost in the stamping process.
I created a mask for this focal sentiment. This is one of the few occasions that I wish the coordinating die creates a border around the stamped image when die cut. But since the coordinating die is an exact match of the stamped impression, I created my own mask that will have that border effect. I stamped the outline sentiment on masking paper. I fussy cut this leaving a small border around it. I adhered this to the stamped panel, trying my best to line up the sentiment on the cardstock panel and the masking paper. I could have used my light box to help with the alignment, but I didn't think about that while I was creating the card.
I stamped the celebrate stamp repeatedly on the background using varied dye inks. The stamp is from the Altenew Label Love stamp set. The colors I used was inspired by the latest Altenew Challenge which I linked below. I used the Misti Stamping Tool to create the background. It is a tedious process but it is just like playing an instrument, the repetitive process is like a stamping rhythm, position stamp ->ink->stamp->re-stamp, if needed->clean stamp with shammy->move paper->repeat the process until the whole background is filled.
I always felt awed once I remove the masking paper that's why masking is one of my favorite techniques.


I added sentiment strips to complete the greeting. I blended ink to a white cardstock with the same mahogany ink I used on the sentiment and the background. I heat set this to dry before stamping with Versamark ink. I poured white embossing powder to this, and heat set it.
I trimmed a sliver off the edges and matted this panel with a dark red cardstock.
I really enjoyed creating this card. I hope you give these techniques a try. Have a blessed, brilliant and creative day!
Maria Giselle B.
I am sharing this creation at

Wow, this is quite a labor of love! I love your use of all sorts of techniques, Maria! Your take is fabulous! So glad that you join the August Inspiration Challenge!
ReplyDeleteAMAZEBALLS!!! This is great! I love the colours you chose too!
ReplyDelete