Showing posts with label Valentine's Card. Show all posts

Saturday, January 18, 2025

Reindeer Scene Card


Hello. Welcome back to my blog. Have you started on your Valentine's cards? For today's card, I created a scene using dies from Kat Scrappiness that can pass as a Valentine's card. 

Have you used your dies to create a mirror image of the die cut image? This is what I did on the reindeer with the antlers. I placed the die on the wrong side of the patterned paper. I used a clean cutting plate for this purpose to prevent impressing the marks of an old cutting plate to the die cut. I die cut two more pieces on white cardstock to adhere to the back of the patterned paper die cut for some dimension. The die I used is the KS Reindeer Duo Craft dies.

I also did some die cut surgery to create a female reindeer. After die cutting the reindeer on the patterned paper, I trimmed the antlers off. I die cut two more pieces and adhered this to the back of the deer without the antlers. I trimmed off the antlers using the patterned paper deer as a guide. 


I die cut a patterned paper using a die from the KS Never Ending Square Craft dies. To add details to this square paper, I die cut this with the KS A2 Stitched Strips Craft dies to create diagonal strips. I pieced this back together on a scrap piece of cardstock. I trimmed a sliver off the edges.

For the tree, I dice cut a green patterned paper from the same paper pad. The tree die is from the KS The Night Before Christmas Window Scene craft dies. I die cut additional pieces to adhere to the back of the patterned paper die cut for some dimension. I adhered this to the square piece trimming off any excess.

For the background panel, I die cut another patterned paper using the largest die from the KS Stitched Rectangle craft dies. I adhered the square piece to this panel. I adhered the reindeers next.

I die cut small hearts using a die from the KS Perfect Pie Maker Add-ons Craft dies. I adhered this to the panel to create a speech bubble of hearts between the two deer. This is the most tedious part of this card. A good pick-up tool like the KS White Crystal Dual Ended Embellishment Pick Up & Die Poker tool, and a small tip liquid glue make the task easy. 

I did not add any sentiment since I think the scene is is pretty as is. I love the muted colors of the patterned paper included in this pack. That's what is good in using a paper pad or pack in a project. Most of the time, the paper complements each other lessening the guess work in mixing and matching papers. 

I hope you like today's project. Have a blessed, brilliant and creative day!

Maria Giselle B.

I added below links to the Kat Scrappiness product I used on this project. There will be no additional cost to you should you decide to purchase this product. While you are at the Kat Scrappiness website, do check out their wide array of products. Enjoy!

I am sharing this project at

Sunday, February 11, 2024

Card & Envelope Set Using Digital Printed Paper (Series 3)


Hello! Welcome back to my blog. I created a card and envelope set using the Blank Page Muse Digital Page with Small Calendar and Versatile Love-themed Images 2024 February Pam Bray Designs on my card. This is a very affordable digital download which includes paper pattern strips and ephemera that you can resize based on your crafting need. 


Isn't this gnome adorable? I fussy cut the gnome leaving a thin white margin around it. You can further embellish the images by doodling on it and adding shimmer to it. I added Ranger Glossy Accents to the heart held by the gnome.


You can easily mix and match the elements of the digital download. I layered several ephemera. I altered the heart wreath by cutting off the sentiment attached to it. 


Best of all, you can use items from your craft stash with this digital download. I used a rotating stamp to add more sentiments to the card panel. I adhered tiny heart sequins to the heart wreath. I used a Martha Stewart heart punch to add a trim to the top and bottom edges of the panel.

The matching envelope, which you will appreciate more on the video below, was created using the paper strips included in the digital download. I cropped the patterns and resized it so I can die cut the patterns using The Stamp Market A2 Standard Envelope die. 


I hope you like today's project. Below are links to the other two sets I created using Blank Page Muse Digital Downloads. I hope you check it out.


Thank you for visiting my blog. Have a blessed, brilliant and creative day!

Maria Giselle B.

Blank Page Muse is generously offering a 15% discount to their online store to YOU, my blog readers. Just use the code BPMMaria when you check out. Enjoy!

I am sharing this creation at


Inspired by the XOXO.


Friday, February 9, 2024

Spotlight Stitching


Hello! Welcome back to my blog. I am in constant search for cross stitching patterns that I can use on paper with my stitching dies. One of my resources is the DMC website. Most of their patterns are large scaled ones like the one I used on my card (Heart). To be able to stitch it on my card panel, I marked the center of the cross stitching pattern. I counted the squares from the center going left, going right, going up and going down to cover the number of squares my stitching die created. The stitching die I am using is from The Greetery Aida Cloth texture plate.

I used the recommended embroidery floss for the project, the DMC Mouline, which is absolutely gorgeous because of the glittery addition to the project. Too bad, the photos are unable to capture the sparkle of the embroidery floss. 


I created a frame for the stitched panel to cover the edges that have no stitching on it. The next time I use this texture plate, I plan to cut the card base larger than 5 1/2" x 4 1/4" so I can maximize the stitching on this panel. 

I added a simple sentiment so that the focus will remain on the stitching. 

I added gems to the panel for a bit of embellishment.


I hope you like today's project. Have a blessed, brilliant and creative day!

Maria Giselle B.

I am sharing this creation at


Thursday, February 1, 2024

All Die Cut Card


Hello! Welcome back to my blog. We have a new challenge at Incy Wincy Designs. The theme for this month's challenge is/are Valentine/Love and/or No Pictures. I created an all die cut card.

I die cut the x and o's using dies from Sugar Pea Designs. It looks like a lot of work but the plus side of it is that I was able to use my scrap paper. 


The red cardstock back panel was cut at 5 1/2" x 4 1/4". I added detail to this panel using The Greetery Aida Cloth Texture plate. It is hard to appreciate this in the photos but in real life, the added texture adds some wow to the card.

I laid the die cut letters on the red cardstock panel. To keep the placement of the die cut letters intact, I used a Glad Press 'N Seal to pick up the letters from the panel. Most of it will stick to the Press 'N Seal. For the letters that fell off or did not stick, I just repositioned it to the space that I assigned it. I used a T-ruler to make sure the letters are adhered on a straight line. After I filled up the whole panel with the die cut letters, I set this aside to dry. I trimmed off any excess hanging over the red cardstock panel. 

For the main die cut sentiment, I stamped the heart from the Pretty Pink Posh Sparkle Dot Patterns 1 stamp set on a white cardstock. I poked holes on the dots created by the heart stamp. I added a chain stitch to the holes using a variegated DMC embroidery floss. I drew a line around the heart and cut the heart out using this line as a guide.


I die cut the letters using the Pretty Pink Posh Hugs coordinating die. I die cut this on white cardstock and on white glitter cardstock. I adhered the glitter letter die cut on the white letter die cut for some dimension. I adhered these letters and the stitched heart to the panel.

I adhered a ribbon die cut on the same white glitter cardstock, and a Pretty Pink Posh Cherry red pearl to the center of the stitched heart. 

I hope you like today's card, and I hope you join this month's challenge. Happy Valentine's everyone!

Have a blessed, brilliant and creative day!

Maria Giselle B.

I am sharing this creation at


Tuesday, January 31, 2023

Spidery Valentine's Card

Hello! Welcome back to my blog. For today's project, I created a Valentine's card using a Halloween released product, the Kat Scrappiness Creepy Crawly Dies. I also created a Christmas card using this product, Spidery Christmas Card. Do check it out, if you have time.

I started off by die cutting the spider web die on black cardstock. I created a heart frame on a red cardstock. I am using a heart die from my stash that when die cut, has floral details on the center. I trimmed the center off to leave me with the frame. You don't have to do it this way. If you have a heart frame die, then that's easy peasy! Or you can use two nesting hearts dies if that is what you have in your stash. In case you don't have any of these products, I linked below a product from Kat Scrappiness that you can use to create a heart frame.

The web die cut comes with stitching details which I used as a guide to poke stitching holes. I stitched a metallic red floss through these holes. 

I adhered this to the back of the heart frame, making sure that it covers most of the heart frame. I set this aside to dry, leaving something heavy on top of it. Once the glue has dried, I snipped off the excess web sticking out of the heart frame. 

I added black Stickles to the heart frame for some texture. 

For the spiders, I die cut the large sized spider on light brown and peach cardstocks. I snipped off the web string. I die cut the spider on white cardstock also but I will only use the eyes on these die cuts. I adhered a piece of tape to the back of the colored spider die cuts. I pieced in the white spider eyes die cuts making sure the embossed dot is positioned with one pair looking towards the left and the other pair looking towards the right. I added a dot on the eyes using a Sakura Glaze black pen. I also added blush on the female spider's cheeks.

Now is the fun part. I dressed up the spiders. For the male spider, I added a die cut hat and a flower. For the female spider, I added a bow and a heart. 

For the sentiment, I stamped a sentiment on a pink banner die cut using a red dye ink. I die cut the word forever on pink patterned paper. I die cut two extra pieces so I can stack the die cuts to create more dimension.

For the card panel, I trimmed a red patterned paper at 4" x 5 1/4". I die cut falling hearts to the middle of the panel using a die. I adhered this to a pink patterned paper cut at 4 1/4" x 5 1/2".

I adhered the banner using foam adhesive on the top of the card panel. I adhered the webbed heart next then the sentiment die cut after. I made sure to give enough time for the liquid glue to dry especially on the webbed heart before adding the spiders.

I adhered the spiders with foam adhesive. I added gems to the bow and the flower. I added Glossy Accent to the heart. I set this aside to dry.

I adhered this to a top folding A2 note card.

I hope you like this non-traditional Valentine's card I created. I always look into extending the use of my craft products to make the most of it. 

Thank you for visiting my blog. Have a blessed, brilliant and creative day!

I added below the link to the Kat Scrappiness product I used on this card. I also added links to Kat Scrappiness products you can use as replacement to the products that I used on this card. There will be no additional cost to you should you decide to purchase a product. While you are at the Kat Scrappiness website, do check out their wide array of products especially the exclusive Kat Scrappiness products. They have a new release of Valentine themed products. There is also an ongoing slimline sale. Enjoy!

Maria Giselle B.

I am sharing this creation at


Friday, January 13, 2023

A Die Cut from Background Die Cut Part 2

Hello! Welcome back to my blog! I hope you are doing well. I mentioned in the title that this is part 2 because I made another card using the same technique of die cutting from a background die cut. Here is the link to that post, A Die Cut from Background Die Cut. Do check it out if you have time.

I am using products from the Christmas release of Kraft Scrappiness. Kat Scrappiness has a Valentine's release. I just find joy creating other uses for a themed craft item to extend its use. 

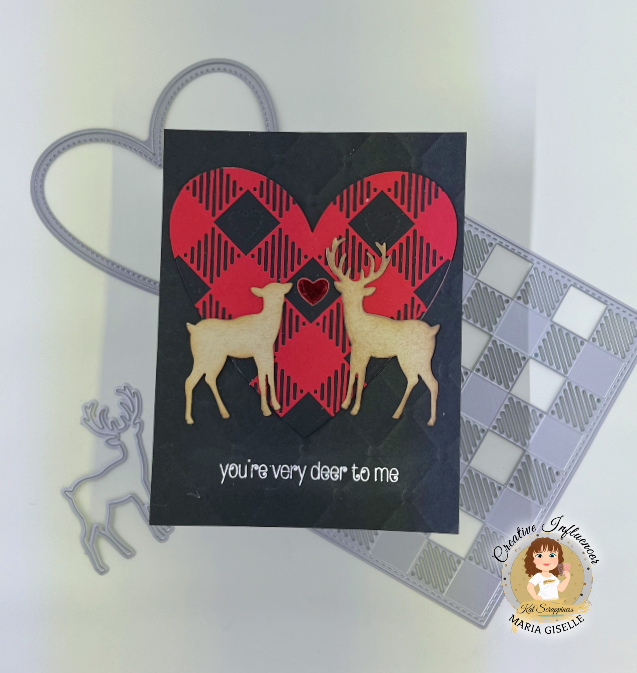
I started with die cutting a stitched heart on a red cardstock. I positioned the heart die cut on the Kat Scrappiness Buffalo Plaid Background so that the plaid pattern will be centered. I temporarily taped the red cardstock to the die to prevent it from shifting while I run this through the die cutting machine. My cutting plate is all warped up. So, I added a metal shim to the cutting sandwich for a better cut. 

I die cut the stitched heart on black cardstock and adhered this to the back of the plaid heart. I placed something heavy on top of it while the glue dries for better adhesion. I added stitched heart details on some of the black blocks on the plaid pattern. 

I die cut four pieces of the small deer from the KS Reindeer Duo Dies on kraft cardstock. I will be using the reverse side of two of these deer die cuts. I cut the antlers off one of the deer die cuts to make it to a doe. Sometimes, you will see the metal imprint of the die on the reverse side of a die cut. If this bothers you, just ran this die cut through the die cutting machine to flatten it out. 

I adhered the deer to the back of the deer with the antlers for some dimension. I adhered the last deer to the back of the doe. Once the glue has dried, I cut the antlers off using the doe on the front as a guide. I blended brown dye inks to both the deer and the doe.

For the card panel, I trimmed a black cardstock at 4 1/4" x 5 1/2". I embossed this using a 3D embossing folder. I heat embossed the sentiment to the bottom part of the card panel which is very tricky because of the embossing details on the card panel. There are definitely missed spots especially on the recessed areas. To fix this, I used a white gel pen to areas where it did not have any white embossing powder.

I adhered  the plaid heart to the card panel. I adhered the deer and the doe. I decided to add a red mirror heart die cut in between the deer and the doe. I adhered this to an A2 note card.

Thank you for visiting my blog. Have a blessed, brilliant and creative day.

Maria Giselle B.

I added below the links to the Kat Scrappiness products I used on this card. There will be no additional cost to you should you decide to purchase a product. While you are at the Kat Scrappiness website, do check out their wide array of products especially the exclusive Kat Scrappiness products. They also have a new release of Valentine themed products. 

I am sharing this creation at


Monday, February 21, 2022

Valentine's And Easter Cards Using Photo Play

Hello! Welcome back to my blog. This will be a photo filled post since I am featuring 4 cards today. I am using Photo Play products on all the cards. For the Valentine's cards, I am using Tulla & Norbert's Love Story Collection. On the Easter cards, I am using Hop To It Collection.


The first card is a shaker card. This is very easy to replicate since all you need is one of the cut-apart patterned papers. Not only that. I used one my extra clear plastic packaging to house the shakers. Just cover the panel with the clear plastic packaging. Secure the edges with a double adhesive tape. Remember to leave one side unsealed. This will be where you pour the shaker elements you want to add to complete the shaker card. I rubbed an anti-static dryer sheet to the inner side of the plastic packaging to prevent the sequins from getting stuck to the plastic. I also adhered some hearts to the cut-apart panel. 


The second card is a slimline card. The pennant banner on this card was inspired by the pennant ephemera included in the pack. I don't have mine in my pack, so I recreated this using some patterned paper and dies. The sub-sentiment banner is also from the ephemera pack. One thing that I like about Photo Play is that they have a pre-colored print-out of the same images in the stamp set. If you are not a colorist, this is the perfect product for you! All you need is the die set which matches these images just like the stamps. 


Now, it's time for the Easter cards. I am using products from the Photo Play Hop It Collection. This is their Easter/Spring collection. For the third card, I created another slimline card. I die cut one of the patterned papers in the collection using a slimline die that cuts scalloped windows. I created scenes on each window using the stickers from the sticker sheet. Isn't the bunny adorable? 


The fourth card is an interactive card with a spinning element. The sticker sheet includes two stickers with a bunny on a basket, one facing front, and one facing backwards. It was not a perfect match when I lined it up but very close enough. If I am going to do this all over again, I will choose a smaller oval for the window. I feel that the window is too big in comparison to the bunny sticker. I added floral sequins to the spinner floss. 


Below is a video showing the bunny spinning.


Thank you for visiting my blog. Have a blessed, brilliant and creative day!

Maria Giselle B.