Thursday, September 17, 2026
Partial Die Cutting and Embossing Using One Die
Friday, May 1, 2026
2-for-1 Graduation Cards
Wednesday, July 10, 2024
Altenew July 2024 Release Blog Hop + Giveaway ($300 in Total Prizes!)
- Altenew Build-A-Garden Sulfur Cosmos & Add-on Die
- Altenew Nature's Wonders Enamel Dots
- Altenew Organic Linen 3D Embossing Folder (not a part of this month's release)
- Altenew Build-A-Garden Sulfur Cosmos & Add-on Die
- Altenew Raised Sentiments 3D Embossing Folder
- Altenew Just Leaves Die Set (not a part of this month's release)

- Altenew Geo Tree Stencil
- Altenew Raised Sentiment 3D Embossing Folder
- Altenew Woodland Escape Fresh Dye Ink (not a part of this month's release)
- Altenew Gold Peach Crisp Embossing Powder (not a part of this month's release)
- Altenew Geo Tree Stencil
- Altenew Halftone Stars Stamp (not part of this month's release)
- Altenew String Art Rectangles Die Set (not part of this month's release)
Giveaway Prizes
$300 in total prizes! To celebrate this release, Altenew is giving away a $100 gift certificate to 1 lucky winner and a $50 gift certificate to 4 winners! Please leave a comment on the Altenew Card Blog and/or each designer’s blog post on the blog hop list below by July 16, 2024 for a chance to win. Altenew will draw 5 random winners from the comments left on each stop of this blog hop and announce the winners on the Altenew Winners Page on July 18, 2024.
*The winner of the $100 gift certificate will be chosen from comments left on the Altenew blog.
You are invited to the Inlinkz link party!
Click here to enterThursday, June 29, 2023
Rainbow Colored Block Letters Greeting Card
Hello! Welcome back to my blog. I created this card to join in the latest Hero Arts Blog Challenge. I heat embossed the letters on a black watercolor cardstock using Wow! White Pearl embossing powder. The Hero Arts products I used on this card are from my stash and are, unfortunately, all retired. I am sure there is something in your craft stash that you can use as substitute to re-create this card.
Using the stencil, I drew the wonky shaped squares around each letter, some of which I have to extend vertically to accommodate the height of the letter. I also extended the width of the squares so the squares will be touching each other. I used the Karin pigment markers to add color to each letter block.
I colored the inside of the letter with a black Wink of Stella shimmer pen. I outlined each block with a black Sakura Glaze marker.
For the other half of the sentiment, I masked a stamp so I will only stamp the word brightly below the letter blocks. I heat embossed this word using the same embossing powder.
I stamped the stars using the Delicata White Shimmer pigment ink and the Avery Elle Silver Fox pigment ink. I brushed the Ranger Perfect Pearls in Perfect Pearl for some shimmer.
I trimmed this panel smaller. I adhered this to a partially embossed rainbow mirrored cardstock. The mirrored cardstock is from Simon Says Stamp.
Sunday, April 5, 2020
Neon Colored Bears Birthday Card
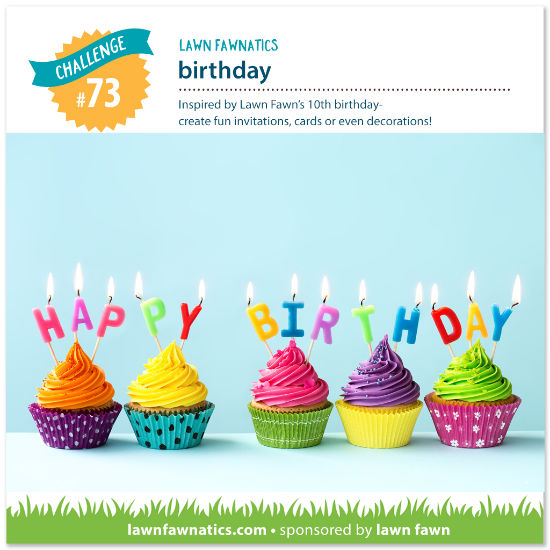
Hello! I created a fun card. I made this to join Lawn Fawnatics latest blog challenge. After I saw the photo, all I can think of is the lively colors of the cupcakes.
I stamped the bear from Lawn Fawn Party Animal stamp set on Arches water color paper using Versafine Onyx Black ink. I colored the bears using Karin Neon Brushmarkers, following the colors of the cupcake icing. I stamped the party hats from the same stamp set following the colors of the cupcake wrappers. I brushed these party hats with Spectrum Noir Sparkle Glitter brush pen. I fussy cut these stamped images leaving a white border around the image.
For the pennants, I partially die cut the ends of the longest banner die in the LF Fancy Folded Banners die set to create small pennants. I die cut different colored card stocks and white card stock from my paper stash following the colors of the birthday candles. I used the negative cut created by the banner end as a placement guide for stamping the individual letters to create the sentiment. To do this, I added a full adhesive Post It tape to the back of the negative die cut. I nestled the banner in the open area, positioned the letter on the banner die cut. I used the Misti Stamping Tool so I can double stamp each letter for embossing. I stamped the letters using Hero Arts Unicorn White pigment ink and HA white embossing powder. The letters are from the LF Milo's ABCs stamp set.
After I have completed embossing the letters, I cut each pennant to an inch and scored the top 1/8". I folded the pennant on this scored line and adhered this to a twine. I adhered the white pennant die cut to the back of the colored pennant.
For the background, I trimmed two blue colored card stocks to 8 7/8" x 3 7/8" to create a slim card for an A9 sized envelope. I also cut a patterned paper using the same measurement. I partially die cut the patterned paper using the LF Outside In Stitched Rectangle to be able to create a longer framer.
I embossed the LF Fancy Lattice Background die on the darker blue card stock. I also did partially embossing on this card stock so I can embossed the whole slim sized card stock.
I created a confetti background on the light blue card stock using some of the small stamps on the LF Animal Party stamp set. I embossed these stamps using Wow! White Pearl embossing powder.
To put the scene together, I adhered the lattice embossed card stock to the bottom of the confetti background panel. I cut off the excess. I positioned the bears next. I adhered the banner using foam adhesive. I glued the excess twine to the card stock panel. I adhered the party hats with foam adhesive. I adhered the scalloped patterned paper next. I added Ranger Glossy Accents to the party hats and set this aside to dry.
Thank you for visiting my blog. It seems like a lot of work done for this card but I truly enjoyed putting this scene together. Have a SAFE, blessed, brilliant and creative day!
Maria Giselle B.
I am sharing this creation at
Monday, February 8, 2016
Partial Die Cut Valentine's Card
It's that time of the year were some of us get busy getting ready creating their Valentine's exchange. I created several cards using the Hero Arts Floral Stamp & Cut by Lia. I only partially die cut the heart onto the front of a note card measuring 3.5" x 7" scored at 3.5". To partially die cut, center the die onto the front of the note card, position the top cutting plate onto the area you want die cut, in this case towards the right edge of the heart, towards the card opening. Using a craft knife and with the guide of a ruler, I cut the card stock where the cut ends. This will reveal the half-heart shaped card front. Using the same die, I die cut glittered papers and directly adhered this onto the card front, making sure I line up the partial die cut heart with the front of the note card. Use a liquid adhesive since this allows some 'buy' time to wiggle the die cut while aligning it.
I stamped the sentiment from the Hero Arts Handmade Kindness stamp sent onto a vellum and poured white embossing powder onto it. I allowed the heat gun to be on for a while before pointing it towards the vellum piece to avoid warping. I applied dots of liquid glue to the back, to areas where there is concentration of the stamped sentiment to hide the glue. I randomly applied dots of Viva Decor Pearl Pen in Pastel Rose to the sides of the heart to add more accents. To finish off the card, I punch the outer top & bottom edges using We R Memory Keepers Crop-a-Dile.
I am submitting this creation to:
Tuesday, November 17, 2015
Watercolor Smooshed Embellishment Encouragement Card
I adhered the flowers to this panel. Then adhered the stems and leaves. I tied the stems with a silver thread. I looped the thread several times on my fingers then tied it on the middle to create a bow. I adhered this on top of the knotted thread.
Maria Giselle B.
I am submitting this creation to: