Showing posts with label Smooshing Technique. Show all posts

Wednesday, July 16, 2025

Card Made Less Than 30 Minutes ~ A Blank Page Muse Post

Hello! I am at the Blank Page Muse blog with this card. I created a one layer, CAS card which is very unusual for me since I usually add layers to my card. 

I used the ink smooshing with an acetate technique on this card. 

The stamps I used on this card are from Blank Page Muse Country Vintage Christmas Rubber Art Stamps Sheet

Please visit the BPM blog for card details. You might be amazed to find out that this card is very easy to replicate and mass produce. 


Thank you! Have a blessed, brilliant and creative day!

Maria Giselle B.

I shared this project at


Friday, July 26, 2024

Ink Smooshing With Acetate


Hello! Welcome back to my blog. The month of July is almost over. I am thankful for this month for a lot of reasons. One of which is I became a part of the Altenew's July Release Blog Hop. Some of my cards are featured on Altenew's shop, online catalogue and social media sites. It is such an honor. 

Today's card features products from this month's release which are currently out of stock. Just click the 'notify me' button at the Altenew website to be informed once these products are back in stock if you are interested in purchasing it. 

The colors I used are inspired by this month's Altenew Inspiration Challenge.

I stamped the flower from the Altenew Build-A-Garden Sulfur Cosmos stamp set to a watercolor cardstock. I stamped it twice to fill a 6" x 4 1/2" panel. I used Versafine Onyx Black ink for the stamping. I dried the ink using a heat gun before doing the ink smooshing.


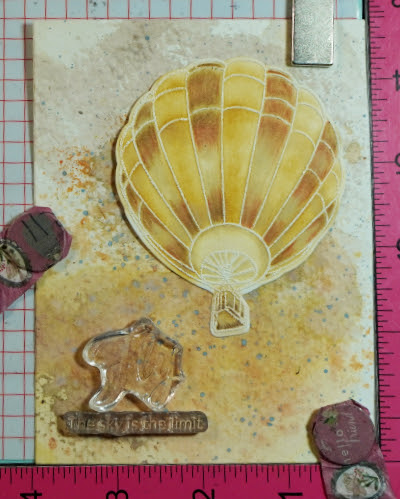
I am using Karin markers for coloring. I used the Neon Yellow, Neon Yellow-Orange and Neon Pink. I applied the pigment to a palette and spritz it with water to dilute the ink. Using a flat brush, I applied water to the stamped panel. This will help mute the color. I picked the ink using a scrap piece of acetate. I transferred the color to the stamped panel by pouncing the acetate to the stamped panel. I heat set in between inking to dry the ink. I repeated this process until I am happy with the coloring of the panel. There are a lot of advantages in using this technique. You can select which area of your project to pounce the ink on. You can also create new colors when the two colors of ink mix while it is still wet. And you can intensify the color by pouncing the acetate with the ink on an area again.


I have a stash of watercolor paper strips from cutting the watercolor paper to 8 1/2" x 11" since most watercolor papers come in 9" x 12". To make use of these watercolor paper strips, I colored a row of sentiments on the debossed side of the Altenew Raised Sentiments 3D Embossing Folder. I used the same colors I used on the smooshed panel. I positioned the watercolor paper strip over this inked portion of the embossing folder, then run it through my Sizzix Big Shot machine. With this technique, the color from the embossing folder transferred to the strip while giving an embossed impression on the paper strip as well. The embossed letters remained white in color.

The ink on the embossing folder can be wiped off with a baby wipe or with a Hero Arts Ultra Clean Spray if the ink won't come off with the baby wipe. 

I trimmed the strips narrower using a craft knife to make it into quarter inch sentiment strips.

I cut the floral panel at 1 3/4". I built the panel by adhering the sentiment strip on a paper cut at 4 1/4" x 5 1/2". You can adhere the strips straight onto a notecard but I like doing it on scrap paper first. 

I adhered this strip to the top most edge of the paper. I adhered the floral strip next, then repeated the process until the paper is covered with the sentiment strips and the floral panels. I trimmed off any excess.

I adhered this to a top folding A2 note card. 


Thank you for visiting my blog. I hope you like today's project. Have a blessed, brilliant and creative day!

Maria Giselle B.

(I added above links to the Altenew products I used on my card. My affiliate link is: https://altenew.com/6358517. There will be no additional cost to you should you decide to purchase these product/s. It is just a way to help a fellow crafter sustain her love for crafting. While in the Altenew blog, don't forget to check out the rest of the products included in this month's release. Thank you for your support!)


I am sharing this project at


Tuesday, August 1, 2023

Die Cut on Patterned Paper


Hello! Welcome back to my blog. We have a new challenge at Incy Wincy Designs. The challenge themes is/are about Sentiments and/or Die Cuts only or Birds and the Bees. You can win one or both prizes, depending on which part of the challenge you plan to participate on. Please visit the challenge blog for more details. 

For my card, I am using a bird die from Simon Says Stamp and a flower die set from Concord & 9th. The patterned paper I am using is from Craft Consortium. I strategically die cut the layers to create depth and color variation on the bird and the flowers. 


The bird die created detailed cut lines which I emphasized with a white Sakura Glaze pen.

I lightly added sticky ink to the flower edges and poured iridescent embossing powder to it, then heat set it for a bit of shimmer.

For the background panel, I am using a light blue cardstock cut at 5 1/2" x 4 1/4". I embossed this with a 3D floral embossing folder from Altenew. I inked the embossing folder with blue dye inks, then ran this through the die cut machine again to transfer the ink to the cardstock panel. I did this twice using two different shades of blue dye ink.

For the flat portion of the cardstock panel, I did ink smooshing using the same blue dye inks I used on the embossing folder. 

I stamped the sentiment using a pink dye ink, then adhered the die cuts to the panel. I adhered this to a top folding vertical top folding A2 note card.

If you don't have a patterned paper like this, you can create your own especially if you have alcohol inks. I don't have alcohol inks so this is a great way of achieving the look of alcohol inks.

I hope you like today's card. Please join us in this month's challenge. We can't wait to see your projects.

Have a blessed, brilliant and creative day!

Maria Giselle B.

I am sharing this at

6/2024: Altenew decided to change its affiliate program starting this month. Below is my affiliate link to the website. I don't think I can directly link the products I used with this new program. Please feel free to do a product search. I will update as I figure this out. The good thing about this new affiliate program is that I get to earn on each Altenew product you purchase and not only on the product/s I used on this project. As before, there will be no additional cost to you if you make a purchase. It is just a way to help a fellow crafter sustain her love for crafting. While in the Altenew blog, don't forget to check out their new release for this month. Thank you for your support!


Sunday, April 16, 2023

Masculine Cards for AECP 2 Final Challenge

Hello! Welcome back to my blog. First & foremost, I want to apologize for a very long post. This is a celebration of me completing the AECP 2. I consider this the final exam of the program. 

Unlike the AECP 1, the final challenge for AECP 2 is less intense. I guess it is because I have gone through the courses so it is more easy for me. 

My chosen components for AECP 2 are as follows:

  1. Impressive Heat Embossing. Embossing is one of my favorite cardmaking techniques. A juicy sticky ink pad brings out the best results in embossing. The stamp positioner is a very helpful tool in re-stamping an image in case of missed spots. Don't forget to pre-treat the area that you will be embossing with an anti-static tool. Heat embossed images can act as a resist to inks, applied either by blending or watercoloring. An image with embossing preserves the color underneath it. Cards 1, 3 & 4 have some embossing done on it.
  2. Magic Marker. Who does not have a stash of markers and/or pens? I am guilty of this. Using markers to accent your stamped images is one way of using markers or pens. On my second card, I used a marker with a stencil. 
  3. Masking Unleashed. There are lots of ways to mask. You can use a masking paper, a masking glue or just simply emboss the image. This technique is further explained on my 3rd card.
  4. Easy Blending Techniques. With all the blending brushes out in the market, there are lots of possibilities in blending. Use a bigger brush for a large area and a detailed brush for a smaller area. Blending also allows you to experiment with colors. Just remember to always blend with a light hand. It is easier to add color to a lightly ink blended area vs. a heavily ink blended area. Pouncing your blender brush or sponge on a scrap paper first before blending the ink to your project usually removes the excess ink off the blending tool. Cards 1 & 3 both have ink blending done on it.

CARD 1: Coloring an image with Ink Blending and Color Pencils


Examine your image before heat setting the powder. Do not commit to heat setting the image if there are spots without powder. Pour powder again on these areas. If the powder still tends to slide off, it means that part of the image has no sticky ink on it for the embossing powder to stick on. If it is a huge part of the image, simply brush off all the powder onto a paper or to your embossing powder container. Re-stamp the image with the sticky ink. This is when a stamp positioner is very helpful. Pour embossing powder to the image. If the image is fully covered with powder, heat set it. 
 
Embossing and using a small blending brush are very helpful in keeping the colors within the lines. The blending above is not perfect but it gets better later on, I promise. This is what I call an undertone. With this image I did a sweeping motion of ink blending.

To add highlights, I used a color pencil. Be gentle when coloring near the embossed lines. We don't want to scrape off the embossing. But if it does get scraped off, I retouched the line with a white gel pen.


I smooshed ink on the background. I rubbed an ink pad on a glass mat and spritz this with water. I smooshed a watercolor paper on the ink. I dried this with a heat gun before smooshing the water color paper to another color. Just make sure you are using complementary colors or else you will end up with a muddy color. I flicked some pigment on the area too. On the photo above, I positioned the balloon so I would know where to stamp the sentiment. 

Despite re-stamping this sentiment, there seems to be a gap on that part of the letter F. So I retouched this using a black sign pen.


CARD 2: Adding Details using Markers


Secure the stencil to the cardstock with a non-tacky tape. This prevents shifting of the stencil during ink blending. For more intricate stencils, use a repositionable spray to temporarily adhere the stencil to the cardstock. 

Stencil over an area larger than your intended card size. This gives you an option to choose which part of your stenciled cardstock to use. Use the leftover piece, if you can, for another card.
Initially, I was struggling with this stencil on how to make the end result 3D looking. Despite the instructions included in the packaging, my end result is different from what the image in the packaging looks like. If you have struggles with a product you have, visit the manufacturer's website. Watch videos on how to use the product. This was very helpful to me in making me figure out what I was doing wrong. Write notes on a sticky note and insert this inside the package of the product for future reference. 

I used a marker to add highlights to the stenciled panel. I used the stencil as a guide to add lines. Felt pens dry quicker than gel pens. Let the gel pen dry first before taking the stencil off to avoid smearing the ink. 

Once I trimmed the stenciled panel to 4 1/4" x 5 1/2", I used the Misti Stamping Tool to stamp the sentiment on the panel. I used a light dye ink for the stamping so I can use a marker to write over the sentiment. Pardon my messy inky Misti. It just shows how much I use this tool in my crafting.

After I colored in the sentiment with a marker, I added an outline around the bold sentiment using a silver marker. The sub-sentiment is a one lined sentiment stamp. I masked a word to stamp one word at a time to change the stamp sentiment's look into a two-lined sentiment. Another option is to cut the one lined sentiment on the space between the words. 


CARD 3: Create a silhouette image using a detailed stamp


I usually lay out my stamp and/or die to know its placement on my card lay-out.

I stamped the image using the Misti Stamping Tool with a Copic friendly ink. I colored the image with a black Copic marker to make this detailed image into a silhouette image as seen below.

I am going to blend ink for the background. You can stamp the image on a masking paper and fussy cut it on the line. For my card, I applied sticky ink to the silhouette image using a Versamark pen. I poured clear embossing powder to it. I could have used a black embossing powder, too.

Using a Post-It note, I created a mask so I can create a background scene for the silhouette couple. I finished off this card by adding an embossed window cardstock panel over the scence. I sanded the embossed floral image then lightly blended a dark brown ink over the raised embossed area and also over the outer edge of the window panel. I also die cut an oval frame using brown cardstock which I also sanded and blended dark brown ink over it. The sentiment was die cut using white cardstock. I blended blue-green ink over the bottom half of the sentiment strip die cut to match the embossed window panel. I die cut extras so I can stack the sentiment strip die cuts on top of each other for a dimensional look.


CARD 4: Using floss for a window filler


I repeatedly stamped the star on a 4 1/4" x 5 1/2" green cardstock to create a background.

I heat embossed some stars to add interest to the background.

To another green cardstock panel, I did partial die cutting to create the stitching holes. I don't need to use the whole panel to add the floss. Also, I wanted the floss to meet at the center of the star shaped window.

To make sure that the star window will be die cut on the right spot of the embossed panel, I added a non-tacky tape to the non-cutting side of the star die. I laid this on the stitched panel, with the cutting side of the die facing up. I lined the embossed panel to the top of this stitched panel. I gently rubbed some pressure over the flipped embossed panel to make sure the tape will secure the star die to this panel. 

I gently flipped the panels sandwiching the star die, gave it another gentle rubbing pressure. I removed the stitched panel. Tada! The star die is adhered to the embossed panel just where I want it. The key here is to have both panels cut at the same size, and to make sure the stitching holes are centered on the panel.

I heat embossed a sub-sentiment on a strip of green vellum. I adhered this to the back of the star window panel to create a floating sentiment strip. I used the Misti Stamping Tool to help me with lining up both panels. Butting the card panels on one of the corners assured me that my panels are aligned. I also use this trick when I adhere my card panels to a note card. If you don't have this kind of stamping tool, a score board's corner can also be used for this purpose.

Now, the panels are aligned. The main sentiment is also heat embossed. Some parts of the sentiment were heat embossed over the already heat embossed stars. To be able to emboss over an embossing requires more than one stamping, thus, the stamping tool was very helpful in this regard. I used a dark green dye ink for the sentiments which is a fast drying ink. To be able to emboss this sentiment, after cleaning the sentiment stamp, I re-stamped the sentiment with a clear sticky ink, poured clear embossing powder over it and heat set it. 


Upcycle a Box into a Craft Storage Organizer

This is how I organize my craft supplies. I re-use sturdy boxes from grocery products.


Using a cardboard cutter, I cut the flaps off the box. I also cut the sides in an angle, with the front of the box lower than the rear portion of the box. If you have rough edges, use a sander to smoothen it out.

I painted the box with a white chalk paint. 

The bottom of the box has a rectangular hole where the seams did not quite meet. I covered this hole with one of the scrap cardboard cut up. I used a glue gun to adhere the scrap cardboard to the bottom of the box.
  
I trimmed one of my sons plastic binder divider and used it to cover the bottom of the box.

I painted each side of the box with Mod Podge glue using a sponge brush.I cut the tissue paper included in my Altenew order and adhered this to the side of the box.I smoothed out the tissue paper using a scraper. 

Now, I have a dedicated box for my Altenew products.

Thank you for visiting my blog. I hope you learned something from the cards I created. If you have any questions, feel free to post it in the comment section. 

6/2024: Altenew decided to change its affiliate program starting this month. Below is my affiliate link to the website. I don't think I can directly link the products I used with this new program. Please feel free to do a product search. I will update as I figure this out. The good thing about this new affiliate program is that I get to earn on each Altenew product you purchase and not only on the product/s I used on this project. As before, there will be no additional cost to you if you make a purchase. It is just a way to help a fellow crafter sustain her love for crafting. While in the Altenew blog, don't forget to check out their new release for this month. Thank you for your support!


I am sharing this creation at


Sunday, May 30, 2021

Stamped Background In Rainbow Colors

Hello! I created this scrapbook layout to take part in Scrapbook & Cards International Scrapbooking Day Stamping Challenge. This is a late post since I had to wait for the announcement of the winners. I did not win but this layout is one of the highlighted work. See the rest of the scrapbooking layouts who are highlighted, and for the challenges' winners, visit Scrapbook & Cards INSD post

I started off by stamping the Technique Tuesday Ali Edwards All My Heart stamp set on watercolor paper.  Since I am creating a full page sheet, I kept the stamps on the plastic that holds all the stamps. I taped the edges of the plastic film to a  Fiskars Easy Stamp Press. I applied Versafine Onyx Black ink to the stamps and started stamping on the watercolor paper. Since the watercolor paper has texture, making sure that the stamp press is down all the time, I used a Chuckie tool to apply more pressure to the stamp press to get a good impression of all the stamps. I repeatedly stamped the stamp set until the whole watercolor paper is stamped on. For the ones with a poor impression, I fixed this with a black gel pen after I am done painting.

I colored each text box with Karin markers, following the colors of the rainbow. For the hearts, I used Gansai Tambi watercolor in white as base, then adding White Gold on top. 

My album pocket's size is 9" x 12". I trimmed the watercolor to 8 3/4" x 11 3/4". I matted this with a white cardstock cut at 9" x 12". I cut my photos and added it to a white cardstock for a little bit of contrast from the busy background. 

I die cut the hello using Concord & 9th Say Hello die. The die cuts an outline, a shadow and a scripty hello. I die cut the shadow on black cardstock and the scripty hello on white cardstock. I saved the outline die cut for a future project.

To create more contrast, I matted the white panel with red cardstock. I created a subtitle for my layout by die cutting letters from the SugarPea Designs Letterboard die on white cardstock. I die cut a duplicate for each letter so I can adhere one on top of the other for a raised look. The die set does not include an ampersand. I heat embossed the ampersand using white embossing powder. The stamp is from Hero Arts Christmas Crystals stamp set. The die set also did not have any apostrophe. I created one by doing a bit of die cut surgery using one of the letter die cuts.

I wrote my journaling underneath the subtitle before trimming the red cardstock with the use of a craft knife. 

I adhered this on the rainbow watercolored panel. I added heart gems from Nuvo. I also added shimmer to the subtitle using Zig Wink of Stella clear shimmer pen. 

Thank you for visiting my blog. Have a blessed, brilliant and creative day!

Maria Giselle B.

I shared this creation at