Showing posts with label Martha Stewart Punch. Show all posts

Wednesday, April 1, 2026

Sketch Inspired Greeting Card, Using a Puncher


Hello! Welcome back to my blog. It is time for a new challenge at Stick It Down Scrapbook and Card Making Challenge on FB. You have three options to choose from so joining is very easy. You can choose from a scrapbook layout, a double page scrapbook layout or a card layout. Choose one or choose all! 

On to my card. I did several modifications on the card sketch without altering it too much which I will explain throughout this blog post.

For the background, I usually search the web for color palettes to use on my card. Once I have made a selection and checked if I have the necessary colored cardstock to create the background, then I start going to work. I used a Martha Stewart punch for the detailed portion of the three wide strip background. 

I was all awe with Martha Stewart punch back then when she still had her crafting brand. I invested on a few. I still have it. The punch I used on the card is one of the punches I bought as a resale. Most of the punches are still boxed. The only downside of a punch, especially detailed ones, is it somehow loses the springy feature and some of the cuts are not crisp. To re-condition the blade of the punch, I punched on aluminum foil a couple of times. I should have punched on wax paper too to make the blade slick. 

Another downside on using a punch is that my wrist is not as strong as it was. Pressing the puncher proved to be more difficult this time. 

Another thing to consider is the paper being punched. I had difficulty with the mustard cardstock. I earned a lot of scraps from the punched rejects. I think results are better on a smooth cardstock that is 80 lb. 


I adhered the strips together, taping it to each other to connect it and create a 4 1/4" x 5 1/2" background panel. I created a lace trim using the punch. I punched on the same colored cardstocks I  used on the strip background. I adhered the same trim color to the wide cardstock strip.


For the main focus of the card, instead of using flowers or other shaped embellishments, I used images from The Greeting Farm stamp set. It is about time for me to use this stamp after purchasing it on FB Marketplace. It is also time to give my color pencils some loving attention.

I stamped the images on kraft cardstock using a black ink. I have an old dye ink pad that did not give good results. I changed to my Memento Tuxedo Black ink which also did not give a good result. The Versafine Clair gave me the best result. Maybe because this is new or maybe the other two ink pads does not do well with the Neenah Desert Storm cardstock because I am able to use these inks on other paper without problem.


I colored the images using the Faber Castell Polychromos. I need to use it more so I don't lose the skill in coloring with color pencils. I have those harsh lines on the faces of the girl images. I should have blended it some more to smoothen it out. I added details to the colored images using gel pens and glitter pens.

I die cut the images using the matching die..

Instead of having the embellishment straight down the card as on the sketch, I staggered the arrangement just to partly cover the images. After all that coloring, I think I should show it off and not hide it.

I stamped a sentiment from the stamp set on a rust colored cardstock, the same one I used on one of the strips. I die cut this using a Lawn Fawn stitched die. I adhered this to the strip panel.


I hope you like today's card. I hope you join this month's challenge. We can't wait to see your projects.

Have a blessed, brilliant and creative day!

Maria Giselle B.


Sunday, February 9, 2025

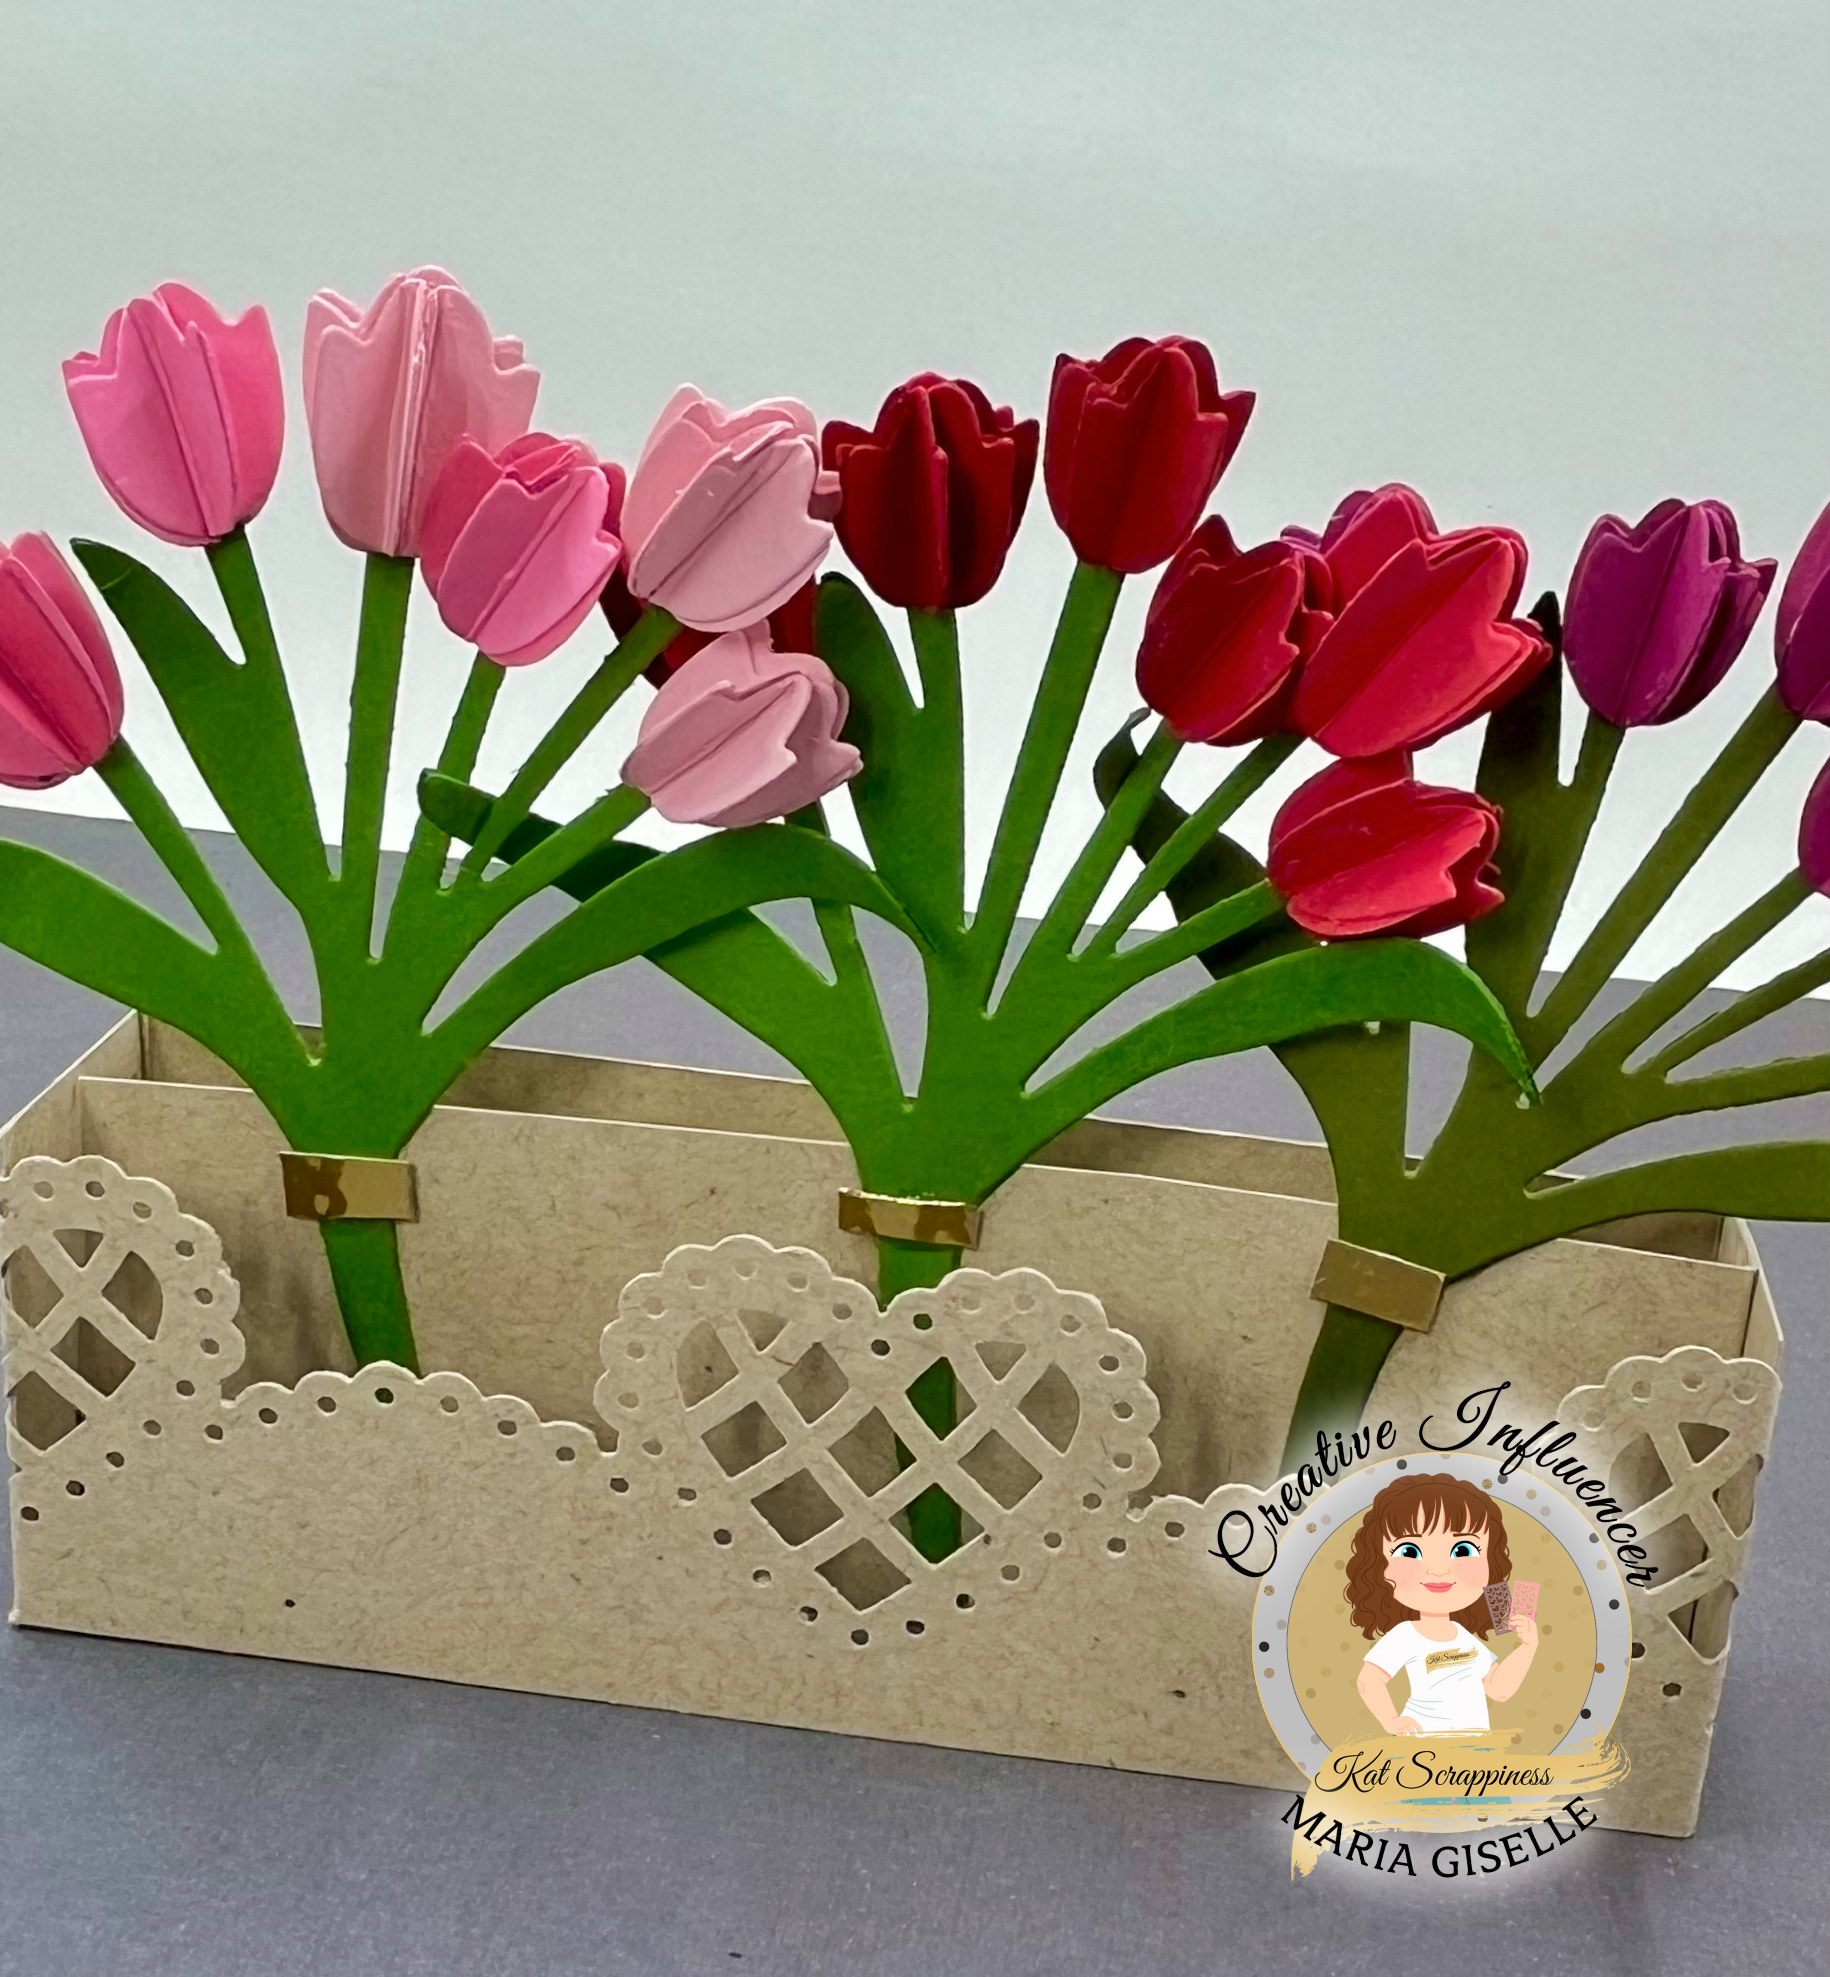
3D Tulips on a Square Vase


Hello! Welcome back to my blog. Today's project can be a Valentine's gift to a special person. Looks tedious to create but the end product will surely wow the recipient. 

I used the Kat Scrappiness Layered Tulip Bouquet craft dies on this project. I die cut the stem/leaf on green cardstock. I die cut extras to double up this die cut to make it sturdy for this project. Doing this step depends on what type of cardstock you are using. I used a heavy cardstock on the die cut on the right so I did not need to double it up. 

For the flowers, I cut the base layer of the tulips on pink, red and purple cardstocks. The craft die set comes with a piece to layer on top of this base die which I did not use on this project. The die set came with 3 tulip sizes. 


To achieve the 3D look, I cut a lot of this base layer. I used five die cuts per tulip. It is a lot of die cutting. I grouped the tulip die cuts, having five pieces of die cuts per group. 


I scored 4 die cuts in a group. The one that is not scored is for the backing of the flower.

I reinforced the folds using a bone folder.


I adhered one tulip die cut to the other, adhering half of the die cut with the other die cut until I adhered all of the 4 pieces. 

I set this aside to dry. I used a mini clothes pin to press the adhered tulip die cuts together while the glue is drying. I repeated this process until all tulips are assembled.

For the vase, I was going to use the KS Pop Up Box craft die but the side tabs were too short for the look that I want to achieve for my project. I did use the dimensions of the pop up box craft die on the vase. I just cut the tabs 1/4" longer than what the die cuts. The final measurements of the vase are 6 3/4" x 1 1/4" and 5 1/4" x 1 1/4". I cut 2 pieces of the longer piece. I scored these long pieces at 1/2" and 6 1/4". This will be the front and the back of the rectangular vase. For the shorter piece, I scored this at 1/4" and 5". This piece will be adhered on the center where the tulip bouquets was adhered.

I punched one of the longer pieces using a heart edge punch. I assembled the box. 


I adhered the 3D tulips to the stem/leaf die cut. I adhered the tulip that was not scored to the back of the 3D tulip.

I snipped a piece of gold mirror cardstock and adhered it to the stem. The craft die set comes with a bow die. The bow size was too large for my vase that I was afraid it will make the vase overcrowded. 

This tulip vase can be put up on display. 

I hope you like today's project. Have a blessed, brilliant and creative day!

Maria Giselle B.

I added below a link to the Kat Scrappiness product I used on this project. There will be no additional cost to you should you decide to purchase this product. While you are at the Kat Scrappiness website, do check out their wide array of products. Enjoy!

I am sharing this project at


Thursday, December 24, 2020

Artful Christmas Sentiment Card


Hello! I am featuring my own drawn Christmas sentiment. I started off with a 5 1/2" x 4 1/4" watercolor paper. I drew straight lines on this paper to guide me in drawing my font. After I am contented with the spacing of each letter, I colored the letters using Karin markers. I am using colors from their December color palette, Burgundy 075, Fire Red 092, Apple 210 and Olive Green 281. I colored the word 'merry' with the Burgundy on the top portion of the letter, and the Fire Red on the bottom portion of the letter. Using a water brush, I blended both pigments on the center of the letter. I repeated the same process on the word "Christmas' using Olive Green on the top portion of the letters and Apple on the bottom. I heat set this to speed up the drying. I carefully erased the pencil lines. Using an extra fine tip black gel pen, I added the outlines to the letters. The word merry is slightly off center so I added a Christmas tree using a Hero Arts stamp. Something I have discovered with the Karin markers is that I can actually use it to add pigment direct to the stamp. This made the coloring of this small tree with different colors so easy. 

Creating this panel into a card, I pulled out from my craft stash a Martha Stewart Poinsettia edger punch and some clear adhesive jewels that you cut apart with a craft knife. Do you still remember these jewels? 

I cut two pieces of 5 1/2" x 3/4" green cardstock. I punched this with the edger punch. I also punch a red pearl cardstock but strategically positioning it on the poinsettia so I can piece this on the punched border. 

I adhered the borders to the top and bottom of the panel with foam adhesive. I cut small pieces of foam so I can slip it under the border showing through the open poinsettia. I squirted a dot of glue on these foam adhesives and then pieced in the red pearl punched poinsettia. I added the jewels to the centers of the poinsettia, squirting glue first for better adhesion of the jewels.


I enjoyed creating my own artful sentiment. Thank you for visiting my blog. Have a blessed, brilliant and creative day! Merry Christmas everyone!

Maria Giselle B.

I am sharing this creation at

Wednesday, February 14, 2018

Valentine Treats 2018-Photo & Project Loaded Post

Happy Valentine's! I got busy creating give-aways for my sons. I am posting all give-aways in one post with a brief description. Please feel free to ask any questions on the comment section.


This treat bag is a Cricut image cut custom-sized for the puzzles we bought last year.


I had to make a couple of modifications along the way. I created a slit on one side of the treat bag for a slot for the mini card. I used a punch for the window heart on the other side of the treat bag.


I used a Concord & 9th matching stamp & die set for the mini card. My 6-year old helped color some of the letters.


This treat bag took most of my time because I created 19 pieces of it for my Kindergartener's class. 


Next up is my Junior's Valentine treats of Sweethearts candy using the left-over patterned papers from the first project.


I created a wrap-around belly band for the pink cardstock which partially wraps the candy box, too.


The top of this pink cardstock was cut using a Concord & 9th metal die. Using more left over patterned paper to matte another cut-apart patterned paper which served as the sentiment. The layer has stitching around the sides created by Simon Says Stamp Stitched Rectangle die. The top got paper punched. A ribbon was threaded through the hole. For the tag, the die and stamp is from Lawn Fawn. This was heat embossed with Rose Gold embossing powder from Simon Says Stamp. I threaded a twine through the tag hole then the ribbon hole, finishing it up with a bow.


This last project took most of my time, planning and designing it. My 11-year old gives Swedish Fish all the time. Since I was only making a few give-aways for his friends (and my 12-year old's friends), instead of the usual stamped Ziplock bag, I took his give-away up a notch. I created the fish bowl using Cricut Design Space. I wasn't able to edit the image the way I want it cut, so I just trimmed the water part off the bowl to create a window. I used this as a guide to custom seal the Ziplock bags. I used a We R Memory Keepers Fuse Tool to do this. I have two colors of die cuts of fish bowl water. Instead of wasting the light blue one, I ink sponged the edge using Tim Holtz Salty Ocean Distress Ink on the top water edge to create contrast. I offset this when I adhered it to the back of the dark blue water die cut.


I heat embossed the sentiment using a Lawn Fawn stamp set and Wow! embossing powder on the solid fish bowl die cut. I embellished the water area with stamped, colored and die cut elements from the stamp set. I applied glue on the edges of the bowl using a tape runner. I sandwiched the Ziplock bag, with the Swedish Fish inside, in between the solid and window bowl die cut. I sealed the top of the Ziplock bag using the Fuse Tool again. I trimmed off any plastic excess sticking out of the edges.

Thank you for visiting my blog. Have a blessed & brilliant day!

Maria Giselle B.

Monday, February 20, 2017

Combined Puncher & Dies Embellishment Card


With the metal die craze today, who is still holding on to their punchers? I do! I remember that the product that attracted me to crafting is the Martha Stewart punchers especially the border punch. For this card, I am using MS Eyelet Lace border punch.

I uploaded the digital image to Cricut Craft Room and used the Print & Cut feature. I printed the image on Strathmore Bristol paper. I colored the image using Zig Clean Color Brush markers and blending it out with clear Wink of Stella marker. I ran a black marker around the edges for a finished look.

For the background panels, I am using patterned papers from a Forever Friends paper pad. I cut the paper per border punch instructions. This is one of the disadvantages of the punch. It is hard to customize the panel. To be able to have a continuous punch border design, you have to follow manufacturer instructions on paper size. With the metal dies, you can do partial die cutting to customize the size according to your project. 

I used a square metal die to cut out a square from the punch panels to create frames. You can always just use a craft knife for this purpose. The use of a die is just convenient in being able to center the square without having to measure.

I die cut a pink vellum into squares a little bit bigger than the inner edge of the frame. I embossed this using an American Crafts Doily embossing folder. To make the embossed design pop, I inked the embossed design with Tim Holtz Distress Ink Pumice Stone. I brushed some Ranger Perfect Pearl to this. The slow to dry property of TH Distress inks and the slick surface of vellum helped set the Perfect Pearl. 

I cut a white pearl card to create a 4 1/4" x 5 1/2" panel. I adhered a 4" x 5 1/4" patterned paper to this. Next, I adhered the punched frames with the embossed vellum adhered to its back. One of the punched panels is wider but than the card base. I trimmed off the excess as part of the design. This layered panels were adhered to a top folding A2 sized note card.

To ground the digital image, I am using an October Afternoon washi tape which has a sentiment printed on it. Using a craft knife, I trimmed off the edges to create a slimmer sentiment washi tape. I adhered the digital image using foam adhesive.


Thanks for visiting my blog. Have a blessed and brilliant day!

Maria Giselle B.