Monday, May 26, 2025

Zhuzhed Vellum Butterflies, a Blank Page Muse Post


Hello! I am back at the Blank Page Muse blog with this project featuring vellum butterflies. Please visit the BPM blog for more details. Thank you!


Have a blessed, brilliant and creative day!

Maria Giselle B.

I am sharing this project at

Tuesday, May 20, 2025

Paper Stitching


Hello! Thank you for visiting my blog. I finally found time to do some cross stitching on paper. It makes me happy.

I would like to thank Stitchable Cards for the beautiful pattern I used on this project.

I don't have the recommended perforated paper used for this stitched design so I used an Ellen Hutson Piercing Plate to add stitching holes to a 4 1/4" x 5 1/2" white cardstock. I marked the center of the stitching panel and started my stitching from that point.

I also don't have all the recommended DMC embroidery flosses. Instead of buying, I usually look for color substitutes using the thread-bare.com tool and check if I have this color. 

My stitching panel is an 11-count cross stitch panel so I only needed to use two pieces of thread in stitching. I ended up with a smaller stitched flower compared to the one created in the website. 


I have no plans with this stitched project at the moment. Instead of die cutting it, I kept the panel as is. I die cut a circle frame on cream cardstock and temporarily adhered it to the panel. 


I hope you like today's project. Have a blessed, brilliant and creative day!

Maria Giselle B.

I am sharing this project at


Saturday, May 17, 2025

Stretching Your Supplies


Hello! Welcome back to my blog. Today's project is about stretching your craft supplies especially during these times when craft supplies are not getting replenished in the stores or craft supplies are getting to be too impractical to buy. I used products from Kat Scrappiness which I listed below in case you are interested.


I worked on the bouquet first. I die cut the layered tulips on pink cardstock. This layered tulip die cuts five tulips but I selective die cut the stems and leaves to make a three tulip floral bunch. I die cut the center stem with the leaf and die cut the right most stem with the leaf. I die cut the latter again but keeping in mind that I will use the reverse side of the die cut. I used a smooth cutting plate for the mirror image die cut to prevent transferring the cuts from the cutting plate to the paper. 

I blended ink on the back most layer of the tulip. I adhered the oval layering piece on top. I adhered the tulips to the stemps. I bunched the tulips together to create a three flower bouquet. I used a pocket die to cut the bouquet wrap on a brown paper. I wrapped this paper around the bouquet. I pinched the flower wrap on the middle where I wrapped a brown paper cord. I tied the paper cord into a bow. I squirted liquid glue to the paper cord to keep it secure. 

I added white accents to the tulips using a white Wink of Stella. 


I worked next on the background. To give the buffalo plaid a different look, instead of adhering it straight as it is intended for, I adhered it diagonally. I die cut two pieces of this background on white cardstock. I adhered the first background die to another white cardstock diagonal to the cardstock panel. I used the other buffalo plaid die cut to fill the open areas on the corners of the cardstock panel. 

I flicked a pearl white ink to the panel.

I die cut the sentiment on the same pink cardstock I used for the tulips. I also die cut this sentiment on vellum. I adhered the vellum die cut on the cardstock die cut to make the color lighter compared to the color of the tulips.

I die cut the stitched strips on the same pink cardstock I used for the tulips. I adhered the strips underneath the words of the sentiment, sort of an underline. I adhered this to the buffalo plaid panel. 

I applied clear Wink of Stella to the sentiment to add shimmer to it. 

I adhered the wrapped bouquet to the panel.


I was going to stop here but I felt something was missing. True enough, it still needed a pop of color so I adhered the stitched strips on the edge of the buffalo plaid panel keeping the corners free of glue so I can snip the corners for a clean,  diagonal look. I squirted a dot of glue underneath these snipped diagonal colors to adhere it.

I hope you like today's project. I recommend for you to look into your stash. You never know what you will come up with your craft stash. 

Thank you for visiting my blog. Have a blessed, brilliant and creative day!

Maria Giselle B.

I added below links to the Kat Scrappiness products I used on this project. There will be no additional cost to you should you decide to purchase this/these product/s. While you are at the Kat Scrappiness website, do check out their wide array of products. Enjoy!


I am sharing this project at

Friday, May 16, 2025

Metallic Painted Dragonfly Panel, A Blank Page Muse Post


Hello! I am at the Blank Page Muse blog with this project. Please visit the BPM blog for more details. Thank you!


Have a blessed, brilliant and creative day!

Maria Giselle B.

I am sharing this project at

Wednesday, May 14, 2025

Craft My Stash: Heart Rosette


Hello! Welcome back to my blog. Today's card is all about using my craft supplies. I have a designated box for my newly purchased supplies specifically stamps and dies. I try my best not to purchase new craft items until I empty this box but you know how that goes. 

I love rosettes! I am so glad that The Stamp Market came out with a die to cut and score a heart rosette. I also have The Stamp Market Butterfly Rosette die. Check my previous post featuring this die (Using Digital Paper to Create a 3D Embellishment) if you want to see how I used it. 

I die cut the the heart rosette on a Lawn Fawn patterned paper which has a rainbow stripe design. 


I layered several hearts using dies from the Hero Arts Nesting die set in addition to the heart included in the heart rosette die set. I poked some holes to add stitching to the hearts. I used a metallic silver embroidery floss for the stitching. 

I cut a white cardstock at 4 1/4" x 5 1/2". I added details to this panel using The Greetery Aida Cloth Texture Plate. 


I stamped the sentiment from The Stamp Market Great Greetings stamp set on white cardstock using an Altenew Pink Pearl Crisp dye ink. I die cut the sentiment using the coordinating die. I layered another die cut to the back for some dimension.

For the sub-sentiment, I stamped this on white cardstock using the Simon Says Stamp Rainbow Splash Ballet dye ink. The sentiment is from Altenew Build a Garden: Sulfur Cosmos stamp set. I die cut this into a strip using an Avery Elle die. 

I adhered some of the drop out hearts from the rosette die cut to the panel. I also adhered a heart to the center of the layered hearts. I added shimmer to the small hearts using a shimmer pen.


I hope you like today's card. Have a blessed, brilliant and creative day.

Maria Giselle B.

I am sharing this project at


Fun Fold Card


Hello! Welcome back to my blog. It brings me joy when I am able to participate in blog challenges. I used to do this a lot but was held back due to DT responsibilities. Not that I do not like being a DT member. This actually keeps me going with my creativity. I just feel good that I was able to meet my DT deadlines giving me some spare time to play with my other craft supplies.

The products I used is from Altenew. The floral cluster is from the Altenew Craft Your Life Project Kit: Watercolor Flowers which I won from A Cherry on Top during their March is National Craft Month giveaway. 

It took me three tries before I came up with this final card. I really want to create a card with the Z-fold card design using this large floral cluster. I am glad that I did not give up. As they say, third is a charm.

On my first try, I did not tape the die to the cardstock. The die shifted when I partially die cut it making the cut not in the right place.

On my second try, I actually finished the card. I embossed the floral cluster on the card front and stenciled in the colors. The background was too plain and too white. I stamped the floral cluster on the background using the Altenew Morning Frost Fresh Dye ink filling up most of the white space. Well, I did not like how it look. The color was too bold and the background was too busy that I felt the colored floral cluster, which is the focal point, got lost.

On my third try, I did another boo-boo. I partially die cut the floral cluster without considering if this will fit in the embossing folder with the design matching the partial die cut. Well, it did not fit. Instead of repeating the process and wasting more craft supplies, I die cut the colored floral cluster on my second card and used it on this card.


To create the Z-Fold, on a side folding 4 1/4" x 5 1/2" note card, mark the front of the card at 2 1/8" using a pencil. You don't have to do partial die cutting if you don't want to. You can just adhere the floral cluster die cut on the flap. But if you are going to do partial die cutting like I did, put the die at the inside portion of the card front. The part that will be partially die cut is the one close to the fold coming from the 2 1/8" mark. This is where you will line up the cutting plate leaving the other half bare. 


This will cut the opening as seen above. Score at the 2 1/8", where the marks are, above and below the cuts. Erase the pencil marks. Gently fold at the score line. The partial die cut should be the fold that gets hidden with the uncut side as the card gets folded into a Z.


Before adhering the stenciled floral cluster, I partially embossed the front flap with the Altenew Organic Linen 3D embossing folder. Then I adhered the floral cluster making sure it is aligned with the partially die cut cluster on the front flap.


For the inner portion of the card that shows behind the floral cluster, I embossed a heavy weight vellum with the Altenew Raised Sentiments Embossing Folder. I trimmed this vellum into 4 1/8" x 5 1/2". I adhered this to the inner right side of the notecard. 

You can write your personal note on the open space on the left side of the embossed vellum which you can see on the second and third photos above.


For the sentiment, I treated the same vellum with an anti-static tool. I stamped a sentiment  using Versafine Onyx Black ink. I poured clear embossing powder and heat set this. I die cut the sentiment using the coordinating die. The stamp is from the stamp set included in the kit.

I added jewels to the flower centers. I rounded the top and bottom corners of the folded side for a bit of interest.

Below is a short video showing how this Z-fold card looks when opened.


I hope you like today's card. Thank you for visiting my blog. Have a blessed, brilliant and creative day!

Maria Giselle B.

I am sharing this project at

Sunday, May 11, 2025

A Mother's Day Gift

Hello! Happy Mother's Day! I am celebrating this day with a project made for two co-worker moms of mine. I hope you like it.

This project was supposed to be a part of a DT project but the colors are not matching so I decided to work on my DT project later and went ahead to finish this project. After all, I have been itching to sew for a while.

The pretty foiled patterned paper is from Spellbinders. I trimmed this based on the size of the stitched scallop rectangle die from Pretty Pink Posh. This paper is very light weight. I won't be able to support any stitching on it. I adhered a cream cardstock behind it to make this paper thicker.

I used The Stamp Market Stitched Alphabet dies to die cut the stitching holes. Initially, I was planning to stich on the patterned paper directly but I tear one of the papers when I was peeling off the tape that kept the letter dies in place. I die cut the letters again on the cream cardstock this time to cover the poked holes on the patterned paper. I cut the letters using a craft knife. 

I used a DMC embroidery floss and a DMC metallic threat do add cross stitching to the poked holes. I adhered this on the patterned paper.

I die cut a total of 6 pieces of the scalloped frame. I adhered 3 pieces on top of each other, stacking it for dimension. I adhered this on the patterned paper.

I used a Stampin Up rubber stamp to spell out the names of the recipients. I stamped the letters using  Wow! embossing pad then poured Wow! gold embossing powder over it. I heat set this. I punched the letters using the square punch included in the stamp set.

I adhered the letters underneath the stitched letter. 


I die cut 6 pieces of the scalloped frame. I adhered 3 pieces on top of each other, stacking it for some dimension. I adhered this on the patterned paper panel. 

I adhered a cream cardstock on the back to cover the stitching. I trimmed off any excess.


I used a die from The Stamp Market Scalloped Frame die for the easel. I die cut 6 pieces total. I trimmed the tabs off on 4 the easels. I adhered 2 of these pieces on the tabbed easel piece. I repeated this on the rest of the easel die cuts. I applied glue to the tab. I aligned the triangle/arrow tip of the easel to the bottom corner of the frame, then pressed the glued tab to the back of the panel. I set this aside to dry. 

I adhered the mini circles included in the die cutting to mimic the screws of the easel.

Thank you for visiting my blog. Have a blessed, brilliant and creative day! Celebrating all the mothers out there. Yay!

Maria Giselle B.

Thursday, May 8, 2025

Adding Wings to Just Us Girls Stamp, a Blank Page Muse Post


Hello! I am back at the Blank Page Muse blog with another entry to my art journal. Please visit the BPM blog for more details. Thank you!


Have a blessed, brilliant and creative day!

Maria Giselle B.

I am sharing this project at

Sunday, May 4, 2025

20 Minute Challenge


Hello! Welcome back to my blog. I am a guest designer at the Craft & Connect Challenge Blog. For this month's challenge, they are doing a 20 Minute Challenge in which you create a card or any handmade project in 20 minutes or less. I was a bit unsure about this since it usually takes me more than 20 minutes to create a card, but I am up for the challenge. How about you?

I did not include in the 20 minutes the time I planned and pulled the supplies out of my stash. I pressed my timer as soon as I started creating.

I trimmed an Altenew Velvet cardstock into 5 1/2" x 4 1/4". I lightly spritz water to this panel to prepare it for embossing. The mist softens the fibers of the paper and prevents cracking with embossing. I embossed this panel using the Simon Say Stamp Margot Tile 3D embossing folder. I heat set this panel to speed dry it.

I inked the flat side of the embossed panel with Altenew Berry Mocha ink. I heat set this to dry the ink.


At this point, I am at the 10-minute mark. I swiped a Versamark ink on the edges of the panel. I poured gold embossing powder on the sticky ink, then heat embossed it. 

I was fiddling with my project as to how to add a sentiment to the panel. I did not want to cover all that detailed embossing. I paused the timer so I can look for a gold cardstock to die cut the sentiment on. The sentiment die cut is from Lawn Fawn. 

I adhered the sentiment to the panel. It was a bit tedious to add glue to the die cut sentiment because of its dainty feature.

I still have a few minutes left so I flicked gold paint to the panel. I heat set this again to dry the paint and this is when I ran out of time. The only step I was not able to do with this project is to adhere it to a note card. Not too bad, right? 

All the use of the heat gun on the cardstock panel caused some warping. I laid an acrylic block over the cardstock panel to flatten it. 


I hope you like today's project. Please join this month's challenge at Craft & Connect. Thank you, Jayne & Emma of Craft & Connect, for giving me this opportunity to guest design in your challenge blog. 

Have a blessed, brilliant and creative day!

Maria Giselle B.
 

Friday, May 2, 2025

Plaid Greeting Card


Hello! Welcome back to my blog. Today's card uses products from Kat Scrappiness. I got my inspiration after joining an IG Hop for another company's products release. I would like to thank @larissaheskettdesigns for the colors and card design inspiration. I like her work so much that I created my own version of it. 

I die cut a red shiny textured cardstock using the KS Buffalo Plaid Background craft die. I kept the red square drop outs which I used later. A tip for a successful one pass cut using this die is to add a metal shim to your cutting plate sandwich. It works each time for me. 

I measured the width of the two columns of the plaid and use this measurements to trim a blue cardstock. I was initially going to adhere this cardstock over the two rows of the plaid background but changed my mind. I placed it behind the plaid cover die cut. To add some depth and detail to this piece, I embossed the plaid pattern to this panel. To use your metal die cuts for embossing, add a silicone mat underneath the cardstock when you layer your die cut sandwich. This pushes the metal die to the paper, thus, transferring the design to the paper. You have to play with your die cutting machine to know what plates are needed to get this effect without ruining your machine and your paper. 

I adhered this to the back of the plaid cover die cut, aligning the embossed design with the opening of the plaid die cut. It is hard to see in the photos but the embossed design added a pillow effect on the openings. 

I adhered the red square negative die cuts to the back of the vented portion of the plaid die cut.

I adhered a white cardstock to the back of the open columns. I pieced in white square negative cuts to the open areas. I used this cover die a lot that I accumulated a lot of these square negative cuts.

I stamped some of the images from the KS Wok On stamp set to a smooth watercolor paper. I used Karin markers to color the images. I added details to the images using a white gel pen and white enamel glue to the eyes. I fussy cut the images. I arranged the images on the panel, mostly placing it on the blue area of the plaid panel. I adhered the images with foam tape for some dimension.


I prepped a piece of white cardstock with an anti-static tool. I stamped the sentiment to this piece using Versafine Onyx Black ink. I poured black embossing powder to it and heat set it. I created this into a strip using a sentiment die. I adhered this sentiment strip to the same blue cardstock I used on the panel. I used a craft knife to gently cut the blue cardstock creating a matte around the white sentiment strip. I adhered this to the panel.


I hope you like today's card. Thank you for visiting my blog. Have a blessed, brilliant and creative day!

Maria Giselle B.

I added below links to the Kat Scrappiness products I used on this project. There will be no additional cost to you should you decide to purchase this/these product/s. While you are at the Kat Scrappiness website, do check out their wide array of products. Enjoy!

I am sharing this project at

Thursday, May 1, 2025

Alcohol Inked Alphabet


Hello! Welcome back to my blog. I attended a virtual workshop by Ishani (@quill_ish) last Saturday. I enjoyed creating live with her and the rest of the attendees. 

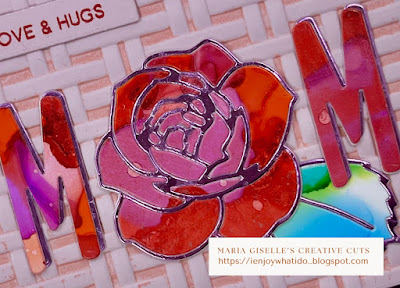
One of the techniques I learned in the class is about creating a background using alcohol markers. I don't have any Altenew alcohol inks. I only have Copic, which is an alcohol based marker. Since I prefer not to start a new collection of a different brand of alcohol ink, I used Copic refills as a substitute for the Altenew alcohol inks. I added drops of colors on a Yupo paper. I don't have an alcohol ink blower so I just used my heat tool to move the ink. Once I am happy with the pattern, I heat set it to dry the ink. 

I created two alcohol blended panels, one red-pink base for the flower, and another blue-green base for the leaf. I die cut these panels using the Altenew Layered Rose die set. I used the drop outs on this project but I kept the outline die cuts for future use. The best way to keep the drop outs in its original placement is to use a masking paper to pick up the pieces from the die or the plate. This will make the next step easier.

I die cut the image outline on pink mirror cardstock. I die cut the solid piece using a scrap white cardstock. I adhered the mirror outline die cut to this and inlayed the alcohol die cuts to the outline die cut. This is the second technique we learned in the workshop. 


I die cut the letters on both the alcohol panel and the mirror cardstock. I adhered the mirror die cut to the back of the alcohol letter die cut offsetting it for a shadow effect. I went off the instructions on the letter M on the left. The mirror letter die cut was supposed to be offset towards the left, not to the right. I only realized my mistake when I was adhering the letters to the weaved panel. 


For the weaved panel, I rubbed pink dye ink on the flat side of the Altenew Wicker Texture 3D embossing folder. I sandwiched a pink cardstock cut at 4 3/4" x 3 3/4" inside and ran this through my embossing machine. What it does is the inked flat side is pushed to the deeper crevices of the embossing. Such a cool technique shared by Ishani during the workshop. No worries with the cleaning. Just wipe the inked side of the embossing folder with a damp cloth and the excess ink should come off. 

I matted this embossed panel with the same pink mirror cardstock. If I had more time during the workshop, I would have cut this piece into a frame so I can use the middle portion of the mirror cardstock for something else.

I adhered this to the same pink cardstock I used on the embossing which was cut at 5 1/2" x 4 1/4".

I added a sentiment strip using a stamp from the Altenew Wild Hibiscus stamp set. I stamped this using a red dye ink on the same pink cardstock which I die cut into a strip. 


I hope you like today's card. Thank you for visiting my blog. Have a blessed, brilliant and creative day!

Maria Giselle B.

I am sharing this project at