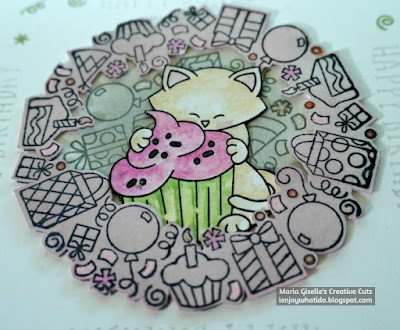
Hello! Welcome back to my blog. I got my inspiration for today's card from Newton's Nook's latest challenge blog which I linked below. I can't keep myself from joining the challenge. This is one of my favorite challenge blogs.
I cut my card base at 9" x 4 1/2". I scored this at 4 1/2" on the long side to create a top folding square card. I stamped the sentiment on all the sides of the card front using a sentiment stamp from Newton's Nook Birthday Roundabout stamp set. I used a light gray ink to stamp this sentiment but I want the color to be lighter, so I used the second generation ink. I had to repeat this second generation stamping twice or thrice, depending on the impression I got. Thanks to the Misti Stamping Tool, it made the re-stamping very easy. Since I stamped the sentiment on the edge and since I am using the Misti, I simply rotated the card to stamp the sentiment on all sides.
I stamped the large round stamp on the center of the card front using a darker gray ink. This stamp is also from the NN Birthday Roundabout stamp set. Thanks again to the Misti, I was able to re-stamp this large stamp since I missed a couple of spots on my first try. I blended the lighter gray ink on the center of the stamped image. I set this aside so I can work on the other elements of my card.
I stamped the same large round stamp on Strathmore Bristol paper using Versafine Onyx Black ink. I heat set this to speed dry it. You can use any circle die to die cut the stamped impression but I wanted to add details so I fussy cut the outer edge of the large round stamped impression leaving a white border around it.
Now, it's time to create this into a frame. I traced a circle on the center using a smaller circle die. I also made sure that the circle I am using is large enough for the cat image to fit in. I used my craft knife to create an opening on the center, then used my sharp pointy scissors to fussy cut and create the frame window. I blended Tim Holtz Distress Tattered Rose Oxide ink on the frame.
For the focal image, I stamped the cat on Strathmore Bristol paper using Versafine Onxy Black ink. The image is from Newton's Nook Loves Cake stamp set. I heat set this to speed dry it. I colored the image using Tim Holtz Distress Crayons, following the colors of the cupcake in the inspiration photo. I fussy cut the image, cutting it near the outline, then running a black marker around the fussy cut image.
I added dimension to the frame using a scrap piece of a circle frame die cut that fits on the back which does not show through the front. I adhered this using liquid glue, then adhered it to the front of the card, lining the images so it will match its layout. I applied liquid glue to the back of the stamped cat and tucked it to the inside bottom frame.
I added details to the frame and background using pink and glittered pens in my stash.
To fill the space in between the sentiments, I stamped several confettis using the Tim Holtz Distress Bundled Sage Oxide ink. As last step, I rounded the corners.
Thank you for visiting my blog. Have a blessed, brilliant and creative day!
Maria Giselle B.
I am sharing this creation at


.jpg)
I'm so glad that Inky Paws is one of your favorite challenges! We love seeing your creativity! As for this card, the kitten with his cupcake looks fabulous with the birthday roundabout image around him! Also like how you stamped the sentiment on all four sides of your card! Thanks so much for sharing with us at IPC!
ReplyDeleteHugs,
Debbie
Your card is so cute! Newton looks so happy with his huge cupcake! I love that you made the stamp into a frame! That is so neat and such a great idea! Thank you so much for joining us at the Inky Paws Challenge!
ReplyDeleteThis card is awesome! Love Newton and his cupcake at the central point! Great use of the colors! Thanks for playing along with us at Inky Paws!
ReplyDeleteSuper cute! Thanks for playing in our square challenge
ReplyDelete