Monday, October 26, 2015

Autumn Colors Inspired Anniversary Card


It's me & my husband's 15th wedding anniversary yesterday. I finished creating this card only today so I was a bit late to hand the card to him. 
I took the leaf stamps from Essentials by Ellen Bold Blooms stamp set and from the Essentials by Ellen Bold Blossoms stand alone die set. I created by own stamps by die cutting fun foam using the dies. This is a technique I learned from Jennifer McGuire (http://www.jennifermcguireink.com/2015/10/video-stretching-holiday-supplies-blog-hop-giveaway.html. ) I also gave my fun foam stamps a 'hair-cut' based from Jennifer's tutorial. Although mine didn't come out perfect since the some part of the leaf spine was left uncut on the fun foam.

I chose the colors from my variety of ink pads, ranging from Hero Arts, Close To My Heart and Altenew. I randomly stamped the leaves on watercolor paper with the intent of making the leaves come from a center point of the panel. Aside from the various ink colors and various shades of colors, I also double stamped some images and used second generation stamping on some. This created more color shades as if I have a wider variety of ink pads. 

I applied watercolor to the leaves. Hero Arts does not react to water compared to the other two brands of ink that I used. I watercolored the background with a wash of gray, being careful not to reactivate the inked stamped leaves so no bleeding will occur. 

I die cut a circle on the watercolored panel. I traced this circle with a pencil onto a dark brown cardstock. This is where the sentiment will peek through the watercolored panel. I treated the area with a powder tool. I did some masking on the sentiment stamp in the Bold Blooms stamp set. I stamped the word 'happy' using Versamark ink and embossed it using white powder. Using an MFT stamp set, I stamped '15th' with Versamark and embossed it with Wow! Rich Gold powder. The word 'anniversary' came from a Technique Tuesday stamp set. After stamping this with Versamark ink, I embossed this in white powder. I treated the cardstock with the powder tool in between stamping. 

I sprayed the brown cardstock with mixed water and Ranger Pearl powder. I dried this with the the heat gun. I adhered the watercolored panel to the brown cardstock making sure the sentiment is showing thru the circle window. I in-laid a gold circle die cut to accent the circle. I adhered some Doodlebug sequins for added embellishment. I adhered this panel to a white note card. 


Thanks for viewing my blog. 

Maria Giselle B.

Stamp: Essentials by Ellen Bold Blooms, MFT First Place Award, Technique Tuesday Say-It Happy
Die: Essentials by Ellen Bold Blossom, MFT Circle Stax

I am submitting this creation to:


CHALLENGE: Wonderful Watercolor


Thursday, October 22, 2015

Embossed Blended Background With In-Laid Sentiment Card


I started off by blending pigment inks on Strathmore Bristol paper. I used Memento Luxe Sweet Plum and Avery Elle Raspberry. Since these are pigment inks, I allowed this to dry. I brushed a powder tool to this then stamped the flowers from Altenew Hennah Elements stamp set using Versamark ink. I stamped a couple of flowers only before I poured Wow! Gold Rich embossing powder to this and heat set it. Once I filled up the paper, using a brush and Prima Color Bloom in the colors of Tea Stain, Pearl White & Cotton Candy, I brushed each color on a flower randomly. I dried this by applying heat to it. To fill up the empty spaces in between the flowers, I stamped the dot using Hero Arts Black dye ink. I added a white dot onto this using Uni-Ball Signo Broad gel pen.

I die cut the word 'Thanks' using My Favorite Things Many Thanks die on this embossed-colored panel making sure I saved all the small pieces. I die cut another thanks on black cardstock. I applied Ranger Pearl onto this. I sprayed mist onto it.

I cut the embossed-colored panel to 5 1/4 x 4 1/4, then this panel onto a fun foam making sure there is plenty of glue on the area where I will in-lay the sentiment. I adhered the sentiment onto the negative space including the small cut pieces.


For the note card, I ran the Versamark on the top and bottom edges of a top folding card. I applied black embossing powder then heat set it. I adhered the embossed-colored panel on this.


Thanks for viewing my blog.

Maria Giselle B.

Supplies used: 
Stamp: Altenew Hennah Elements
Die: MFT Many Thanks
Ink: Avery Elle Raspberry, Memento Luxe Sweet Plum
Powder: Wow! Gold Rich Embossing, Martha Stewart Embossing
Shimmer: Prima Color Bloom (Cotton Candy, Tea Stain, Pearl White), Ranger Pearl (Pearl)

I am submitting this creation to:


Tuesday, October 20, 2015

Christmas Tag Card


I cut the tag using my Cricut Imagine and the Cricut Small Talk Frames & Tags Cartridge. I cut a frame using kraft cardstock, and two pieces of base, one using white cardstock and another using watercolor paper.

I stamped the hat onto the watercolor paper using Ranger Archival Ink. I also stamped the hat on a Post-it Note to create a mask. I stamped the snowman over the masked hat. I applied a Fineline masking fluid to the snowman and hat. I also created a mound mask using a Post-It note to ground the snowman. I blended Tim Holtz Distress Ink Broken China. I applied the color heavily on the top of the image, and lightened the pressure on the bottom near the mound. Using Simon Say Falling Snow stencil, I inked the holes with Memento Luxe Pigment Wedding Dress ink. After allowing this to dry,  I applied a coat of Wendy Vecchi Embossing paste to the stencil. I set this aside to dry.

I removed the Post-It masks from the image, then remove the masking fluid using my finger. One thing I've noticed after I removed the mask is that it left a bluish stain onto the area where I applied the mask. I think I should have shook the bottle first before applying the fluid to the image. I don't want to re-do what I've accomplished on this card, so I used watercolor brush pens to color in the image. I applied Marvy Uchida Snow Pen to the base of the snowman. It took me two applications to get my desired effect since my pen is drying up already. To further embellish the snowman, I applied red Stickles to the heart, I applied clear Wink of Stella to the cap, and some google eyes. Actually, I messed up the eyes when I was highlighting it with black Glaze pen. Since I am not re-creating this card from the beginning, the google eyes were a good option to save the project.


I stamped the frame with snowflakes using My Favorite Things Kraft ink. I adhered this onto the snowman panel. I created a ribbon hole on the top by using a craft knife. I threaded a sheer red ribbon into this and tied a silver string onto it. I squirted a small amount of Ranger Multi Medium onto the bow to secure it.

For the back panel, I scored the white cardstock at the top to create the flap to which I will adhere the front panel. I stamped the messages using MFT Kraft and Hero Arts Black dye inks. I applied glue to the top using a tape runner. My Cricut does not cut clean especially with this type of projects but no worries. I just trimmed off the excess back panels that shows through the sides of the frame.


Thanks for viewing my blog.

Maria Giselle B. 

Stamps: Paper Smooches Chit Chat, Merry Motifs, Warm Hearts

I am submitting this creation to:


Thursday, October 15, 2015

Christmas Pop-up Card


I created the pop-up mechanism first. I cut a white cardstock at 8 x 5 1/2. I scored this at 4 inches. Using a retractable knife, I cut two parallel slits to create the platform. I scored the slits on both the top and bottom where the cut ends. I folded the score lines.

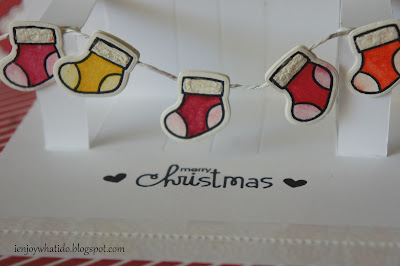
Then it is time to create the pop-up elements. I stamped the stockings onto a watercolor paper.  I applied watercolor to each stocking based on the colors in the photo inspiration. I cut these using the matching die. I die cut extras as well. I applied a snow marker for the top of the stockings for added dimension. I applied Clear Wink of Stella to the stockings.


I wanted a simple background to let the pop-up elements stand out. I scored the pop-up panel vertically. I used a Copic marker to accent these embossed lines. I adhered the colored stocking to a twine, then sandwiched the twine with another stocking die cut. I let this dry in between stockings. After I adhered the 3 stockings, I tied the twine to the platforms. I squirted a dot of liquid glue into the knots and pinched this with tweezers for better adhesion. I applied a stocking to each platforms.


For the sentiment, I stamped this using Versafine Onyx Black. I applied clear embossing powder to this, then heat set it.


To create the note card, and to continue the simple theme of the card, I scored the front horizontally. I used the same Copic marker to accent these lines. I stamped the sentiment into this space using the same ink and heat embossed it as well.


I adhered the pop-up panel to the note card using double sided tape, making sure not to apply tape to the pop-up slits. For added embellishment and cover the gap between the pop-up panel and the note card, I adhered a clear decorative tape. I used the same element to the front, too.


Thanks for viewing my blog.

Maria Giselle B.

Stamp: Paper Smooches Merry Motifs
Die: Paper Smooches Merry Motifs coordinating die

I am submitting this creation to:


I am saddened by the imminent closing of PS Challenge blog. They gave me my first win, and I will not forget that. One of the cards I submitted to their challenge blog got featured in their PS Patrol, and most recently, in their Facebook page. Savannah O' Gwynn is one of  the first to post a comment in my blog, and that truly made me happy. I will miss the weekly challenges, even if I don't participate all the time. I'll do my best to create a card in the challenge blog's last 3 weeks as gratitude to their never ending creativity to inspire other cardmakers like me. Thank you very much, PS Sparks!

Friday, October 2, 2015

Watercolored Halloween Card


I have two inspirations when I made this card. My first inspiration is Kristina's Watercolor Halloween Card which you can  view at the following link, http://www.kwernerdesign.com/blog/?p=14765. I was inspired by how she watercolored the elements in her card. 

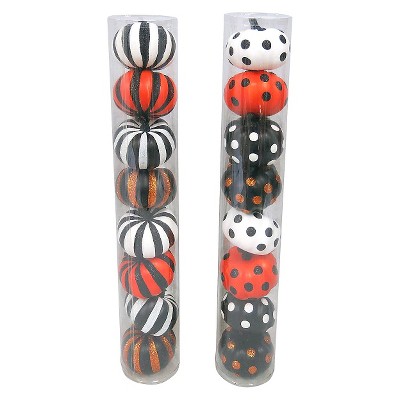
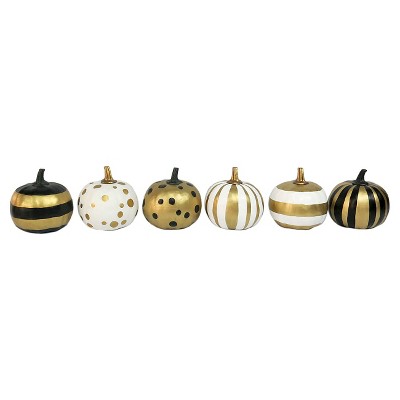
My second inspiration is this week's Target ad which featured their decorative pumpkins. 


It is Paper Smooches Designers Draft Challenge this week. 

I first stamped the pumpkins from the Spookalicios set onto a watercolor card. I created a Post-it mask so I can stamp the pumpkin side by side. I applied a mask using Molotow masking pen to the edges of the pumpkin since I will be watercoloring the background. I am using the Zig Kuretake Gansai Tambi for this card. 

I removed the Molotow mask. I watercolored the pumpkins based on the inspirations given to me by the Target pumpkins. I used the dot from the Sassy Script set. I tried watercoloring a circle but I end up with some other shape. I splattered some white watercolor onto the background sky. 

For the vampire, I stamped this on another watercolor paper. I watercolored it. I mixed the white earl and black from the Zig Kuretake Gansai Tambi set to paint the coat. For the color, I mixed the white pearl and the dark purple. I fuzzy cut this and ran a black marker on the edge.

For the sentiment, I cut a vellum speech bubble using Cricut Artiste cartridge. I stamped the sentiments from Spookalicious and Chit Chat sets using Versafine ink. I embossed this with clear powder. 

The vampire was adhere using foam tape. I applied dots of liquid glue behind the stamped sentiment to adhere the vellum to the background. I adhered bat sequins for additional embellishment. I bought these from Michaels.

To finish off the card. I adhered this panel to an Authentique Halloween patterned paper, then to a white note card.


Thanks for viewing my blog.

Maria Giselle B.

I am submitting this creation to:


Christmas Tree Petal Die Cut Card


I have two motivations in creating this card. One of which is to join the Avery Elle's challenge. The other motivation is to use Doodlebug Frosty Friends 6x6 paper pad for this card. I am so excited to mash up these two brand of products into creating this card. The focal point of the card will be the tree. I used the petal cut from Avery Elle Custom Panels Elle-ments. I cut this three times. The only way to make it look like a tree, as suggested by my eldest son Rudy is to stagger the size of the die cut, with the top being smaller then gradually getting bigger. So I trimmed the sides of the two pieces. I am enjoying using my decorative edge scissors ever since I used it on a previous project. I trimmed the curve edge of the petal making sure that I follow the curve of the petal while I am cutting. I added some details to the dot randomly using Uniball Signo White Broad and Sakura Gelly Roll Stardust Clear pens. I inked the edges. I scored the die cuts. I staggered these die cuts and adhered it using a dimensional tape. Now, the tree is done and it is time to create the background.

After choosing the pattern papers that I will be using for the card, I cut the gray patterned paper using SSS Stitched Rectangles die. I used this to cut a light blue patterned paper but I only cut it at 3" long so I can save on paper. This will serve as the ground for the tree and the area where I will be stamping the sentiment. I use the curve die from the Custom Panels.

To create the sentiment, I masked the word birthday from the Avery Elle Brushed Stamps to stamp the word happy using Versamark ink. I applied Ranger Liquid Platinum to this and heat embossed it. To complete the sentiment, I used Technique Tuesday Say It-Happy stamp set. This was also stamped using Versamark and embossed with the same powder.

For the trunk of the tree, I use Art Alternatives Barc Wood tape. I die cut using the stitched edge of the SSS Stitched Rectangle die just to trim the width down and also to get the stitched impression.

Before adhering the patterned papers, I spritz the gray patterned paper with pearlized water. I zapped this with a heat gun to dry it. I tried to captured the glimmer in camera but I couldn't. I adhered the slope patterned paper to this using foam adhesive. I adhered the barc tape next and applied some foam tape to the back of the overhang tape to make it even with the slope. I adhered the tree next using double foam adhesive. I then applied the hexagon die cut to the top of the tree. This was cut from gold glitter tape and using the middle sized hexagon from the Custom Panels. I also punched a star using a silver glitter tape which I adhered with a doubled foam tape at the back.

I cut a 4 1/2 x 5 1/4 blue paper from the same Doodlebug line. I adhered this to a white notecard. I then adhered the patterned paper panel to this.


Thanks for viewing my blog.

Maria Giselle B.

Stamp: Avery Elle Brushed, Technique Tuesday Say It-Happy
Die: Avery Elle Custom Panels Elle-ments
Paper: Doodlebug Frosty Friends

I submitted this creation to: