Showing posts with label Cats. Show all posts

Friday, August 4, 2023

Paper Weaving


Hello! Welcome back to my blog. Today's card was inspired by Newton's Nook Designs Color Challenge. This is a card is also a tribute to my sister's cat, Bibi, who was lost and now, found. He is finally home after two weeks of being lost. 

I worked on the weaving by trimming scraps of patterned paper at 1/4". The patterned papers I used have red and pink colors on it. After I've weaved the paper strips, I adhered this to a scrap of white cardstock. I die cut a slope on this weaved panel.

For the background, I used the Newton's Nook Designs Sunscape Stencil. I first inked the sun rays with Tim Holtz Distress Oxide in SaltwaterTaffy. I applied ink heavily near the center then lightly towards the sun ray ends. I cleaned the stencil then rotated it so that the stencil will cover the inked sun rays. I blended THDO in Spun Sugar on these open areas. Some of the sun rays on the stencil does not reach the end of the paper. I just rotated the stencil until I can find a sun ray that will reach the edge of the paper.


I stamped the image on white cardstock. The cat is from NND Netwon's Graduation stamp set. I colored the image using Prismacolor color pencils with Bibi's color in mind. It is always a challenge to color a cat black. I fussy cut the image leaving a white border around it. 

The globe was colored using the colors on the challenge. I added shimmer to the globe but this was not captured on the photo. 

To complete the scene, I die cut a strip of the slope on green cardstock. I stamped a speech bubble on the sunscape portion. I made sure this is dry before stamping the sentiment which is also from the same stamp set. I added shadow to the speech bubble with a blue color pencil.

I adhered the cat with foam tape for dimension.

I hope you like today's card. Have a blessed, brilliant and creative day!

Maria Giselle B.

I am sharing this creation at

Wednesday, March 1, 2023

A Cat-ty Card Panel

Hello! Welcome back to my blog. We have a new challenge at Incy Wincy Designs. For this month, the challenge themes are Pets +/or Happiness. We have two sponsors for this challenge. I am using an image from one of our sponsors which is linked below. 

If you noticed the title, I am calling this project a card panel. So, what is a card panel? It is a cardstock or patterned paper cut at a certain card size card, in this case, a portrait A2 card. It is where the elements of the card front are adhered. Once it is finished, just adhere it to the front of a note card to make it into a card. My sister has a lot of my handmade cards. I don't foresee her giving these cards away since most of these cards were made with her and her cats as inspirations. So, I told her that from now on, any cards made about her, and her cats will be created into panels and compiled in a portfolio. 

As I mentioned above, the inspiration for this project is my sister and her cats. Her house is currently in the finishing phase of construction. And through the construction, sadly, she lost most of her cats and kittens. When I saw the images provided by the sponsor, I conceptualized the idea of paying tribute to my sister, her living cats and the cats that went to heaven. The cats with the girl on the image are my sister's living cats. The ones on the frames are her cats in heaven. 

After I printed the image, I colored these with Copic markers. I fussy cut the images leaving a white border around it. 

I trimmed a patterned paper at 4 1/4" x 5 1/2". I die cut a woodgrain cardstock using the Lawn Fawn Mini Picture Frames die set. I die cut a floral patterned paper using the same die set. I only used the negative cuts. I inlaid the floral negative cuts to the frame and adhered it together with tape on the back. I used a strip of brown patterned paper to ground the couch of the main image. I inked the edges of this strip with brown dye ink. 


I adhered the elements to the patterned paper panel to create my scene. 

I can't think of any other sentiment more appropriate than 'meow.' I die cut the letters using the Sugar Pea Designs Message Letter Board die set. I die cut these letters originally on white cardstock but I decided to color it with a brownish gray Copic marker to match the patterned paper strip. I added clear Wink of Stella to these letters for some shimmer. 

I inked the edges of the panel with the same brown dye ink for a bit of vintage look. 

I hope I've inspired you with this project. I hope you join our latest challenge. Have a blessed, brilliant and creative day!

Maria Giselle B.

Image Sponsor


I am sharing this creation at

Friday, February 18, 2022

One Layer Card


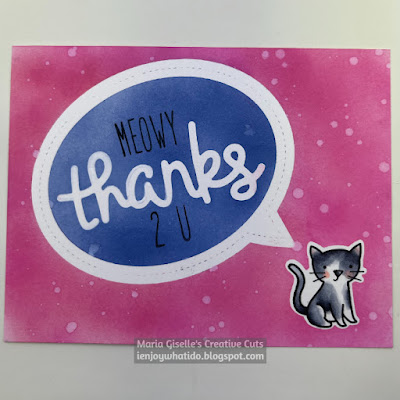
Hello, and welcome back. For today's card, I challenged myself to create a one-layer card and do some masking. Masking for ink blending is my least favorite because my masks tend to peel off while I blend inks. I always hear on other crafter's videos that these can be re-used. Mines tend to be a one-time use only. Maybe it depends on the kind of masks. After I use up the brand of masking paper that I have, I will try another brand.

To create my card, I die cut the Lawn Fawn Stitched Speech Bubble Frames die, LF Sripty Thanks die and a cat die from the LF Spooktacular coordinating die on sheet of masking paper. I left the masking paper on the release paper. I only peeled off the speech bubble negative masking paper cut. I blended the Tim Holtz Faded Jeans Distress Oxide to this area being careful that I do not peel off the intricate scripty masking paper die cut. No matter how careful I was, some of it peeled off, having a bit of blue ink bleed which I have a fix later on.

I replaced the speech bubble negative cut then removed the background negative cut masking paper, making sure I leave the cat masking paper die cut adhered. I blended TH Picked Raspberry Distress Oxide Ink to this area. I flicked some water to this inked area, allowing the water to seep in before lifting it off with a dry paper towel.


I removed all the masking paper which is always like Christmas morning with the reveal. This is the best thing about masking, and my favorite so far, the revelation including any errors in blending. To fix the blue bleed on the white sentiment, I used a white Sakura Gelli Roll pen to cover up the areas with the blue ink. 

I stamped the cat on the area of the panel where the cat masking paper used to be. I colored the cat with Copic markers. For this card, Peppy is my model cat.

I added supplement sentiments to the large focal sentiment using LF Milo's ABCs. 

Thank you for viewing my blog. Have a blessed, brilliant and creative day!

Maria Giselle B.

I am sharing this creation at