Showing posts with label Kraft. Show all posts

Wednesday, December 7, 2022

Yellow Themed Stitched Card


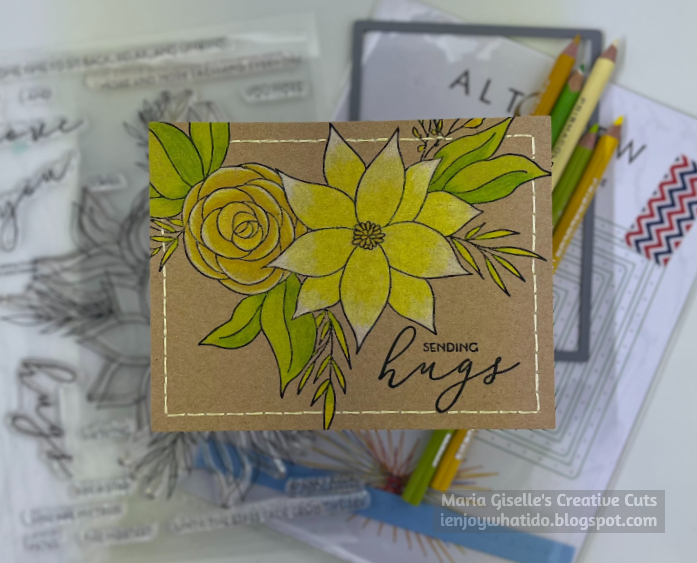
Hello! Welcome back to my blog. Today's card was created as part of my AECP Level 2 journey. This is my 2nd card for the class. My favorite color is yellow, which explains the color choice of my flowers in this card. 

I stamped the image on a 5 1/2" x 8 1/4" kraft cardstock. The stamp I used is larger than 4 1/4" x 5 1/2". Since I have no specific plans yet when I started this card, I decided to stamp the whole image so I can color it. I can decide later on what to do with this panel. The stamp I used is Altenew Calming Cluster stamp set. 

I stamped the image using Memento Tuxedo Black ink. I used the Misti Stamping Tool to stamp the image  not only because this is a large image but I will be re-stamping the image after I colored the image. 

I colored the image with yellow color pencils from my stash, adding shadows and highlights on certain areas. I took my time in coloring this image. Since I am heavy handed in coloring with color pencils, my hand gets tired easily. Taking breaks is important for me especially if I have to color a large image.

I used yellow-green color pencils for the leaves. I blended the yellow and yellow-green for the floral sprays. 

I returned the colored panel to the Misti Stamping Tool, making sure it is positioned the same way it was positioned earlier. I re-inked and re-stamped the image on the colored panel to regain the crisp outline of the image.

It's time to decide on what to do with this panel. Using a 5 1/2" x 4 1/4" rectangle die as a guide, I positioned the sentiment stamp on the lower right bottom of the floral cluster. Once I committed to the placement of the sentiment, I temporarily taped the rectangle die, then ran this through the die cutting machine. 

I stamped the sentiment using the Misti Stamping Tool and the same black ink. I re-stamped the sentiment a couple of times. I only applied gentle pressure over the sentiment stamp. I don't want to press too hard and have a squished looking sentiment. I added a sub-sentiment on top of the main sentiment using the same ink. The sentiment is also from the same stamp set.

I wanted to add an outline frame to make the image pop out. I could have drawn the lines but I wanted to add stitching to the panel. I used the Altenew String Art Rectangles die set but I did not run the die over the colored panel. I don't want to add pierced holes on the flowers and leaves. To avoid doing this I created a template for adding pierced holes by cutting a vellum at 5 1/2" x 4 1/4". I positioned the die at the center of this vellum panel, temporarily taping it to the vellum. I ran this through the die cut machine. I temporarily taped this pierced vellum on top of the colored panel. I poked the holes using the pierced holes as a guide avoiding poking holes over solid images. The vellum allowed me to see which holes to avoid poking. I also added holes to the areas close to the images to keep the stitched line continuous.


I did a running stitch for the outline using a light yellow DMC floss. 

I adhered this to a top-folding A2 portrait card. 


Thank you for viewing my blog. Have a blessed brilliant and creative day!

Maria Giselle B.

6/2024: Altenew decided to change its affiliate program starting this month. Below is my affiliate link to the website. I don't think I can directly link the products I used with this new program. Please feel free to do a product search. I will update as I figure this out. The good thing about this new affiliate program is that I get to earn on each Altenew product you purchase and not only on the product/s I used on this project. As before, there will be no additional cost to you if you make a purchase. It is just a way to help a fellow crafter sustain her love for crafting. While in the Altenew blog, don't forget to check out their new release for this month. Thank you for your support!


I am sharing this creation at


Tuesday, April 18, 2017

Stamp Tracing on Kraft Cardstock


This is my second card for today's Incy Wincy Designs Challenge using a digi stamp from one of our sponsors. I got my inspiration from Jennifer McGuire. Do check out her blog post on stamp tracing which includes a video on the technique.

I printed the image on kraft cardstock. The cardstock I am using is from Papelmeroti, a gift shop in the Philippines. This is one of the treasures I brought back to my craft stash during my visit to my parents & sister in the Philippines. Papelmeroti's kraft cardstock is thinner, darker and about half an inch longer than the cardstock bought here in the US. Fuzzy cutting the image is actually easy because of how thin the cardstock is.

I colored the image with Pentel Juice pastel gel pens which has 6 colors only. I used Prismacolor pencils to add accents to the images. I fuzzy cut the heart wreath image leaving a thin border around it. I cut a pink vellum big enough to cover the opening of the heart wreath. I embossed the vellum using Ellen Hutson Stitching Dies. I adhered the vellum to the back of the digital die cut. I adhered foam adhesive to the back for dimension.

For the card base, I am using a Bazzil cardstock, I partially embossed the front of the card using Li'l Inker Designs Quilted Swirl Stitch Pattern die. To the area not embossed, I heat embossed the sentiment from Honey Bee Bless Your Heart stamp set.

I poured some flower sequins behind the vellum to create a muted shaker card. The vellum somehow conceals the shaker elements. I used flower sequins from Simon Says Stamp and flower sequins from the Philippines. Using an acetate can be another option instead of using vellum if you want to showcase your shaker elements. I adhered this digital die cut to the card front. There is a bit of overhang on the design so this card will need a bigger sized envelope.

I added sparkle to some of the images using Wink of Stella. I adhered butterfly sequins (another treasure from the Philippines). I applied Tonic Nuvo Crystal Drops on top of the butterflies, and near the sentiment. As last step, I rounded the corners using We R Memory Keepers Corner Chomper.


Thanks for viewing my blog. Have a blessed & brilliant day!

Maria Giselle B.

I am sharing this creation with


Friday, November 27, 2015

All Kraft Sparkly Christmas Card


For this card, I challenged myself to create a card using just kraft cardstock. I stamped the raccoon using My Favorite Things Kraft Hybrid ink on a scrap kraft cardstock. I stamped it a couple of times just in case I make a mistake in coloring. My next challenge is how to color the raccoon. Raccoon always seem to be black and white so I went searching the net for a brown colored raccoon...and I did find one.


I colored the raccoon using Copics. For the white accents of the raccoon, I used a white colored pencil. I used black Glaze pen for the eyes. I fuzzy cut the raccoon, including his belly since I am planning to make the image holiday inspired. This is my only Newton's Nook stamp set which I won by commenting on Chari Moss's blog. Looking through my stash of stamps, I found this Technique Tuesday gift stamp which is a part of Say It-Happy stamp set. I stamped this on Kraft colored cardstock using the same Kraft ink I used with the raccoon. I colored this by adding lines to create a striped gift wrapper. I used a Versamark pen on the ribbon to apply gold embossing powder to it. I also applied glue to the center of the ribbon, then poured gold glitter onto it. 


I cut a Christmas tree using the Cricut Winter Wonderland cartridge. I cut this on kraft cardstock, too. I used Copics to color the tree. I used the 0 to bleach out spots on the tree, sort of an ornament. I applied white dots to this bleached spots. I colored the star with a gold marker. Using the Versamark pen, I covered the star with the sticky ink, then poured Wow! Ultra Clear Embossing powder to this. I did this process twice.


For the background, I created a slope onto a Post-it note using Avery Elle Custom Panels Elle-ments. This will serve as a mask when I blend inks for the sky. I also punched a circle onto a Post-It note.  After adhering the Post-It masks, I blended Tim Holtz Distress inks to create the night sky. Guided by the circle, I attached the negative circle cut of the Post-It note, then remove the circle. I blended more yellow inks on this circle. I reapplied the circle Post-It note, then sprayed pearlized water to the night sky for shimmer.  I set this aside to dry. 

Once the shimmer is dry, I adhered the other half of the slope Post-It note to the shimmered area. I rub the Versmark ink pad onto this area. I poured Ranger Holographic embossing powder to this, then heat set it.

For the sentiment, I used stamps from two stamp sets and did some masking to create the message. I applied washi tape to the stamp, applied Versamark ink, remove the wash tape, stamp the sentiment onto the panel, then poured white embossing powder onto it. I was doing well doing these steps until I got to the last word. The letters overlapping the already powdered sentiment attracted the powder. So, I had to brush off all the powder. Good thing, the Versamark ink stayed wet long enough for me to apply powder to the three-lined sentiment again and all together. Whew! That would have been a disaster since I stamped this direct to the shimmered-blended panel.


I adhered the Christmas tree and the raccoon using foam adhesive. I trimmed 1/8th of an inch from the left and bottom sides of the panel. I adhered this panel onto a kraft cardstock.


Thanks for viewing my blog.

Maria Giselle B.