Showing posts with label My Besties. Show all posts

Monday, September 7, 2020

Patterned Paper Collection Inspired Colored Image


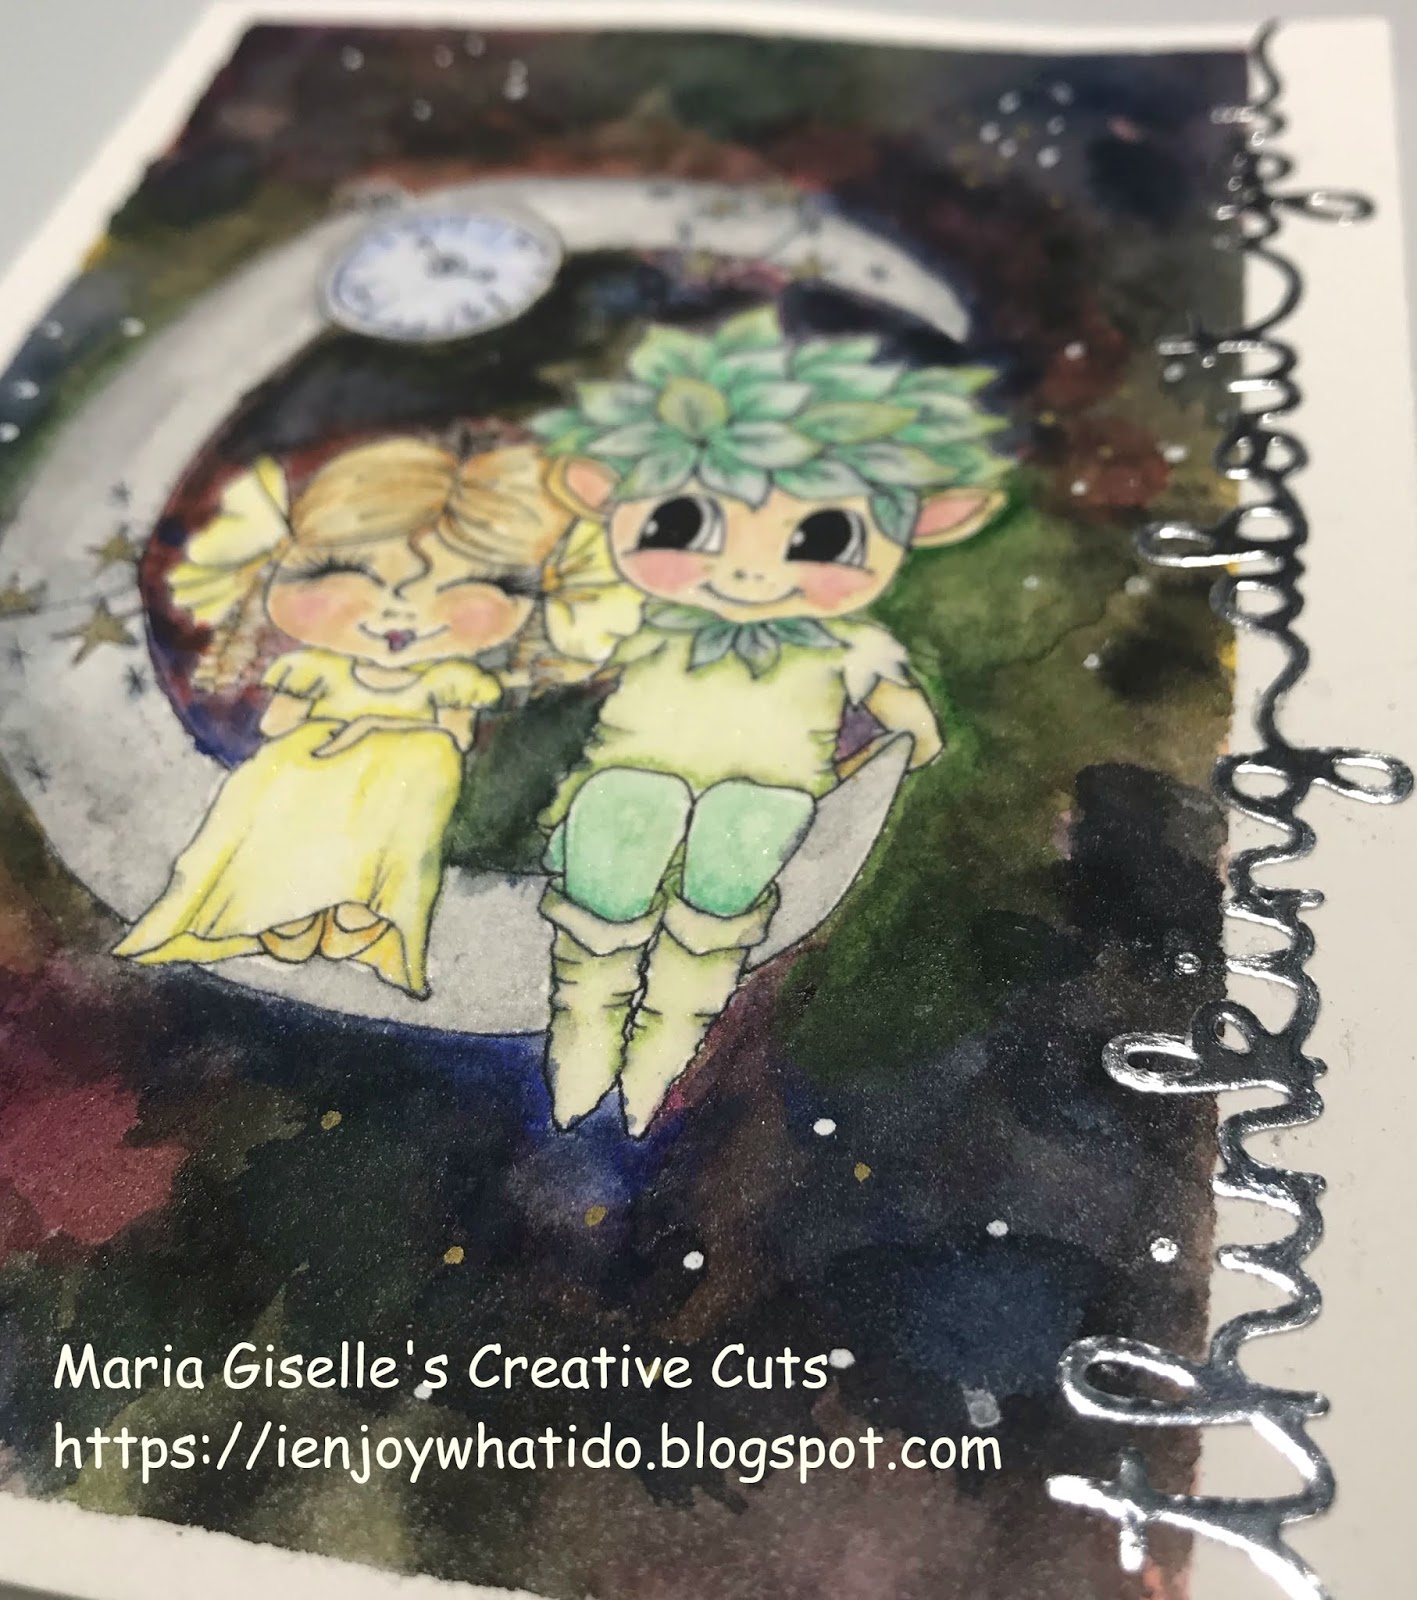
Hello! We have a new challenge at Incy Wincy Designs. The theme for the challenge is Girls, Girls, Girls-Majorly Girly/Tomboy. I am using an image from one of our two sponsors, My Besties, for this challenge.


I printed the image on Neenah Solar White cardstock. I colored the image using Copic markers. I got my color inspiration from an old American Crafts paper pack, My Girl. I fussy cut the image leaving a small border around the printed image. Since this is a large image to fussy cut, I took a break in the middle of the cutting to rest my hand.

I am using scraps from the 6x6 AC My Girl paper pad. I created a simple collage of the scraps by adhering it to a 4 1/4" x 5 1/2" typing paper.

I am taking out the We R Memory Keepers Sew Easy Stitch Piercer from my craft chest. I ran this through the collage for a running stitch but this is less noticeable after I covered the panel with vellum. I am using another WRMK Sew Easy Heart Stitch Piercer. I ran this on one of the scrap patterned paper and stitched the hearts with DMC floss. To make the hearts pop, I inked the inside of the heart with Tim Holtz Distress ink and pounced a brush with Ranger Perfect Pearl powder. I created this into a border by fussy cutting the top portion of the hearts. I grounded the colored image to this heart border.

I covered the collage of patterned papers with vellum to mute this busy background and make the image pop. I die cut the vellum using a stitched rectangle die from Mama Elephant Peek A Frame Creative Cuts. I adhered the stitched heart border to the bottom of the panel. I adhered a cut along sentiment from the paper pack and cross stapled this to the top of the panel. I adhered the image with foam tape.


Thank you for visiting my blog. I hope to see your creations in the challenge blog. Have a blessed, brilliant and creative day!

Maria Giselle B.


I am sharing this creation at


Sunday, August 2, 2020

Sketch Inspired Shaker Card


Hello! We have a new challenge at Incy Wincy Designs Challenge Blog. I am the author of this challenge. I also came up with the challenge theme. We are trying a triple choice approach this time. I did not have a particular challenge theme so I made suggestions to our blog moderator, Heather. Instead of choosing one theme, she decided to use all three themes for this challenge for a change. Use one, combine two or better yet, use all to create a card! And that is exactly what I did. Not to forget, this is the first time I created a sketch for a challenge. The other two themes are magical and interactive.


For this card, I am using the image from our sponsor, My Besties Shop. I printed this on Neenah Solar White cardstock. I colored the image with Copic markers and Prismacolor color pencils. I had a little bit of an exercise for my aging eyes since I printed this on a smaller scale. Good thing, I have my reading glasses to help me out. I added details to the image using my gel pen stash and Spectrum Noir clear shimmer pen. I fussy cut the image afterwards. 

To create the interactive part while following the sketch, I temporarily taped the patterned paper and a gold shimmer pearl cardstock together so I can die cut a circle window at the center. I adhered a transparency on the back of the window panel using double adhesive tape. I adhered foam tape on this back side.

I adhered a clear thread to the back of the digital image. I positioned the digital image on the center of the clear window, print side down, I adhered the ends of the thread to the foam adhesive. I poured star sequins to the well created by the foam tape, closing it up with a white pearl shimmer cardstock. If I will re-create this project, I would be blending ink on this shimmer cardstock for some added interest. 

To complete the card, I adhered this to a top folding white note card. I heat embossed the sentiment on the same patterned paper using Wow! Gold Rich embossing powder. The sentiment is from Paper Smooches Magical Sampler stamp set. I cut this into a strip and adhered this to the bottom right of the card panel, just like in the sketch. I drew in straight lines using a silver gel pen.

I created a circle frame for the shaker window by die cutting a patterned paper with the Simon Says Stamp Circle Stiched die and a My Favorite Things Circle Stax die. I brushed this frame with Spectrum Noir shimmer pen. I adhered this to the window, making sure it is lined up.


The digital image slides from side to side as you shake the card. 

Thank you for visiting my blog. I hope to see your creations at the Incy Wincy Designs Challenge Blog. Have a blessed, brilliant and creative day!

Maria Giselle B.


I am sharing this creation at


Monday, April 20, 2020

Metallic Water Colored Image


Hello! We have a new challenge at Incy Wincy Designs. The challenge theme is Embellishment Starting With Your Initial. I could not think of what to create after I learned about the challenge theme. Good thing that most of my co-DT members has a name that starts with M, and somebody mentioned metallic. Aside from metallic, I thought about mirror, mini clothespin and mini brad.

Our sponsor is My Besties by Sherry Baldy. I printed the image on Arches Water color paper. I colored the image using Karin Deco Brush metallic markers. I did not color the image directly with these markers. I applied the pigment on a plastic film and picked the color with a brush. It was a challenge coloring this image due to the small spaces I have to apply the color to. 

I created the window panel by first applying Coliro Pearl Deep Space water color. I heat set this to dry. I created the window using My Favorite Things LJD Rectangle Peek-A-Boo Window Die-namics. I did partial die cutting technique to be able to extend the length of the window. I painted the stitched frame created by this die with a Finetec Pearl Gold water color. 

Do you remember grommets? I still have this in my stash including the Making Memories Eyelet Setter Grommet tool kit. I added this metal embellishment to the corners of the die cut window. 

I stamped the sentiment on a pink mirror card stock using Versafine Onyx Black ink. To prevent shifting while stamping, I used the Misti Stamping Tool. The stamp is from Ink Blot Bubble Words stamp set. I poured clear embossing to the stamped sentiment then heat set it. I fussy cut the sentiment leaving a small border around it.


I adhered the colored digi. to the back of the water colored window panel, making sure it is centered. I adhered the mirror sentiment with foam tape. I adhered this to a top folding A2 note card. I drew diagonal lines using a silver pen. I stamped small hearts using a Tsukineko Delicata Rose Gold Pigment ink.

Thank you for visiting my blog. Have a SAFE, blessed, brilliant and creative day!

Maria Giselle B.


I am sharing this creation at


Monday, August 5, 2019

Digital Image on Galaxy Background


Hello! We have a new challenge at Incy Wincy Designs Challenge Blog. Our challenge is on Fantasy. We have two sponsors for this challenge. I am using an image from My Besties.

I bravely printed the image on watercolor paper using my Canon TS9512C wireless crafting printer. I said bravely because I plan to do watercoloring on this image. I was not able to print the image on a toner printer so I am using my inkjet printer. With inkjet printers, the ink reacts with water or liquid causing the outline to bleed. But I changed the setting to a photo setting hoping that it will avoid any bleeding. It actually worked except that I have to set the printed image aside for at least overnight. I figured this out since I started watercoloring the image after I printed it. I did not watercolor all of the image right away. That is how I noticed that the bleed is minimal after leaving the image overnight.


I started off with using watercolored pencils but later on switched to Kuretake Gansai Tambi watercolor due to the limited colors of my watercolor pencils. And I don't think I can achieve the galaxy effect using the pencils. I also used Tim Holtz Distress Ink Hickory Smoke and mixed it with Prima Color Blooms Storm Cloud for the moon.


I am going for a one layer card but printed the image turned out to be off center after I scored and folded the paper to create a side folding note card. I could have trimmed off the excess and made it center but I decided to use the space for the sentiment. I die cut a silver mirror cardstock using Lawn Fawn Thinking of You die. My card front is also warped from the watercoloring and drying with a heat gun. I placed this inside one of the tabs of the Sizzix Multi-Purpose Platform and ran it through the die cut machine just like I normally do with die cutting and/or embossing. It did not only straightened my warped card, it also pushed the sentiment die cut into the watercolor paper, leaving a leveled feel on the front of the card. It is actually kind of cool!

Thank you for visiting my blog. I hope you join us in this latest challenge at Incy Wincy Designs Challenge Blog. We cannot wait to see your work. Have a blessed, brilliant and creative day!

Maria Giselle B.


I am sharing this creation at