Hello! If you came from my previous post, this is my 8-year old son's version of a space scene. He wanted to share his idea so I allowed him to play, too. I cut him a half of a Canson watercolor paper, right at 6". He placed his stamps pieces from Lawn Fawn Out Of This World stamp set where he wanted it stamped. My craft table does not allow two people working at the same time so I did the stamping for him using Versafine Onyx Black ink. He colored the images with Karin markers. He wrote speech bubbles for the sun and the planets which I hope you enjoy.
Thank you for viewing my son's creation. I am sure he will appreciate if you can drop in a message for him. Have a blessed, brilliant and creative day from both of us.
Hello! I created this card for the Lawnfawnatics Blog Create A Scene Challenge. I also got inspired by the recent NASA launch last May.
I created the galaxy background using Karin markers on Canson watercolor paper which you can appreciate more in the close-up photo below. I would like to thank Gladiis Moreno for the short video she shared on how to use Karin markers to create a galaxy background. I added splatters of gold paint from Finetec/Coliro Artist Mica Watercolor Paint set. I set this aside to dry.
Using the same watercolor paper and markers, I stamped the images from Lawn Fawn Out Of This World stamp set using Versafine Onyx Black ink. I dried the images with a heat gun before coloring it. I colored the astronaut's suit based on the SpaceX suit. I used a color pencil to create the U.S.A. flag on the suit. I fussy cut the images leaving a thin white border around it. I adhered a transparent tape on the back of the astronaut with a piece of tape.
I die cut the frames from LF #Awesome. I stacked 3 layers of this frame. I adhered a skinny double sided tape to two corners of the frame. I loosely adhered the tips of the thread to these tape. I covered these thread with the same skinny double sided tape.
I adhered the planets to the galaxy background. I rotated the frame to make it into a diamond shaped frame and give it a new look. I adhered this watercolored panel to the bottom of the stacked frame, and cut off the excess. For the top frame, I embossed this with Wow! Pearl Gold embossing powder using the Wow! Mixed Media Embossing brush to apply the embossing ink to the frame.
For the background panel, I was die cutting the LF Fancy Lattice Backdrop to the Paper Source Peacock cardstock but the negative cuts did not fell off so I decided to keep them attached to the the backdrop for an embossed/in-laid look. I applied a wide piece of tape on the back to keep all of the pieces intact.
After I treated the panel with an anti-static pouch, I painted the diamond pieces with the Wow! Mixed Media embossing brush. This works like a manicure for the nails. I think I overdid the paint on some areas but for the most part, I like this product. I poured the same pearl gold embossing powder to the area, then heat set it.
For the sentiment, I die cut a banner strip from the LF Flippin' Awesome die on the same colored cardstock. I had to partially die cut this banner so I can extend its length to accommodate the sentiment. The sentiment is from LF Lucky Stars stamp set. This was stamped with Versafine Onyx Black ink and embossed with clear embossing powder.
I adhered the scene to the top of the panel and adhered the sentiment strip with foam adhesive to the bottom of the panel. I applied Nuvo Aqua Shimmer Glitter Gloss pen to the planets.
I have a short video included here so you can see how the astronaut floats around the space.
Thank you for visiting my blog. My son, Ryan, did his space scene version using most of the products I used while these items are out on my table. Please check it out on my next blog post. Have a blessed, brilliant and creative day!
Hello! I created this card to join the Paper Smooches Challenge Blog on Flowers. If you have not heard, Paper Smooches is retiring. Kim, the owner and artist of Paper Smooches, who has gone through a lot of life challenges lately, is taking in a new simplified life. I wish her good luck as she takes on this new chapter of her life. I want to thank her for sharing her beautiful talent with all of us. Paper Smooches will always have a special place in my heart. My first ever blog challenge win is from Paper Smooches back in 2013. Since then, I've enjoyed joining blog challenges and continued to join Paper Smooches challenges, winning on some as you can see on my blog's side bar.
I am using the PS Rad Roses die. I die cut a red cardstock for the flowers and a green pearl cardstock for the leaves. I am applying Jennifer McGuire's technique to keep the placement of the die cuts intact when doing an in-lay technique. After running the die and paper thru the die cut machine, I flip the die over, adhere a wide tape to the back of the die cut, then remove the die. This technique also keeps the clutter manageable since they are also stuck to the tape.
This technique also allows to ink blend on the die cuts. I blended inks to the red flower die cuts and the green leaves die cut for some dimension.
For the outline, I adhered a Cricut Holographic Vinyl on a white piece of cardstock. I burnished the vinyl to the cardstock with a Cricut scraper. A brayer is much better to use for this process to prevent scratch marks on the vinyl. Next, I die cut the PS Rad Roses die to this panel. I weeded the die outline carefully.
On a black 4 1/4" x 5 1/2" cardstock, I die cut the PS Stitching Thanks Die.
I adhered the vinyl die cut to this black cardstock, and then adhered the flower and leaf die cuts, piecing it in to the outline die cut.
I trimmed off an 8th of an inch from each side of the black panel. I matted this panel with a pearl white cardstock. I decided not to add stitching to the Thanks die cut. It actually looks like small gems with the pearl cardstock on the back.
Thank you for visiting my blog. Have a blessed, brilliant and creative day! I will miss you, Paper Smooches!
Hello! I created this card to join the challenges at the My Favorite Things Blog. I am going for another 'one card for three challenges' again. I really enjoy mixing up challenges because it stimulates my creativity.
I am using my handy dandy Cricut Explore II machine for this card. I sketched my lay-out idea and used the Cricut Design Space to help with the sizing of the image cuts. There is a project icon in CDS that allows you to see how your image cut/s will look like on your chosen project, in this case, I chose a card with a size of 4 1/4" x 5 1/2".
The balloon cut image is cut together with the balloon string. There is another feature in CDS, the Slice, that allows you to cut a part of the cut image. That is what I did here. I wanted to layer the balloon on the string. I could have just cut the original image cut four times, then snip off the string with scissors, but that is a waste of cardstock since most likely, I will not use the extra string image cut.
After all the images have been cut...and yes, including that less than an inch letters for the sentiments, I inked one of the balloons with a soft blue dye ink. I heat set this to dry since I am going to emboss on this balloon. I stamped the MFT Diagonal Stripes cling rubber stamp on the balloon using Versamark ink. I am using the Wow! Lightening Effects for the first time. I mixed the Wow! Primary Blue Topaz embossing powder to the Wow! Glisten and the mix created a glittered embossing powder. It is actually cool. I cannot wait to use the other two Wow! Lightening Effects.
I blended more ink to the balloon especially to the right of the balloon.
After I decided placement of the balloon, I drew lines on the back of the balloon so I can trim off the excess before adhering the balloon. This is easier compared to adhering the balloon first before trimming. I adhered the string cut then adhered the balloon on the front of a Hero Arts acetate card. I adhered another balloon to the inner front of the card to hide the adhesive, making sure I lined up the balloons. I adhered another balloon to the inner back side of the card so I have an area to write a personal message. Finishing it off with another balloon adhered to the back to cover the adhesive. The trick here is to make sure all balloons are lined up so it looks like one cut image on the front with a surprise inside. The string image cut also has a cover up on the inner front of the card.
The colors I am using for the card are based on the color inspiration challenge. I created gradient of colors for the sentiment using two different hues of green cardstock. I temporarily adhered the letters to a Post-It Full Adhesive, having half of a letter hanging out and lining this with a T-ruler. I cut off the hanging part using scissors, keeping every cut piece. I adhered the letters to the banner cut. This is the most tedious job among all the steps in creating this card. An easy way to do this is by coloring the cut letter. Cover half of the letter, then color the exposed half of the letter. After which, cover the colored portion, and then color the other half.
I added Nuvo Aqua Shimmer Glitter Gloss pen to the letters for more sparkle.
I adhered the same banners to the inner card front to hide the adhesive. I added a bowed twine to finish off the card.
Thank you for visiting my blog. Have a blessed, brilliant and creative day!
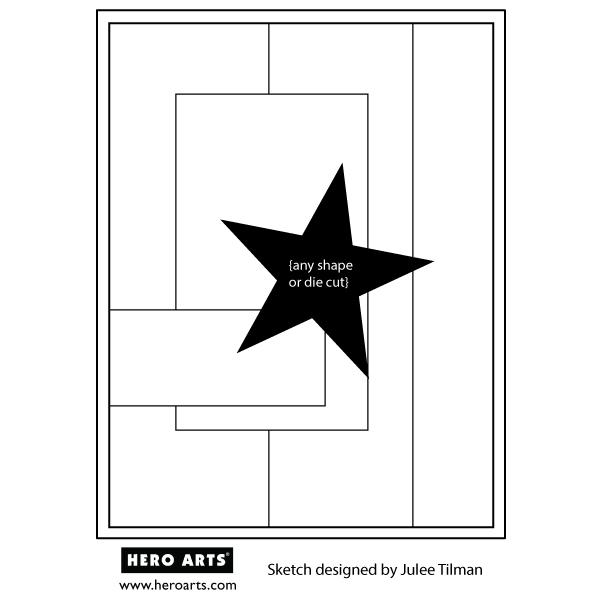
Hello! I created this card to join Hero Arts' Challenges. I've combined two themes in one card. I enjoy doing that. It is not really about having an entry in several challenges but more on being able to create a card that suits several themes. It challenges my creative mind.
When I found out that one of the challenges is on hugs, this stamp set, Hero Arts Lil Hoot, came into my mind right away. I had this for a long time now. I like the cute images in this set and one of the sentiments in this set suits the theme.
I stamp the bear duo on a Neenah Solar White cardstock with Memento Tuxedo Black ink. I colored the image with Copic markers. I fussy cut the image leaving a white background around it.
Working on the sketch background, this is where I feel I had more difficulty in putting together. I was trying to incorporate a heart to the lay out but it just would not work despite changing patterned papers. When this happens to me, I walk away from my crafting table instead of wasting my effort and supplies. This crafting time out always work for me. When I come back with a fresh mind, I usually figure out what's wrong in the design that I am able to fix it, and finish the card.
I am using scraps of patterned paper. I used the A & B sides for the back panel and middle strip panel. Using this kind of paper is very convenient since most of the time, the A & B sides coordinate with each other. I inked the edges of this paper with Tim Holtz Distress Tea Dye Distress ink.
For the rectangular paper, I used a gold vellum. I added diamond cuts using an Ellen Hutson Diamond Designer die tying up with the diamond patterned paper.
I heat embossed the sentiment on a kraft card stock using Hero Arts white embossing powder.
I put these all together to re-create the sketch. I adhered this to a top folding kraft cardstock. I added Ranger Black Enamel to make the eyes pop. I made an enamel mess on one of the baby bear's eyes. Despite burping my enamel bottle on a rag, it just gave out a big blob of enamel. Oh, no! I scooped some of the enamel off to the best that I can. Despite doing this, since it is a black enamel, it left a black stain to the area. After the enamel has dried, I covered this black stain with a Sakura White Gelly Roll pen. Looks much better, what do you think?
Thank you for visiting my blog. Have a blessed, brilliant and creative day! Stay safe always.
Hello! I created this card to join in Pink Fresh Studio's latest FB Weekly Card Sketch Challenge.
I created the circle windows on the front panel using a circle die using an acetate grid as a guide to make sure I create holes that are centered and evenly spaced. I also used a T-square to make sure my circles are aligned. I am using a white pearl cardstock for this panel.
I die cut the Pinkfresh Studio Lacy Floral Border die on a bluish-gray cardstock. I adhered this to the back of the top and bottom half circles making sure that the die cut is peeking thru these half circles and that it is aligned to the edges of the pearl cardstock. I cut off any excess.
For the center circle, I die cut a stitched circle frame on a dark gray cardstock. I adhered this to the front of the panel.
I cut a 4 1/4" x 5 1/2" light blue cardstock. I aligned this to the front panel. Using the Misti Stamping Tool, I positioned my stamp on the circle window opening. The stamp is from PS My Favorite Things To Say stamp set. I stamped this sentiment with a dye ink. I re-stamped the sentiment with Versamark ink, then heat embossed it with a clear embossing powder.
I trimmed a 1/4" on both sides of the front panel. I adhered this to the light blue cardstock. I trimmed two pieces of bluish-gray cardstock and adhered this to the sides of the front panel.
Remember those extra pieces of Lacy Floral Border die cuts? I did not want to put this to waste so I did a little bit of fussy cutting on these extra pieces, cutting off the leaf portion with a scissor. I used this to embellish the front and top of the sentiment circle. I adhered white gems to the center of the wreath.
I like the sentiment I used for this card. I feel that it is very timely with all the things going on in our region.
Thank you for visiting my blog. Have a blessed, brilliant and creative day! Stay safe always.
Hello! We have a new challenge at Incy Wincy Designs. Our challenge theme is Anything But A Card. Our sponsor for this challenge is Polkadoodles. Thank you very much, Polkadoodles!
I printed the image on Strathmore watercolor paper. I strategically positioned the image so it will be on the left lower corner of a slim envelope. I trimmed off the excess so I will end up with a 8 1/2" x 11" watercolor paper. On the short side, I scored the paper at 2 1/2" and 6 1/2". On the long side, I scored the paper at 1 1/2" and 10 1/2". Here is a video tutorial by Jenny Card Designs that I found very helpful in creating this envelope.
I taped the watercolor paper to a board, right at the score lines to serve as a mask for the flaps of the envelope. I watercolored the image using Karin Decobrush markers. I did not apply the pigment straight on the image. I was afraid that I won't be able to save any areas with plenty of pigment due to the intricacy of the image. Not to forget, I might activate the printer ink with the pigment since I just used a jet ink printer to print the image.
When I have no idea on how to color an image, I usually go to the image's website and reference my coloring to their sample. This also helps me to make sure that I am coloring a part of the image as I should. It also helps me see if I missed any areas.
I try not to touch the outline of the image with my waterbrush. To fill in any gaps, I used Prismacolor color pencils. I also used the color pencils to add details.
I added a wash of watercolor as a background of the image. Since the image is a bit too far from the edge, I drew in black lines to fill in that gap.
I don't have a card yet to put in this envelope. But I can also use this envelope if I need to mail a letter to someone.
To protect the image from water after I mail it, I applied a thin coat of Ranger Distress Glaze over the image.
I created a process video featuring this card.
Thank you for visiting my blog. I hope you have a blessed, brilliant and creative day! Stay safe always!