Tuesday, January 31, 2023

Spidery Valentine's Card

Hello! Welcome back to my blog. For today's project, I created a Valentine's card using a Halloween released product, the Kat Scrappiness Creepy Crawly Dies. I also created a Christmas card using this product, Spidery Christmas Card. Do check it out, if you have time.

I started off by die cutting the spider web die on black cardstock. I created a heart frame on a red cardstock. I am using a heart die from my stash that when die cut, has floral details on the center. I trimmed the center off to leave me with the frame. You don't have to do it this way. If you have a heart frame die, then that's easy peasy! Or you can use two nesting hearts dies if that is what you have in your stash. In case you don't have any of these products, I linked below a product from Kat Scrappiness that you can use to create a heart frame.

The web die cut comes with stitching details which I used as a guide to poke stitching holes. I stitched a metallic red floss through these holes. 

I adhered this to the back of the heart frame, making sure that it covers most of the heart frame. I set this aside to dry, leaving something heavy on top of it. Once the glue has dried, I snipped off the excess web sticking out of the heart frame. 

I added black Stickles to the heart frame for some texture. 

For the spiders, I die cut the large sized spider on light brown and peach cardstocks. I snipped off the web string. I die cut the spider on white cardstock also but I will only use the eyes on these die cuts. I adhered a piece of tape to the back of the colored spider die cuts. I pieced in the white spider eyes die cuts making sure the embossed dot is positioned with one pair looking towards the left and the other pair looking towards the right. I added a dot on the eyes using a Sakura Glaze black pen. I also added blush on the female spider's cheeks.

Now is the fun part. I dressed up the spiders. For the male spider, I added a die cut hat and a flower. For the female spider, I added a bow and a heart. 

For the sentiment, I stamped a sentiment on a pink banner die cut using a red dye ink. I die cut the word forever on pink patterned paper. I die cut two extra pieces so I can stack the die cuts to create more dimension.

For the card panel, I trimmed a red patterned paper at 4" x 5 1/4". I die cut falling hearts to the middle of the panel using a die. I adhered this to a pink patterned paper cut at 4 1/4" x 5 1/2".

I adhered the banner using foam adhesive on the top of the card panel. I adhered the webbed heart next then the sentiment die cut after. I made sure to give enough time for the liquid glue to dry especially on the webbed heart before adding the spiders.

I adhered the spiders with foam adhesive. I added gems to the bow and the flower. I added Glossy Accent to the heart. I set this aside to dry.

I adhered this to a top folding A2 note card.

I hope you like this non-traditional Valentine's card I created. I always look into extending the use of my craft products to make the most of it. 

Thank you for visiting my blog. Have a blessed, brilliant and creative day!

I added below the link to the Kat Scrappiness product I used on this card. I also added links to Kat Scrappiness products you can use as replacement to the products that I used on this card. There will be no additional cost to you should you decide to purchase a product. While you are at the Kat Scrappiness website, do check out their wide array of products especially the exclusive Kat Scrappiness products. They have a new release of Valentine themed products. There is also an ongoing slimline sale. Enjoy!

Maria Giselle B.

I am sharing this creation at


Friday, January 20, 2023

Monochromatic Winter Card

Hello! Welcome back to my blog. Today's card features products from Kat Scrappiness. I created a scene with a one color scheme as theme. I chose pink to create a feminine card. The first card I created using the deer die is a masculine card, A Die Cut from Background Die Cut.

I trimmed a light pink cardstock to 5 1/4" x 4". Using a falling snow stencil, I added white embossing paste to this card panel. After I filled up all the openings of the stencil, I lifted the stencil up and set the panel aside to dry. I washed the stencil right away using soapy lukewarm water. 

I started of with planning out the scene. I pulled out patterned papers from my scraps which has mostly pink on it. I die cut one of the patterned papers using the KS Buffalo Plaid Cover die. I adhered this to a white cardstock and set it aside to dry. I die cut this plaid panel with a stitched hill border die to create a slope.

I die cut the two trees from the KS The Night Before Christmas Window Scene die set on one of the patterned papers. I later on changed my mind and die cut these trees using pink cardstock. Not wanting to put the patterned paper tree die cuts to waste, I adhered this to the back of the pink cardstock tree die cut for a bit of dimension. I am using the reverse side of one of the trees. The tree die cut is cut straight on one edge. Reversing it makes this straight edge flushed to the  other side of the front panel which balances the scene with a tree on each side of the deer. I also added snow to the trees using a Marvy Uchida Snow marker.

For the deer, I die cut this on one of the patterned papers. The deer is from the KS Reindeer Duo die set. I strategically die cut the antlers on white cardstock. After a bit of trimming of this die cut antlers, I adhered this on top of the antlers of the pink deer die cut, making sure it is aligned. 

To embellish the deer, I applied Ranger Glossy Accents to the antlers. I spread this evenly over the antlers using a foam brush. I poured Tim Holtz Distress Clear Rock Candy Glitter to the antlers giving it a sparkly look. 

I created a scarf for the deer using a pink strip of cardstock. I die cut this using the thinnest strip die from the KS Stitched Slimline Strips die set. I wrapped this around the neck of the deer and carefully created a knot. I adhered this with liquid glue and use a tweezer to keep the knot pressed while the glue dries.

I heat embossed the sentiment on the deer's body using white embossing powder. 

Putting the scene together, I adhered the trees on both sides of the pink snow panel. I adhered the plaid slope. Then, I adhered the deer. I cut off the excess.

I adhered this panel to a top folding A2 note card. The scene panel was cut smaller thus, revealing a white border around it when adhered on the white card base.


I want to acknowledge the design inspiration for my card, Meg Loven of Loven Stamps. I card-lifter her gift card holder and created my version of it. 

Thank you for visiting my blog. Have a blessed, brilliant and creative day!

I added below the links to the Kat Scrappiness products I used on this card. There will be no additional cost to you should you decide to purchase a product. While you are at the Kat Scrappiness website, do check out their wide array of products especially the exclusive Kat Scrappiness products. They also have a new release of Valentine themed products. Enjoy!

Maria Giselle B.

I am sharing this creation at

Inspired By Challenge Blog~Inspired by the color pink.


Thursday, January 19, 2023

Dye Ink Colored Shaped Card

Hello! Welcome back to my blog. Today's post is a continuation of my journey in AECP 2. I am featuring the technique of painting with dye inks on this card. This is my first time to use dye inks for painting. I always use Distress Inks for painting since they are easily activated by water and blending has not been a problem. Had a bit of struggle with the dye ink but I think with practice, I should be able to find my comfort level in using these inks.

I started my card by stamping the image on watercolor paper. The image is from Altenew Up & Away stamp set. Since this is a large image, I used the Misti Stamping Tool to help me achieve a good impression of the image. It took me twice to stamp the whole image but I had to fix some missed spots by re-inking and re-stamping that particular area of the stamp image. I used Versafine Onyx Black ink since I will be painting. 

I taped the stamped watercolor panel to a board for some warp control while I paint. I applied a bit of the ink from the ink pad to a palette. I am using Altenew dye inks, Vineyard Berry, Heart Beat, Pink Pearl and Pink Sand. I applied a light wash of the colors over the hot air balloon using a waterbrush. Then I switched to a small brush to add details using the darker ink. 

This image is not within my forte of images that I usually color. That's what great about taking the AECP courses. It challenged me to go beyond my comfort level. Try other things. 

I die cut the image using the matching die. To create this into a shaped card, I trimmed a heavy weight cardstock at 11" x 5 1/4". I scored this on the long end at 5 1/2". Using the die I used to die cut the hot air balloon, I positioned this die close to the folded edge, making sure the die has an overhang on the folded edge. This prevents the die from cutting that side of the card, thus preserved the fold.

I also made sure that I like the orientation of the hot air balloon. I did this by re-positioning the hot air balloon die cut over the note card, then I matched the die over it. I temporarily taped the metal die then removed the die cut. I passed this through the die cut machine. Took me at least four times to get the note card cut on both the front and back sides.

I used the negative cut created above as a holding piece for the painted die cut as I stamp the sentiment. I positioned this on the Misti Stamping Tool. Using the holding piece helped in positioning the sentiment in relation to the fold of the card. I prepped the area for embossing with a powder tool. I stamped the sentiment, which is from the same stamp set, onto the painted die cut using Versafine Onyx Black ink. I poured clear embossing powder to this then heat set it. I repeated this process for the sub-sentiment. 

The sentiment somehow is unreadable because of the black outlines of the hot air balloon. To make the sentiment pop, I outlined it with a Zebra Mild gray Highlighter Midliner. This did not have the same effect on the sub-sentiment. I painted a white paint marker over the grayed sub-sentiment. I wiped the paint off the embossed letters. 

I have some residual inks on my palette. Instead of putting this into waste, I picked some of these inks with a water brush and flicked it on the hot air balloon.

I adhered this to the shaped card, matching the die cut with the shaped card. I embellished this with some pink sequins.

Whew! I thought I won't able to pull this course together. My first attempt didn't turn out the way I wanted it to be. I am so glad I have a back-up plan.

Thank you for visiting my blog. Have a blessed, brilliant and creative day!

6/2024: Altenew decided to change its affiliate program starting this month. Below is my affiliate link to the website. I don't think I can directly link the products I used with this new program. Please feel free to do a product search. I will update as I figure this out. The good thing about this new affiliate program is that I get to earn on each Altenew product you purchase and not only on the product/s I used on this project. As before, there will be no additional cost to you if you make a purchase. It is just a way to help a fellow crafter sustain her love for crafting. While in the Altenew blog, don't forget to check out their new release for this month. Thank you for your support!


Maria Giselle B.

I am sharing this creation at


Inspired By Challenge Blog~Inspired by the color pink.


Sunday, January 15, 2023

Pastel Color Inspired Greeting Card


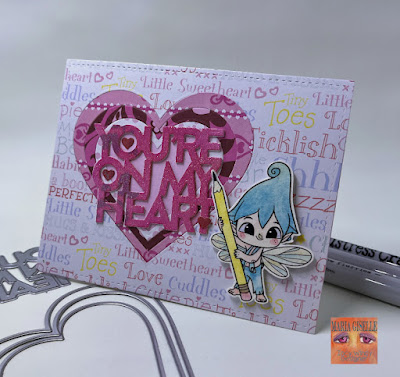
Hello! Welcome back to my blog. We have a new challenge at Incy Wincy Designs. The challenge theme is Cute +/or Pastel Colours. Our sponsor for this challenge is TLC Designs. The image I used on my card is linked below.


I printed the image on watercolor cardstock. I colored the image with Tim Holtz Distress Crayons. I particularly used the Holiday Pearlescent Set #2 to color the image then used the other colors to complete coloring the image. It is hard to capture the sheen in photo but somehow you can see it on the pencil and on the Pixie's hat. I used Lawn Fawn Liquid Stardust to pain the wings. I fussy cut the image, leaving a white border around it.

For the card panel, I die cut a patterned paper using a stitched rectangle die. I created a window on this panel using a heart die. This heart die is part of a nesting heart die set. I die cut three more hearts using the heart dies that are next to each other in size. I created frames out of these three hearts by die cutting the next smaller sized heart on the large heart, and so on and so forth until all of the three hearts are cut into frames. I trimmed a pink cardstock at 5 1/2" x 4 1/4" and adhered this to the back of the window panel. I pieced in the heart frames to the heart window, adhering it with liquid adhesive.


For the sentiment, I am using a product new to my stash. This sentiment die is from Simon Says Stamp. It comes with a shadow die which I did not use on this card. I die cut the sentiment on one of the patterned papers in the set. I blended pink dye ink to it to intensify the color. I pounced sticky ink to this sentiment die cut. I poured Judikins Iridescent Sparkle embossing powder. I heat embossed this to melt the powder. I die cut three more pieces of this sentiment. I adhered one die cut over the other to create some dimension. I adhered the embossed sentiment on top. I placed something heavy over it for better adhesion while the glue dries. I adhered this to the center of the pieced heart. 

I adhered the image with foam adhesive. I added small heart die cuts randomly to the sentiment. I painted LF Liquid Stardust to these hearts for some shimmer. 


Thank you for visiting my blog. I hope you join our challenge at Incy Wincy Designs. Have a blessed, brilliant and creative day!

Maria Giselle B.


I am sharing this creation at


Friday, January 13, 2023

A Die Cut from Background Die Cut Part 2

Hello! Welcome back to my blog! I hope you are doing well. I mentioned in the title that this is part 2 because I made another card using the same technique of die cutting from a background die cut. Here is the link to that post, A Die Cut from Background Die Cut. Do check it out if you have time.

I am using products from the Christmas release of Kraft Scrappiness. Kat Scrappiness has a Valentine's release. I just find joy creating other uses for a themed craft item to extend its use. 

I started with die cutting a stitched heart on a red cardstock. I positioned the heart die cut on the Kat Scrappiness Buffalo Plaid Background so that the plaid pattern will be centered. I temporarily taped the red cardstock to the die to prevent it from shifting while I run this through the die cutting machine. My cutting plate is all warped up. So, I added a metal shim to the cutting sandwich for a better cut. 

I die cut the stitched heart on black cardstock and adhered this to the back of the plaid heart. I placed something heavy on top of it while the glue dries for better adhesion. I added stitched heart details on some of the black blocks on the plaid pattern. 

I die cut four pieces of the small deer from the KS Reindeer Duo Dies on kraft cardstock. I will be using the reverse side of two of these deer die cuts. I cut the antlers off one of the deer die cuts to make it to a doe. Sometimes, you will see the metal imprint of the die on the reverse side of a die cut. If this bothers you, just ran this die cut through the die cutting machine to flatten it out. 

I adhered the deer to the back of the deer with the antlers for some dimension. I adhered the last deer to the back of the doe. Once the glue has dried, I cut the antlers off using the doe on the front as a guide. I blended brown dye inks to both the deer and the doe.

For the card panel, I trimmed a black cardstock at 4 1/4" x 5 1/2". I embossed this using a 3D embossing folder. I heat embossed the sentiment to the bottom part of the card panel which is very tricky because of the embossing details on the card panel. There are definitely missed spots especially on the recessed areas. To fix this, I used a white gel pen to areas where it did not have any white embossing powder.

I adhered  the plaid heart to the card panel. I adhered the deer and the doe. I decided to add a red mirror heart die cut in between the deer and the doe. I adhered this to an A2 note card.

Thank you for visiting my blog. Have a blessed, brilliant and creative day.

Maria Giselle B.

I added below the links to the Kat Scrappiness products I used on this card. There will be no additional cost to you should you decide to purchase a product. While you are at the Kat Scrappiness website, do check out their wide array of products especially the exclusive Kat Scrappiness products. They also have a new release of Valentine themed products. 

I am sharing this creation at


Thursday, January 12, 2023

Angled Card Front


Hello! Welcome back to my blog. I created this card for the Altenew Educator Certification Program for the With A Twist course. I created a card with an angled card front. You will see what I mean in a little bit. 

I started off by creating the focal point of the card which is the flower. I am using the Altenew Layered Rose die set. I die cut the flower on pink cardstock, and die cut the leaves on green cardstock. The colors are inspired by the latest Altenew Inspiration Challenge. I blended the same colored dye inks to the top two layers of the die cut images.


After I adhered the layers, I lightly pounced a sticky ink to the layered die cut. I poured Judikins Iridescent Sparkle embossing powder to this then heat set it. I did it this way to keep the shimmer of the embossing powder on the top two layers only. This also saves some time since I didn't have to heat emboss each layer individually.

I am using the Altenew Moroccan Mosaic Creative Cutouts which is a 12x12 detailed laser cut cardstock. I didn't know Altenew has a product like this until I got this as a freebie on one of my orders. I trimmed one of the corners to the size that I will be using on my card. I gently blended Tim Holtz Twisted Citron Distress ink to this detailed paper. I didn't like the look of it over the pink card front. Instead of wasting this paper, I spritz some Tim Holtz Picked Raspberry Distress Oxide Spray to this. I heat set this to dry. Now, I like the effect of the spray to the blended paper, especially how it preserved the blended green ink underneath since you can still see specks of green. 

Working on the card base, I am using a top folding A2 pink cardstock. I pressed a Delicata Rose Gold Pigment ink to an acrylic block. I sprayed some water to dilute the pigment ink. I picked the pigment with a paint brush and flicked it to the card front. I heat set this dry.


I adhered the detailed paper at an angle to the ink splattered card front. Once the glue has dried, I trimmed off the excess. I adhered the flower and the leaf to angled edge. Using a craft knife, I trimmed off the pink cardfront following the outline of the detailed cardstock.

I trimmed a lime green cardstock at 4 1/4" x 5 1/2". I trimmed a sliver off the short end so this will nicely seat on the inside of the card. Before adhering this panel, I stamped the sentiment to the left bottom corner. I am using the Misti Stamping Tool for this step. I temporarily positioned the green panel on the inside of the angled card. I positioned the sentiment stamp then picked this up with the door of the Misti Stamping Tool. I removed the angled card and re-positioned the green panel back to the Misti. I stamped the sentiment using a dark pink dye ink. I adhered this to the inside of the card. The sentiment is from the Altenew Silk Art Craft Your Life Project Kit.


I added rose gold sequins on the angled card front. 

Looking at the card, you would think it is just an ordinary rectangular card. This is a nice twist especially with the inside sentiment showing through because of the open design on the bottom part of the card. There is still an area where to write a personal sentiment to the recipient. 

I hope you like this idea and give it a try. Thank you for visiting my blog. Have a blessed, brilliant and creative day!

6/2024: Altenew decided to change its affiliate program starting this month. Below is my affiliate link to the website. I don't think I can directly link the products I used with this new program. Please feel free to do a product search. I will update as I figure this out. The good thing about this new affiliate program is that I get to earn on each Altenew product you purchase and not only on the product/s I used on this project. As before, there will be no additional cost to you if you make a purchase. It is just a way to help a fellow crafter sustain her love for crafting. While in the Altenew blog, don't forget to check out their new release for this month. Thank you for your support!


Maria Giselle B.

I am sharing this creation at


Thursday, January 5, 2023

A Die Cut from Background Die Cut

Hello! Welcome back to my blog. Today's post features a technique in which you die cut another die cut. If this sounds confusing, I'll explain it as we go along. Please bear with me. 

I die cut a light blue cardstock using the Kat Scrappiness Buffalo Plaid Background die. I did selective die cutting since I won't be using the whole panel. I adhered this to a light gray cardstock. From this, I die cut a banner using a die from the KS Fishtail Banners die set. I did partial die cutting so I can extend the length of the banner. I also strategically positioned the banner die so the pattern will be centered on the banner. Depending on how good you adhered the plaid die cut to the solid gray cardstock, some of the vented die cuts fell off. I am not worrying about this since it is hardly noticeable. This is what I meant with die cutting from another die cut.

For the main card panel, I die cut the plaid background on dark blue cardstock. I adhered this to a dark gray cardstock. 

For the main focus of the card, I die cut a reindeer from the KS Reindeer Duo dies on a blue patterned paper. I also die cut the reindeer on black cardstock. I adhered the black reindeer die cut to the back of the patterned paper die cut for some dimension.

For the sentiment, I stamped this on the same dark gray cardstock I used for the card panel. I used a dark blue dye ink for stamping. I die cut this into a strip using a sentiment strip die. I die cut several more strips. The sentiment comes as a phrase. I want the words separated so I cut the phrase in between each word. To create this into a chipboard like embellishment, I adhered the strips on top of the other. I adhered one word at a time. I cut this using scissors. I repeated this process until all the words were done and separated. To step this up, I pounced the word strips to a sticky ink pad, then poured Wow! Ultra High Clear embossing powder to it and heat set it. I repeated this twice to make it smoother.

I adhered the word strips to the top right corner of the light blue banner. I adhered the reindeer next. I added foam adhesive to the back and adhered this to the center of the dark blue-gray plaid panel. 

I hope you give this technique a try. This extends the use of large die cuts by creating smaller die cuts from it.

Have a blessed, brilliant and creative day!

Maria Giselle B.

I added below the links to the Kat Scrappiness products I used on this card. There will be no additional cost to you should you decide to purchase a product. While you are at the Kat Scrappiness website, do check out their wide array of products especially the exclusive Kat Scrappiness products. 

I am sharing this creation at