Thursday, January 23, 2025
3D Floral Birdcage
Tuesday, January 21, 2025
Negative Space Coloring
Saturday, January 18, 2025
Reindeer Scene Card
Wednesday, January 8, 2025
Stitching on Photo
Hello! Welcome back to my blog. Have you stitched on photo? This is my first time to do it. I was hesitant at first because I am not familiar with this art, and I am afraid to ruin a photo. That's why I would like to thank @ladylaurenstitching for the inspiration, the support, and the freebie pattern for me to be able to try this art. She held an IG live to show her process in photo stitching. She was very patient in answering my questions and the rest of the viewers' questions.
We just had a nurse who retired after 45-years of service. This momentous occasion deserves a one of a kind gift. How about a stitched photo? I took photos of her using my Sony-Alpha ZV-E10 during her last days of work. I had the photo printed as 5x7 with a glossy finish as recommended by Lady Lauren. I had my photo printed at Walgreens. I used the freebie pattern in Lauren's bio. I printed the pattern on both typing paper and vellum. I placed the vellum on top of the photo and lightly traced the outline of the subject of the photo. I started poking holes using the vellum pattern as guide. I made sure that I don't poke beyond the outline I created.
After all the holes are poked, I removed the vellum and started stitching. I used a DMC Damiant Gold/Black metallic thread for stitching.
Monday, January 6, 2025
Color Combo Inspired Card
Friday, January 3, 2025
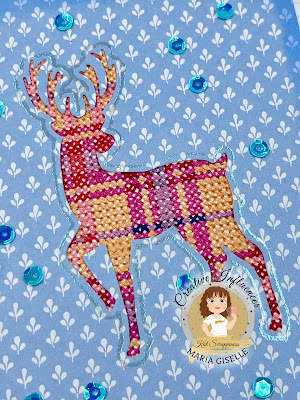
Stitched Window Card
Hello! Welcome back to my blog. I hope you had a great holiday celebration.
Today's card features the Kat Scrappiness Reindeer Duo Craft Dies. I used the largest reindeer in the set for my card. Instead of using the positive die cut created by the die, I die cut the reindeer on a 4 1/4" x 5 1/2" patterned paper to create a window. On another 4 1/4" x 5 1/2" white cardstock, I added stitching holes to this panel and stitched on it with an embroidery floss. I used the window panel as a guide to make sure I stitched on the area that will show through reindeer window.
Once I was done with the stitching, I blended ink on the edges of the window panel using a blue ink. I added an outline to the deer window. To create this, I popped the die back on the window. Using an embossing pen, I traced the outer edge of the die on the patterned paper. I poured a blue pearl powder to the outline. I brushed off any excess then, heat embossed the powder until it was melted.
I adhered the window panel to the stitched panel. I adhered blue sequins to the panel for additional sparkle.


.jpg)


